2005 FIAT DUCATO 244 Instrument panel warning lights
[x] Cancel search: Instrument panel warning lightsPage 6 of 258

5GETTING TO KNOW YOUR VEHICLE
G G
E E
T T
T T
I I
N N
G G
T T
O O
K K
N N
O O
W W
Y Y
O O
U U
R R
V V
E E
H H
I I
C C
L L
E E
DASHBOARD
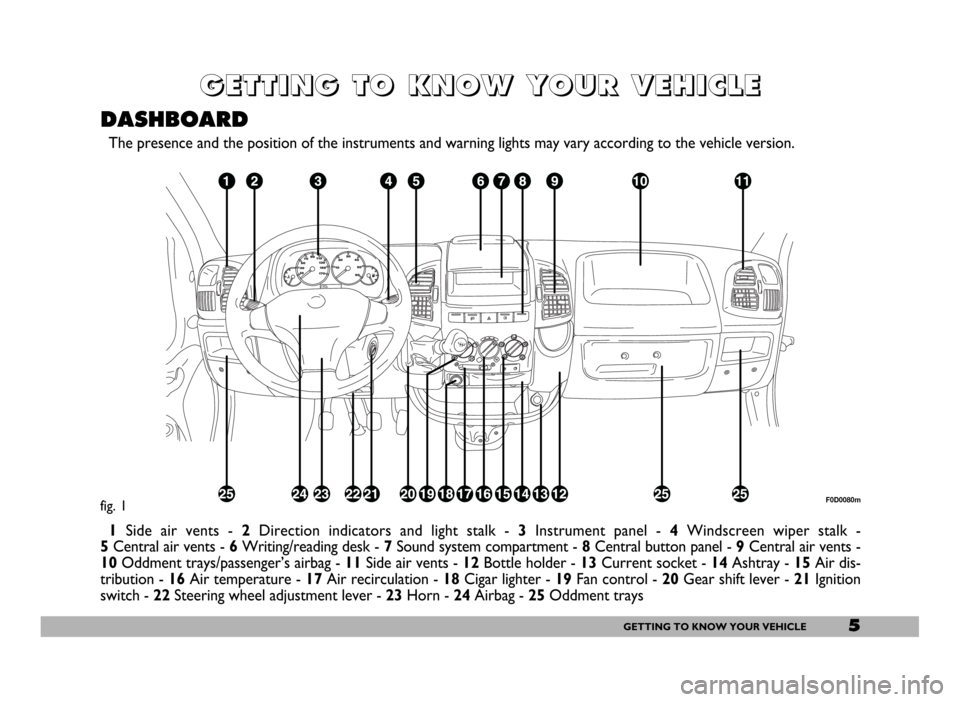
The presence and the position of the instruments and warning lights may vary according to the vehicle version.
1Side air vents - 2Direction indicators and light stalk - 3Instrument panel - 4Windscreen wiper stalk -
5Central air vents - 6Writing/reading desk - 7Sound system compartment - 8Central button panel -9Central air vents -
10Oddment trays/passenger’s airbag - 11Side air vents - 12Bottle holder - 13Current socket - 14Ashtray - 15Air dis-
tribution - 16Air temperature - 17Air recirculation -18Cigar lighter - 19Fan control - 20Gear shift lever - 21Ignition
switch - 22Steering wheel adjustment lever - 23Horn - 24Airbag - 25Oddment trays
fig. 1F0D0080m
Page 7 of 258

6GETTING TO KNOW YOUR VEHICLE
fig. 2F0D0246m
The presence and the position of the instruments and warning lights may vary according to the vehicle version.
1Side air vent - 2Oddment trays/passenger’s airbag - 3 Central air vents - 4Central button panel - 5Sound system com-
partment - 6Writing/reading desk - 7Direction indicators and light stalk - 8Instrument panel - 9Windscreen wiper stalk -
10Oddment trays - 11Ignition switch - 12Airbag - 13Horn - 14Steering wheel adjustment lever - 15Gear shift lever -
16Air distribution - 17Current socket - 18Ashtray - 19Air temperature - 20Air recirculation - 21Cigar lighter - 22Fan
control - 23Bottle holder
Page 66 of 258

65GETTING TO KNOW YOUR VEHICLE
STEERING COLUMN
STALKS
LEFT-HAND STALK
The left-hand stalk operates most of
the external lights.
The external lights can only be
switched on when the ignition key is
at MAR. The instrument panel and
the heating/ventilation (or climate con-
trol system) controls and the cigar
lighter ring will come on with the ex-
ternal lights.Side/taillights fig. 91
Turn the ring from åto 6to switch
the lights on. Instrument panel warn-
ing light 3will come on.
Dipped beam headlights fig. 92
Turn the ring from 6to 2.
IMPORTANTThe dipped beam
headlights will automatically be
switched off when the main beam
headlights are switched on if the front
fog lights are on.Main beam headlights fig. 93
Push the stalk from position 2to-
wards the dashboard to switch the
headlights on.
Instrument panel warning light 1
will come on.
Pull the stalk towards the steering
wheel to switch the lights off.
IMPORTANTThe dipped beam
headlights will be automatically
switched off when the main beam
headlights are on and the front fog
lights are switched on.
fig. 91
F0D0013m
fig. 92
F0D0014m
fig. 93
F0D0015m
Page 67 of 258

66GETTING TO KNOW YOUR VEHICLE
Flashing the headlights fig. 94
Pull the stalk towards the steering
wheel (temporary position) to flash
the lights.Direction indicators fig. 95
Move the stalk as follows:
upwards - to turn the right-hand in-
dicators on
downwards - to turn the left-hand in-
dicators on.
Instrument panel warning light RE
will flash.
The direction indicators will auto-
matically be switched off when the ve-
hicle is straightened out.
If you wish to signal a lane change
where only a slight movement of the
steering wheel is required, move the
stalk up or down without pushing it far
enough to make it click. The stalk will
return to the neutral position as soon
as it is released.RIGHT-HAND STALK
Windscreen wiper/washer
fig. 96
The device will only work when the
ignition key is at MAR.
Positions
0- windscreen wiper off;
1- flick wipe;
2- slow continuous wipe;
3- fast continuous wipe;
4- temporary: when released the
stalk returns to position 0and auto-
matically switches the windscreen
wiper off.
fig. 94
F0D0016m
fig. 95
F0D0017m
fig. 96
F0D0018m
Page 73 of 258

72GETTING TO KNOW YOUR VEHICLE
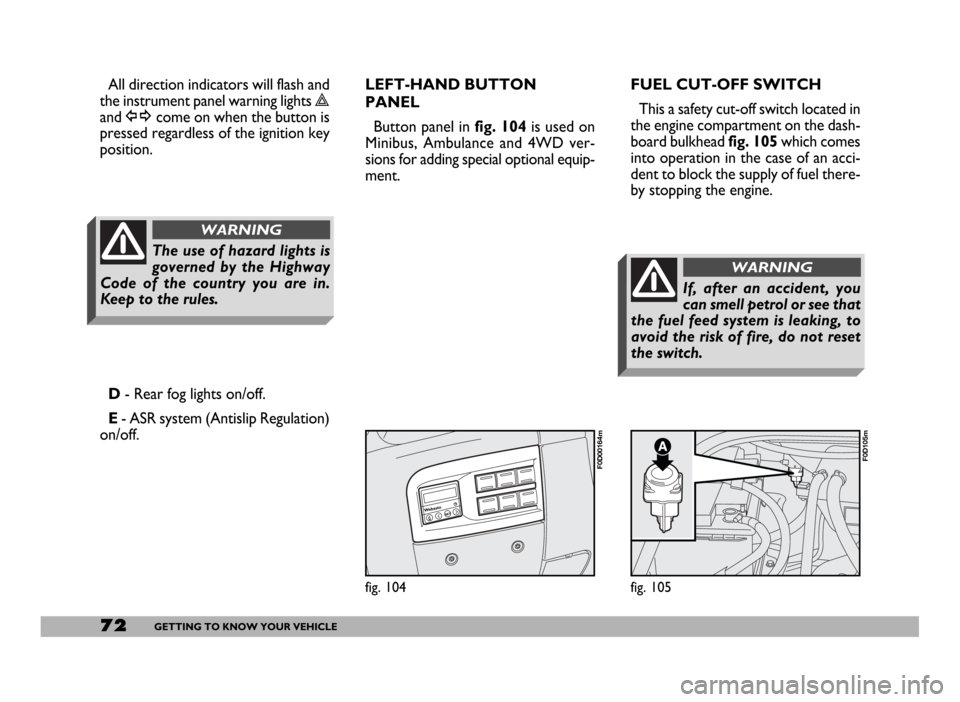
fig. 104
F0D00164m
fig. 105
F0D105m
All direction indicators will flash and
the instrument panel warning lights r
and ycome on when the button is
pressed regardless of the ignition key
position.FUEL CUT-OFF SWITCH
This a safety cut-off switch located in
the engine compartment on the dash-
board bulkhead fig. 105which comes
into operation in the case of an acci-
dent to block the supply of fuel there-
by stopping the engine.
D- Rear fog lights on/off.
E- ASR system (Antislip Regulation)
on/off.LEFT-HAND BUTTON
PANEL
Button panel in fig. 104is used on
Minibus, Ambulance and 4WD ver-
sions for adding special optional equip-
ment.
The use of hazard lights is
governed by the Highway
Code of the country you are in.
Keep to the rules.
WARNING
If, after an accident, you
can smell petrol or see that
the fuel feed system is leaking, to
avoid the risk of fire, do not reset
the switch.
WARNING
Page 107 of 258

106GETTING THE BEST OUT OF YOUR VEHICLE
HOW TO START DIESEL
VERSIONS
1) Ensure that the handbrake is up.
2)Put the gear lever into neutral.
3)Press the clutch pedal down to
the floor without touching the accel-
erator.
4) Turn the ignition key to MAR. In-
strument panel warning lights mand
Ywill come on.
5)Wait for the instrument panel
warning light Yto go out.
6) Wait for the instrument panel
warning light mto go out. The hot-
ter the engine is, the quicker this will
happen.
7) Turn the key to AVVimmediate-
ly after the mwarning light goes out.
If you wait too long, you will lose the
benefit of the work done by the glow
plugs.
Release the key as soon as the engine
starts.Intake air heater (Heat Flange)
An air heating device is fitted on the
intake manifold inlet in 2.8 JTD ver-
sions to facilitate starting the engine in
cold weather.
This device will be switched on au-
tomatically when the key is turned to
MAR.
The heater is fitted in all 2.8 JTD ver-
sions with EGR system. It is optional
for other JTD versions.
The engine start-up procedure is the
same with and without the heater.GENERAL NOTES
If the engine does not start first time,
return the key to STOPbefore try-
ing to start the engine again.
If warning light Yremains lit when
the ignition key is at MAR, turn the
key to STOPand then to MAR; if the
warning light stays on, try with the
other keys provided. The warning light m
will flash (for approxi-
mately 60 seconds) at
start-up or during prolonged
cranking to signal a fault in the
glow plug heating system. You
can use the vehicle as usual if the
engine starts but you should con-
tact a Fiat Dealership as soon as
possible to have problem seen to.
SELENIA 20K (petrol en-
gines) is recommended
when the vehicle is mainly
used in relatively mild climates. If
however, the vehicle is mainly
used where the climate is partic-
ularly severe, the use of SELENIA
PERFORMER MULTIPOWER
(petrol engines) or SELENIA WR
(diesel engines) is recommended.
Page 155 of 258

154IN AN EMERGENCY
System/Component
Rear current socket
Siren (Ambulance versions)
Suction fan (Minibus versions)
Current socket for special set-up
CFB (main fusebox under the dashboard on driver’s side for
LH drive versions, on passenger’s side for RH drive versions)
Windscreen washer pump
Cigar lighter
Cab heater fan
Direction indicators
Hazard lights
Instrument panel
Cab lights
EOBD diagnostic socket
Rear fog lights
Radio
Front current socket
Headlight washer pump
Front right-hand side light
Rear right-hand side light
Front left-hand side light
Rear left-hand side light
Number plate lights
Side/taillight warning light
Control lights
PCA (Ambulance - Minibus versions)
Radio
ABI
Door power window controlLocation
Fig. 38
Fig. 38
Fig. 38
Fig. 38
Fig. 36
Fig. 36
Fig. 36
Fig. 36
Fig. 36
Fig. 36
Fig. 36
Fig. 36
Fig. 36
Fig. 36
Fig. 36
Fig. 36
Fig. 36
Fig. 36
Fig. 36
Fig. 36
Fig. 36
Fig. 36
Fig. 36
Fig. 36
Fig. 36
Fig. 36
Fig. 36 Ampere
20
20
20
10
15
15
30
10
10
10
10
10
7,5
15
20
15
5
5
5
5
5
5
5
10
7.5
7.5
7.5 Fuse no.
F 64
F 64
F 64
F 65
F 43
F 44
F 55
F 53
F 53
F 53
F 39
F 39
F 33
F 32
F 52
F 49
F 12
F 12
F 13
F 13
F 24
F 24
F 24
F 51
F 25
F 35
F 35
Page 166 of 258

165VEHICLE MAINTENANCE
ANNUAL
INSPECTION
SCHEDULE
The following annual inspection
schedule is required for vehicles trav-
elling 15,000 Kmapprox. a year. The
schedule includes the following oper-
ations:
– check tyre condition and wear and
adjust pressure, if required (including
spare wheel);
– check operation of lights (head-
lights, direction indicators, hazard
lights, boot light, passenger compart-
ment light, instrument panel lights,
etc.);
– check windscreen wiper/washer
and adjust nozzles;
– check position and wear of wind-
screen/rear window wiper blades;
– check front pad conditions and
wear;
– check for bonnet and boot lock
cleanness, lever cleanness and lubri-
cation;– inspect conditions of: engine, gear-
box, transmission, piping (exhaust, fu-
el feed, brakes), rubber parts (boots,
sleeves, bushings, etc.), brake and fu-
el line hoses;
– check battery charge status;
– check conditions of various control
belts;
– check and top up fluid levels (en-
gine coolant, brakes, windscreen
washer, battery, etc.);
– check and top up engine oil;
– replace pollen filter.
ADDITIONAL
CHECKS
Every 1,000 km or before long
trips, check and top up as necessary:
– engine coolant level
– brake fluid level
– power steering fluid level
– battery electrolyte level
– windscreen washer fluid
– tyre pressure and conditions.
Every 3,000 km or before long
trips, check and top up as necessary:
engine oil
Every 10,000 kmor at cwarning
light coming on (diesel engines only):
bleed water from fuel filter.
You are recommended to use FL
Seleniaproducts designed and pro-
duced for Fiat vehicles (see the “Ca-
pacities” table in the “Technical Spec-
ifications” section).