2005 FIAT DUCATO 244 key
[x] Cancel search: keyPage 113 of 258

112GETTING THE BEST OUT OF YOUR VEHICLE
IMPORTANTRemoving the igni-
tion key is only allowed with the
gearshift lever in position Pand for a
maximum time of 30 seconds from
when the engine is turned off P, when
the door is opened a buzzer will sound
for about 15 seconds to alert the dri-
ver.
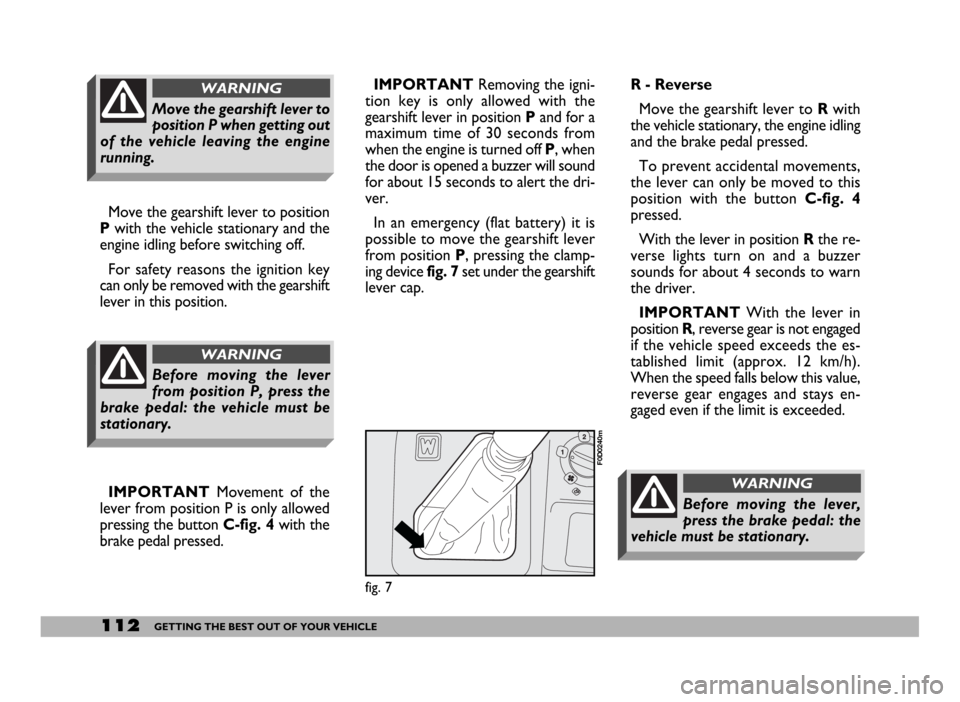
In an emergency (flat battery) it is
possible to move the gearshift lever
from position P, pressing the clamp-
ing device fig. 7set under the gearshift
lever cap.R - Reverse
Move the gearshift lever to Rwith
the vehicle stationary, the engine idling
and the brake pedal pressed.
To prevent accidental movements,
the lever can only be moved to this
position with the button C-fig. 4
pressed.
With the lever in position Rthe re-
verse lights turn on and a buzzer
sounds for about 4 seconds to warn
the driver.
IMPORTANTWith the lever in
position R, reverse gear is not engaged
if the vehicle speed exceeds the es-
tablished limit (approx. 12 km/h).
When the speed falls below this value,
reverse gear engages and stays en-
gaged even if the limit is exceeded.
fig. 7
F0D0240m
Before moving the lever,
press the brake pedal: the
vehicle must be stationary.
WARNING
Move the gearshift lever to position
Pwith the vehicle stationary and the
engine idling before switching off.
For safety reasons the ignition key
can only be removed with the gearshift
lever in this position.
IMPORTANTMovement of the
lever from position P is only allowed
pressing the button C-fig. 4with the
brake pedal pressed.
Move the gearshift lever to
position P when getting out
of the vehicle leaving the engine
running.
WARNING
Before moving the lever
from position P, press the
brake pedal: the vehicle must be
stationary.
WARNING
Page 116 of 258

115GETTING THE BEST OUT OF YOUR VEHICLE
Moving the lever back to position D
the gearbox instantly resumes the au-
tomatic mode selecting the ratio ac-
cording to the driving characteristics.
IMPORTANTThe electronic con-
trol unit is programmed to change
gear one at a time, therefore repeat-
ed fast actuations will not result in re-
peated engagements of the gears. The
higher or lower gear is engaged mov-
ing the lever to the (+) or (–) position
when the previous request has been
performed.
In the event of a fault to the sequen-
tial manual system, the system will se-
lect the automatic mode.FAILURE INDICATIONS
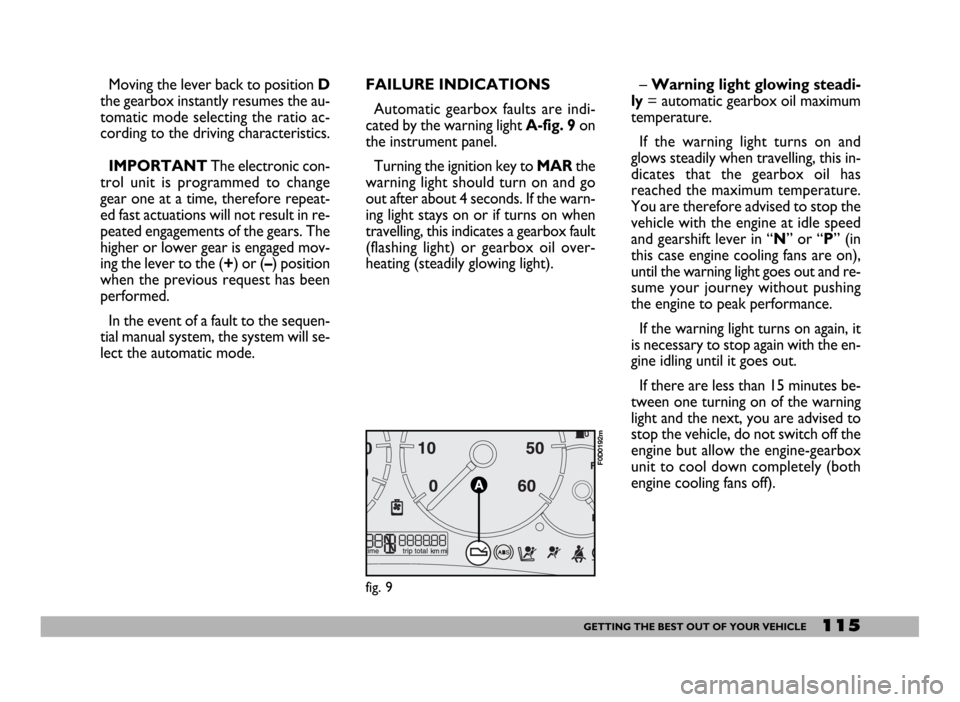
Automatic gearbox faults are indi-
cated by the warning light A-fig. 9 on
the instrument panel.
Turning the ignition key to MARthe
warning light should turn on and go
out after about 4 seconds. If the warn-
ing light stays on or if turns on when
travelling, this indicates a gearbox fault
(flashing light) or gearbox oil over-
heating (steadily glowing light).– Warning light glowing steadi-
ly= automatic gearbox oil maximum
temperature.
If the warning light turns on and
glows steadily when travelling, this in-
dicates that the gearbox oil has
reached the maximum temperature.
You are therefore advised to stop the
vehicle with the engine at idle speed
and gearshift lever in “N” or “P” (in
this case engine cooling fans are on),
until the warning light goes out and re-
sume your journey without pushing
the engine to peak performance.
If the warning light turns on again, it
is necessary to stop again with the en-
gine idling until it goes out.
If there are less than 15 minutes be-
tween one turning on of the warning
light and the next, you are advised to
stop the vehicle, do not switch off the
engine but allow the engine-gearbox
unit to cool down completely (both
engine cooling fans off).
fig. 9
F0D0192m
Page 124 of 258

123GETTING THE BEST OUT OF YOUR VEHICLE
– if you are forced to stop your ve-
hicle (breakdown, limited visibility,
etc.) try to stop off the road. Turn on
the hazard lights and, if possible, the
dipped beam headlights. Rhythmically
sound the horn if you release anoth-
er vehicle is coming.
DRIVING IN THE
MOUNTAINS
– Check fluid levels (oil, brake fluid,
coolant) and tyre wear before driving
in the mountains;
– when driving downhill use the en-
gine braking effect by engaging a low
gear so as not to overheat the brakes;
– under no circumstances should you
drive downhill with the engine off or
with the gear in neutral, let alone with
the ignition key out;
– drive at moderate speed and avoid
“cutting” corners;
– remember that overtaking while
going uphill is slower and therefore re-
quires more free road. If you are be-
ing overtaken while driving uphill,
make it easier for the other vehicle
to pass.DRIVING ON SNOW
AND ICE
Here are some tips for driving in
these conditions:
– keep your speed down;
– use chains if the roads are covered
with snow;
– do not park the vehicle with the
engine running for long periods of
time: snow could divert exhaust fumes
into the passenger compartment;
– mainly use the braking effect of the
engine and under all circumstances
avoid braking sharply;
– when braking a vehicle not fitted
with ABS, reduce the possibility of the
wheels locking by varying the pressure
you exert on the brake pedal;
– do not accelerate suddenly and
avoid swerving;– in the winter, even apparently dry
roads may have icy patches. Be care-
ful therefore when driving over
stretches that do not get much expo-
sure to the sun or are lined with trees
or rocks where ice might not have
melted;
– keep a good distance from the ve-
hicles in front.
DRIVING WITH ABS
– ABS is a braking system that es-
sentially offers two advantages:
1) It prevents wheel lock and con-
sequent skidding in emergency stops,
particularly when the road does not
offer much grip.
2) it makes it possible to brake and
steer at the same time and direct the
vehicle where you want while braking.
Page 129 of 258

128GETTING THE BEST OUT OF YOUR VEHICLE
LOOKING AFTER EMISSION
CONTROL DEVICES
The correct use of pollution control
devices not only ensures respect for
the environment but also has an effect
on the vehicle’s performance.
Keeping these devices in good con-
ditions is therefore a fundamental rule
for driving that is easy on your pock-
et and on the environment too.
The first step to take is to follow the
Service Schedule to the letter.
If your vehicle has a petrol engine
with catalytic converter use only un-
leaded petrol.
if you have trouble starting, do not
keep turning the ignition key for long
periods. Be especially careful to avoid
bump starting the vehicle by pushing,
towing or rolling downhill: these are
all manoeuvres that can damage the
catalyst.
Use an auxiliary battery for start-ups
only.If the engine begins to “loose its
smoothness” when travelling, contin-
ue your journey but reduce the de-
mands you are making on the engine
and have the vehicle seen to at a Fi-
at Dealershipas soon as you can.
When the instrument panel fuel re-
serve warning light comes on, fill up as
soon as possible. A low fuel level may
cause an uneven supply of fuel to the
engine with inevitable increase in the
temperature of the exhaust gas and se-
rious damage to the catalytic con-
verter.
Never run the engine with one or
more spark plugs disconnected, even
for testing purposes.
Do not warm up the engine by let-
ting it idle for a while before moving
off unless the outside temperature is
very low and, even in this case, only
do so for less than thirty seconds.
Do not install heat shields and do not
remove those already fitted to the cat-
alytic converter and exhaust pipe.
Do not allow anything to
be sprayed onto the cat-
alytic converter, lambda sensor and
exhaust pipe.
WARNING
Ignoring the above rules
may lead to fire.
WARNING
When functioning normal-
ly the catalytic converter
reaches high temperatures. For this
reason do not park the vehicle over
inflammable material (grass, dry
leaves, pine needles, etc.): fire haz-
ard.
WARNING
Page 135 of 258

134GETTING THE BEST OUT OF YOUR VEHICLE
VEHICLE STORAGE
The following precautions should be
taken if the vehicle will not be used for
several months:
– park the vehicle in covered, dry and
if possible well-ventilated premises;
– engage a gear;
– remove the cables from the battery
(first remove the cable to the negative
terminal) and check the battery
charge. If the vehicle is to be stored
for long periods the charge of the bat-
tery should be checked every month
and recharged if it falls below 12.5 V;– make sure the handbrake is not en-
gaged;
– clean and protect the painted parts
using protective wax;
– clean and protect the shiny metal
parts using special compounds readi-
ly available;
– sprinkle talcum powder on the rub-
ber windscreen and rear window
wiper blades and lift them off the glass;
– slightly open the windows;
– cover the vehicle with a cloth or
perforated plastic sheet. Do not use
sheets of non-perforated plastic as
they do not allow moisture on the ve-
hicle body to evaporate;– inflate the tyres to 0.5 bar above
the normal specified pressure and
check it at intervals;
– do not drain the engine cooling sys-
tem.
IMPORTANTWhere relevant,
switch off the electronic vehicle alarm
with the remote control and deacti-
vate the system by turning the emer-
gency key to OFF (see “Electronic
alarm” in section “Getting to know
your vehicle”).
Page 136 of 258

135IN AN EMERGENCY
I I
N N
A A
N N
E E
M M
E E
R R
G G
E E
N N
C C
Y Y
EMERGENCY
START-UP
DIESEL VERSIONS
Emergency start-ups cannot be per-
formed on versions with a diesel en-
gine; contact aFiat Dealership.
PETROL VERSIONS
If the Fiat CODE cannot deactivate
the engine immobiliser, the Yand
Uwarning lights stay on and the en-
gine will not start. Follow the emer-
gency start-up procedure to start the
engine.
Read the whole procedure care-
fully before trying to carry it out.
If you make a mistake, you must turn
the ignition key back to STOPand re-
peat the whole operation from the be-
ginning (step 1).1) Read the 5-figure electronic code
given on the CODE card.
2) Turn the ignition key to MAR.
3)Press and hold down the accel-
erator pedal. Warning light
Uwill
come on for about 8 seconds, and
then go out. At this point release the
accelerator pedal and get ready to
count the flashes of the warning light
U.
4) Count the number of flashes that
corresponds to the first figure of the
code on the CODE card, then press
the accelerator pedal and keep it there
until the warning light
Ucomes on
for four seconds and then goes out;
release the accelerator pedal.
5) Warning light
Uwill start flash-
ing again: after it has flashed the num-
ber of times that corresponds to the
second figure on the CODE card,
press the accelerator pedal and keep
it pressed.
6) Do the same for the remaining fig-
ures on the CODE card.7) Once the final figure has been en-
tered, keep the accelerator pedal
pressed. Warning light
Uwill light up
for four seconds and then go out; re-
lease the accelerator pedal.
8)Warning light
Uwill flash rapid-
ly for about 4 seconds to indicate that
the operation has been completed
correctly.
9) Start the engine by turning the ig-
nition key from MARto AVV.
If, however, the warning light
U
stays on, turn the ignition key to
STOPan repeat the procedure from
step 1).
IMPORTANT After an emergency
start-up, you should contact a Fiat
Dealership otherwise you will have
to repeat the procedure described
each time you want to start the en-
gine.
Page 137 of 258

136IN AN EMERGENCY
JUMP STARTING
If the battery is flat, you can use an-
other battery to start the engine. Its
capacity must be the same or slightly
greater than the flat battery.
Proceed as follows fig. 1:
1) connect positive terminals1and
2 (+sign near terminal) of the two
batteries with a jump lead;
2) with a second lead, connect the
negative terminal 3(– sign near the
terminal) of the auxiliary battery to an
earthing point 4(E) on the engine or
gearbox of the vehicle to be started;IMPORTANTDo not directly
connect the two negative terminals:
sparks could ignite the flammable gas
from the battery. If the other battery
is fitted in a vehicle, prevent acciden-
tal contacts between the metal parts
of the two vehicles.
3) Start the engine.
4)when the engine has been start-
ed, remove the leads reversing the or-
der above.
If the engine fails to start after a few
attempts, do not keep turning the key
but have the vehicle seen at a Fiat
Dealership.
fig. 1
F0D0203m
Under no circumstances
should a battery charger
be used to start the en-
gine: it could damage the elec-
tronic systems and in particular
the ignition and injection control
units.
Do not carry out this pro-
cedure if you lack experi-
ence; if it is not done correctly it
can cause very intense electrical
discharges and the battery might
even explode. The liquid in the bat-
tery is poisonous and corrosive.
Keep it away from the eyes and
skin. You are also advised not to put
naked flames or lighted cigarettes
near the battery and not to cause
sparks: risk of fire and explosion.
WARNING
Page 150 of 258

149IN AN EMERGENCY
Before changing a fuse,
check the ignition key has
been removed and that
all the other electric devices have
been turned off/disabled.IF A FUSE BLOWS
GENERAL FEATURES
A fuse is an element for protecting
the electrical system. A fuse will trip
(i.e. blow) in the event of a failure or
improper interventions in the electri-
cal system.
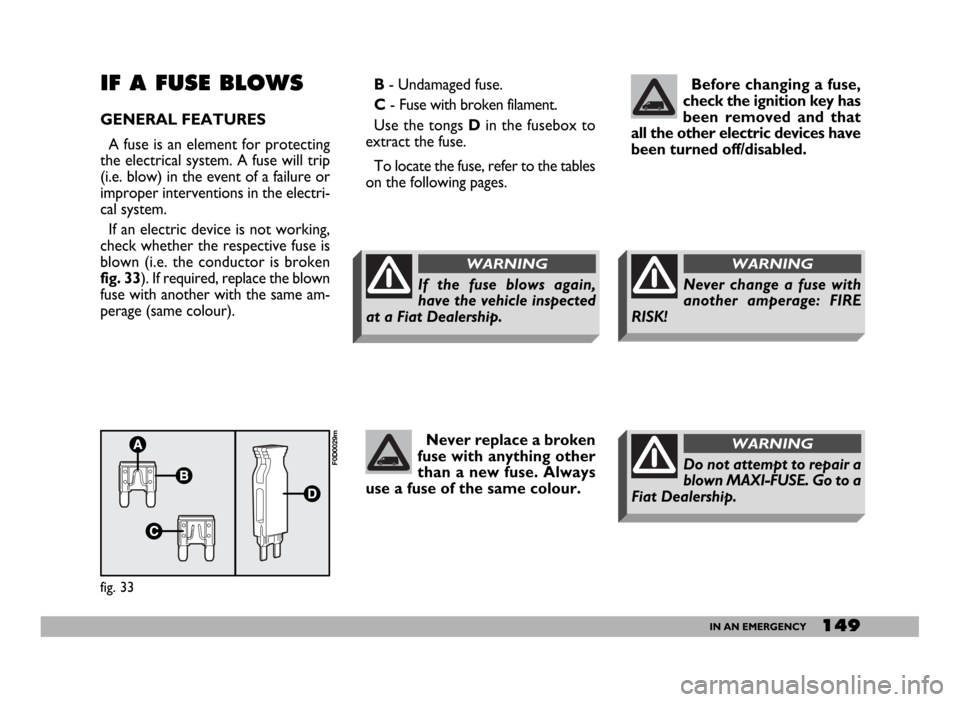
If an electric device is not working,
check whether the respective fuse is
blown (i.e. the conductor is broken
fig. 33). If required, replace the blown
fuse with another with the same am-
perage (same colour).B- Undamaged fuse.
C- Fuse with broken filament.
Use the tongs Din the fusebox to
extract the fuse.
To locate the fuse, refer to the tables
on the following pages.
fig. 33
F0D0029m
Never replace a broken
fuse with anything other
than a new fuse. Always
use a fuse of the same colour.
If the fuse blows again,
have the vehicle inspected
at a Fiat Dealership.
WARNING
Never change a fuse with
another amperage: FIRE
RISK!
WARNING
Do not attempt to repair a
blown MAXI-FUSE. Go to a
Fiat Dealership.
WARNING