2005 FIAT CROMA window
[x] Cancel search: windowPage 72 of 164
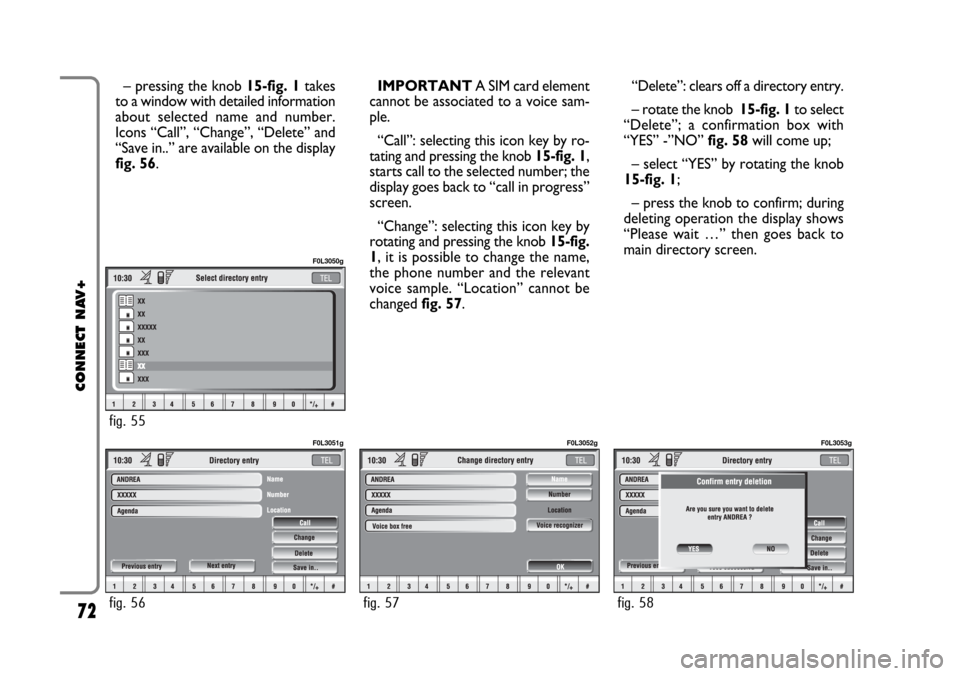
– pressing the knob 15-fig. 1takes
to a window with detailed information
about selected name and number.
Icons “Call”, “Change”, “Delete” and
“Save in..” are available on the display
fig. 56.IMPORTANT A SIM card element
cannot be associated to a voice sam-
ple.
“Call”: selecting this icon key by ro-
tating and pressing the knob 15-fig. 1,
starts call to the selected number; the
display goes back to “call in progress”
screen.
“Change”: selecting this icon key by
rotating and pressing the knob 15-fig.
1, it is possible to change the name,
the phone number and the relevant
voice sample. “Location” cannot be
changed fig. 57. “Delete”: clears off a directory entry.
– rotate the knob 15-fig. 1to select
“Delete”; a confirmation box with
“YES” -”NO” fig. 58will come up;
– select “YES” by rotating the knob
15-fig. 1;
– press the knob to confirm; during
deleting operation the display shows
“Please wait …” then goes back to
main directory screen.
72
CONNECT NAV+
fig. 56
F0L3051g
fig. 57
F0L3052g
fig. 58
F0L3053g
fig. 55
F0L3050g
Page 77 of 164
“Delete voice directory”
icon key
This icon key (Delete voice directo-
ry) allows to clear off previously
recorded voice samples; proceed as
follows:
– rotate the knob 15-fig. 1, select
the icon key and then press the knob
to confirm; the display will show the
following string: “Press “ENTER” to
confirm, “ESCAPE” to cancel”.
– pressing the knob 15-fig. 1clears
off voice samples, during deletion the
display will show “Please wait…”.
– pressing “ESC” 14-fig. 1deletion
is not performed and previous screen
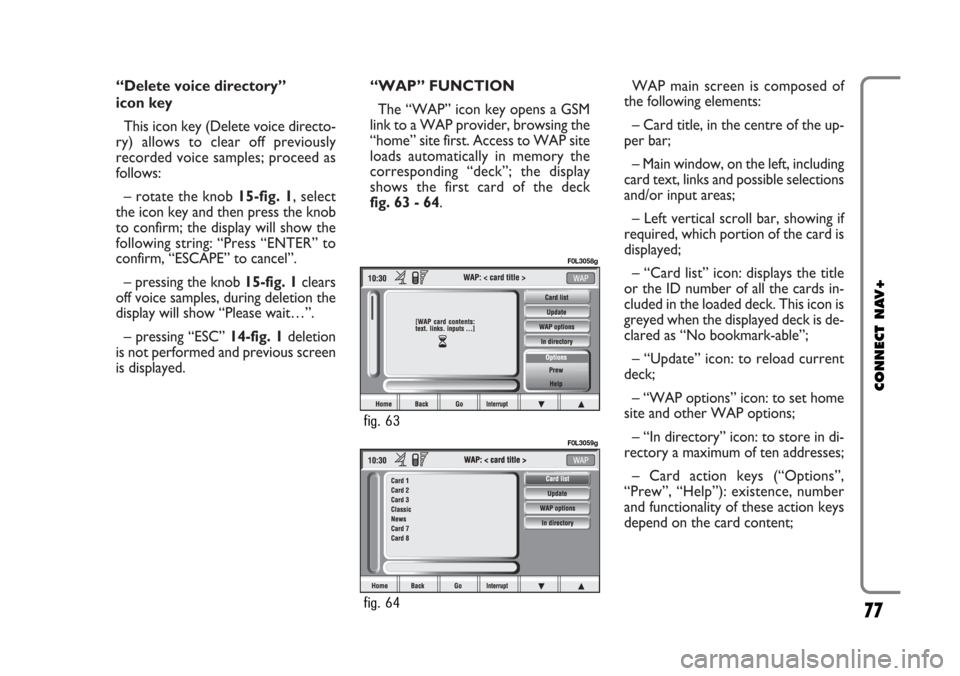
is displayed.“WAP” FUNCTION
The “WAP” icon key opens a GSM
link to a WAP provider, browsing the
“home” site first. Access to WAP site
loads automatically in memory the
corresponding “deck”; the display
shows the first card of the deck
fig. 63 - 64.WAP main screen is composed of
the following elements:
– Card title, in the centre of the up-
per bar;
– Main window, on the left, including
card text, links and possible selections
and/or input areas;
– Left vertical scroll bar, showing if
required, which portion of the card is
displayed;
– “Card list” icon: displays the title
or the ID number of all the cards in-
cluded in the loaded deck. This icon is
greyed when the displayed deck is de-
clared as “No bookmark-able”;
– “Update” icon: to reload current
deck;
– “WAP options” icon: to set home
site and other WAP options;
– “In directory” icon: to store in di-
rectory a maximum of ten addresses;
– Card action keys (“Options”,
“Prew”, “Help”): existence, number
and functionality of these action keys
depend on the card content;
77
CONNECT NAV+
fig. 64
F0L3059g
fig. 63
F0L3058g
Page 78 of 164

– Lower horizontal bar icon keys, en-
abled or disabled according to the
case:
“Home”: makes access to the ad-
dress defined as Home.
“Back”: displays previously shown
card.
“Go”: goes to input address screen
(direct access or “bookmark” recall);
“Interrupt”: stops current deck load-
ing;
“
N”, “O”: scrolls up/down when
card cannot be entirely displayed.
During loading operations, an hour-
glass is displayed on the current page.Low bar and right icon keys are ac-
tive only when they are necessary and
they are greyed when not consistent;
for example “
N” and “O” keys are ac-
tive only when window size is not
enough to show the entire card.
Rotate the knob 15-fig. 1to select
card action key; after selecting the re-
quired key press the knob 15-fig. 1to
confirm; the relevant screen will be
displayed.
Press “ESC” 14-fig. 1and confirm to
quit the WAP mode, the display will
return to the main telephone screen
(TEL).
“Go” low bar icon key
This graphic key fig. 63-64, which
is selected by pressing the corre-
sponding key 16-fig. 1, below the
writing, makes it possible to get con-
nected to the specified Web address
(if allowed for by the provider).Proceed as follows:
– rotate the knob 15-fig. 1, select
“Address” fig. 65and then press the
knob to confirm; the display will show
a keypad for typing in the required net
address;
or, if address is already stored in the
directory:
– rotate the knob 15-fig. 1, select
“Site directory” fig. 65and then press
the knob to confirm; the display will
show the stored site directory;
– rotate the knob 15-fig. 1to se-
lect the required address and then
press the knob to confirm.
During these operations “
N”, “O”,
“Home”, “Back” and “Interrupt” are
disabled.
78
CONNECT NAV+
Page 122 of 164
122
CONNECT NAV+
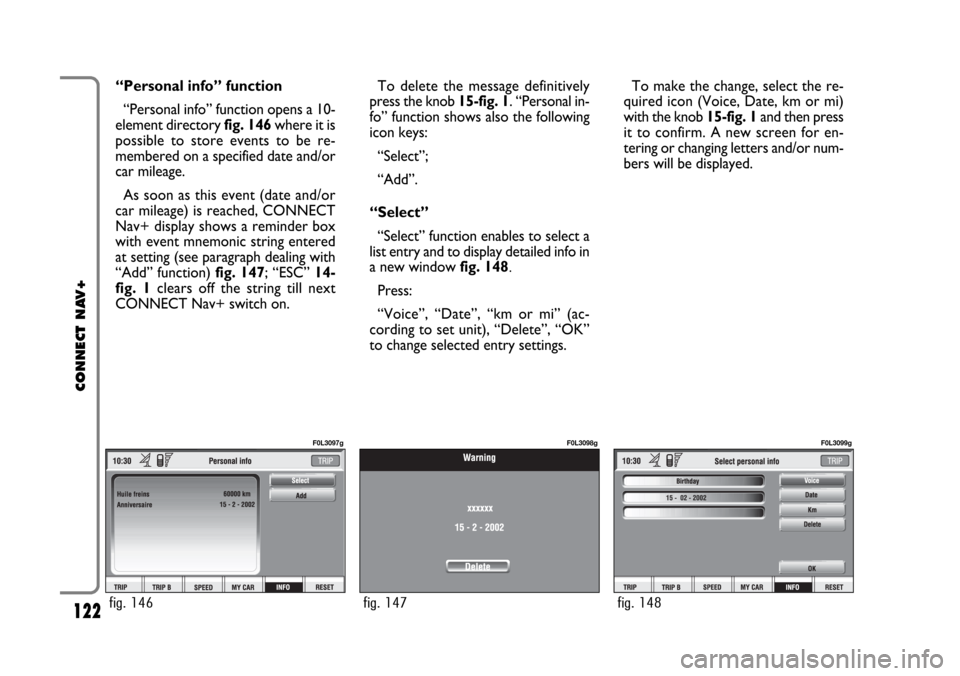
“Personal info” function
“Personal info” function opens a 10-
element directory fig. 146where it is
possible to store events to be re-
membered on a specified date and/or
car mileage.
As soon as this event (date and/or
car mileage) is reached, CONNECT
Nav+ display shows a reminder box
with event mnemonic string entered
at setting (see paragraph dealing with
“Add” function) fig. 147; “ESC” 14-
fig. 1clears off the string till next
CONNECT Nav+ switch on.To delete the message definitively
press the knob 15-fig. 1. “Personal in-
fo” function shows also the following
icon keys:
“Select”;
“Add”.
“Select”
“Select” function enables to select a
list entry and to display detailed info in
a new window fig. 148.
Press:
“Voice”, “Date”, “km or mi” (ac-
cording to set unit), “Delete”, “OK”
to change selected entry settings.To make the change, select the re-
quired icon (Voice, Date, km or mi)
with the knob 15-fig. 1and then press
it to confirm. A new screen for en-
tering or changing letters and/or num-
bers will be displayed.
fig. 146
F0L3097g
fig. 147
F0L3098g
fig. 148
F0L3099g
Page 123 of 164
123
CONNECT NAV+
Then select “OK” and press the
knob 15-fig. 1to confirm.
“Delete” clears off the stored entry.
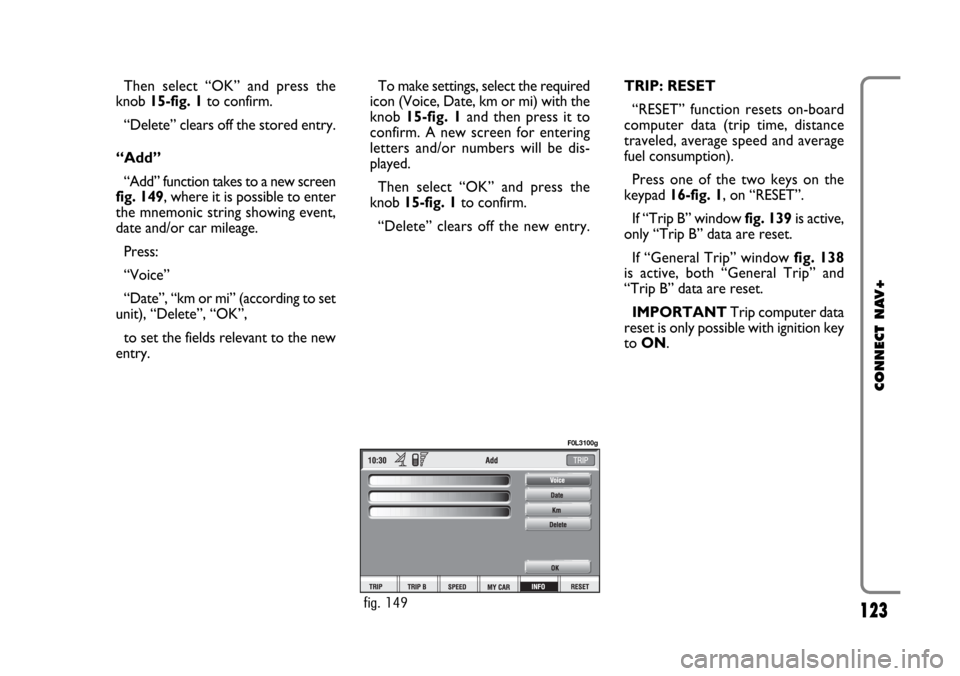
“Add”
“Add” function takes to a new screen
fig. 149, where it is possible to enter
the mnemonic string showing event,
date and/or car mileage.
Press:
“Voice”
“Date”, “km or mi” (according to set
unit), “Delete”, “OK”,
to set the fields relevant to the new
entry. To make settings, select the required
icon (Voice, Date, km or mi) with the
knob 15-fig. 1and then press it to
confirm. A new screen for entering
letters and/or numbers will be dis-
played.
Then select “OK” and press the
knob 15-fig. 1to confirm.
“Delete” clears off the new entry.TRIP: RESET
“RESET” function resets on-board
computer data (trip time, distance
traveled, average speed and average
fuel consumption).
Press one of the two keys on the
keypad 16-fig. 1, on “RESET”.
If “Trip B” window fig. 139is active,
only “Trip B” data are reset.
If “General Trip” window fig. 138
is active, both “General Trip” and
“Trip B” data are reset.
IMPORTANTTrip computer data
reset is only possible with ignition key
to ON.
fig. 149
F0L3100g
Page 145 of 164
145
CONNECT NAV+
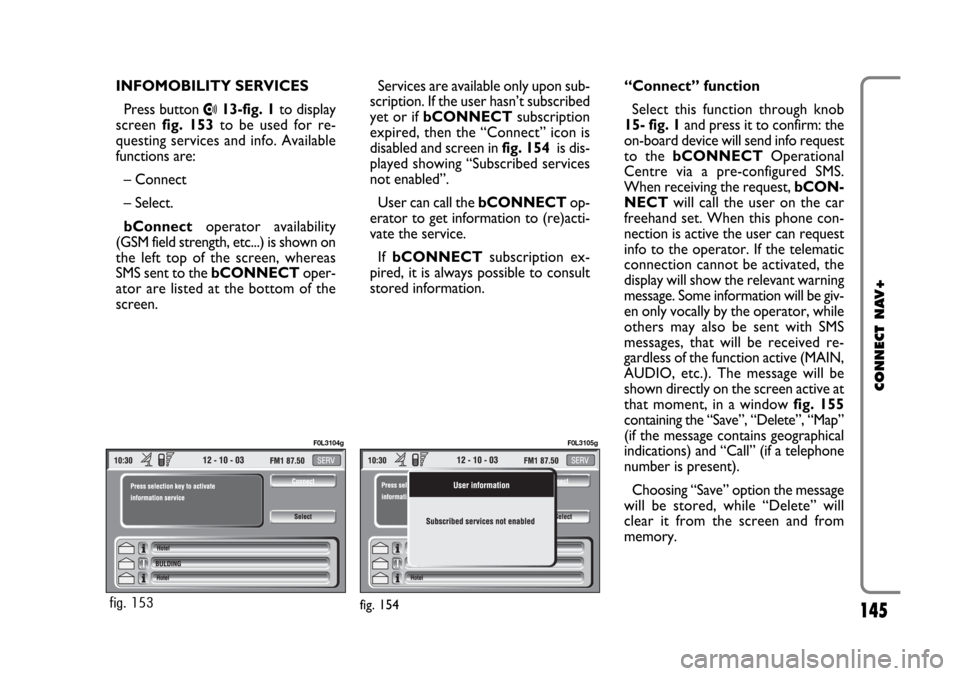
INFOMOBILITY SERVICES
Press button
•13-fig. 1to display
screen fig. 153to be used for re-
questing services and info. Available
functions are:
– Connect
– Select.
bConnectoperator availability
(GSM field strength, etc...) is shown on
the left top of the screen, whereas
SMS sent to the bCONNECToper-
ator are listed at the bottom of the
screen.Services are available only upon sub-
scription. If the user hasn’t subscribed
yet or if bCONNECTsubscription
expired, then the “Connect” icon is
disabled and screen in fig. 154is dis-
played showing “Subscribed services
not enabled”.
User can call the bCONNECTop-
erator to get information to (re)acti-
vate the service.
If bCONNECTsubscription ex-
pired, it is always possible to consult
stored information.“Connect” function
Select this function through knob
15- fig. 1and press it to confirm: the
on-board device will send info request
to the bCONNECTOperational
Centre via a pre-configured SMS.
When receiving the request, bCON-
NECTwill call the user on the car
freehand set. When this phone con-
nection is active the user can request
info to the operator. If the telematic
connection cannot be activated, the
display will show the relevant warning
message. Some information will be giv-
en only vocally by the operator, while
others may also be sent with SMS
messages, that will be received re-
gardless of the function active (MAIN,
AUDIO, etc.). The message will be
shown directly on the screen active at
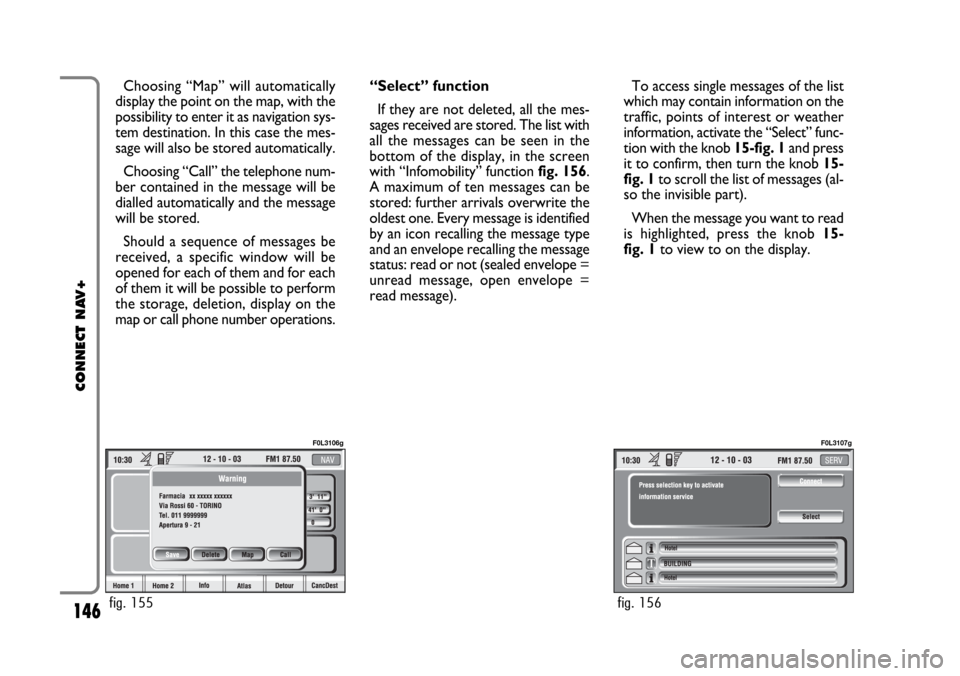
that moment, in a window fig. 155
containing the “Save”, “Delete”, “Map”
(if the message contains geographical
indications) and “Call” (if a telephone
number is present).
Choosing “Save” option the message
will be stored, while “Delete” will
clear it from the screen and from
memory.
fig. 154fig. 153
F0L3104gF0L3105g
Page 146 of 164
146
CONNECT NAV+
Choosing “Map” will automatically
display the point on the map, with the
possibility to enter it as navigation sys-
tem destination. In this case the mes-
sage will also be stored automatically.
Choosing “Call” the telephone num-
ber contained in the message will be
dialled automatically and the message
will be stored.
Should a sequence of messages be
received, a specific window will be
opened for each of them and for each
of them it will be possible to perform
the storage, deletion, display on the
map or call phone number operations.“Select” function
If they are not deleted, all the mes-
sages received are stored. The list with
all the messages can be seen in the
bottom of the display, in the screen
with “Infomobility” function fig. 156.
A maximum of ten messages can be
stored: further arrivals overwrite the
oldest one. Every message is identified
by an icon recalling the message type
and an envelope recalling the message
status: read or not (sealed envelope =
unread message, open envelope =
read message).To access single messages of the list
which may contain information on the
traffic, points of interest or weather
information, activate the “Select” func-
tion with the knob 15-fig. 1and press
it to confirm, then turn the knob 15-
fig. 1to scroll the list of messages (al-
so the invisible part).
When the message you want to read
is highlighted, press the knob 15-
fig. 1to view to on the display.
fig. 155
F0L3106g
fig. 156
F0L3107g
Page 152 of 164
152
CONNECT NAV+
VEHICLE
To display the relevant screen page,
press one of the keypad keys 16-
fig. 1under VEHICLE.
Choosing this Setup option two dif-
ferent setting menus are displayed, ac-
cording to the car version.
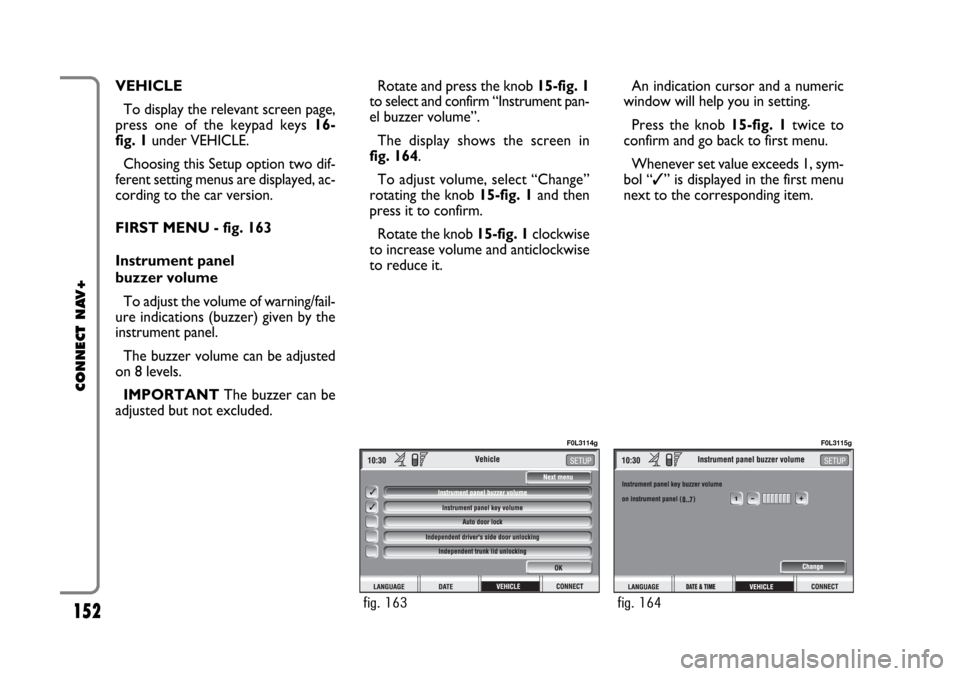
FIRST MENU - fig. 163
Instrument panel
buzzer volume
To adjust the volume of warning/fail-
ure indications (buzzer) given by the
instrument panel.
The buzzer volume can be adjusted
on 8 levels.
IMPORTANT The buzzer can be
adjusted but not excluded.Rotate and press the knob 15-fig. 1
to select and confirm “Instrument pan-
el buzzer volume”.
The display shows the screen in
fig. 164.
To adjust volume, select “Change”
rotating the knob 15-fig. 1and then
press it to confirm.
Rotate the knob 15-fig. 1clockwise
to increase volume and anticlockwise
to reduce it.An indication cursor and a numeric
window will help you in setting.
Press the knob 15-fig. 1twice to
confirm and go back to first menu.
Whenever set value exceeds 1, sym-
bol “✓” is displayed in the first menu
next to the corresponding item.
fig. 163
F0L3114g
fig. 164
F0L3115g