Page 31 of 293

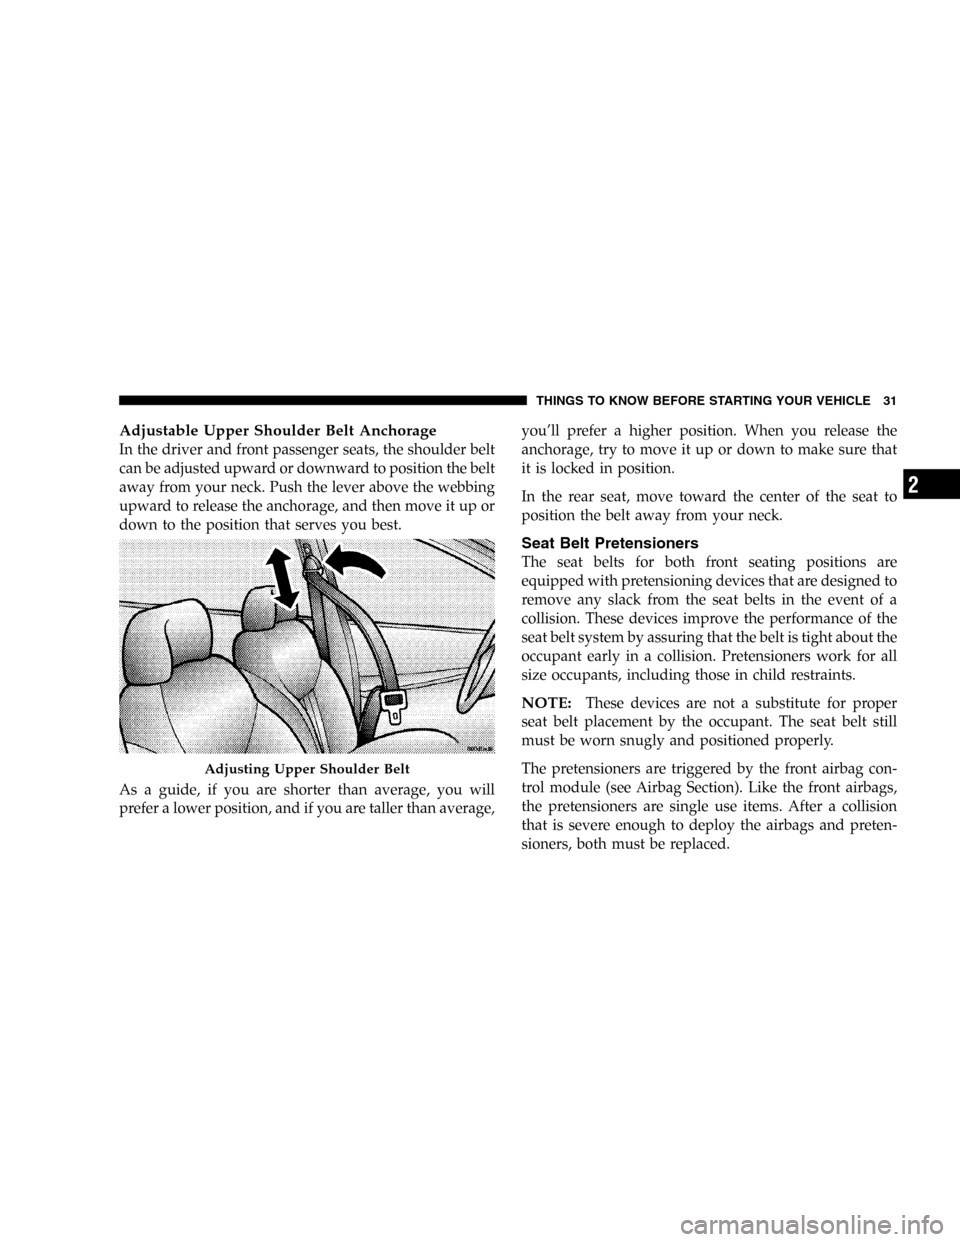
Adjustable Upper Shoulder Belt Anchorage
In the driver and front passenger seats, the shoulder belt
can be adjusted upward or downward to position the belt
away from your neck. Push the lever above the webbing
upward to release the anchorage, and then move it up or
down to the position that serves you best.
As a guide, if you are shorter than average, you will
prefer a lower position, and if you are taller than average,you’ll prefer a higher position. When you release the
anchorage, try to move it up or down to make sure that
it is locked in position.
In the rear seat, move toward the center of the seat to
position the belt away from your neck.
Seat Belt Pretensioners
The seat belts for both front seating positions are
equipped with pretensioning devices that are designed to
remove any slack from the seat belts in the event of a
collision. These devices improve the performance of the
seat belt system by assuring that the belt is tight about the
occupant early in a collision. Pretensioners work for all
size occupants, including those in child restraints.
NOTE:These devices are not a substitute for proper
seat belt placement by the occupant. The seat belt still
must be worn snugly and positioned properly.
The pretensioners are triggered by the front airbag con-
trol module (see Airbag Section). Like the front airbags,
the pretensioners are single use items. After a collision
that is severe enough to deploy the airbags and preten-
sioners, both must be replaced.
Adjusting Upper Shoulder Belt
THINGS TO KNOW BEFORE STARTING YOUR VEHICLE 31
2
Page 43 of 293

Here are some tips on getting the most out of your child
restraint:
•Before buying any restraint system, make sure that it
has a label certifying that it meets all applicable Safety
Standards. We also recommend that you make sure
that you can install the child restraint in the vehicle
where you will use it before you buy it.
•The restraint must be appropriate for your child’s
weight and height. Check the label on the restraint for
weight and height limits.
•Carefully follow the instructions that come with the
restraint. If you install the restraint improperly, it may
not work when you need it.
•Buckle the child into the seat according to the child
restraint manufacturer’s directions.
•When your child restraint is not in use, secure it in the
vehicle with the seat belt or remove it from the vehicle.
Do not leave it loose in the vehicle. In a sudden stop or
collision, it could strike the occupants or seat backs
and cause serious personal injury.
NOTE:For additional information refer to
www.seatcheck.org or call 1–866–SEATCHECK.
Older Children and Child Restraints
Children who weigh more than 20 lbs (9 kg) and who are
older than one year can ride forward-facing in the
vehicle. Forward-facing child seats and convertible child
seats used in the forward-facing direction are for children
who weigh 20 to 40 lbs (9 to 18 kg) and who are older
than one year. These child seats are also held in the
vehicle by the lap/shoulder belt or the LATCH child
restraint anchorage system. (See the LATCH—Child
Seat Anchorage System Section.)
The belt-positioning booster seat is for children weighing
more than 40 lbs (18 kg), but who are still too small to fit
the vehicle’s seat belts properly. If the child cannot sit
with knees bent over the vehicle’s seat cushion while the
child’s back is against the seat back, they should use a
belt-positioning booster seat. The child and belt-
positioning booster seat are held in the vehicle by the
lap/shoulder belt.
THINGS TO KNOW BEFORE STARTING YOUR VEHICLE 43
2
Page 81 of 293

Sunroof Fully Closed
Press and hold the switch forward until the sunroof stops
completely to ensure that the sunroof is fully closed.
ELECTRICAL POWER OUTLET
The power outlet is located in the lower center of your
instrument panel. If your vehicle is equipped with heated
seats, a second power outlet is located inside the center
console. All accessories connected to any outlet should be
removed or turned off when the vehicle is not in use.
CAUTION!
Electrical Outlet Use With Engine Off
•Many accessories that can be plugged in draw
power from the vehicle’s battery, even when not in
use (i.e., cellular phones, etc.). Eventually, if
plugged in long enough, the vehicle’s battery will
discharge sufficiently to degrade battery life
and/or prevent engine starting.
•Accessories that draw higher power (i.e., coolers,
vacuum cleaners, lights, etc.) will degrade the
battery even more quickly. Only use these inter-
mittently and with greater caution.
•After the use of high power draw accessories, or
long periods of the vehicle not being started (with
accessories still plugged in), the vehicle must be
driven a sufficient length of time to allow the
alternator to recharge the vehicle’s battery.
•Power outlets are designed for accessory plugs
only. Do not hang any type of accessory or acces-
sory bracket from the plug. Improper use of the
power outlet can cause damage.
UNDERSTANDING THE FEATURES OF YOUR VEHICLE 81
3
Page 135 of 293

Rear Seat Outlets
These outlets are located under the front seats and direct
warm air to the rear seat passengers. Air is directed
through these outlets when you select either the Floor,
Bi-Level, or Mix modes.
Rear Window Defroster
The Rear Window Defroster button is located to
the right of the Mode Control. Press this button
once to turn on the Rear Window Defrost and a second
time to turn them off. A light above the button shows that
the defroster is on.
NOTE:The defroster turns off automatically after 15
minutes of operation. Each later activation will allow 10
minutes of operation.
Side Window Demisters
A side window demister outlet is at each end of the
instrument panel. These non-adjustable outlets direct air
toward the side windows when the system is in either the
FLOOR, MIX, or DEFROST modes. A small amount of air
is directed to the side window demisters in BI-LEVEL
mode as well. The air is directed at the area of the
windows through which you view the outside mirrors.
Windshield and Side Window Fogging
Interior fogging on the windshield can be quickly
removed by using the defrost position on the mode
control.
Your side windows may fog on the inside in mild
rainy or humid weather. To clear the windows,
select the Panel-Air Conditioning mode on the
Mode Control. Point the panel outlets toward the side
windows.
NOTE:Do not use the recirculation mode as it will not
clear windows under these conditions.
UNDERSTANDING YOUR INSTRUMENT PANEL 135
4