Page 209 of 396

NTuning.............................228
NBalance............................228
NFade..............................228
NTone Control........................228
NMODE Selection......................228
NPTY (Program Type) Selection.............228
NScan Button.........................228
NTo Set The Pushbutton Memory...........229
NTo Change From Clock To Radio Mode......229
NGeneral Information...................229
NOperating Instructions Ð CD Changer......229
NInserting the Compact Disc..............229
NSeek Button.........................230
NFF /Tune/ RW Button..................230
NRandom Play........................230
NRadio/CD Button.....................230NTime Button.........................230
NScan Button.........................230
NLoading The CD Changer...............230
NPlaying Discs........................231
NRemoving Discs From The CD Changer.....231
mSteering wheel remote control switches (if so
equipped)
...........................231
NHow to adjust the volume...............232
NTo listen to the audio system..............232
NTo listen to the radio...................232
NAutomatic tuning the radio...............232
NTo select the preset memory..............232
NTo listen to a tape.....................233
NTo listen to a CD......................233
NHandling of compact discs...............234
mRadio operation and cellular phones........236
FOR PLEASANT DRIVING 209
6
Page 231 of 396

Playing Discs
The radio display indicates the CD number (the slot
where the CD is loaded), and the current track being
played at the time.
If more than one CD is loaded in the CD changer, it
automatically plays the next CD after playing the last
track of the current CD. If there is only one CD loaded, it
will automatically return to the first track of the CD. To
play any available disc select the desired disc position
button.
Removing Discs from the CD Changer
1. Press the load/eject button then press the desired disc
position button to eject that CD.
2. The display will flash the disc number that is being
ejected.
3. If the disc is not removed from the unit within 15
seconds the disc will automatically re-load.
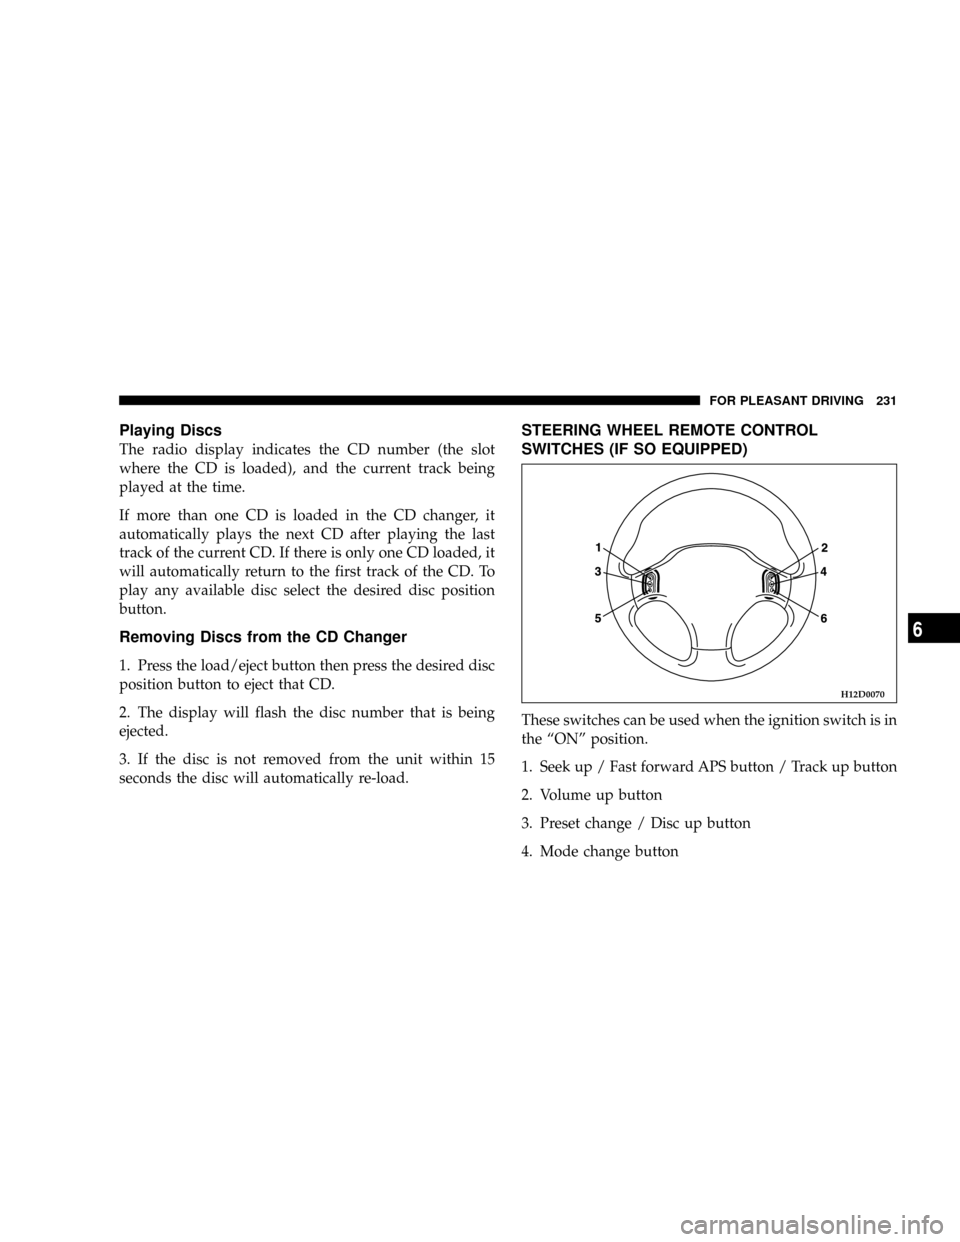
STEERING WHEEL REMOTE CONTROL
SWITCHES (IF SO EQUIPPED)
These switches can be used when the ignition switch is in
the ªONº position.
1. Seek up / Fast forward APS button / Track up button
2. Volume up button
3. Preset change / Disc up button
4. Mode change button
H12D0070
FOR PLEASANT DRIVING 231
6
Page 232 of 396

5. Seek down / Rewind APS button / Track down button
6. Volume down button
NOTE:
²Do not push two or more of the steering wheel
remote control switches at the same time.
How to adjust the volume
Volume up button - 2
The volume will increase when this button is pressed.
Volume down button - 6
The volume will decrease when this button is pressed.
To listen to the audio system
Select the desired mode by lightly pressing the Mode
change button (4). Every time the button is pressed, the
mode can be changed.
Radio (AM)!Radio (FM)!Tape!CD
NOTE:
²Tape or CD mode cannot be selected unless a tape or
CD is in the slot.
To listen to the radio
To select AM/FM mode
Mode change button - 4
Select the desired band (AM or FM) by pressing this
button.
Automatic tuning the radio
Seek up button - 1
Seek down button - 5
After pressing these buttons, release the buttons, and
reception of the selected station will begin.
To select the preset memory
Preset change button - 3
When the radio is on and this button is pressed, the
preset station frequencies are sequentially selected each
time the button is pressed; 1, 2, 3, 4, 5, 6, 7, 8, 9, 10, 1, 2 etc.
232 FOR PLEASANT DRIVING
Page 270 of 396

Before installing the wheel cover to the wheel, make sure
that the opening with the symbol mark is correctly
aligned with the air valve.
JACKING AND TIRE CHANGING
If a tire must be changed, do so only after making sure
the vehicle is stopped in a safe, flat location.
Jacking up the vehicle
1. Park the vehicle on level and stable ground.
2. Switch on the hazard warning flashers, set up a
warning triangle, flashing signal light, etc., at an ad-
equate distance from the vehicle, and have all passengers
leave the vehicle. Turn the ignition key to the ªLOCKº
position.
3. Set the parking brake firmly, and move the gearshift
lever (manual transaxle) to the ªNº (Neutral) position or
move the selector lever (automatic transaxle) to the ªPº
(PARK) position.4. Apply a chock or block (A) at the tire diagonally
opposite the tire (B) to be changed.
NOTE: The chock shown is not supplied with the ve-
hicle. It is recommended that you keep one in the vehicle
for use if required.
N24A0100
A
B
270 EMERGENCIES
Page 276 of 396
10. Clear out any mud, etc. on the hub surface, hub bolts
or in the installation holes in the wheel, and then mount
the spare tire.
11. Install the spare wheel with the nut's tapered end
facing inward, then tighten by hand until the wheel is no
longer loose.
CAUTION!
Never apply oil to either wheel bolts or nuts as it can
cause them to overtighten.
NOTE: Flange nuts can be temporarily used on the steel
wheel, but return to the original wheel and tire as soon as
possible.
If all four wheels are changed to steel wheels, use
tapered nuts.
N24A1410
Tapered nut
Flange nut
276 EMERGENCIES
Page 331 of 396

Special additives
DaimlerChrysler does not recommend the addition of
any fluid additives to the transaxle.
MANUAL TRANSAXLE
Add oil to maintain the proper level. Refill or change oil
according to the scheduled maintenance table.
Lubricant Gear Oil Classification GL-4
Viscosity range SAE75W-90 or 75W-85W
DISC BRAKE PADS, REAR DRUM BRAKE
LININGS AND REAR WHEEL CYLINDERS
Proper brakes are essential to safe operation of your
vehicle. Check brake pads and rear brake linings for
wear, and check rear wheel cylinders for leakage.
For proper braking performance, replace brake pads with
original equipment type pads.
BRAKE HOSES
Brake hoses and tubing should be checked for:
1. Severe surface cracking, scuffing or worn spots. If the
casing of the hose is exposed by cracks or abrasions in therubber hose cover, the hose should be replaced. Deterio-
ration of the hose could cause brake failure.
2. Faulty installation may cause twisting, or wheel, tire
or chassis interference.
BALL JOINT, STEERING LINKAGE SEAL AND
DRIVE SHAFT BOOTS
Check the following parts for damage and grease leak-
age:
1. Ball joint boots of the front suspension and steering
linkage
2. Bellows on both ends of the drive shaft
SUPPLEMENTAL RESTRAINT SYSTEM (SRS)
The entire SRS system must be inspected by an autho-
rized dealer 10 years after the vehicle manufacture date
shown on the certification label. [See ªSRS servicingº on
page 101.]
MAINTENANCE 331
9
Page 348 of 396

CAUTION!
Do not use the compact spare tire for tire rotation.
Tire chains
CAUTION!
Tire chains are not recommended for your vehicle.
The clearance between the chains and the body is
small, and the body might be damaged.
Snow tires
Some areas of the country require the use of snow tires
during winter. Standard tires are of the all season type
and satisfy this requirement as indicated by the M+S
designation on the tire side wall.
If you need snow tires, select tires equivalent in size and
type to the original equipment tires. Failure to do so may
adversely affect the safety and handling of your vehicle.Snow tires should be inflated 4 psi (28 kPa) higher than
the inflation pressure shown on the vehicle's tire placard.
Never inflate over the maximum pressure shown on the
tire sidewall.
Snow tires should not be operated at sustained speeds
over 75 mph (120 km/h).
NOTE: As flange nuts are used on your vehicle, change
to tapered nuts when snow tires (steel wheels) are used.
348 MAINTENANCE
Page 350 of 396

!24,000 Miles (38 000 km) or at 24 months
NCheck automatic transaxle fluid level.
NInspect disc brake pads, rotors and calipers for
wear and leaks.
NCheck brake hoses for deterioration or leaks.
NInspect drive shaft boots for grease leaks and
damage.
NChange engine oil and engine oil filter.
NRotate tires.
MILEAGE/
MONTHSDEALERSHIP
NAME/CODE DATEREPAIR
ORDER #
!30,000 Miles (48 000 km) or at 30 months
NReplace air cleaner filter.
NReplace spark plugs, standard type.
NCheck drive belts condition (for the generator,
water pump, power steering pump).
NCheck manual transaxle oil level.
NCheck coolant hoses (radiator hose, heater hose).
NCheck fuel hoses condition.
NInspect rear drum brake linings and rear wheel
cylinders (except vehicles with disc brakes) for
wear and leaks of all wheels.
NInspect ball joint and steering linkage seals for
grease leaks and damage.
NInspect suspension system for looseness and dam-
age.
NCheck and service exhaust system as required
(connection portion of muffler, muffler pipes and
converter heat shields).
MILEAGE/
MONTHSDEALERSHIP
NAME/CODE DATEREPAIR
ORDER #
350 MAINTENANCE