Page 343 of 448
MAINTENANCE PROCEDURES
The pages that follow contain therequiredmaintenance
services determined by the engineers who designed your
vehicle.
Besides the maintenance items for which there are fixed
maintenance intervals, there are other items that should
operate satisfactorily without periodic maintenance.
However, if a malfunction of these items does occur, it
could adversely affect the engine or vehicle performance.
These items should be inspected if a malfunction is
observed or suspected.
Engine Oil
Checking Oil Level
To assure proper lubrication of your vehicle’s engine, the
engine oil must be maintained at the correct level. Check
the oil level at regular intervals. The best time to check
the oil level is before starting the engine after it has been
parked overnight. When checking oil after operating theengine, first ensure the engine is at full operating tem-
perature, then wait at least 15 minutes after engine
shutdown to check the oil.
Checking the vehicle while it’s on level ground will also
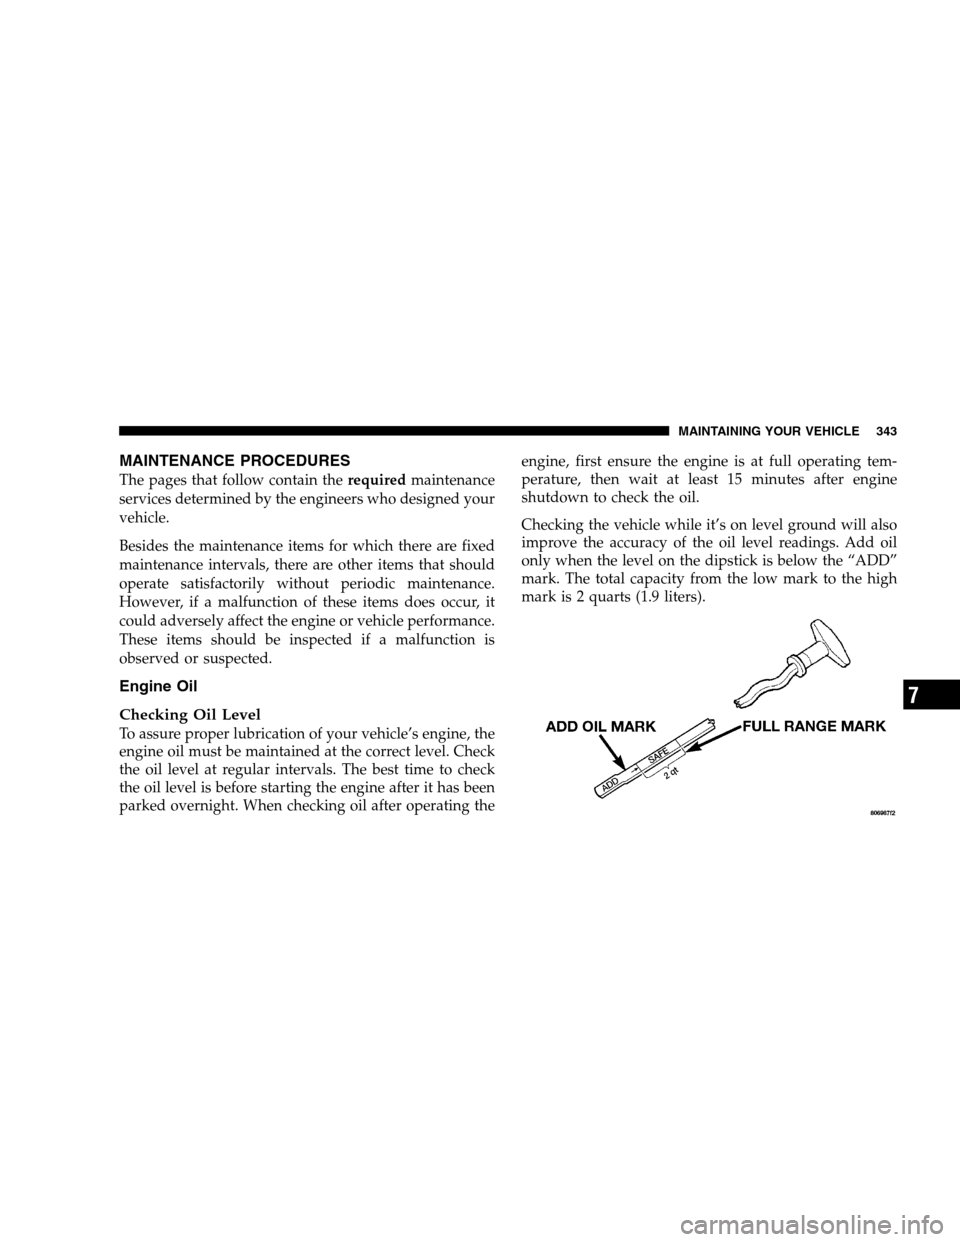
improve the accuracy of the oil level readings. Add oil
only when the level on the dipstick is below the “ADD”
mark. The total capacity from the low mark to the high
mark is 2 quarts (1.9 liters).
MAINTAINING YOUR VEHICLE 343
7
Page 344 of 448
Never operate the engine with oil level below the “ADD”
mark or above the upper “SAFE” mark.
Change Engine Oil
CAUTION!
Overfilling or underfilling the crankcase will cause
oil aeration or loss of oil pressure. This could dam-
age your engine.
Road conditions as well as your kind of driving affect the
interval at which your oil should be changed. Check the
following to determine if any apply to you:
•Frequent short trips where the engine does not achieve
full operating temperature (operating temperature de-
fined as 190° F (66° C) coolant temperature).
•Extensive engine idling (over 10 minutes per hour of
operation) at ambient temperatures less than 32° F (0°
C).
•Driving in dusty conditions.
•Frequent trailer towing.
•Taxi, police, or delivery service (commercial service).
•Off-road or desert operation.
•Extensive operation at high engine speeds (greater
than 2900 rpm) and loads (greater than 70% throttle).
IfANYof these apply to you, then change your engine oil
at every interval shown in schedule�B�of the�Mainte-
nance Schedules�section of this manual.
If none of these apply to you, then change your engine oil
at every interval shown on schedule�A�of the�Mainte-
nance Schedules�section of this manual.
344 MAINTAINING YOUR VEHICLE
Page 345 of 448
NOTE:Most vehicles are operated under the conditions
listed for Schedule�B.�
Engine Oil Selection
1. Engine Oil Quality
Use only oils conforming to API Ser-
vice CI-4. A sulfated ash limit is speci-
fied for lubrication oil used in Cum-
mins engines. Oils with a high ash
content may produce deposits on
valves that can progress to guttering
and valve burning. A maximum sul-
fated ash content of 1.85 mass % is recommended for all
oil used in the engine.
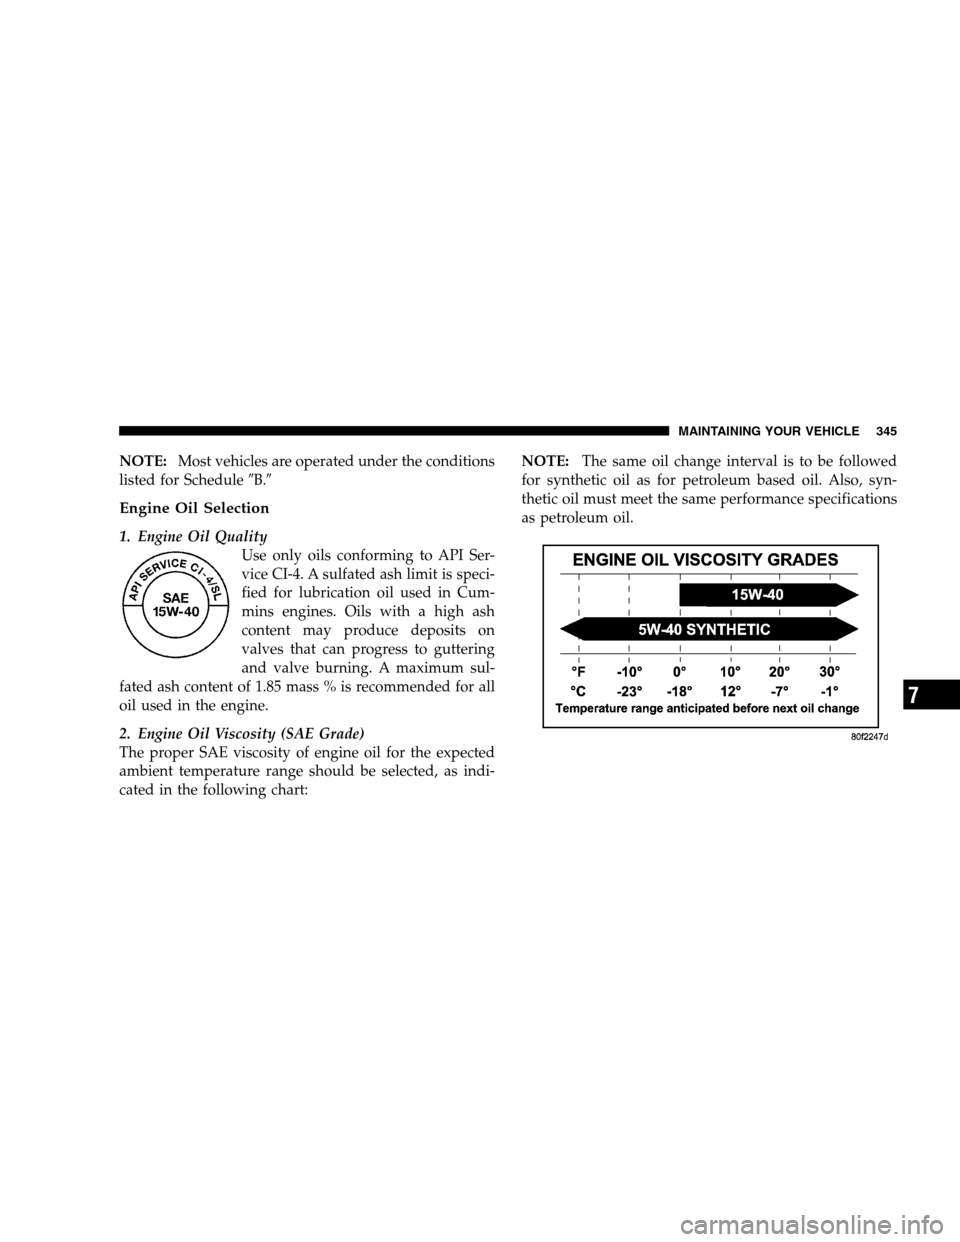
2. Engine Oil Viscosity (SAE Grade)
The proper SAE viscosity of engine oil for the expected
ambient temperature range should be selected, as indi-
cated in the following chart:NOTE:The same oil change interval is to be followed
for synthetic oil as for petroleum based oil. Also, syn-
thetic oil must meet the same performance specifications
as petroleum oil.
MAINTAINING YOUR VEHICLE 345
7
Page 346 of 448

Engine Oil Filter
Refer to Recommended Fluids, Lubricants and Genuine
Parts for the correct part number. The engine oil filter
should be changed ateveryengine oil change.
Engine Oil And Filter — Change
WARNING!
Hot oil can cause personal injury.
Operate the engine until the coolant temperature reaches
140°F (60°C). Shut the engine off. Remove the oil drain
plug.
Use a container that can hold at least 12 quarts (11.3
Liters) to hold the used oil.Always check the condition of the used oil. This can give
you an indication of some engine problems that might
exist.
•Thin, black oil indicates fuel dilution.
•Milky discoloration indicates coolant dilution.
Clean the area around the oil filter base. Remove the filter
from the underside of the vehicle using a cap style oil
filter wrench.
Clean the gasket surface of the filter mount. The filter
gasket can stick on the filter mount. Make sure it is
removed.
Change the engine oil filter with every engine oil change.
Only a high quality MOPAR filter should be used to
assure most efficient service.
346 MAINTAINING YOUR VEHICLE
Page 347 of 448
CAUTION!
The filtering medium of other aftermarket filters
may disintegrate. Debris from failed filters may plug
the piston oil cooling nozzles, resulting in scuffed
pistons and engine failure.
CAUTION!
Fill the oil filter element with clean oil before
installation. Use the same type oil that will be used
in the engine. When filling the oil filter, prevent
foreign material from falling into the filter. Severe
engine damage may occur.
Apply a light film of lubricating oil to the sealing surface
of the filter gasket before installing the filter.
CAUTION!
Overtightening may distort the threads or damage
the filter element seal.
Install the filter as specified by the filter manufacturer.
Turn the filter 3/4 to one full turn after making contact
with the gasket.
Check the condition of the threads and sealing surface on
the oil pan and drain plug.
Install the drain plug and sealing washer and tighten to
37 ft-lbs. (50 N·m).
Use only high-quality multi-grade lubricating oil in your
Cummins Diesel Engine. Choose the correct oil for your
operating conditions as outlined in the Selection of
Engine Oil.
MAINTAINING YOUR VEHICLE 347
7
Page 348 of 448

Cummins Turbo Diesel
Fill the engine with the correct grade of new oil. The
engine capacity is 11 quarts (10.4 liters) in the crankcase
and 1 quart (.95 liter) in the lubricating oil filter.
Start the engine and operate it at idle for several minutes.
Check for leaks at the lubricating oil filter and oil pan
drain plug.
Run the engine until it has reached operating tempera-
ture, stop the engine. Wait approximately 15 minutes to
let the oil in the upper parts of the engine drain back to
the pan. Check the oil level again.
Add oil as necessary to bring the level to the “SAFE”
mark on the dipstick.
Disposing Of Used Engine Oil And Filter
Care should be taken in disposing of the used engine
fluids from your vehicle. Used fluids, indiscriminately
discarded, can present a problem to the environment.Contact your local dealer, service station, or governmen-
tal agency for advice on recycling programs and where
used fluids and filters can be safely discarded in your
area.
Drive Belt
Inspection
Check the belt for intersecting cracks.
•Transverse (across the belt width) cracks are accept-
able.
•Longitudinal (direction of belt length) cracks that
intersect with transverse cracks are NOT acceptable.
Replace the belt if it has unacceptable cracks, is frayed or
has pieces of material missing.
The engine speed sensor, located near the damper, should
be inspected for damage if a belt is frayed.
348 MAINTAINING YOUR VEHICLE
Page 350 of 448
across the filter element increases, a yellow disc travels
along a graduated scale on the side of the Filter
Minder™.
The yellow disc will always show the greatest restriction
experienced by the filter element. When the disc reaches
the red zone, the filter element may need to be replaced.
There is no other time or mileage interval for changing
the air cleaner filter element.
If the vehicle experiences a sudden loss of engine power
when being driven in heavy snow or rain or when
plowing snow, check the Filter Minder™
•If the Filter Minder™ is showing a plugged filter, the
filter should be visually inspected for snow/ice build
up or extreme water saturation.
•The filter is not damaged, remove all snow/ice, rein-
stall filter and reset the Filter Minder™.A visual inspection of the air cleaner filter element is
never recommended under normal circumstances. A
badly restricted element may appear clean while a soiled
element may be quite effective in filtering particles
without restricting air flow. Rely on the Filter Minder™
to determine when a filter change is necessary.
After a new filter element is inserted, press the rubber
button on the top of the Filter Minder™. This action will
reset the yellow disc to the clean position.
CAUTION!
When using an engine cleaner or a degreaser, be sure
to wrap and tape the Filter Minder™ to protect the
plastic housing from damage and discoloration.
350 MAINTAINING YOUR VEHICLE
Page 358 of 448

Front Prop Shaft Lubrication
Lubricate the front driveshaft grease fitting at each oil
change listed in the appropriate Maintenance Schedule
for your vehicle (Schedule “A” and “B”). Use Mopar�
type MS-6560 (lithium based grease), or equivalent.
Front Axle Universal Drive Joints And Pivot
Bearings
The front axle universal joint and pivot bearings are
permanently lubricated and do not require servicing.
Body Lubrication
Locks and all body pivot points, including such items as
seat tracks, doors,liftgate and hood hinges, should be
lubricated periodically to assure quiet, easy operation
and to protect against rust and wear. Prior to the appli-
cation of any lubricant, the parts concerned should be
wiped clean to remove dust and grit; after lubricating
excess oil and grease should be removed. Particular
attention should also be given to hood latching compo-
nents to insure proper function. When performing other
underhood services, the hood latch, release mechanism
and safety catch should be cleaned and lubricated.
The external lock cylinders should be lubricated twice a
year, preferably in the fall and spring. Apply a small
Front Driveshaft Grease Fitting
358 MAINTAINING YOUR VEHICLE