Page 257 of 462

Downloaded from www.Manualslib.com manuals search engine 251
ENGINE
CHECKING AND SETTING THE VALVE TIMING
Engines: 9HZ - 9HY
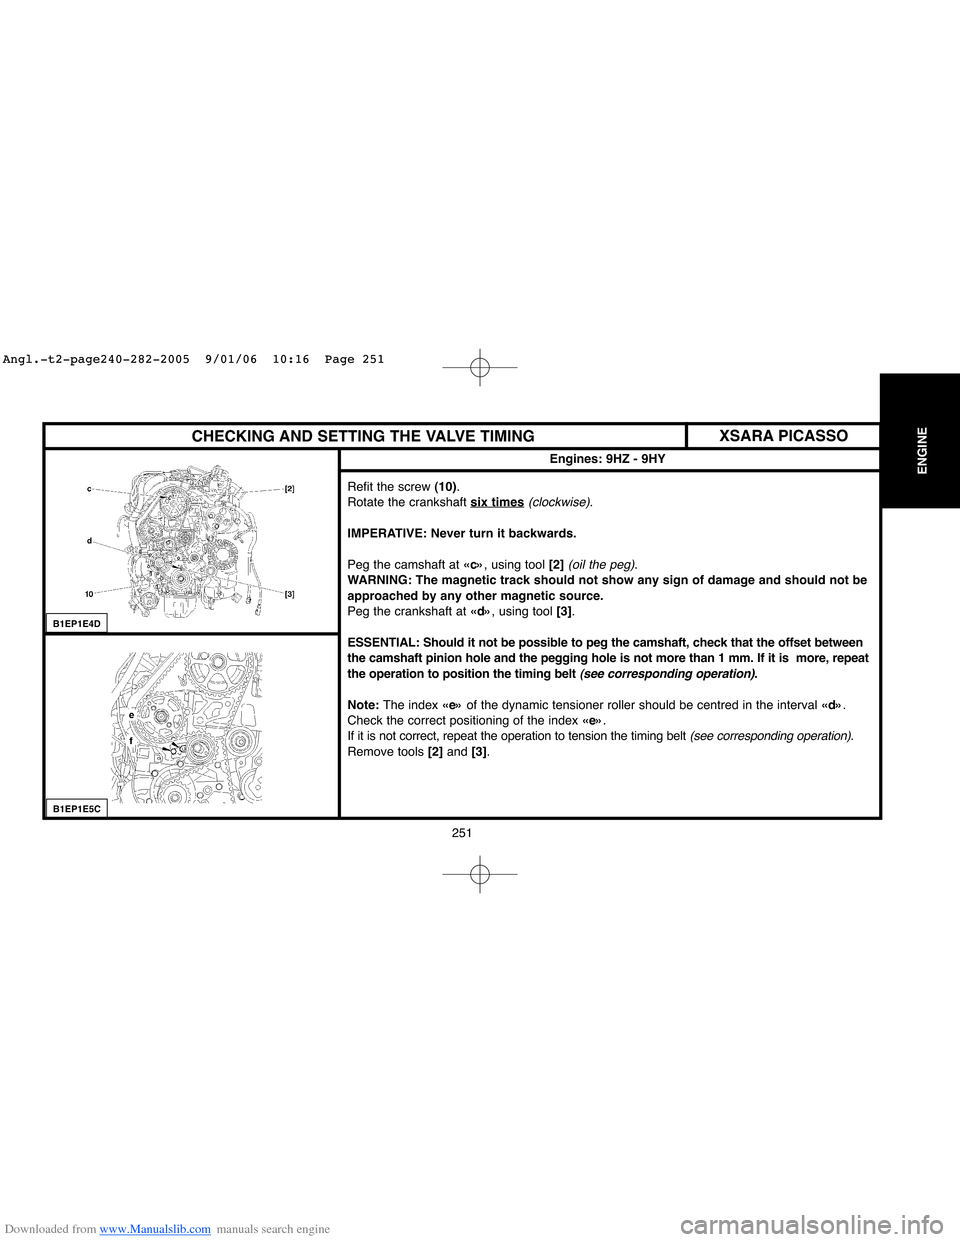
Refit the screw (10).
Rotate the crankshaft six times
(clockwise).
IMPERATIVE: Never turn it backwards.
Peg the camshaft at «c», using tool [2]
(oil the peg).
WARNING: The magnetic track should not show any sign of damage and should not be
approached by any other magnetic source.
Peg the crankshaft at «d», using tool [3].
ESSENTIAL: Should it not be possible to peg the camshaft, check that the offset between
the camshaft pinion hole and the pegging hole is not more than 1 mm. If it is more, repeat
the operation to position the timing belt
(see corresponding operation).
Note: The index «e»of the dynamic tensioner roller should be centred in the interval «d».
Check the correct positioning of the index «e».
If it is not correct, repeat the operation to tension the timing belt
(see corresponding operation).
Remove tools [2] and [3].
B1EP1E4D
B1EP1E5C
XSARA PICASSO
Angl.-t2-page240-282-2005 9/01/06 10:16 Page 251
Page 259 of 462
Downloaded from www.Manualslib.com manuals search engine 253
ENGINE
CHECKING AND SETTING THE VALVE TIMING
Engines: 9HZ - 9HY
B1BP304D
Tools.
[1]Flywheel setting peg: (-).0194.C
[2]Camshaft setting peg: (-).0194.B
[3] Crankshaft setting peg: (-).0194.A
Checking and setting the timing.
Removing.
Raise and support the vehicle, wheels hanging.
Disconnect the positive and negative terminals of the battery.
Remove:
- The front RH wheel.
- The front RH splash-shield.
- The accessories drive belt
(see corresponding operation).
Uncouple:
- The fuel supply unions (1).
- The air/air heat exchanger inlet and outlet pipes (3).
- The exhaust line
(at the flexible pipe).
Disconnect the connecter at «a».
Remove and move aside the power steering fluid reservoir (6).
Uncouple, plug and move aside the tube (2).
Support the engine with a roller jack equipped with a block.
Remove the engine supports(4)and (5).
XSARA PICASSO
Angl.-t2-page240-282-2005 9/01/06 10:16 Page 253
Page 261 of 462

Downloaded from www.Manualslib.com manuals search engine 255
ENGINE
CHECKING AND SETTING THE VALVE TIMING
Engines: 9HZ - 9HY
B1EP1E6D
Refit the screw (10).
Turn the crankshaft to bring the camshaft towards its pegging point.
Peg the camshaft at «c», using tool [2]
(oil the pegs).
WARNING: Do not press or damage the track of the engine speed sensor target (13).
Peg the crankshaft at «e», using tool [3].
Remove:
- The timing belt protector (13).
- The engine speed sensor (14).
Slacken the screw (15)of the tensioner roller, and keep it slackened using an allen
spanner at «d».
Detension the timing belt by pivoting the tensioner roller
(clockwise).
Remove the timing belt, starting with the coolant pump pinion.
Checks.
ESSENTIAL: Just prior to refitting, proceed to the checks as below.
Check:
- That the rollers and the coolant pump pulley turn freely
(without play and without tight spot).
- That there are no signs of oil leaks (at the crankshaft and camshaft seals).
- That there are no leaks of coolant fluid (at the coolant pump).
- That the track of the engine speed sensor target (15)is not damaged or scratched.
Replace any components that are defective
(if necessary).
XSARA PICASSO
Angl.-t2-page240-282-2005 9/01/06 10:16 Page 255
Page 262 of 462
Downloaded from www.Manualslib.com manuals search engine 256
ENGINE
CHECKING AND SETTING THE VALVE TIMING
Engines: 9HZ - 9HY
B1EP1E7D
Refitting.
Fit the timing belt on the crankshaft pinion.
Position the belt on the guide roller, belt well tensioned.
Refit:
- The timing belt protector (13).
- The engine speed sensor(14).
Reposition the timing belt, strip «f»well tensioned, in the following sequence:
- Guide roller (16).
- Camshaft pulley (20).
- Fuel high pressure pump pulley (19).
- Coolant pump pulley (17).
- Tensioner roller (18).
XSARA PICASSO
Angl.-t2-page240-282-2005 9/01/06 10:16 Page 256
Page 263 of 462

Downloaded from www.Manualslib.com manuals search engine 257
ENGINE
CHECKING AND SETTING THE VALVE TIMING
Engines: 9HZ - 9HY
B1EP1E8C
Adjusting the timing belt tension.
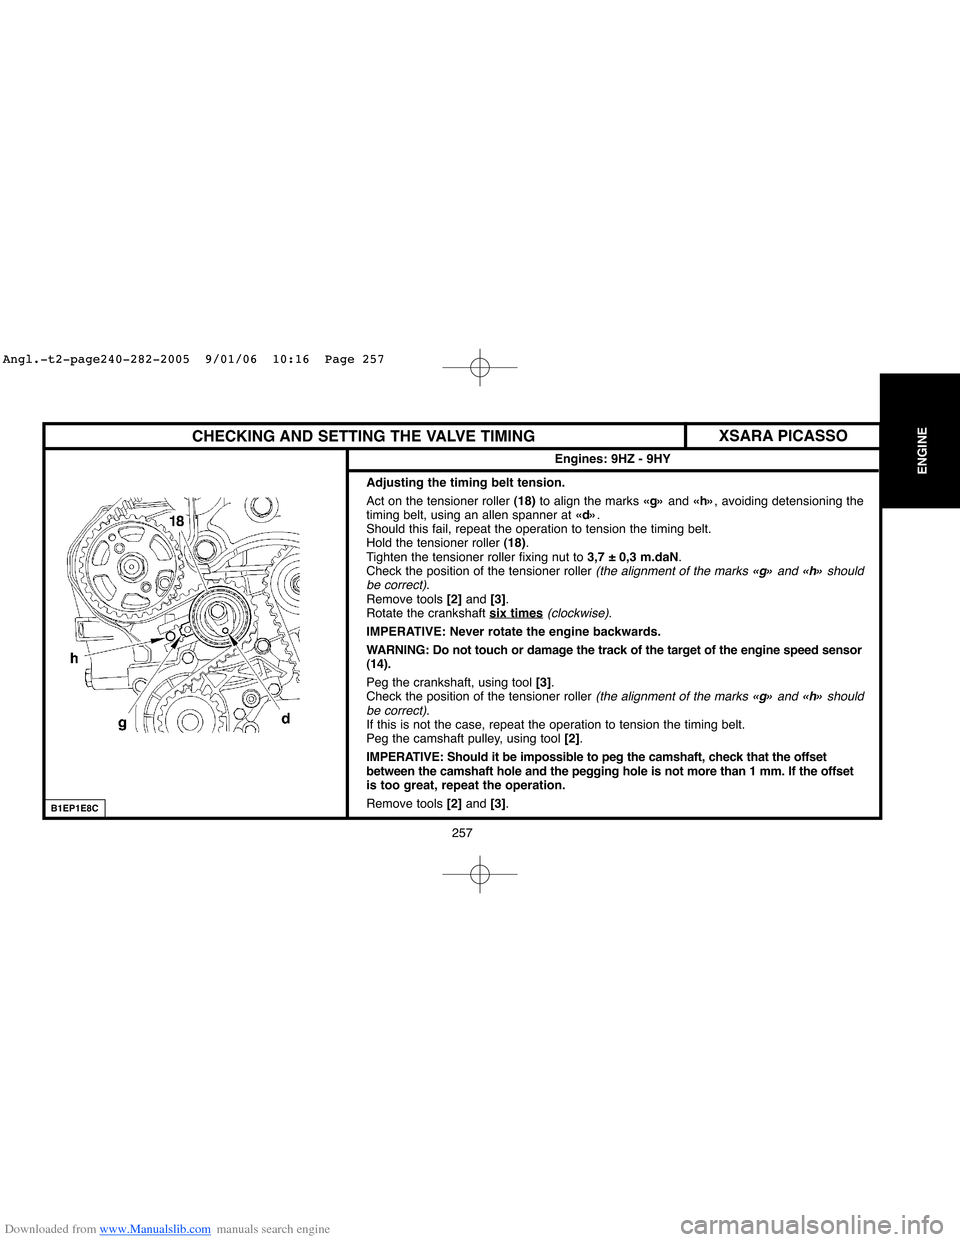
Act on the tensioner roller (18)to align the marks «g»and «h», avoiding detensioning the
timing belt, using an allen spanner at «d».
Should this fail, repeat the operation to tension the timing belt.
Hold the tensioner roller (18).
Tighten the tensioner roller fixing nut to 3,7 ± 0,3 m.daN.
Check the position of the tensioner roller
(the alignment of the marks «g»and «h»should
be correct).
Remove tools [2] and [3].
Rotate the crankshaft six times
(clockwise).
IMPERATIVE: Never rotate the engine backwards.
WARNING: Do not touch or damage the track of the target of the engine speed sensor
(14).
Peg the crankshaft, using tool[3].
Check the position of the tensioner roller
(the alignment of the marks «g» and «h»should
be correct).
If this is not the case, repeat the operation to tension the timing belt.
Peg the camshaft pulley, using tool [2].
IMPERATIVE: Should it be impossible to peg the camshaft, check that the offset
between the camshaft hole and the pegging hole is not more than 1 mm. If the offset
is too great, repeat the operation.
Remove tools [2] and [3].
XSARA PICASSO
Angl.-t2-page240-282-2005 9/01/06 10:16 Page 257
Page 267 of 462
Downloaded from www.Manualslib.com manuals search engine 261
ENGINE
CHECKING AND SETTING THE VALVE TIMING
Engine: WJY
Setting the timing (continued).
Peg the camshaft hub, using tool[4].
Peg the injection pump hub, using tool[3].
Slacken screws (5)and (6).
Slacken screw (9)of the tensioner roller (8).
Remove the timing belt.
Refitting.
Retighten screws (5)and (6) by hand.
Turn the pinions (10)and(7)clockwise in order to place them at end of slots.
Fit the timing belt on the crankshaft.
Hold the belt, using tool [5].
Position the timing belt in the following sequence:
- Guide roller (11).
- Injection pump pinion (7).
- Camshaft pinion (10).
- Coolant pump pinion (12).
- Tensioner roller (8).
B1EP16PDB1EP1EDCB1EP132C
XSARA
B1EP1EEC
Angl.-t2-page240-282-2005 9/01/06 10:16 Page 261
Page 268 of 462

Downloaded from www.Manualslib.com manuals search engine 262
ENGINECHECKING AND SETTING THE VALVE TIMING
Engine: WJY
B1EP1EDC
Setting the timing (continued).
NOTE:If necessary, you can slightly rotate the pinions (10)and (7)anti-clockwise in order to engage the belt.
The angular displacement value of the belt in relation to the pinions should not be more than half a tooth.
Remove tool [5].
Act on the tensioner roller (8)by its square «a», using tool [6]to check that the camshaft and injection
pump pinions can turn freely.
Position the belt tension instrument [7]on the belt at «b».
Using tool [6], act at «a»in the direction opposite to that of engine rotation, to obtain a tension value of
106 ± 2 SEEMunits.
Tighten screws (9), (5) and (6).
Remove tools [7], [2], [3]and [4].
Rotate the crankshaft 8 times
in the normal direction of rotation.
Peg the flywheel, using tool [2].
Peg the camshaft hub, using tool [4].
Peg the injection pump hub, using tool [3].
Slacken screws (9), (5)and (6).
Position the belt tension instrument [7]on the belt at «b».
Using tool [6], act at «a»in the direction opposite to that of engine rotation, to obtain a tension value of
42 ± 2 SEEMunits.
B1EP1EFC
XSARA
Angl.-t2-page240-282-2005 9/01/06 10:16 Page 262
Page 269 of 462

Downloaded from www.Manualslib.com manuals search engine 263
ENGINE
CHECKING AND SETTING THE VALVE TIMING
Engine: WJY
Setting the timing (continued).
Tighten:
- Screw (9)to 2.1 ± 0.2 m.daN.
- Screws (5)to 2,3 ± 0.2 m.daN.
- Screws (6)to 2,3 ± 0.2 m.daN.
- Remove and refit tool [7].
- The tension value should be between 38 and 46 SEEMunits.
- Remove tools [7], [2], [3]and [4].
- Turn the crankshaft 2 times
in the normal direction of rotation.
- Peg the flywheel, using the peg [2].
- Visually check the peggings of the camshaft and injection pump.
ESSENTIAL: Visually check that the offsets between the holes of
the camshaft and injection pump hubs and the corresponding
pegging holes are not more than 1 mm. If necessary, recommence
the procedure for fitting the timing belt.
XSARA
Setting the timing (continued).
Remove the peg [2].
Remove the screw (4)and the washer.
Refit the lower cover (3).
Refit the intermediate cover (2).
Refit the upper cover (1).
Remove the RH engine support.
Take away the workshop hoist.
Remove the plugs and recouple the diesel fuel delivery and return
hoses.
Refit the accessories drive belt
(see corresponding operation).
Refit the RH lower splash-shield.
Disengage 5th gear.
Connect the battery.
Angl.-t2-page240-282-2005 9/01/06 10:16 Page 263