Page 52 of 291

▫Multi-Function Control Lever..............66
▫Headlights, Parking Lights, Instrument Panel
Lights..............................66
▫Automatic Headlights—If Equipped.........67
▫Daytime Running Lights (Canada Only)......67
▫Lights-On Reminder....................67
▫Fog Lights—If Equipped................67
▫Turn Signals..........................67
▫Headlight Beam Select Switch.............68
▫Flash To Pass.........................68
▫Headlight Time Delay...................68
�Windshield Wipers And Washers...........68
▫Mist................................69
▫Speed Sensitive Intermittent Wiper System....69
�Tilt Steering Column.....................70
�Traction Control—If Equipped.............71
�Electronic Speed Control—If Equipped......71
▫To Activate...........................72
▫To Set At A Desired Speed................72
▫To Deactivate.........................72
▫To Resume Speed......................72
▫To Vary The Speed Setting................72
▫To Accelerate For Passing................73
▫Using Speed Control On Hills.............73
�Garage Door Opener—If Equipped.........74
▫Programming The Universal Transceiver......75
▫“Rolling Code”Programming.............76
▫Canadian Programming/Gate Programming . . .78
▫Operation............................78
▫Reprogramming A Single Button...........78
▫Security.............................78
52 UNDERSTANDING THE FEATURES OF YOUR VEHICLE
Page 57 of 291
CAUTION!
To avoid damage to the mirror during cleaning,
never spray any cleaning solution directly onto the
mirror. Apply the solution onto a clean cloth and
wipe the mirror clean.
Electric Remote-Control Mirrors—If Equipped
Both of the outside mirrors can be adjusted by using the
remote controls mounted on the instrument panel to the
left of the steering wheel.
NOTE:Place the mirror selector switch in the center
(neutral) position to prevent accidental movement of the
mirrors.
Outside Mirror—Driver’s Side
Adjust the outside mirror to center on the adjacent lane of
traffic, with a slight overlap of the view obtained on the
inside mirror.
Power Mirror Controls
UNDERSTANDING THE FEATURES OF YOUR VEHICLE 57
3
Page 63 of 291
TO OPEN AND CLOSE THE HOOD
To open the hood, two latches must be released. First pull
the hood release lever located under the left side of the
instrument panel.
Then lift the secondary latch located under the front edge
of the hood, near the center and raise the hood.Use the hood prop rod to secure the hood in the open
position. Place the upper end of the prop rod in the hole
marked“prop”on the underside of the hood.
To prevent possible damage, do not slam the hood to
close it. Use a firm downward push at the center of the
hood to ensure that both latches engage.
Hood Release Lever
Hood Safety Catch
UNDERSTANDING THE FEATURES OF YOUR VEHICLE 63
3
Page 64 of 291

WARNING!
If the hood is not fully latched it could fly up when
the vehicle is moving and block your forward vision.
You could have a collision. Be sure all hood latches
are fully latched before driving.
LIGHTS
Interior Lights
The map/courtesy lights come on when a door is opened
and the panel lamp dimmer switch (located on the turn
signal control stalk) is in any detent except fully counter-
clockwise (dome lamp ON position) or fully clockwise
(dome lamp OFF position). Rotating the panel dimmer
switch fully counter-clockwise will turn on the lights.
Turn the panel dimmer switch fully clockwise to prevent
the lights from coming on when a door is opened.
NOTE:The interior lights have a“fade to off”feature.
When the lights are turned off, they gradually“fade”off.
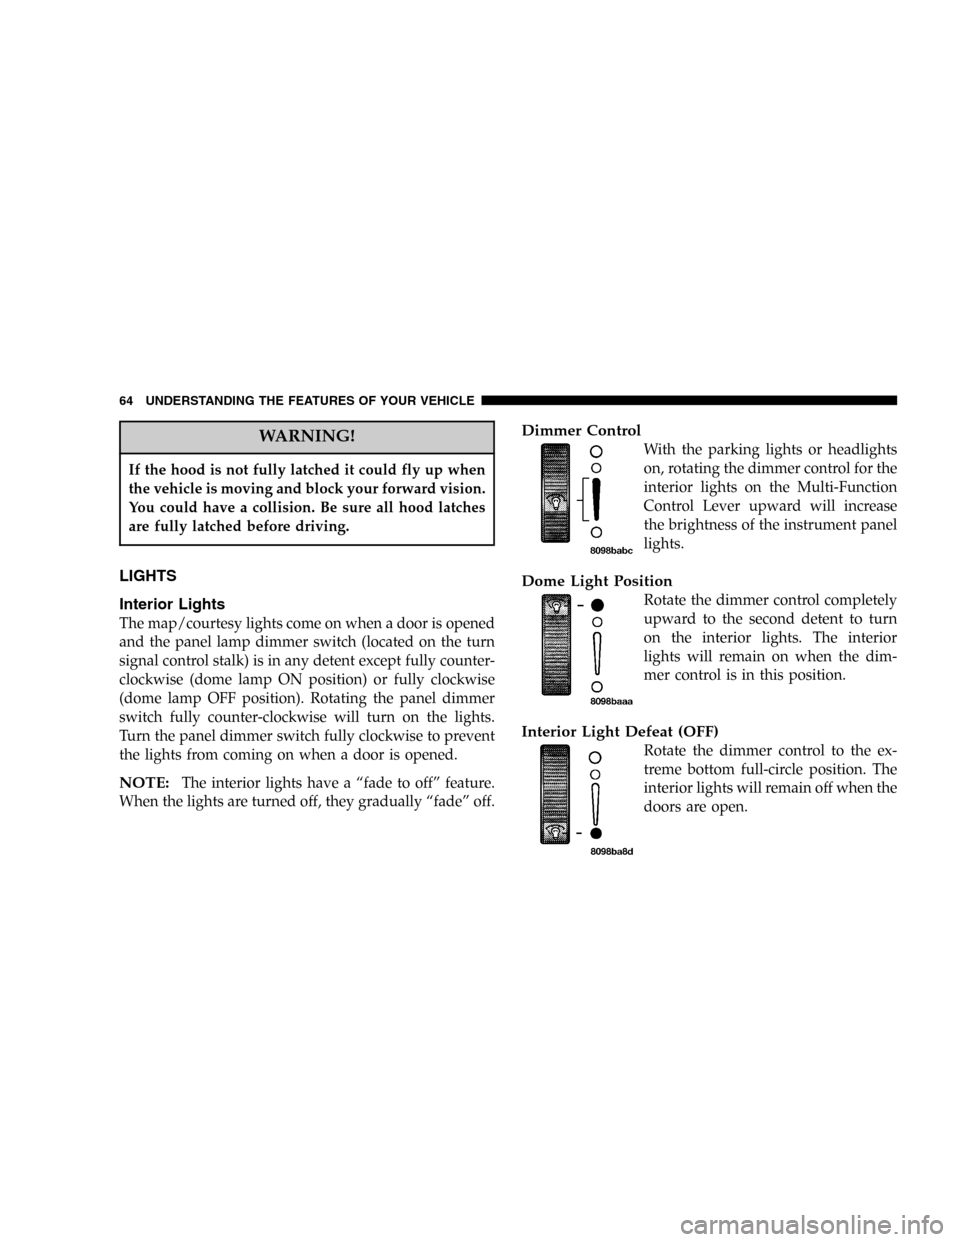
Dimmer Control
With the parking lights or headlights
on, rotating the dimmer control for the
interior lights on the Multi-Function
Control Lever upward will increase
the brightness of the instrument panel
lights.
Dome Light Position
Rotate the dimmer control completely
upward to the second detent to turn
on the interior lights. The interior
lights will remain on when the dim-
mer control is in this position.
Interior Light Defeat (OFF)
Rotate the dimmer control to the ex-
treme bottom full-circle position. The
interior lights will remain off when the
doors are open.
64 UNDERSTANDING THE FEATURES OF YOUR VEHICLE
Page 66 of 291
Multi-Function Control Lever
The Multi-Function lever controls the operation of the
headlights, turn signals, headlight beam select switch,
instrument panel light dimming, courtesy lights, passing
lights, dome light and fog lights.
Headlights, Parking Lights, Instrument Panel
Lights
Turn the end of the Multi-Function lever to the first
detent for parking light operation. Turn to the second
detent for headlight operation.To change the brightness of the instrument panel lights,
turn the center portion of the lever up or down. Turning
the dimmer control to the full up position also turns on
the courtesy lights. Turning the dimmer control to the full
down position prevents the courtesy lights from coming
on when a door is opened.
Multi-Function Lever
Multi-Function Lever
66 UNDERSTANDING THE FEATURES OF YOUR VEHICLE
Page 81 of 291

Sunshade Operation
The sunshade can be opened manually. However, the
sunshade will open automatically as the sunroof opens.
NOTE:The sunshade cannot be closed if the sunroof is
open.
Wind Buffeting
Wind buffeting can be described as the perception of
pressure on the ears or a helicopter type sound in the
ears. Your vehicle may exhibit wind buffeting with the
windows down, or the sunroof (if so equipped) in certain
open or partially open positions. This is a normal occur-
rence and can be minimized. If the buffeting occurs with
the rear windows open, open the front and rear windows
together to minimize the buffeting. If the buffeting occurs
with the sunroof open, adjust the sunroof opening to
minimize the buffeting.
Sunroof Maintenance
Use only a non abrasive cleaner and a soft cloth to clean
the glass panel.
Sunroof Fully Closed
Press and hold the switch forward until the sunroof stops
completely to ensure that the sunroof is fully closed.
ELECTRICAL POWER OUTLET
The power outlet is located in the lower center of your
instrument panel. If your vehicle is equipped with heated
seats, a second power outlet is located inside the center
console. All accessories connected to any outlet should be
removed or turned off when the vehicle is not in use.
UNDERSTANDING THE FEATURES OF YOUR VEHICLE 81
3
Page 83 of 291

UNDERSTANDING YOUR INSTRUMENT PANEL
CONTENTS
�Instruments And Controls.................87
�Instrument Cluster Standard...............88
�Instrument Cluster Premium...............89
�Instrument Cluster Description.............90
�Compass, Temperature, And Trip Computer
Display—If Equipped
...................95
▫Control Buttons.......................96
▫Trip Conditions........................96
▫Compass Temperature Display.............97
�Cigar Lighter/Ashtray...................99
�Electronic Digital Clock..................99
▫To Set The Clock......................100
�Radio General Information...............100
▫Radio Broadcast Signals.................100
▫Two Types Of Signals..................100
▫Electrical Disturbances..................100
▫AM Reception.......................100
▫FM Reception........................100
�Sales Code RAZ—AM/ FM Stereo Radio With
Cassette Tape Player, CD Player And CD
Changer Controls
......................101
▫Operating Instructions—Radio...........101
▫Power Switch, Volume Control............101
▫Seek Button (Radio Mode)...............101
4
Page 84 of 291

▫Tuning.............................101
▫Radio Data System (RDS)...............101
▫PTY (Program Type) Button..............102
▫Balance............................103
▫Fade..............................103
▫Tone Control........................103
▫AM/FM Selection.....................103
▫Scan Button.........................103
▫To Set The Radio Push-Button Memory......104
▫To Change From Clock To Radio Mode......104
▫Operating Instructions—Tape Player.......104
▫Seek Button.........................104
▫Fast Forward (FF).....................105
▫Rewind (RW)........................105
▫Tape Eject...........................105
▫Scan Button.........................105▫Changing Tape Direction................105
▫Metal Tape Selection...................105
▫Pinch Roller Release...................105
▫Noise Reduction......................105
▫Operating Instructions—CD Player........106
▫Inserting The Compact Disc..............106
▫Seek Button.........................107
▫EJT CD (Eject) Button..................107
▫FF/Tune/RW........................107
▫Program Button 4 (Random Play)..........107
▫Mode..............................107
▫Tape CD Button......................108
▫Time Button.........................108
▫Scan Button.........................108
▫CD Changer Control Capability—
If Equipped.........................108
84 UNDERSTANDING YOUR INSTRUMENT PANEL