Page 214 of 280

CAUTION!
Do not allow petroleum-based fluid to contaminate
the brake fluid as seal damage will result!
Automatic Transmission
The fluid in the automatic transmission should be
changed at 80,000 miles (129,000 km), along with the
transmission fluid filter. After that, the transmission fluid
is filled for life.
Selection of Lubricant
It is important that the proper lubricant is used in the
transmission to assure optimum transmission perfor-
mance. Use only ATF approved to MB 236.10, MB 236.12.
Synthetic Dexron III�Automatic Transmission Fluid may
be substituted. Refer to the Recommended Fluids, Lubri-
cants and Genuine Parts section for the correct fluid type.
It is important that the transmission fluid be maintained
at the prescribed level using the recommended fluid.
CAUTION!
Using a transmission fluid other than the fluid
recommended by DaimlerChrysler Corporation may
cause deterioration in transmission shift quality
and/or torque converter shudder. Using a transmis-
sion fluid other than that recommended by the
DaimlerChrysler Corporation will result in more
frequent fluid and filter changes. Refer to the Rec-
ommended Fluids, Lubricants and Genuine Parts
section for correct fluid type.
Fluid Level Check
Regular automatic transmission fluid level checks and
changes are not required. For this reason the dipstick is
omitted.
If you notice fluid loss or gear shift malfunction, have
your authorized dealer check the transmission fluid level.
Fluid and Filter Changes
Automatic transmission fluid and filter should be
changed at 80,000 miles (129,000 km). The fluid is then
filled for life.
214 MAINTAINING YOUR VEHICLE
Page 221 of 280

Wet Cleaning
Wash with clear water or with a mild detergent and an
ample supply of luke warm water by wiping with a
soft-bristled brush or sponge from front to rear. Then
rinse thoroughly with clear water.
Allow the top to dry before lowering. Vacuuming the top
with a wet/dry shop vacuum will decrease the top’s
drying time, ensure removal of all dirt, and delete streaks
in the material. Multiple cleanings may be necessary to
remove stubborn stains. If stains persist, contact your
local dealership for further suggestions.
Weather Strip Care
Lubricate all top and door glass weather strips periodi-
cally with Mopar Weather Strip Lubricant (part number
4773427), to keep them soft and pliable.
FUSES
Underhood Accessory Fuse Block Fuses
The underhood accesseory fuse block fuses are located
under the hood on the driver’s side, between the brake
master cylinder and the left front fender.
To remove the lid, squeeze the tabs together located at the
front of the fusebox. Then lift the lid up by the tabs. The
lid will then slide off the top of the fuse box. To replace
the lid, place the two hinge-like tabs at the rear of the lid
under the tabs on the fusebox. Push down on the front of
the lid until the tabs at the front click.
MAINTAINING YOUR VEHICLE 221
7
Page 227 of 280
Interior Fuses
Cavity Fuse Circuits
1 Not Assigned
2 15 Amp Blue Brake Lamp/Speed Control
3 7.5 Amp
BrownRight High Beam, High Beam
Indicator Light
4 15 Amp Blue Reverse/Turn signal Light
Cavity Fuse Circuits
5 7.5 Amp
BrownLeft High Beam
6 15 Amp Blue Right Low Beam
7 7.5 Amp
BrownRight Parking/Tail Light Side
Marker
8 15 Amp Blue Left Low Beam
9 15 Amp Blue Fog Light
10 7.5 Amp
BrownLeft Parking/Tail Light Side
Marker
11 7.5 Amp
BrownLicense Plate/Instrument
Cluster Lighting/Symbol
Lighting
12 Not Used - Spare Fuse
13 Not Used - Spare Fuse
14 Not Used - Spare Fuse
MAINTAINING YOUR VEHICLE 227
7
Page 232 of 280

•If the vehicle will be subjected to freezing tempera-
tures, remove the battery and store it in a dry, well-
ventilated place. If the vehicle is not going to be driven
in the next three weeks, follow the battery recharge
procedure in the Service Manual, then disconnect the
battery at the negative terminal.
CAUTION!
Use care when disconnecting the remote positive
cable. It is connected to the battery and can short out
to any metal on the vehicle. Always tape or wrap the
exposed cable end to prevent electrical shorts.
Disconnecting the battery causes the engine control sys-
tem to lose memory of some“learned”functions. The
engine may run rough when first started after a battery
disconnect until the control module“relearns”these
functions.Check the battery every four to six weeks to ensure that
the voltage is above 12.40. Voltage will drop more rapidly
in hot temperatures. If battery voltage drops below 12.40,
follow the battery recharge procedure in the Service
Manual.
•Check that the radiator coolant level of protection is to
at least -20°F (-29°C).
•Block the wheels. Do not apply the parking brake.
•Make sure that all tires are inflated to the optimum
pressure.
•Cut blocks of plywood about the same size of the tires.
Cover each block with indoor/outdoor carpeting and
place them between the tires and concrete. This will
prevent tire flat spotting.
•For long term storage, remove the tires and put the
vehicle up on blocks. Stack the tires on plywood and
cover with a tarp to prevent flat spotting.
•Move the wiper blades away from the windshield.
232 MAINTAINING YOUR VEHICLE
Page 235 of 280
FLUID CAPACITIES
Metric U.S.
Fuel (Approximate)60.0 Liters 15.8 Gallons
Fuel Tank Reserve8.0 Liters 2.1 Gallons
Engine Oil (with filter)
3.2 L Supercharged Engine 8.0 Liters 8.5 Qts.
Cooling System *
3.2 L Supercharged Engine 14.5 Liters 15.3 Qts.
Automatic Transmission8.0 Liters 8.5 Qts.
Rear Axle1.3 Liters 1.4 Qts.
Power Steering Reservoir1.0 Liters 1.1 Qts.
Brake Reservoir.5 Liters .5 Qts.
Windshield Washer Reservoir7.0 Liters 7.4 Qts.
* Includes heater and coolant recovery bottle filled to MAX level.
MAINTAINING YOUR VEHICLE 235
7
Page 237 of 280
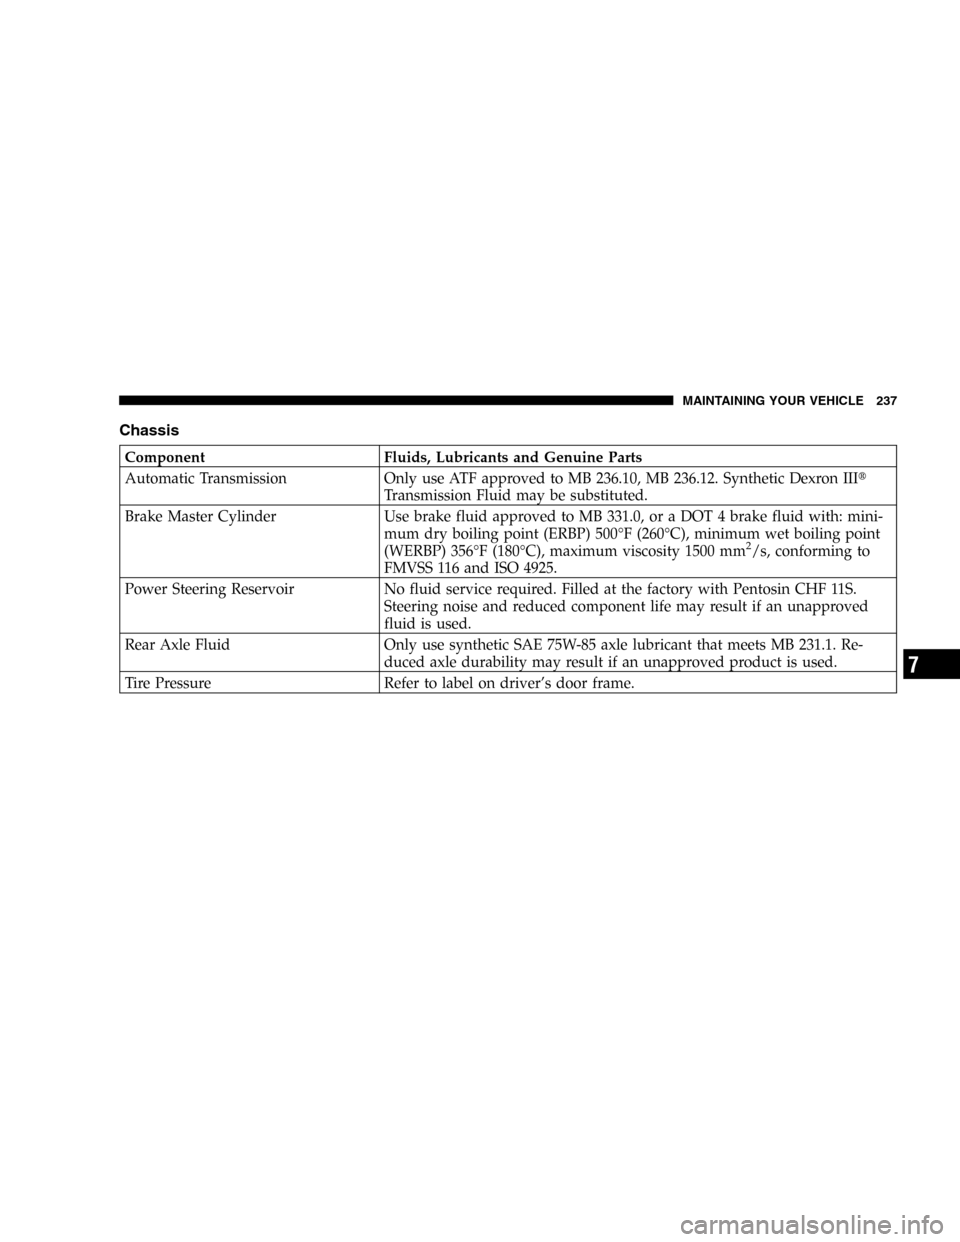
Chassis
Component Fluids, Lubricants and Genuine Parts
Automatic Transmission Only use ATF approved to MB 236.10, MB 236.12. Synthetic Dexron III�
Transmission Fluid may be substituted.
Brake Master Cylinder Use brake fluid approved to MB 331.0, or a DOT 4 brake fluid with: mini-
mum dry boiling point (ERBP) 500°F (260°C), minimum wet boiling point
(WERBP) 356°F (180°C), maximum viscosity 1500 mm
2/s, conforming to
FMVSS 116 and ISO 4925.
Power Steering Reservoir No fluid service required. Filled at the factory with Pentosin CHF 11S.
Steering noise and reduced component life may result if an unapproved
fluid is used.
Rear Axle Fluid Only use synthetic SAE 75W-85 axle lubricant that meets MB 231.1. Re-
duced axle durability may result if an unapproved product is used.
Tire Pressure Refer to label on driver’s door frame.
MAINTAINING YOUR VEHICLE 237
7
Page 242 of 280
—see Understanding
Your Instrument Panel section—should give you an
exact indication of when your vehicle should be sched-
uled for service and which schedule to")
Your Flexible Service System (FSS)—see Understanding
Your Instrument Panel section—should give you an
exact indication of when your vehicle should be sched-
uled for service and which schedule to follow.
Additional Periodic Maintenanceitems should also be
performed beyond the items listed in the following charts
to assure the optimum performance of your Crossfire.
SCOPE OF WORK FOR“A”SCHEDULE
MAINTENANCE SERVICE
Oil Change
•Change oil and replace filter
Maintenance
•Lubricate hood hinges, latch, and secondary latch
•Reset FSS Display
Function Check
•Horn, hazard warning flashers, turn signals, and indi-
cator lamps
•Headlamps and exterior lighting
•Windshield wipers and washer system
Inspection
•Check front and rear brake pads for lining thickness
•Check tires for damage and general condition
•Check tire inflation pressures and correct if necessary
Fluid Levels
Check fluid levels for the following systems and correct if
necessary. Should there be a loss of fluid that cannot be
explained by regular use, trace and eliminate the cause.
•Engine cooling system (check corrosion inhibitor/
antifreeze)
•Hydraulic brake system
•Power steering system
•Windshield washer system
242 MAINTENANCE SCHEDULES
8
M
A
I
N
T
E
N
A
N
C
E
S
C
H
E
D
U
L
E
S
Page 243 of 280

SCOPE OF WORK FOR“B”SCHEDULE
MAINTENANCE SERVICE
Oil Change
•Change oil and replace filter
Maintenance
•Rotate tires
•Replace dust filter
•Lubricate hood hinges, latch, and secondary latch
•Reset FSS Display
Function Check
•Horn, hazard warning flashers, turn signals, and indi-
cator lamps
•Headlamps and exterior lighting
•Windshield wipers and washer system
•Check seat belts for damage and proper function
•Test hydraulic brakes and check parking brake func-
tionInspection
•Check front and rear brake pads for lining thickness
•Check condition of front and rear brake discs
•Check tires for damage and general condition
•Check tire inflation pressures and correct if necessary
•Check major underbody components for leakage or
damage (if there are signs of leakage, determine cause
and repair)
•Check condition of front axle ball joints and rubber
boots
•Check condition of steering components and rubber
boots
•Check underhood components for leakage or damage
(if there are signs of leakage determine cause and
repair)
•Check condition of accessory drive belt
•Check headlamp aiming, adjust if necessary
•Check windshield wiper blades, replace if necessary
MAINTENANCE SCHEDULES 243
8
M
A
I
N
T
E
N
A
N
C
E
S
C
H
E
D
U
L
E
S

60.0 Liters 15.8 Gallons
Fuel Tank Reserve8.0 Liters 2.1 Gallons
Engine Oil (with filter)
3.2 L Supercharged Engine 8.0 Liters 8.5 Qts.
Cooling System *")