Page 220 of 280
Washing
CAUTION!
•Remove bird droppings immediately. The organic
acid can damage the material and cause the top to
leak.
•Never use a power washer to clean the top, as you
may damage the top material.
•If an automatic car wash is used, never use hot-
wax.
Hand washing is highly recommended. Automatic car
washing equipment can damage the top material. If you
must use an automatic car wash, soft cloth systems are
preferred.
General Cleaning
CAUTION!
Do not use any of the following to clean the top:
•Gasoline
•Paint Thinner
•Tar and Stain Removers
•Glass Cleaner
•Similar Organic Solvents
•Abrasive Type Cleaners or Bleaches
The following methods are sufficient if the top is only
lightly soiled:
Dry Cleaning
Brush the dry top with a soft-bristled brush from front to
rear of the vehicle.
220 MAINTAINING YOUR VEHICLE
Page 224 of 280
Cavity Fuse Circuits
8 15 Amp
BlueRadio
9 10 Amp
RedRoof Light, Horn, Anti-Theft
Alarm, Cargo Lamp and Tire
Pressure Control
10 5 Amp
BeigeSpeed Control
11 15 Amp
BlueIgnition Coil 6 Cyl.
12 10 Amp
RedHeated Washer Nozzles
13 10 Amp
RedCharge Air Cooler Circulation
Pump
14 10 Amp
RedDiagnostic Socket
15 5 Amp
BeigeResidual Engine Heat Utilization
16 Spare
17 40 Amp
OrangeElectronic Stability ProgramCavity Fuse Circuits
18 40 Amp
OrangeElectronic Stability Program
19 40 Amp
OrangePower Window
20 30 Amp
GreenWiper Motor
21 30 Amp
GreenSeat Adjustment Right Side
22 30 Amp
GreenSeat Adjustment Left Side
23 15 Amp
BlueSound Booster (Amplifier)
24 30 Amp
GreenSeat Heater
25 20 Amp
YellowPneumatic Control Unit, Rear
Window Defroster
26 20 Amp
YellowCentral Locking
30 Spare (Coupe)
30 15 Amp
BlueRadio (Roadster)
224 MAINTAINING YOUR VEHICLE
Page 229 of 280

3. Release the spring clamps holding the bulb in place,
and pull out the bulb. Replace the bulb and reverse the
removal procedure exactly.
CAUTION!
Do not touch the new bulb with your fingers. Oil
contamination will severely shorten bulb life. If the
bulb comes in contact with an oily surface, clean the
bulb with rubbing alcohol.
Front Turn Signal and Parking/Standing Lights
•
Twist the bulb socket counterclockwise and pull out.
Push the bulb into the socket, turn counterclockwise
and remove.
•Replace the bulb, push in and twist clockwise. Rein-
stall the socket, and turn clockwise.
Front and Rear Sidemarker Lights
1. Push the front sidemarker assembly in and slide it
forward. Push the rear sidemarker assembly in and slide
rearward. The assembly will release from the fascia.
2. Twist the bulb socket counterclockwise and pull out.
Push the bulb into the socket, turn counterclockwise and
remove.
3. Replace the light, push in and twist clockwise.
MAINTAINING YOUR VEHICLE 229
7
Page 231 of 280

NOTE:Always test the operation of all lights after
service operations have been performed to validate an
effective repair.
Headlight Aiming
The headlights on your new vehicle were aimed at the
factory. The factory setting was made at a no load setting.
A great increase in weight will change the aiming and it
may be necessary to readjust the headlights if carrying an
excessive amount of weight in the rear cargo area. To
readjust the headlights first mark the position of the
headlights on a wall prior to loading the vehicle. Loadthe vehicle and then readjust the headlights to the
original position. If any further adjustments are neces-
sary contact your manufacturer’s dealer. A detailed ser-
vice procedure is contained in the manufacturer’s Service
Manual. Information on purchasing a Service Manual can
be found at the back of this Owner’s Manual.
VEHICLE STORAGE
We recommend that you follow these guidelines before
storing your Crossfire for extended periods.
•Fill the gas tank. This will prevent water condensation
inside the tank. If you plan on storing your vehicle
more than two months, add an anti-oxidant fuel
stabilizer to the gas tank.
•Change the oil to remove any corrosive combustion-
related acids in the crankcase.
•Wash and wax the vehicle to protect the finish.
•Cover the vehicle whenever possible to prevent acci-
dental damage to the finish.
•Store the vehicle in a dry, well-ventilated location.
MAINTAINING YOUR VEHICLE 231
7
Page 235 of 280
FLUID CAPACITIES
Metric U.S.
Fuel (Approximate)60.0 Liters 15.8 Gallons
Fuel Tank Reserve8.0 Liters 2.1 Gallons
Engine Oil (with filter)
3.2 L Supercharged Engine 8.0 Liters 8.5 Qts.
Cooling System *
3.2 L Supercharged Engine 14.5 Liters 15.3 Qts.
Automatic Transmission8.0 Liters 8.5 Qts.
Rear Axle1.3 Liters 1.4 Qts.
Power Steering Reservoir1.0 Liters 1.1 Qts.
Brake Reservoir.5 Liters .5 Qts.
Windshield Washer Reservoir7.0 Liters 7.4 Qts.
* Includes heater and coolant recovery bottle filled to MAX level.
MAINTAINING YOUR VEHICLE 235
7
Page 236 of 280
RECOMMENDED FLUIDS, LUBRICANTS AND GENUINE PARTS
Engine
Component Fluids, Lubricants and Genuine Parts
Engine Coolant Use coolant approved to MB 325.0, such as Valvoline GO5, or an equivalent
extended life coolant.
Engine Oil Only use synthetic engine oils, approved to MB 229.3 or MB 229.5, such as
Mobil 1 SAE 0W-40. The FSS may not alert for an oil change at the proper
interval if an unapproved engine oil is used; engine damage and reduced
engine life may result.
Engine Oil Filter Mopar�5102905AA or equivalent
Spark Plugs NGK IFR 6D10
Spark Plug Gap 0.039 in (1.0 mm)
Fuel Selection Premium Unleaded 91 Octane
236 MAINTAINING YOUR VEHICLE
Page 237 of 280
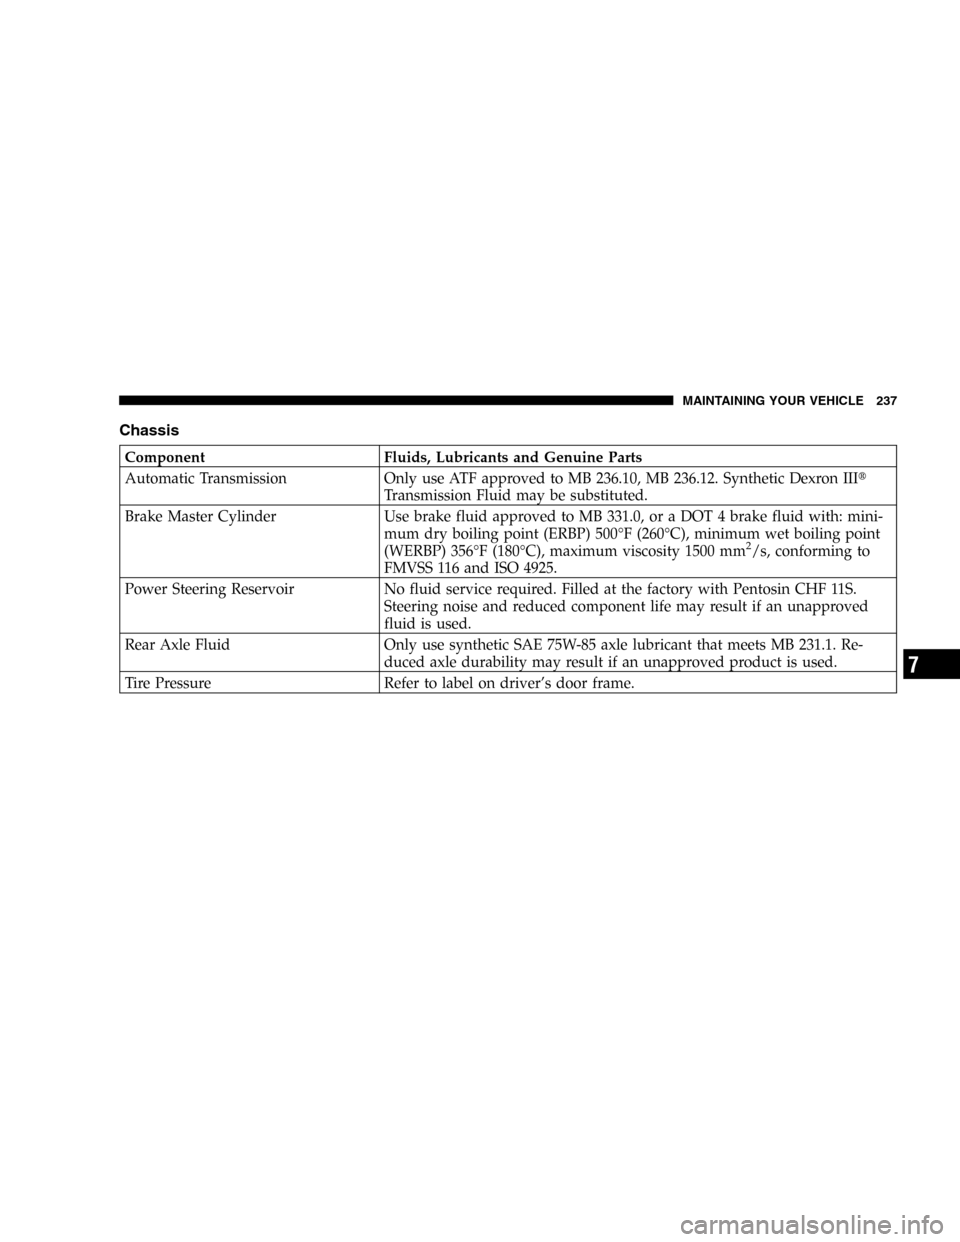
Chassis
Component Fluids, Lubricants and Genuine Parts
Automatic Transmission Only use ATF approved to MB 236.10, MB 236.12. Synthetic Dexron III�
Transmission Fluid may be substituted.
Brake Master Cylinder Use brake fluid approved to MB 331.0, or a DOT 4 brake fluid with: mini-
mum dry boiling point (ERBP) 500°F (260°C), minimum wet boiling point
(WERBP) 356°F (180°C), maximum viscosity 1500 mm
2/s, conforming to
FMVSS 116 and ISO 4925.
Power Steering Reservoir No fluid service required. Filled at the factory with Pentosin CHF 11S.
Steering noise and reduced component life may result if an unapproved
fluid is used.
Rear Axle Fluid Only use synthetic SAE 75W-85 axle lubricant that meets MB 231.1. Re-
duced axle durability may result if an unapproved product is used.
Tire Pressure Refer to label on driver’s door frame.
MAINTAINING YOUR VEHICLE 237
7
Page 239 of 280
MAINTENANCE SCHEDULES
CONTENTS
�Introduction..........................240
�Warranty............................240
�Emission Control System Maintenance......241
�Maintenance Schedules..................241
▫Scope Of Work For“A”Schedule Maintenance
Service.............................242
▫Scope Of Work For“B”Schedule Maintenance
Service.............................243
�FSS System...........................244
�Regular Check-Ups.....................246
▫Additional Periodic Maintenance..........247
�Special Maintenance Requirements.........248
▫Coolant............................248
▫Dust Filter For Heating/Ventilation
Replacement.........................248
�Engine Oil Change And Filter Replacement...2488
M
A
I
N
T
E
N
A
N
C
E
S
C
H
E
D
U
L
E
S


60.0 Liters 15.8 Gallons
Fuel Tank Reserve8.0 Liters 2.1 Gallons
Engine Oil (with filter)
3.2 L Supercharged Engine 8.0 Liters 8.5 Qts.
Cooling System *")