2005 CHRYSLER CARAVAN index
[x] Cancel search: indexPage 1997 of 2339
STRUCTURAL ADHESIVE
LOCATIONS
SPECIFICATIONS
SPECIFICATIONS - STRUCTURAL ADHESIVE
LOCATIONS
INDEX
DESCRIPTION FIGURE
UPPER COWL PLENUM, UPPER AND LOWER DASH PANEL 65
ROOF AND REAR QUARTER PANELS - LONG WHEEL BASE ONLY 66
FLOOR PAN - LONG WHEEL BASE ONLY 67
SUSPENSION HANGER REINFORCEMENTS - LONG WHEEL BASE ONLY 68
FRONT HINGE PILLAR REINFORCEMENTS - LONG WHEEL BASE ONLY 69
ROOF AND REAR QUARTER PANELS - SHORT WHEEL BASE ONLY 70
FLOOR PAN - SHORT WHEEL BASE ONLY 71
FRONT SIDE RAILS/OUTER CROSS MEMBER BRACKETS 72
OUTER ROOF PANEL/UPPER WINDSHIELD FRAME 73
COWL SIDE PANEL / BODY SIDE APERTURE, B-PILLAR / SLIDING DOOR TRACK
SUPPORT74
FRONT HINGE PILLAR REINFORCEMENT / COWL SIDE TAPPING PLATE 75
UPPER COWL PLENUM / UPPER AND LOWER DASH PANEL - RIGHT HAND DRIVE
ONLY76
23 - 218 BODY STRUCTURERS
Page 2007 of 2339
SPECIFICATIONS - STRUCTURAL ADHESIVE
LOCATIONS - FOLD-IN-FLOOR ONLY
INDEX
DESCRIPTION FIGURE
FRONT FLOOR PAN 77
LADDER COMPLETE (1 OF 3) 78
LADDER COMPLETE (2 OF 3) 79
LADDER COMPLETE (3 OF 3) 80
LOWER LADDER ASSEMBLY 81
MIDDLE FLOOR PAN (1 OF 2) 82
MIDDLE FLOOR PAN (2 OF 2) 83
SECOND AND THIRD ROW SEAT TUBS 84
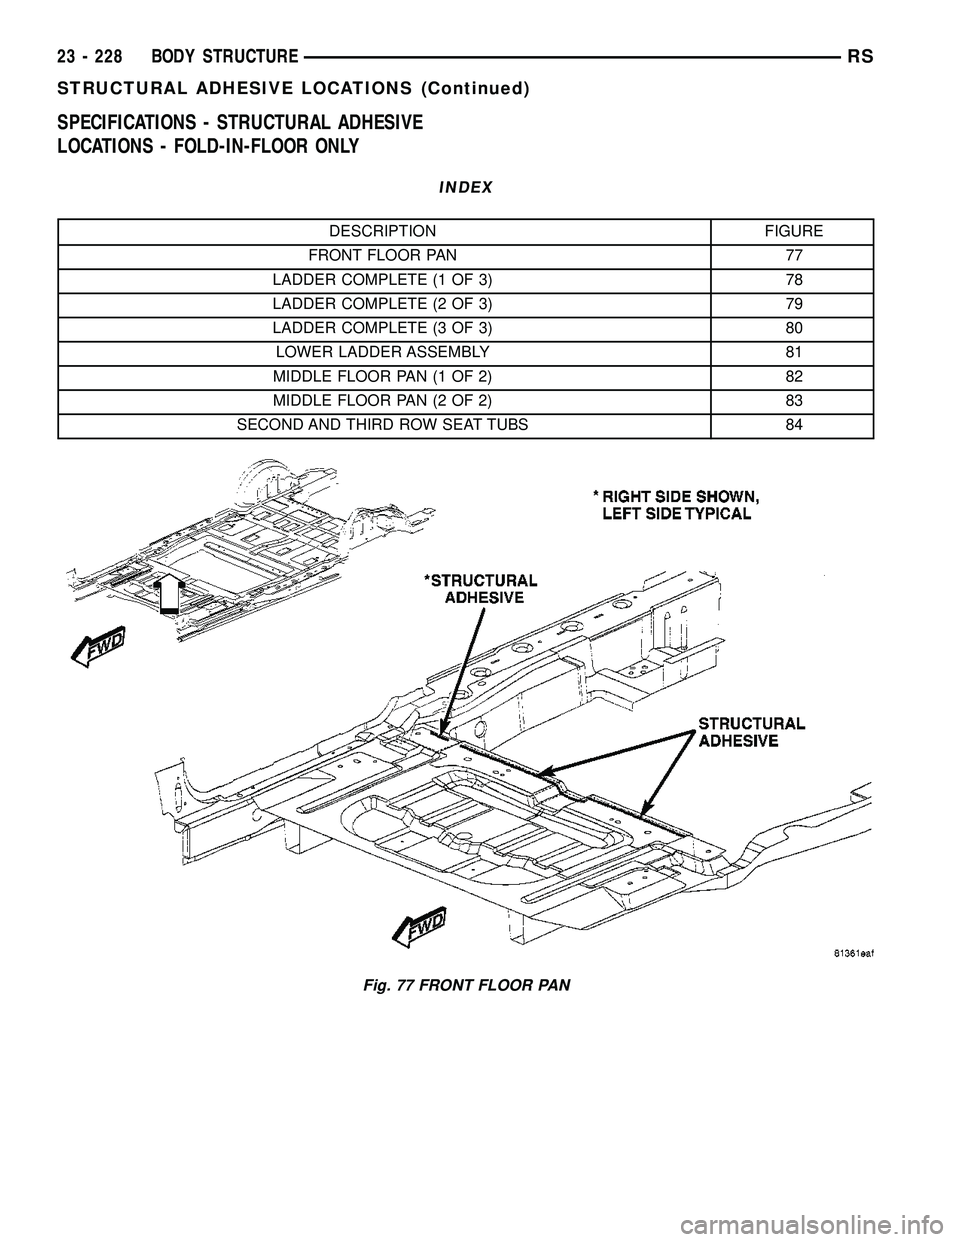
Fig. 77 FRONT FLOOR PAN
23 - 228 BODY STRUCTURERS
STRUCTURAL ADHESIVE LOCATIONS (Continued)
Page 2013 of 2339
WELD LOCATIONS
SPECIFICATIONS
SPECIFICATIONS - WELD LOCATIONS
INDEX
DESCRIPTION FIGURE
FRONT FENDER SHIELD - RIGHT 85
FRONT FENDER SHIELD - LEFT 86
STRUT TOWER AND REINFORCEMENTS - RIGHT 87
SUSPENSION RETAINERS AND REINFORCEMENTS - RIGHT 88
STRUT TOWER AND REINFORCEMENTS - LEFT 89
SUSPENSION RETAINERS AND REINFORCEMENTS - LEFT 90
FLOOR PAN REINFORCEMENTS - SIDE RAILS 91
REAR SUSPENSION BRACKETS 92
FLOOR PAN CROSS MEMBERS 93
SEAT REINFORCEMENTS - LONG WHEEL BASE ONLY 94
STRIKER REINFORCEMENTS - LONG WHEEL BASE ONLY 95
FUEL TANK MOUNTING/REAR SEAT AND SUSPENSION 96
REAR SUSPENSION HANGER BRACKETS - LONG WHEEL BASE 97
FRONT SEAT CROSS MEMBER 98
FLOOR PAN SIDE RAIL REINFORCEMENT 99
SILL BULKHEAD REINFORCEMENTS 100
FLOOR PAN CROSS MEMBER REINFORCEMENTS 101
FRONT SEAT CROSS MEMBER 102
SEAT REINFORCEMENT CROSS MEMBERS - SHORT WHEEL BASE 103
CENTER CONSOLE REINFORCEMENT - SHORT WHEEL BASE 104
REAR SUSPENSION HANGER BRACKETS - SHORT WHEEL BASE 105
LOWER LIFTGATE PANEL LATCH REINFORCEMENT 106
ENGINE MOUNTING PLATE AND TOW BRACKET 107
HEADLAMP MOUNTING PLATE 108
LOWER RADIATOR CROSS MEMBER BRACKETS 109
CROSS MEMBER EXTENSIONS 110
JACK MOUNTING BRACKET - LONG WHEEL BASE SHOWN, SHORT SIMILAR 111
FRONT SEAT CROSS MEMBER - LONG WHEELBASE ONLY 112
FRONT SEAT CROSS MEMBER - ALL WHEEL DRIVE ONLY 113
FUEL TANK SUPPORT CROSS MEMBERS - LONG WHEEL BASE ONLY 114
REAR SUPPORT AND TIRE STOWAGE CROSS MEMBERS - LONG WHEEL BASE
ONLY11 5
INNER SIDE SILLS - LONG WHEEL BASE ONLY 116
WHEELHOUSES, SIDE SILLS, SUSPENSION BRACKETS - LONG WHEEL BASE ONLY 117
REAR SEAT REINFORCEMENTS - SHORT WHEEL BASE ONLY 118
23 - 234 BODY STRUCTURERS
Page 2129 of 2339
SPECIFICATIONS - WELD LOCATIONS -
FOLD-IN-FLOOR
INDEX
DESCRIPTION FIGURE
LOWER LADDER (1 OF 4) 214
LOWER LADDER (2 OF 4) 215
LOWER LADDER (3 OF 4) 216
LOWER LADDER (4 OF 4) 217
MISCELLANEOUS WELDS (1 OF 2) 218
MISCELLANEOUS WELDS (2 OF 2) 219
UNDERBODY (1 OF 4) 220
UNDERBODY (2 OF 4) 221
UNDERBODY (3 OF 4) 222
UNDERBODY (4 OF 4) 223
UPPER LADDER (1 OF 2) 224
UPPER LADDER (2 OF 2) 225
UNDERBODY COMPLETE (1 OF 8) 226
UNDERBODY COMPLETE (2 OF 8) 227
UNDERBODY COMPLETE (3 OF 8) 228
UNDERBODY COMPLETE (4 OF 8) 229
UNDERBODY COMPLETE (5 OF 8) 230
UNDERBODY COMPLETE (6 OF 8) 231
UNDERBODY COMPLETE (7 OF 8) 232
UNDERBODY COMPLETE (8 OF 8) 233
LADDER COMPLETE (1 OF 6) 234
LADDER COMPLETE (2 OF 6) 235
LADDER COMPLETE (3 OF 6) 236
LADDER COMPLETE (4 OF 6) 237
LADDER COMPLETE (5 OF 6) 238
LADDER COMPLETE (6 OF 6) 239
23 - 350 BODY STRUCTURERS
WELD LOCATIONS (Continued)
Page 2173 of 2339
BLEND DOOR ACTUATOR
DESCRIPTION
The blend door actuators are reversible, 12-volt
Direct Current (DC), servo motors. Models with the
single zone heater and air conditioner system have a
single blend air door, which is controlled by a single
blend door actuator. Models with the optional dual
zone front heater and air conditioner system have
dual blend air doors, which are controlled by two
blend door actuators. The single zone blend door
actuator is located on the driver's side end of the
HVAC housing, close to the middle of the distribution
housing. In the dual zone system, the same blend
door actuator used for the single zone system
becomes the passenger blend door actuator, and is
mechanically connected to only the passenger side
blend air door. In the dual zone system, a second sep-
arate blend door actuator is also located on the
driver side end of the HVAC housing, close to the
middle of the distribution housing, and is mechani-
cally connected to only the driver's side blend air
door.
The blend door actuators are interchangeable with
each other, as well as with the actuators for the
mode door and the recirculation air door. Each actua-
tor is contained within an identical black molded
plastic housing with an integral wire connector
receptacle. Two integral mounting tabs allow the
actuator to be secured with two screws to the distri-
bution housing. Each actuator also has an identical
output shaft with splines that connects it to the link-
age that drives the proper blend air door. The blend
door actuators do not require mechanical indexing to
the blend door linkage, as they are electronically cal-
ibrated by the heater-A/C control module.
OPERATION
The blend door actuators are connected to the A/C-
heater control through the vehicle electrical system
by a dedicated two-wire lead and connector of the
HVAC wire harness. The blend door actuator(s) can
move the blend-air door(s) in two directions. When
the A/C-heater control pulls the voltage on one side
of the motor connection high and the other connec-
tion low, the blend-air door will move in one direc-
tion. When the A/C-heater control reverses the
polarity of the voltage to the motor, the blend-air
door moves in the opposite direction.
When the A/C-heater control makes the voltage to
both connections high or both connections low, the
blend-air door stops and will not move. The A/C-
heater control uses a feedback signal positioning sys-
tem to monitor the operation and relative position of
the blend door actuator(s) and the blend-air door(s).
The A/C-heater control learns the blend-air door stoppositions during the calibration procedure and will
store a diagnostic trouble code (DTC) for any prob-
lems it detects in the blend door actuator circuits.
The blend door actuators are diagnosed using a
scan tool (Refer to 24 - HEATING & AIR CONDI-
TIONING - DIAGNOSIS AND TESTING and to 24 -
HVAC Electrical Diagnostics for more information).
The blend door actuators cannot be adjusted or
repaired and, if faulty or damaged, they must be
replaced.
REMOVAL
WARNING: ON VEHICLES EQUIPPED WITH AIR-
BAGS, DISABLE THE AIRBAG SYSTEM BEFORE
ATTEMPTING ANY STEERING WHEEL, STEERING
COLUMN, OR INSTRUMENT PANEL COMPONENT
DIAGNOSIS OR SERVICE. DISCONNECT AND ISO-
LATE THE BATTERY NEGATIVE (GROUND) CABLE,
THEN WAIT TWO MINUTES FOR THE AIRBAG SYS-
TEM CAPACITOR TO DISCHARGE BEFORE PER-
FORMING FURTHER DIAGNOSIS OR SERVICE. THIS
IS THE ONLY SURE WAY TO DISABLE THE AIRBAG
SYSTEM. FAILURE TO TAKE THE PROPER PRE-
CAUTIONS COULD RESULT IN ACCIDENTAL AIR-
BAG DEPLOYMENT AND POSSIBLE PERSONAL
INJURY.
NOTE: The single zone heating and air conditioning
system is equipped with a single blend door actua-
tor. The dual zone system has two blend door
actuators, one for the driver side blend air door and
one for the passenger side blend air door. The
same service procedures can be used for each of
these actuators.
(1) Disconnect and isolate the battery negative
cable.
(2) Remove the silencer from beneath the driver
side end of the instrument panel. (Refer to 23 -
BODY/INSTRUMENT PANEL/INSTRUMENT
PANEL SILENCER - REMOVAL).
(3) Disconnect the wire harness connector from the
blend door actuator(s) (Fig. 11).
(4) Remove the two screws that secure the blend
door actuator to the distribution housing.
(5) Remove the blend door actuator.
INSTALLATION
(1) Position the blend door actuator onto the distri-
bution housing. If necessary, rotate the actuator
slightly to align the splines on the actuator output
shaft with those in the blend air door linkage.
(2) Install the two screws that secure the blend
door actuator to the housing. Tighten the screws to 2
N´m (17 in. lbs.).
24 - 22 CONTROLS - FRONTRS
Page 2180 of 2339
MODE DOOR ACTUATOR
DESCRIPTION
The mode door actuator is a reversible, 12-volt
Direct Current (DC), servo motor. The single mode
door actuator is located on the driver's side end of
the HVAC housing, close to the top of the distribution
housing. The mode door actuator is mechanically con-
nected to the mode door.
The mode door actuator is interchangeable with
the actuators for the blend air door(s) and the recir-
culation air door. Each actuator is contained within
an identical black molded plastic housing with an
integral wire connector receptacle. Two integral
mounting tabs allow the actuator to be secured with
two screws to the distribution housing. Each actuator
also has an identical output shaft with splines that
connects it to the linkage that drives the mode door.
The mode door actuator does not require mechanical
indexing to the mode door linkage, as it is electroni-
cally calibrated by the heater-A/C control module.
OPERATION
The mode door actuator is connected to the A/C-
heater control through the vehicle electrical system
by a dedicated two-wire lead and connector from the
HVAC wire harness. The mode door actuator can
move the mode door in two directions. When the A/C-
heater control pulls the voltage on one side of the
motor connection high and the other connection low,
the mode door will move in one direction. When the
A/C-heater control reverses the polarity of the volt-
age to the motor, the mode door moves in the oppo-
site direction. When the A/C-heater control makes
the voltage to both connections high or both connec-
tions low, the mode door stops and will not move.
These same motor connections also provide a feed-
back signal to the A/C-heater control. This feedback
signal allows the A/C-heater control to monitor the
operation and relative position of the mode door
actuator and the mode door. The A/C-heater control
learns the mode door stop positions during the cali-
bration procedure and will store a diagnostic trouble
code (DTC) for any problems it detects in the mode
door actuator circuits.
The mode door actuator can be diagnosed using a
DRBIIItscan tool. Refer to Body Diagnostic Proce-
dures for more information. The mode door actuator
cannot be adjusted or repaired and, if damaged or
faulty, it must be replaced.
REMOVAL
WARNING: ON VEHICLES EQUIPPED WITH AIR-
BAGS, DISABLE THE AIRBAG SYSTEM BEFORE
ATTEMPTING ANY STEERING WHEEL, STEERING
COLUMN, OR INSTRUMENT PANEL COMPONENT
DIAGNOSIS OR SERVICE. DISCONNECT AND ISO-
LATE THE BATTERY NEGATIVE (GROUND) CABLE,
THEN WAIT TWO MINUTES FOR THE AIRBAG SYS-
TEM CAPACITOR TO DISCHARGE BEFORE PER-
FORMING FURTHER DIAGNOSIS OR SERVICE. THIS
IS THE ONLY SURE WAY TO DISABLE THE AIRBAG
SYSTEM. FAILURE TO TAKE THE PROPER PRE-
CAUTIONS COULD RESULT IN ACCIDENTAL AIR-
BAG DEPLOYMENT AND POSSIBLE PERSONAL
INJURY.
(1) Disconnect and isolate the battery negative
cable.
(2) Remove the silencer from beneath the driver
side end of the instrument panel (Refer to 23 -
BODY/INSTRUMENT PANEL/INSTRUMENT
PANEL SILENCER - REMOVAL).
(3) Disconnect the wire harness connector from the
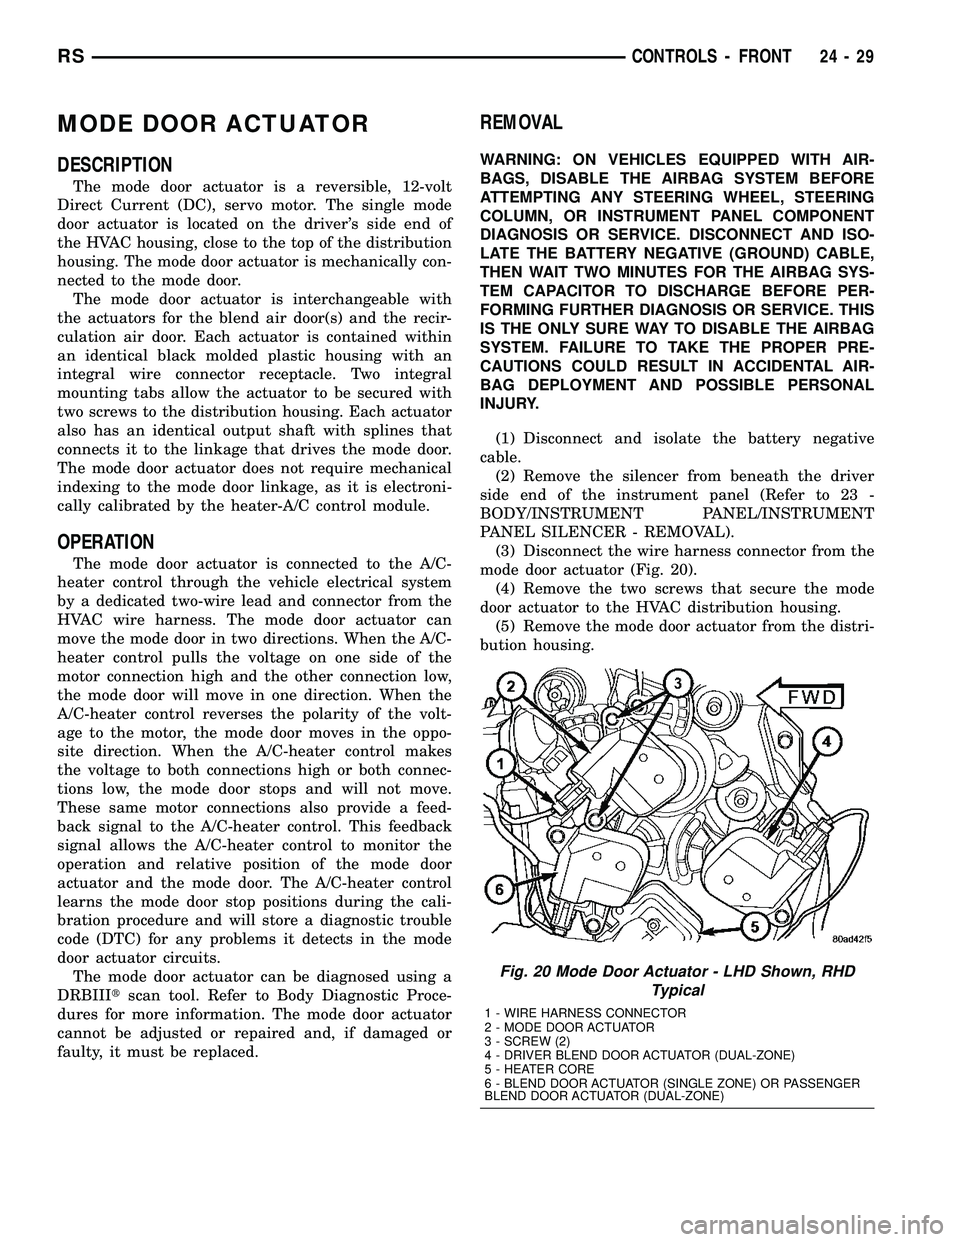
mode door actuator (Fig. 20).
(4) Remove the two screws that secure the mode
door actuator to the HVAC distribution housing.
(5) Remove the mode door actuator from the distri-
bution housing.
Fig. 20 Mode Door Actuator - LHD Shown, RHD
Typical
1 - WIRE HARNESS CONNECTOR
2 - MODE DOOR ACTUATOR
3 - SCREW (2)
4 - DRIVER BLEND DOOR ACTUATOR (DUAL-ZONE)
5 - HEATER CORE
6 - BLEND DOOR ACTUATOR (SINGLE ZONE) OR PASSENGER
BLEND DOOR ACTUATOR (DUAL-ZONE)
RSCONTROLS - FRONT24-29
Page 2182 of 2339
(1) Disconnect and isolate the negative battery
cable.
(2) Remove the glove box from the instrument
panel (Refer to 23 - BODY/INSTRUMENT PANEL/
GLOVE BOX - REMOVAL).
(3) Disconnect the two wire harness connectors
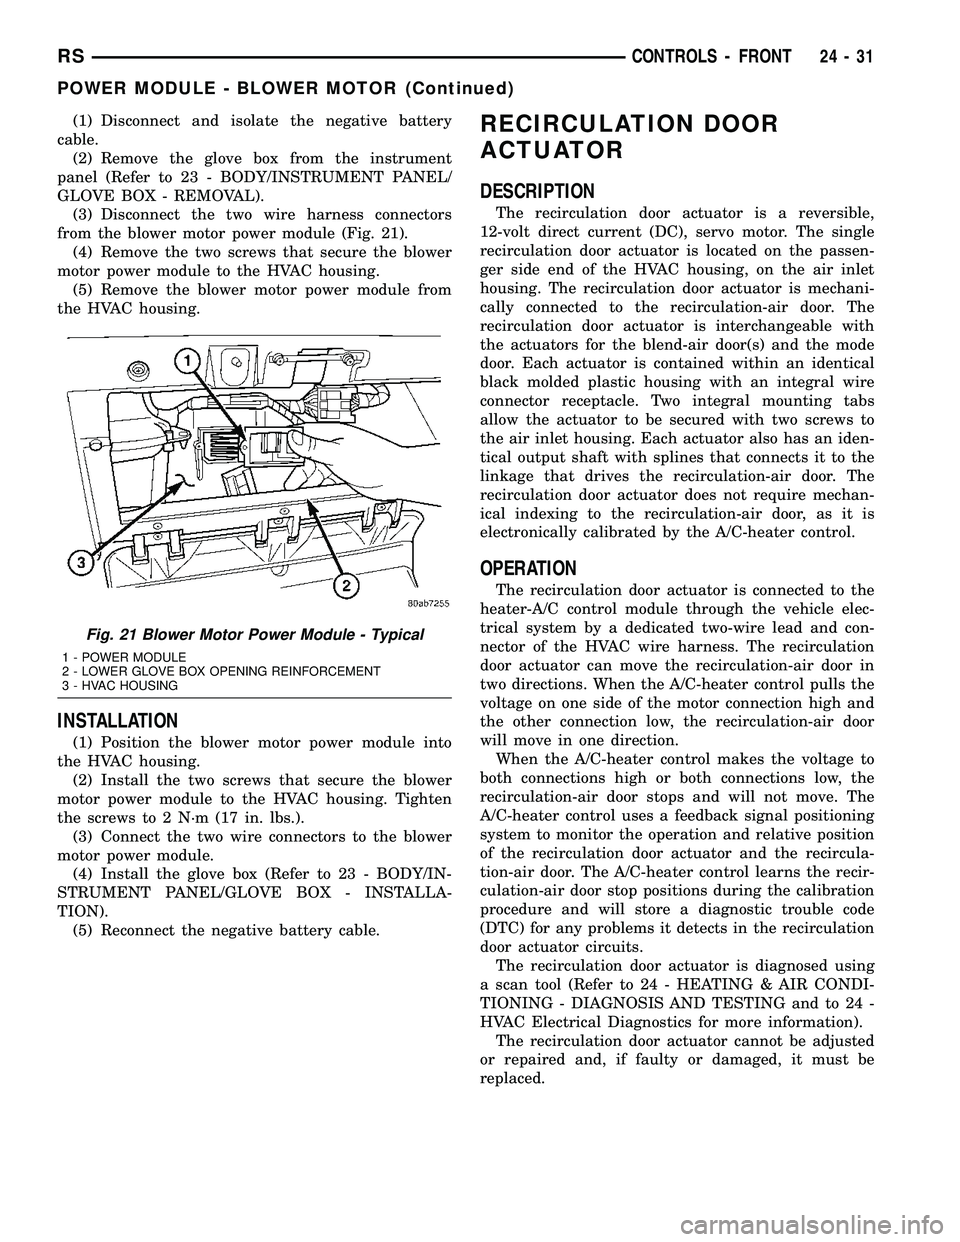
from the blower motor power module (Fig. 21).
(4) Remove the two screws that secure the blower
motor power module to the HVAC housing.
(5) Remove the blower motor power module from
the HVAC housing.
INSTALLATION
(1) Position the blower motor power module into
the HVAC housing.
(2) Install the two screws that secure the blower
motor power module to the HVAC housing. Tighten
the screws to 2 N´m (17 in. lbs.).
(3) Connect the two wire connectors to the blower
motor power module.
(4) Install the glove box (Refer to 23 - BODY/IN-
STRUMENT PANEL/GLOVE BOX - INSTALLA-
TION).
(5) Reconnect the negative battery cable.
RECIRCULATION DOOR
ACTUATOR
DESCRIPTION
The recirculation door actuator is a reversible,
12-volt direct current (DC), servo motor. The single
recirculation door actuator is located on the passen-
ger side end of the HVAC housing, on the air inlet
housing. The recirculation door actuator is mechani-
cally connected to the recirculation-air door. The
recirculation door actuator is interchangeable with
the actuators for the blend-air door(s) and the mode
door. Each actuator is contained within an identical
black molded plastic housing with an integral wire
connector receptacle. Two integral mounting tabs
allow the actuator to be secured with two screws to
the air inlet housing. Each actuator also has an iden-
tical output shaft with splines that connects it to the
linkage that drives the recirculation-air door. The
recirculation door actuator does not require mechan-
ical indexing to the recirculation-air door, as it is
electronically calibrated by the A/C-heater control.
OPERATION
The recirculation door actuator is connected to the
heater-A/C control module through the vehicle elec-
trical system by a dedicated two-wire lead and con-
nector of the HVAC wire harness. The recirculation
door actuator can move the recirculation-air door in
two directions. When the A/C-heater control pulls the
voltage on one side of the motor connection high and
the other connection low, the recirculation-air door
will move in one direction.
When the A/C-heater control makes the voltage to
both connections high or both connections low, the
recirculation-air door stops and will not move. The
A/C-heater control uses a feedback signal positioning
system to monitor the operation and relative position
of the recirculation door actuator and the recircula-
tion-air door. The A/C-heater control learns the recir-
culation-air door stop positions during the calibration
procedure and will store a diagnostic trouble code
(DTC) for any problems it detects in the recirculation
door actuator circuits.
The recirculation door actuator is diagnosed using
a scan tool (Refer to 24 - HEATING & AIR CONDI-
TIONING - DIAGNOSIS AND TESTING and to 24 -
HVAC Electrical Diagnostics for more information).
The recirculation door actuator cannot be adjusted
or repaired and, if faulty or damaged, it must be
replaced.
Fig. 21 Blower Motor Power Module - Typical
1 - POWER MODULE
2 - LOWER GLOVE BOX OPENING REINFORCEMENT
3 - HVAC HOUSING
RSCONTROLS - FRONT24-31
POWER MODULE - BLOWER MOTOR (Continued)
Page 2185 of 2339
INSTALLATION
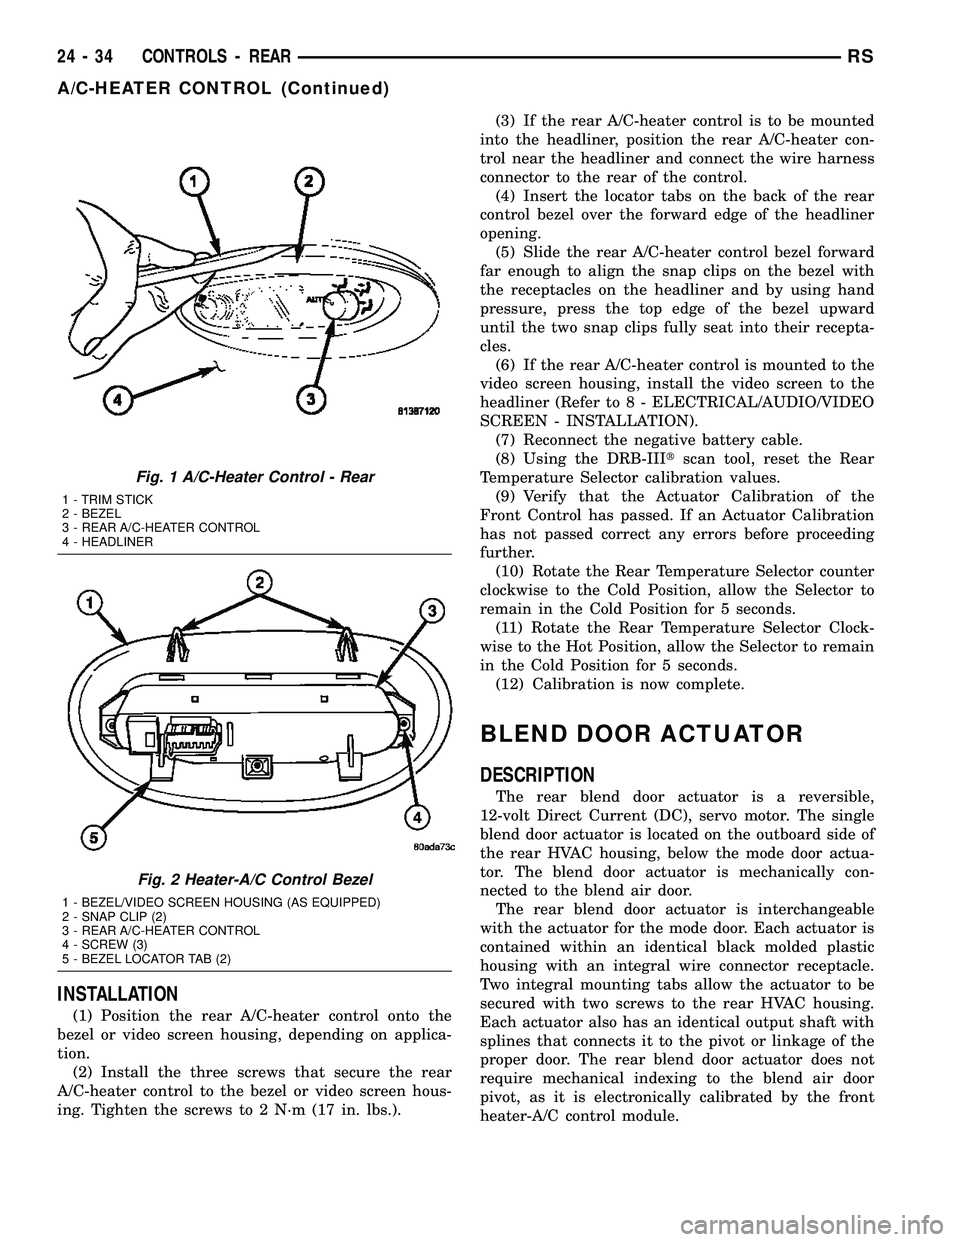
(1) Position the rear A/C-heater control onto the
bezel or video screen housing, depending on applica-
tion.
(2) Install the three screws that secure the rear
A/C-heater control to the bezel or video screen hous-
ing. Tighten the screws to 2 N´m (17 in. lbs.).(3) If the rear A/C-heater control is to be mounted
into the headliner, position the rear A/C-heater con-
trol near the headliner and connect the wire harness
connector to the rear of the control.
(4) Insert the locator tabs on the back of the rear
control bezel over the forward edge of the headliner
opening.
(5) Slide the rear A/C-heater control bezel forward
far enough to align the snap clips on the bezel with
the receptacles on the headliner and by using hand
pressure, press the top edge of the bezel upward
until the two snap clips fully seat into their recepta-
cles.
(6) If the rear A/C-heater control is mounted to the
video screen housing, install the video screen to the
headliner (Refer to 8 - ELECTRICAL/AUDIO/VIDEO
SCREEN - INSTALLATION).
(7) Reconnect the negative battery cable.
(8) Using the DRB-IIItscan tool, reset the Rear
Temperature Selector calibration values.
(9) Verify that the Actuator Calibration of the
Front Control has passed. If an Actuator Calibration
has not passed correct any errors before proceeding
further.
(10) Rotate the Rear Temperature Selector counter
clockwise to the Cold Position, allow the Selector to
remain in the Cold Position for 5 seconds.
(11) Rotate the Rear Temperature Selector Clock-
wise to the Hot Position, allow the Selector to remain
in the Cold Position for 5 seconds.
(12) Calibration is now complete.
BLEND DOOR ACTUATOR
DESCRIPTION
The rear blend door actuator is a reversible,
12-volt Direct Current (DC), servo motor. The single
blend door actuator is located on the outboard side of
the rear HVAC housing, below the mode door actua-
tor. The blend door actuator is mechanically con-
nected to the blend air door.
The rear blend door actuator is interchangeable
with the actuator for the mode door. Each actuator is
contained within an identical black molded plastic
housing with an integral wire connector receptacle.
Two integral mounting tabs allow the actuator to be
secured with two screws to the rear HVAC housing.
Each actuator also has an identical output shaft with
splines that connects it to the pivot or linkage of the
proper door. The rear blend door actuator does not
require mechanical indexing to the blend air door
pivot, as it is electronically calibrated by the front
heater-A/C control module.
Fig. 1 A/C-Heater Control - Rear
1 - TRIM STICK
2 - BEZEL
3 - REAR A/C-HEATER CONTROL
4 - HEADLINER
Fig. 2 Heater-A/C Control Bezel
1 - BEZEL/VIDEO SCREEN HOUSING (AS EQUIPPED)
2 - SNAP CLIP (2)
3 - REAR A/C-HEATER CONTROL
4 - SCREW (3)
5 - BEZEL LOCATOR TAB (2)
24 - 34 CONTROLS - REARRS
A/C-HEATER CONTROL (Continued)