2005 CHRYSLER CARAVAN service
[x] Cancel search: servicePage 2245 of 2339
OPERATION
R-134a refrigerant is not compatible with R-12
refrigerant in an air conditioning system. Even a
small amount of R-12 added to an R-134a refrigerant
system will cause compressor failure, refrigerant oil
sludge or poor air conditioning system performance.
In addition, the PolyAlkylene Glycol (PAG) synthetic
refrigerant oils used in an R-134a refrigerant system
are not compatible with the mineral-based refriger-
ant oils used in an R-12 refrigerant system. R-134a
refrigerant system service ports, service tool couplers
and refrigerant dispensing bottles have all been
designed with unique fittings to ensure that an
R-134a system is not accidentally contaminated with
the wrong refrigerant (R-12). There are also labels
posted in the engine compartment of the vehicle and
on the compressor identifying to service technicians
that the air conditioning system is equipped with
R-134a.
REFRIGERANT OIL
DESCRIPTION
The refrigerant oil used in R-134a refrigerant sys-
tems is a synthetic-based, PolyAlkylene Glycol (PAG),
wax-free lubricant. Mineral-based R-12 refrigerant
oils are not compatible with PAG oils, and should
never be introduced to an R-134a refrigerant system.
There are different PAG oils available, and each con-
tains a different additive package. The compressor
used in this vehicle is designed to use an ND-8 PAG
refrigerant oil. Use only refrigerant oil of this same
type to service the refrigerant system.
OPERATION
After performing any refrigerant recovery or recy-
cling operation, always replenish the refrigerant sys-
tem with the same amount of the recommended
refrigerant oil as was removed. Too little refrigerant
oil can cause compressor damage, and too much can
reduce air conditioning system performance. PAG
refrigerant oil is much more hygroscopic than min-
eral oil, and will absorb any moisture it comes into
contact with, even moisture in the air. The PAG oil
container should always be kept tightly capped until
it is ready to be used. After use, recap the oil con-
tainer immediately to prevent moisture contamina-
tion.
STANDARD PROCEDURE
REFRIGERANT OIL LEVEL
WARNING: REFER TO THE APPLICABLE WARN-
INGS AND CAUTIONS FOR THIS SYSTEM BEFORE
PERFORMING THE FOLLOWING OPERATION (Refer
to 24 - HEATING & AIR CONDITIONING/PLUMBING -
FRONT - WARNING - A/C PLUMBING) and (Refer to
24 - HEATING & AIR CONDITIONING/PLUMBING -
FRONT - CAUTION - A/C PLUMBING).
CAUTION: Use only PAG oils that are designed to
work with R-134a refrigerant and the A/C compres-
sor in the vehicle. Refer to the underhood A/C Sys-
tem Specification Label.
It is important to have the correct amount of lubri-
cant in the A/C refrigerant system to ensure proper
lubrication of the A/C compressor. Too little lubricant
will result in damage to the compressor. Too much
lubricant will reduce the cooling capacity of the A/C
system and consequently result in higher discharge
air temperatures.
The lubricant used in the compressor is polyalka-
lene glycol PAG lubricant. Only the refrigerant lubri-
cant approved for use with this vehicle should be
used to service the system. Do not use any other
lubricant. The lubricant container should be kept
tightly capped until it is ready for use. Refrigerant
lubricant will quickly absorb any moisture it comes
in contact with.
It will not be necessary to check the oil level in the
A/C compressor or to add oil, unless there has been
an oil loss. An oil loss may occur due to a rupture or
leak from a refrigerant line, connector fitting, compo-
nent or component seal. If a leak occurs, add 30 mil-
liliters (1 fluid ounce) of the recommended
refrigerant oil to the refrigerant system after the
repair has been made. Refrigerant oil loss will be evi-
dent at the leak point by the presence of a wet, shiny
surface around the leak.
REFRIGERANT OIL LEVEL CHECK
When an air conditioning system is first assembled
at the factory, all components (except the A/C com-
pressor) are refrigerant oil free. After the refrigerant
system has been charged with (R-134a) refrigerant
and operated, the oil in the A/C compressor is dis-
persed through the lines and components. The A/C
evaporator, A/C condenser, and receiver/drier will
retain a significant amount of oil. Refer to the A/C
Component Refrigerant Oil Capacities table. When a
component is replaced, the specified amount of refrig-
erant oil must be added. When the compressor is
replaced, the amount of oil that is retained in the
24 - 94 PLUMBING - FRONTRS
REFRIGERANT (Continued)
Page 2246 of 2339
rest of the system must be drained from the replace-
ment A/C compressor. The oil capacity of the system,
minus the amount of oil still in the remaining com-
ponents (refer to the oil capacity chart below) can be
measured and poured into the suction port of the A/C
compressor. When a line or component has ruptured
and oil has escaped, the receiver/drier must be
replaced along with the ruptured component.
Example: On this A/C system the front A/C evapo-
rator retains 50 ml. (1.7 oz.). The A/C condenser
retains 50 ml. (1.7 oz.) of oil, and front A/C system oil
capacity is 180 ml. (6.1 oz.).
180 ml. ± 100 ml. = 80 ml. (2.7 oz.).
A/C COMPONENT REFRIGERANT OIL
CAPACITIES
Front A/C Front & Rear
A/C
COMPONENT ml fl oz ml fl oz
Total System Fill 180 6.1 230 7.8
Receiver/Drier 25 0.8 25 0.8
A/C Condenser 50 1.7 50 1.7
Front Evaporator 50 1.7 50 1.7
Rear Evap. (including
underbody lines)N/A N/A 50 1.7
A/C Compressor Drain and measure the oil
from the old A/C compressor
- See text above.
VERIFY REFRIGERANT LUBRICANT LEVEL
(1) Recover the refrigerant from the system.
(2) Disconnect the refrigerant lines from the A/C
compressor. Cap open lines to prevent moisture from
entering the system.
(3) Remove A/C compressor from the vehicle.
(4) From the suction and discharge ports on the
A/C compressor, drain the lubricant from the com-
pressor.
(5) Add the system capacity minus the capacity of
the components that have not been replaced. Refer to
the A/C Component Refrigerant Oil Capacities chart.
Add lubricant through the suction and discharge
ports on the A/C compressor.
(6) Install the A/C compressor and connect the
refrigerant lines. Then evacuate and charge refriger-
ant system.
(7) Most reclaim/recycling equipment will measure
the lubricant being removed. This amount of lubri-
cant should be added back to the system. If a new
A/C compressor is being installed, drain the lubricant
from the used compressor, measure the amount
drained and discard the used lubricant. Drain the
lubricant from the new A/C compressor into a cleancontainer. Return the amount of lubricant measured
from the used compressor, plus the amount reclaimed
from the system back into the new A/C compressor.
Refer to the reclaim/recycling equipment manufactur-
ers instructions.
SERVICE PORT VALVE CORE
DESCRIPTION
A/C SERVICE PORT VALVE CORES
The low side valve is located on the suction line
near the A/C compressor. The low side A/C service
port valve core is a serviceable item. The high side
A/C service port valve core is located on the liquid
line fitting attached to the top of the receiver/drier.
The high side A/C service port valve core is not a sep-
arate serviceable item. If the high side service port
valve core is faulty or damaged, the front section of
the liquid line will require replacement.
REMOVAL
WARNING: REFER TO THE APPLICABLE WARN-
INGS AND CAUTIONS FOR THIS SYSTEM BEFORE
PERFORMING THE FOLLOWING OPERATION (Refer
to 24 - HEATING & AIR CONDITIONING/PLUMBING -
FRONT - WARNING - A/C PLUMBING) and (Refer to
24 - HEATING & AIR CONDITIONING/PLUMBING -
FRONT - CAUTION - A/C PLUMBING).
(1) Recover the refrigerant from the refrigerant
system (Refer to 24 - HEATING & AIR CONDITION-
ING/PLUMBING - FRONT/REFRIGERANT - STAN-
DARD PROCEDURE - REFRIGERANT
RECOVERY).
(2) Using a standard Schrader-type valve core tool,
remove the valve core from the low side A/C service
port located on the suction line.
(3) Install a plug in or tape over the opened low
side A/C service port.
INSTALLATION
(1) Lubricate the low side A/C service port valve
core with clean refrigerant oil prior to installation.
Use only refrigerant oil of the type recommended for
the compressor in the vehicle.
(2) Remove the tape or plug from the A/C service
port located on the suction line near the A/C com-
pressor.
(3) Using a standard Schrader-type valve core tool,
install and tighten the replacement valve core into
the low side A/C service port.
RSPLUMBING - FRONT24-95
REFRIGERANT OIL (Continued)
Page 2247 of 2339
CAUTION: A valve core that is not fully seated in
the A/C service port can result in damage to the
valve during refrigerant system evacuation and
charge. Such damage may result in a loss of sys-
tem refrigerant while uncoupling the charge adapt-
ers.
(4) Evacuate the refrigerant system (Refer to 24 -
HEATING & AIR CONDITIONING/PLUMBING -
FRONT/REFRIGERANT - STANDARD PROCE-
DURE - REFRIGERANT SYSTEM EVACUATE).
(5) Charge the refrigerant system (Refer to 24 -
HEATING & AIR CONDITIONING/PLUMBING -
FRONT/REFRIGERANT - STANDARD PROCE-
DURE - REFRIGERANT SYSTEM CHARGE).
(6) Reinstall the protective cap onto the A/C ser-
vice port.
SUCTION LINE
REMOVAL
WARNING: REFER TO THE APPLICABLE WARN-
INGS AND CAUTIONS FOR THIS SYSTEM BEFORE
PERFORMING THE FOLLOWING OPERATION (Refer
to 24 - HEATING & AIR CONDITIONING/PLUMBING -
FRONT - WARNING - A/C PLUMBING) and (Refer to
24 - HEATING & AIR CONDITIONING/PLUMBING -
FRONT - CAUTION - A/C PLUMBING).
NOTE: The front suction line includes the low side
service port on a section of tubing located near the
A/C compressor. On models equipped with the
optional rear A/C system, the front suction line also
includes a suction line hose and tube extension
that connects the front suction line to the suction
line for the rear A/C system.
(1) Recover the refrigerant from the refrigerant
system (Refer to 24 - HEATING & AIR CONDITION-
ING/PLUMBING - FRONT/REFRIGERANT - STAN-
DARD PROCEDURE - REFRIGERANT
RECOVERY).
(2) Disconnect and isolate the battery negative
cable.
(3) Remove the air cleaner top cover and snorkel
from the air cleaner housing located on the right side
of the engine compartment.
(4) Disconnect the drain tube from the wiper mod-
ule drain on the right side of the engine compart-
ment.
(5) Remove the nut that secures the suction line
fitting to the top of the A/C compressor.
(6) Disconnect the suction line fitting from the
compressor suction port.(7) Remove the O-ring seal from the suction line
fitting and discard.
(8) Install plugs in, or tape over the opened suc-
tion line fitting and the compressor suction port.
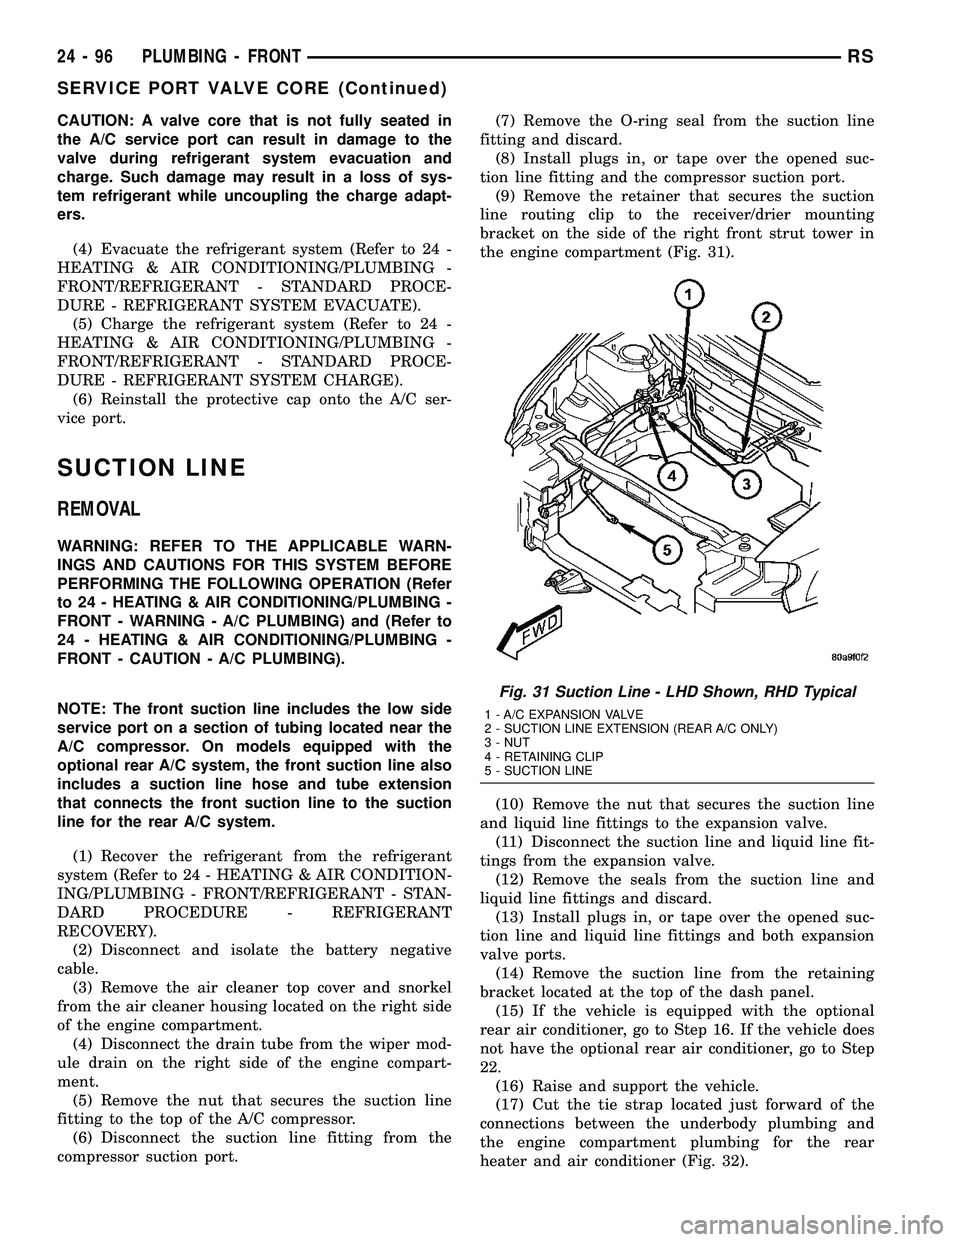
(9) Remove the retainer that secures the suction
line routing clip to the receiver/drier mounting
bracket on the side of the right front strut tower in
the engine compartment (Fig. 31).
(10) Remove the nut that secures the suction line
and liquid line fittings to the expansion valve.
(11) Disconnect the suction line and liquid line fit-
tings from the expansion valve.
(12) Remove the seals from the suction line and
liquid line fittings and discard.
(13) Install plugs in, or tape over the opened suc-
tion line and liquid line fittings and both expansion
valve ports.
(14) Remove the suction line from the retaining
bracket located at the top of the dash panel.
(15) If the vehicle is equipped with the optional
rear air conditioner, go to Step 16. If the vehicle does
not have the optional rear air conditioner, go to Step
22.
(16) Raise and support the vehicle.
(17) Cut the tie strap located just forward of the
connections between the underbody plumbing and
the engine compartment plumbing for the rear
heater and air conditioner (Fig. 32).
Fig. 31 Suction Line - LHD Shown, RHD Typical
1 - A/C EXPANSION VALVE
2 - SUCTION LINE EXTENSION (REAR A/C ONLY)
3 - NUT
4 - RETAINING CLIP
5 - SUCTION LINE
24 - 96 PLUMBING - FRONTRS
SERVICE PORT VALVE CORE (Continued)
Page 2249 of 2339
PLUMBING - REAR
TABLE OF CONTENTS
page page
A/C EVAPORATOR
DESCRIPTION.........................98
OPERATION...........................98
REMOVAL
REAR A/C EVAPORATOR...............98
REAR A/C EVAPORATOR LINE
EXTENSION.........................99
INSTALLATION
REAR A/C EVAPORATOR..............100
REAR A/C EVAPORATOR LINE
EXTENSION........................100
A/C EXPANSION VALVE
DESCRIPTION........................100
OPERATION..........................100
DIAGNOSIS AND TESTING
REAR A/C EXPANSION VALVE..........101
REMOVAL............................101
INSTALLATION........................101
HEATER CORE
DESCRIPTION........................102
OPERATION..........................102
STANDARD PROCEDURE
REAR HEATER CORE FILLING..........102REMOVAL............................103
INSTALLATION........................104
HEATER HOSES
REMOVAL............................104
INSTALLATION........................105
LIQUID LINE
REMOVAL............................105
INSTALLATION........................106
SUCTION LINE
REMOVAL............................106
INSTALLATION........................107
UNDERBODY LINES
DESCRIPTION........................108
OPERATION..........................108
REMOVAL
UNDERBODY HEATER TUBES..........109
UNDERBODY REFRIGERANT LINES......110
INSTALLATION
UNDERBODY HEATER TUBES..........112
UNDERBODY REFRIGERANT LINES......112
A/C EVAPORATOR
DESCRIPTION
The rear A/C evaporator is located in the rear
HVAC housing, behind the right rear wheel house.
The evaporator is positioned in the rear housing so
that all air that enters the housing must pass over
the fins of the evaporator coils before it is distributed
through the system ducts and outlets. However, air
passing over the evaporator fins will only be condi-
tioned when the compressor is engaged and circulat-
ing refrigerant through the evaporator tubes. The
rear HVAC housing must be removed from the vehi-
cle to access the A/C evaporator for service.
OPERATION
Refrigerant enters the rear evaporator from the
rear expansion valve as a low-temperature, low-pres-
sure liquid. As air flows over the fins of the evapora-
tor, the humidity in the air condenses on the fins,
and the heat from the air is absorbed by the refrig-
erant. Heat absorption causes the refrigerant to boil
and vaporize. The refrigerant becomes a low-pressure
gas when it leaves the evaporator.
REMOVAL
REAR A/C EVAPORATOR
WARNING: REFER TO THE APPLICABLE WARN-
INGS AND CAUTIONS FOR THIS SYSTEM BEFORE
PERFORMING THE FOLLOWING OPERATION (Refer
to 24 - HEATING & AIR CONDITIONING/PLUMBING -
FRONT - WARNING - A/C PLUMBING), (Refer to 24 -
HEATING & AIR CONDITIONING/PLUMBING -
FRONT - CAUTION - A/C PLUMBING), and (Refer to
24 - HEATING & AIR CONDITIONING/PLUMBING -
FRONT - WARNING - HEATER PLUMBING).
(1) Remove the rear HVAC housing from the vehi-
cle (Refer to 24 - HEATING & AIR CONDITIONING/
DISTRIBUTION/HVAC HOUSING - REMOVAL).
(2) Remove the rear evaporator line extension from
the expansion valve (Refer to 24 - HEATING & AIR
CONDITIONING/PLUMBING - REAR/EVAPORA-
TOR - REMOVAL - EVAPORATOR LINE EXTEN-
SION).
(3) Remove the rear expansion valve from the rear
evaporator (Refer to 24 - HEATING & AIR CONDI-
24 - 98 PLUMBING - REARRS
Page 2252 of 2339

DIAGNOSIS AND TESTING
REAR A/C EXPANSION VALVE
WARNING: REFER TO THE APPLICABLE WARN-
INGS AND CAUTIONS FOR THIS SYSTEM BEFORE
PERFORMING THE FOLLOWING OPERATION.
(Refer to 24 - HEATING & AIR CONDITIONING/
PLUMBING - FRONT - WARNING - A/C PLUMBING)
and (Refer to 24 - HEATING & AIR CONDITIONING/
PLUMBING - FRONT - CAUTION - A/C PLUMBING).
NOTE: The expansion valve should only be tested
following testing of the compressor.
NOTE: Liquid CO
2is required to test the expansion
valve. This material is available from most welding
supply facilities. Liquid CO
2is also available from
companies which service and sell fire extinguish-
ers.
When testing the expansion valve, the work area
and the vehicle temperature must be 21É to 27É C
(70É to 85É F). To test the expansion valve:
(1) Connect a charging station or manifold gauge
set to the refrigerant system service ports. Verify the
refrigerant charge level.
(2) Close all doors, windows and vents to the pas-
senger compartment.
(3) Set the heater-air conditioner controls so that
the compressor is operating, the temperature control
is in the highest temperature position, the mode door
is directing the output to the floor outlets, and the
blower is operating at the highest speed setting.
(4) Start the engine and allow it to idle at 1000
rpm. After the engine has reached normal operating
temperature, allow the passenger compartment to
heat up. This will create the need for maximum
refrigerant flow into the evaporator.
(5) If the refrigerant charge is sufficient, the dis-
charge (high pressure) gauge should read 965 to 1655
kPa (140 to 240 psi). The suction (low pressure)
gauge should read 140 kPa to 207 kPa (20 psi to 30
psi). If OK, go to Step 6. If not OK, replace the faulty
expansion valve.
WARNING: PROTECT THE SKIN AND EYES FROM
EXPOSURE TO LIQUID CO
2. PERSONAL INJURY
CAN RESULT.
(6)
If the suction (low pressure) gauge reads within
the specified range, freeze the expansion valve control
head for 30 seconds using liquid CO
2or another suit-
able super-cold material.Do not spray R-134a or
R-12 refrigerant on the expansion valve controlhead for this test.
The suction (low pressure) gauge
reading should drop by 10 psi. If OK, go to Step 7 If
not OK, replace the faulty expansion valve.
(7) Allow the expansion valve control head to thaw.
The suction (low pressure) gauge reading should sta-
bilize at 140 kPa to 240 kPa (20 psi to 30 psi). If not
OK, replace the faulty expansion valve.
(8) When expansion valve testing is complete, test
the overall air conditioner performance (Refer to 24 -
HEATING & AIR CONDITIONING - DIAGNOSIS
AND TESTING - A/C PERFORMANCE TEST).
Remove all test equipment before returning the vehi-
cle to service.
REMOVAL
WARNING: REFER TO THE APPLICABLE WARN-
INGS AND CAUTIONS FOR THIS SYSTEM BEFORE
PERFORMING THE FOLLOWING OPERATION (Refer
to 24 - HEATING & AIR CONDITIONING/PLUMBING -
FRONT - WARNING - A/C PLUMBING), (Refer to 24 -
HEATING & AIR CONDITIONING/PLUMBING -
FRONT - CAUTION - A/C PLUMBING), and (Refer to
24 - HEATING & AIR CONDITIONING/PLUMBING -
FRONT - WARNING - HEATER PLUMBING).
(1) Remove the rear HVAC housing from the vehi-
cle (Refer to 24 - HEATING & AIR CONDITIONING/
DISTRIBUTION/HVAC HOUSING - REMOVAL).
(2) Carefully remove the foam insulator wrap from
the rear expansion valve.
(3) Remove the rear evaporator line extension from
the expansion valve (Refer to 24 - HEATING & AIR
CONDITIONING/PLUMBING - REAR/EVAPORA-
TOR - REMOVAL - EVAPORATOR LINE EXTEN-
SION).
(4) Remove the two screws that secure the expan-
sion valve to the evaporator tube sealing plate.
(5) Remove the expansion valve from the evapora-
tor tubes.
(6) Remove the seals from the evaporator tube fit-
tings and discard.
(7) Install plugs in, or tape over the opened evap-
orator tube fittings and both expansion valve ports.
INSTALLATION
(1) Remove the tape or plugs from the rear A/C
evaporator tube fittings and both expansion valve
ports.
(2) Lubricate new rubber O-ring seals with clean
refrigerant oil and install them on the rear evapora-
tor tube fittings.
(3) Position the expansion valve onto the evapora-
tor tubes.
(4) Install the two screws that secure the rear A/C
expansion valve to the evaporator tube sealing plate.
Tighten the screws to 11 N´m (97 in. lbs.).
RSPLUMBING - REAR24 - 101
A/C EXPANSION VALVE (Continued)
Page 2253 of 2339
(5) Install the rear evaporator line extension onto
the expansion valve (Refer to 24 - HEATING & AIR
CONDITIONING/PLUMBING - REAR/EVAPORA-
TOR - INSTALLATION - EVAPORATOR LINE
EXTENSION).
(6) Install the foam insulator wrap over the rear
expansion valve.
(7) Install the rear HVAC housing (Refer to 24 -
HEATING & AIR CONDITIONING/DISTRIBUTION/
HVAC HOUSING - INSTALLATION).
(8) Run the HVAC Cooldown Test to verify proper
operation.
HEATER CORE
DESCRIPTION
The rear heater core is located near the front of
the rear HVAC housing, behind the right rear wheel
house. It is a heat exchanger made of rows of tubes
and fins. One end of the core is fitted with a molded
plastic tank that includes integral heater core inlet
and outlet nipples. The rear heater core can be ser-
viced without removing the rear HVAC housing from
the vehicle.
OPERATION
Engine coolant is circulated through underbody
heater hoses to the rear heater core at all times. As
the coolant flows through the rear heater core, heat
removed from the engine is transferred to the heater
core fins and tubes. Air directed through the heater
core picks up the heat from the heater core fins. The
rear blend door allows control of the rear heater out-
put air temperature by controlling how much of the
air flowing through the rear HVAC housing is
directed through the heater core.
The rear heater core cannot be repaired and, if
faulty or damaged, it must be replaced.
STANDARD PROCEDURE
REAR HEATER CORE FILLING
In its final installed position, the rear heater core
is positioned higher than the radiator fill cap. There-
fore, when the cooling system is drained and refilled,
gravity will not refill the heater core with coolant to
the proper level. This may result in two problems:1.
Insufficient coolant level in the engine cooling sys-
tem, which may result in engine overheating.2.Air
entrapped within the rear heater core, which may
result in insufficient rear heater performance. There
are two methods that may be employed to prevent
these problems:1.Pre-filling of the rear heater core.
2.Thermal cycling of the engine cooling system. Fol-lowing are descriptions of both prevention methods,
as well as a method to verify rear heater perfor-
mance.
WARNING: REFER TO THE APPLICABLE WARN-
INGS AND CAUTIONS FOR THIS SYSTEM BEFORE
PERFORMING THE FOLLOWING OPERATION (Refer
to 24 - HEATING & AIR CONDITIONING/PLUMBING
FRONT - WARNING - HEATER PLUMBING).
PRE-FILLING
If the rear heater core or the rear HVAC housing
have been removed from the vehicle for service, the
rear heater core may be pre-filled with the proper
engine coolant mixture prior to reconnecting the
heater hoses to the heater core hose fittings.
(1) The heater core should be installed in the rear
HVAC housing, and the rear HVAC housing should
be installed in the vehicle.
(2) Take the proper precautions to protect the car-
peting below the rear heater core from spilled engine
coolant and have absorbent toweling readily avail-
able to mop up any spills.
(3) Insert the small end of an appropriate funnel
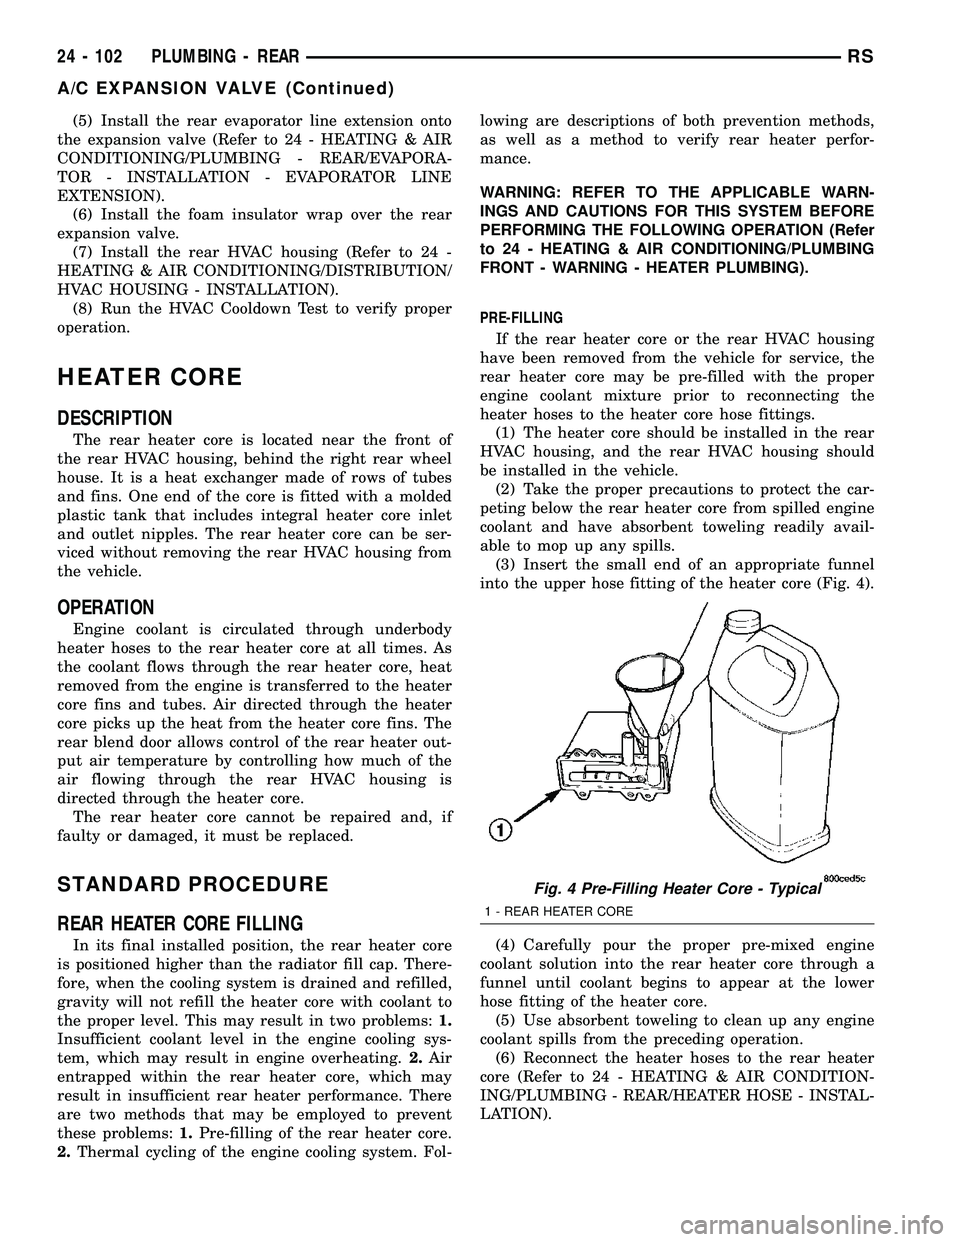
into the upper hose fitting of the heater core (Fig. 4).
(4) Carefully pour the proper pre-mixed engine
coolant solution into the rear heater core through a
funnel until coolant begins to appear at the lower
hose fitting of the heater core.
(5) Use absorbent toweling to clean up any engine
coolant spills from the preceding operation.
(6) Reconnect the heater hoses to the rear heater
core (Refer to 24 - HEATING & AIR CONDITION-
ING/PLUMBING - REAR/HEATER HOSE - INSTAL-
LATION).
Fig. 4 Pre-Filling Heater Core - Typical
1 - REAR HEATER CORE
24 - 102 PLUMBING - REARRS
A/C EXPANSION VALVE (Continued)
Page 2255 of 2339
(9) Use absorbent toweling to clean up any engine
coolant spills from the preceding operation.
(10) Release the four latch tabs that secure the
heater core into the rear HVAC housing.
(11) Carefully pull the heater core straight out of
the rear HVAC housing.
(12) Use absorbent toweling to clean up any
engine coolant spills from the preceding operation.
INSTALLATION
NOTE: If the rear heater core or the rear HVAC
housing have been removed from the vehicle for
service, the rear heater core may be pre-filled with
the proper engine coolant mixture prior to recon-
necting the heater hoses to the heater core hose fit-
tings (Refer to 24 - HEATING & AIR CONDITIONING/
PLUMBING - REAR/HEATER CORE - STANDARD
PROCEDURE - HEATER CORE FILLING).
(1) Carefully slide the heater core into the rear
HVAC housing.
(2) Using hand pressure, press firmly and evenly
on the heater core end plate until the four latch tabs
that secure the heater core in the rear HVAC housing
are fully engaged.
(3) Remove the plugs or tape from the heater core
fittings and both heater hoses.
(4) Reconnect the heater hoses to the rear heater
core (Refer to 24 - HEATING & AIR CONDITION-
ING/PLUMBING - REAR/HEATER HOSE - INSTAL-
LATION).
(5) Install the screw that secures the front of the
rear HVAC housing to the right quarter inner panel.
Tighten the screw to 11 N´m (97 in. lbs.).
(6) Install the screw that secures the back of the
rear HVAC housing to the right D-pillar. Tighten the
screw to 11 N´m (97 in. lbs.).
(7) Install the rear heater distribution duct (Refer
to 24 - HEATING & AIR CONDITIONING/DISTRI-
BUTION - REAR/REAR HEATER DISTRIBUTION
DUCT - INSTALLATION).
(8) Install the right quarter trim panel and right
D-pillar trim panel (Refer to 23 - BODY/INTERIOR/
QUARTER TRIM PANEL - INSTALLATION).
(9) Refill the engine cooling system (Refer to 7 -
COOLING - STANDARD PROCEDURE - COOLING
SYSTEM REFILL).
HEATER HOSES
REMOVAL
WARNING: REFER TO THE APPLICABLE WARN-
INGS AND CAUTIONS FOR THIS SYSTEM BEFORE
PERFORMING THE FOLLOWING OPERATION (Refer
to 24 - HEATING & AIR CONDITIONING/PLUMBING -
WARNING).
(1) Drain the engine cooling system (Refer to 7 -
COOLING - STANDARD PROCEDURE - COOLING
SYSTEM DRAIN).
(2) Using spring tension clamp pliers, compress
and slide the clamps off of each end of the hose being
removed.
CAUTION:
DO NOT apply excessive pressure on heater tubes
or connections when removing heater hoses.
Excessive pressure may damage or deform the
tubes, causing an engine coolant leak.
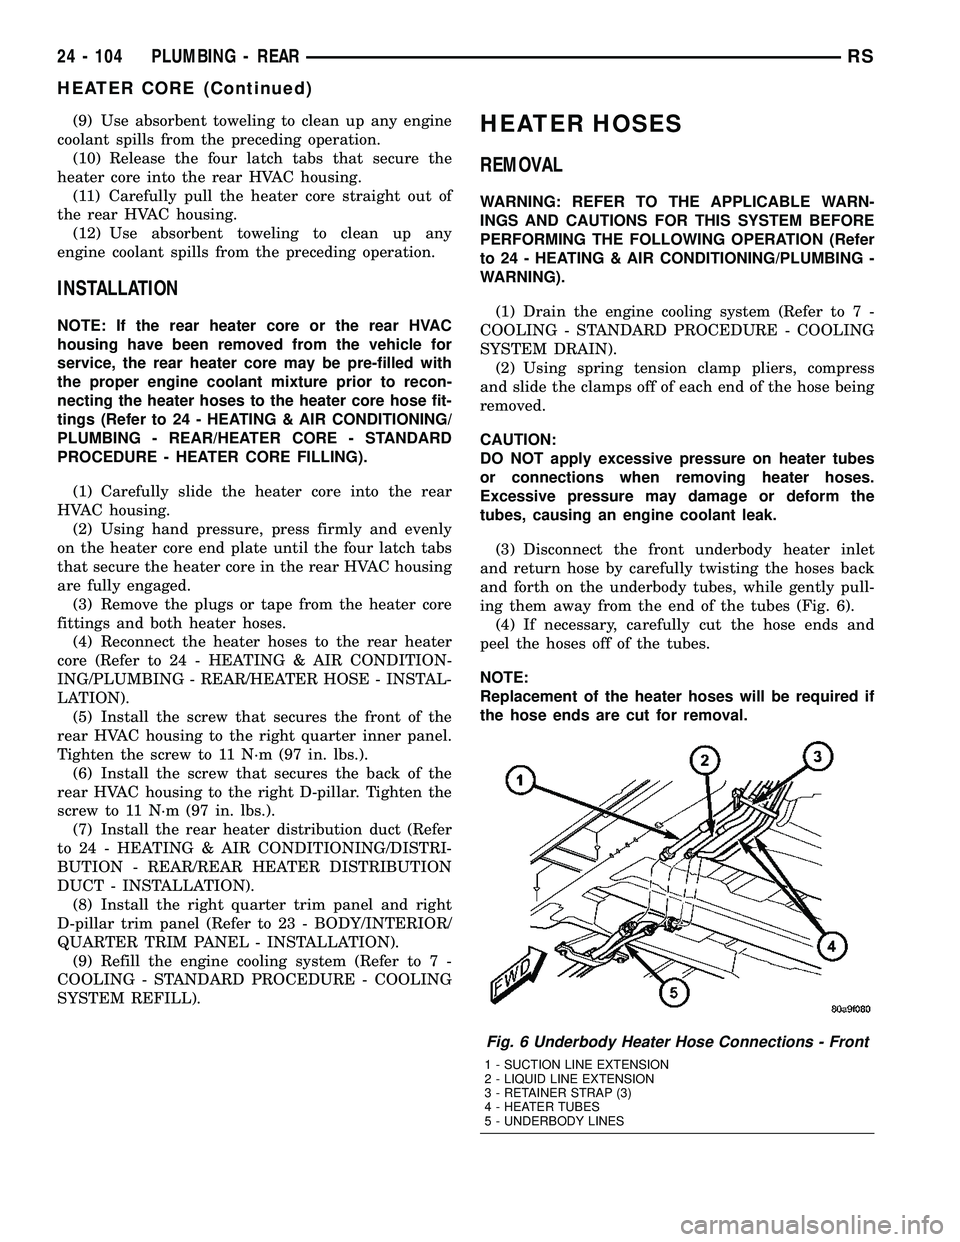
(3) Disconnect the front underbody heater inlet
and return hose by carefully twisting the hoses back
and forth on the underbody tubes, while gently pull-
ing them away from the end of the tubes (Fig. 6).
(4) If necessary, carefully cut the hose ends and
peel the hoses off of the tubes.
NOTE:
Replacement of the heater hoses will be required if
the hose ends are cut for removal.
Fig. 6 Underbody Heater Hose Connections - Front
1 - SUCTION LINE EXTENSION
2 - LIQUID LINE EXTENSION
3 - RETAINER STRAP (3)
4 - HEATER TUBES
5 - UNDERBODY LINES
24 - 104 PLUMBING - REARRS
HEATER CORE (Continued)
Page 2259 of 2339
(3) Lubricate new rubber O-ring seals with clean
refrigerant oil and install them on the suction line
and liquid line fittings.
(4) Reconnect the liquid line and suction line fit-
tings to the expansion valve.
(5) Install the nut that secures the suction line
and liquid line fittings to the front expansion valve.
Tighten the nut to 23 N´m (17 ft. lbs.).
(6) Engage the retainer that secures the suction
line routing clip to the receiver/drier mounting
bracket on the side of the right front strut tower in
the engine compartment.
(7) Remove the tape or plugs from the compressor
suction port and the suction line fitting.
(8) Lubricate a new rubber O-ring seal with clean
refrigerant oil and install it on the suction line fit-
ting.
(9) Reconnect the suction line fitting to the com-
pressor suction port.
(10) Install the nut that secures the suction line
fitting to the A/C compressor. Tighten the nut to 23
N´m (17 ft. lbs.).
(11) Reconnect the drain tube to the wiper module
drain on the right side of the engine compartment.
(12) Reinstall the air cleaner top cover and snorkel
onto the air cleaner housing located on the right side
of the engine compartment.
(13) Reconnect the battery negative cable.
(14) Raise and support the vehicle.
(15) Remove the tape or plugs from the suction
line extension fitting and the underbody suction line
fitting.
(16) Lubricate a new rubber O-ring seal with clean
refrigerant oil and install it on the underbody suction
line fitting.(17) Reconnect the suction line extension fitting to
the underbody suction line fitting. Tighten the fitting
to 23 N´m (17 ft. lbs.).
(18) Install a new tie strap just forward of the con-
nections between the underbody plumbing and the
engine compartment plumbing for the rear heater
and air conditioner.
(19) Lower the vehicle.
(20) Evacuate the refrigerant system (Refer to 24 -
HEATING & AIR CONDITIONING/PLUMBING -
FRONT/REFRIGERANT - STANDARD PROCE-
DURE - REFRIGERANT SYSTEM EVACUATE).
(21) Charge the refrigerant system (Refer to 24 -
HEATING & AIR CONDITIONING/PLUMBING -
FRONT/REFRIGERANT - STANDARD PROCE-
DURE - REFRIGERANT SYSTEM CHARGE).
UNDERBODY LINES
DESCRIPTION
The underbody heater-A/C plumbing is used only
on models with the optional rear heater-A/C system
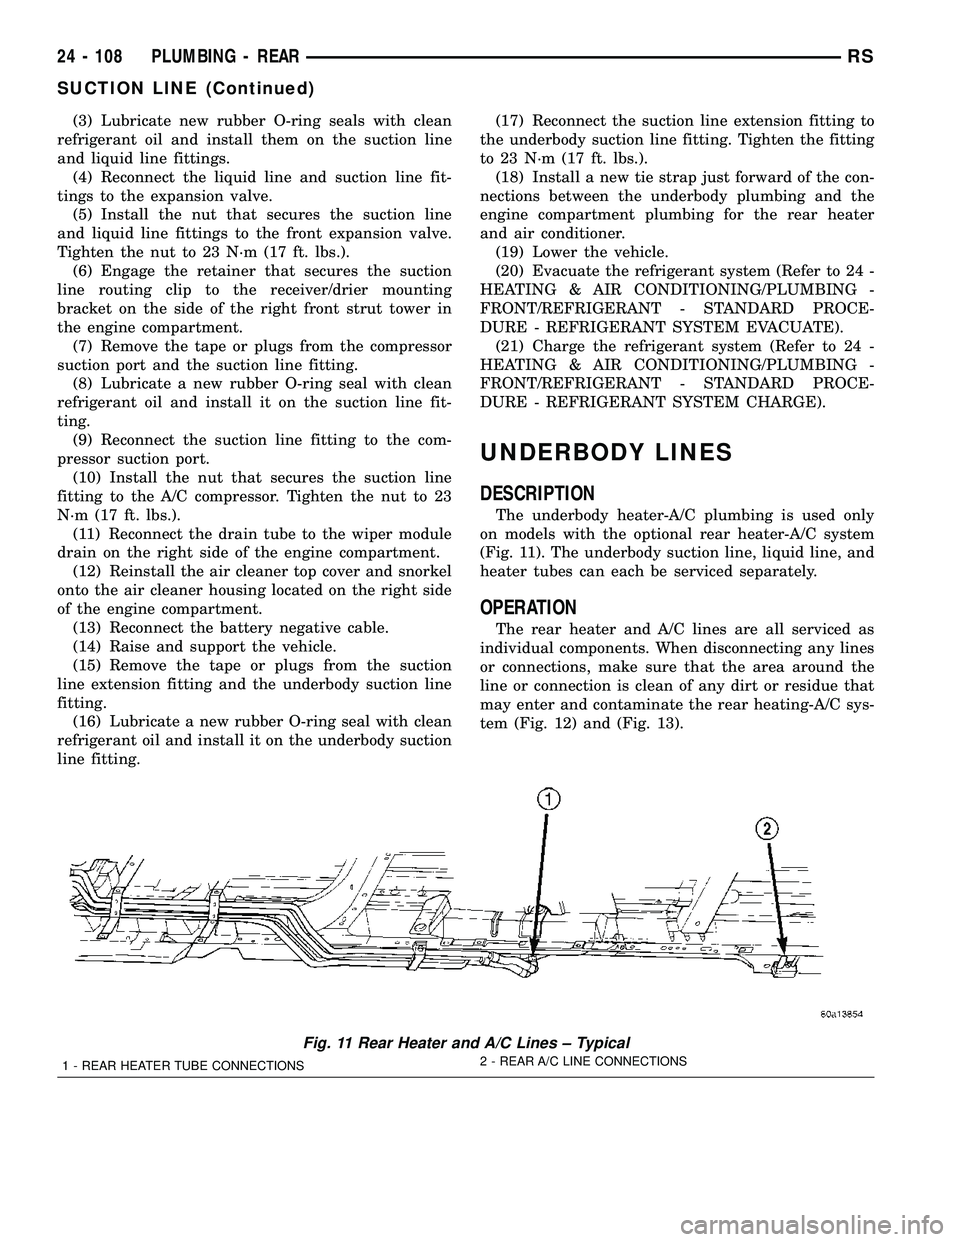
(Fig. 11). The underbody suction line, liquid line, and
heater tubes can each be serviced separately.
OPERATION
The rear heater and A/C lines are all serviced as
individual components. When disconnecting any lines
or connections, make sure that the area around the
line or connection is clean of any dirt or residue that
may enter and contaminate the rear heating-A/C sys-
tem (Fig. 12) and (Fig. 13).
Fig. 11 Rear Heater and A/C Lines ± Typical
1 - REAR HEATER TUBE CONNECTIONS2 - REAR A/C LINE CONNECTIONS
24 - 108 PLUMBING - REARRS
SUCTION LINE (Continued)