2005 CHRYSLER CARAVAN fuse
[x] Cancel search: fusePage 2187 of 2339
(6) Install the screw that secures the front of the
rear HVAC housing to the right quarter inner panel.
Tighten the screw to 11 N´m (97 in. lbs.).
(7) Install the screw that secures the back of the
rear HVAC housing to the right D-pillar. Tighten the
screw to 11 N´m (97 in. lbs.).
(8) Install the two screws that secure the top of
the quarter trim panel attaching bracket to the quar-
ter inner panel. Tighten the screws to 2 N´m (17 in.
lbs.).
(9) Reinstall the right quarter trim panel and
right D-pillar trim panel onto the quarter inner
panel (Refer to 23 - BODY/INTERIOR/QUARTER
TRIM PANEL - INSTALLATION).
(10) Reconnect the battery negative cable.
(11) Perform the heater-A/C control calibration
procedure (Refer to 24 - HEATING & AIR CONDI-
TIONING/CONTROLS - FRONT/A/C-HEATER CON-
TROL - STANDARD PROCEDURE - HEATER-A/C
CONTROL CALIBRATION).
BLOWER MOTOR RELAY
DESCRIPTION
The rear blower motor relay is a International
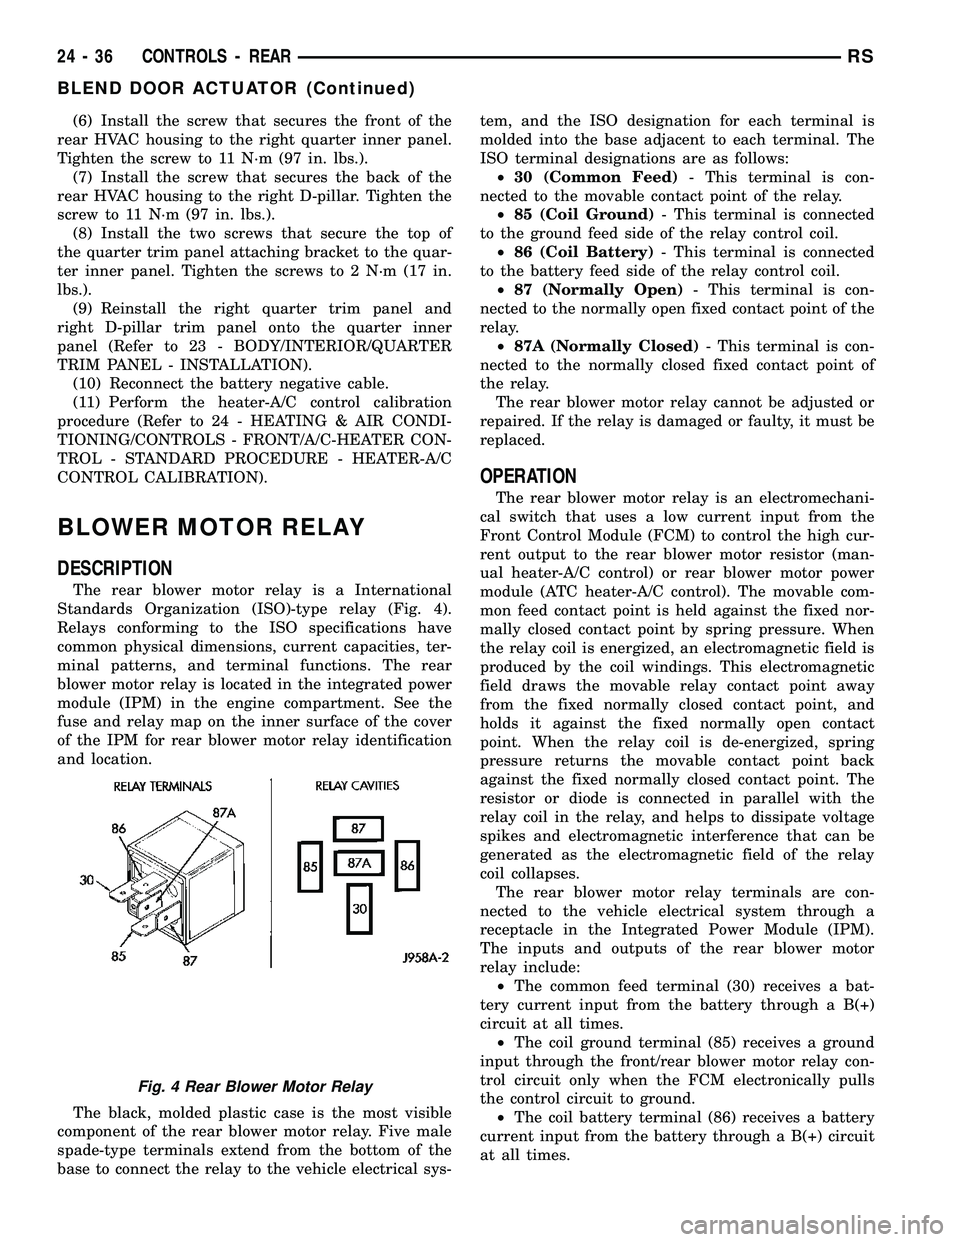
Standards Organization (ISO)-type relay (Fig. 4).
Relays conforming to the ISO specifications have
common physical dimensions, current capacities, ter-
minal patterns, and terminal functions. The rear
blower motor relay is located in the integrated power
module (IPM) in the engine compartment. See the
fuse and relay map on the inner surface of the cover
of the IPM for rear blower motor relay identification
and location.
The black, molded plastic case is the most visible
component of the rear blower motor relay. Five male
spade-type terminals extend from the bottom of the
base to connect the relay to the vehicle electrical sys-tem, and the ISO designation for each terminal is
molded into the base adjacent to each terminal. The
ISO terminal designations are as follows:
²30 (Common Feed)- This terminal is con-
nected to the movable contact point of the relay.
²85 (Coil Ground)- This terminal is connected
to the ground feed side of the relay control coil.
²86 (Coil Battery)- This terminal is connected
to the battery feed side of the relay control coil.
²87 (Normally Open)- This terminal is con-
nected to the normally open fixed contact point of the
relay.
²87A (Normally Closed)- This terminal is con-
nected to the normally closed fixed contact point of
the relay.
The rear blower motor relay cannot be adjusted or
repaired. If the relay is damaged or faulty, it must be
replaced.
OPERATION
The rear blower motor relay is an electromechani-
cal switch that uses a low current input from the
Front Control Module (FCM) to control the high cur-
rent output to the rear blower motor resistor (man-
ual heater-A/C control) or rear blower motor power
module (ATC heater-A/C control). The movable com-
mon feed contact point is held against the fixed nor-
mally closed contact point by spring pressure. When
the relay coil is energized, an electromagnetic field is
produced by the coil windings. This electromagnetic
field draws the movable relay contact point away
from the fixed normally closed contact point, and
holds it against the fixed normally open contact
point. When the relay coil is de-energized, spring
pressure returns the movable contact point back
against the fixed normally closed contact point. The
resistor or diode is connected in parallel with the
relay coil in the relay, and helps to dissipate voltage
spikes and electromagnetic interference that can be
generated as the electromagnetic field of the relay
coil collapses.
The rear blower motor relay terminals are con-
nected to the vehicle electrical system through a
receptacle in the Integrated Power Module (IPM).
The inputs and outputs of the rear blower motor
relay include:
²The common feed terminal (30) receives a bat-
tery current input from the battery through a B(+)
circuit at all times.
²The coil ground terminal (85) receives a ground
input through the front/rear blower motor relay con-
trol circuit only when the FCM electronically pulls
the control circuit to ground.
²The coil battery terminal (86) receives a battery
current input from the battery through a B(+) circuit
at all times.
Fig. 4 Rear Blower Motor Relay
24 - 36 CONTROLS - REARRS
BLEND DOOR ACTUATOR (Continued)
Page 2188 of 2339
²The normally open terminal (87) provides a bat-
tery current output to the blower motor resistor
(manual heater-A/C control) or blower power module
(ATC heater-A/C control) through a fuse in the IPM
on the fused rear blower motor relay output circuit
only when the blower motor relay coil is energized.
²The normally closed terminal (87A) is not con-
nected to any circuit in this application, but provides
a battery current output only when the rear blower
motor relay coil is de-energized.
Refer to the appropriate wiring information for
diagnosis and testing of the micro-relay and for com-
plete HVAC wiring diagrams.
REMOVAL
(1) Disconnect and isolate the negative battery
cable.
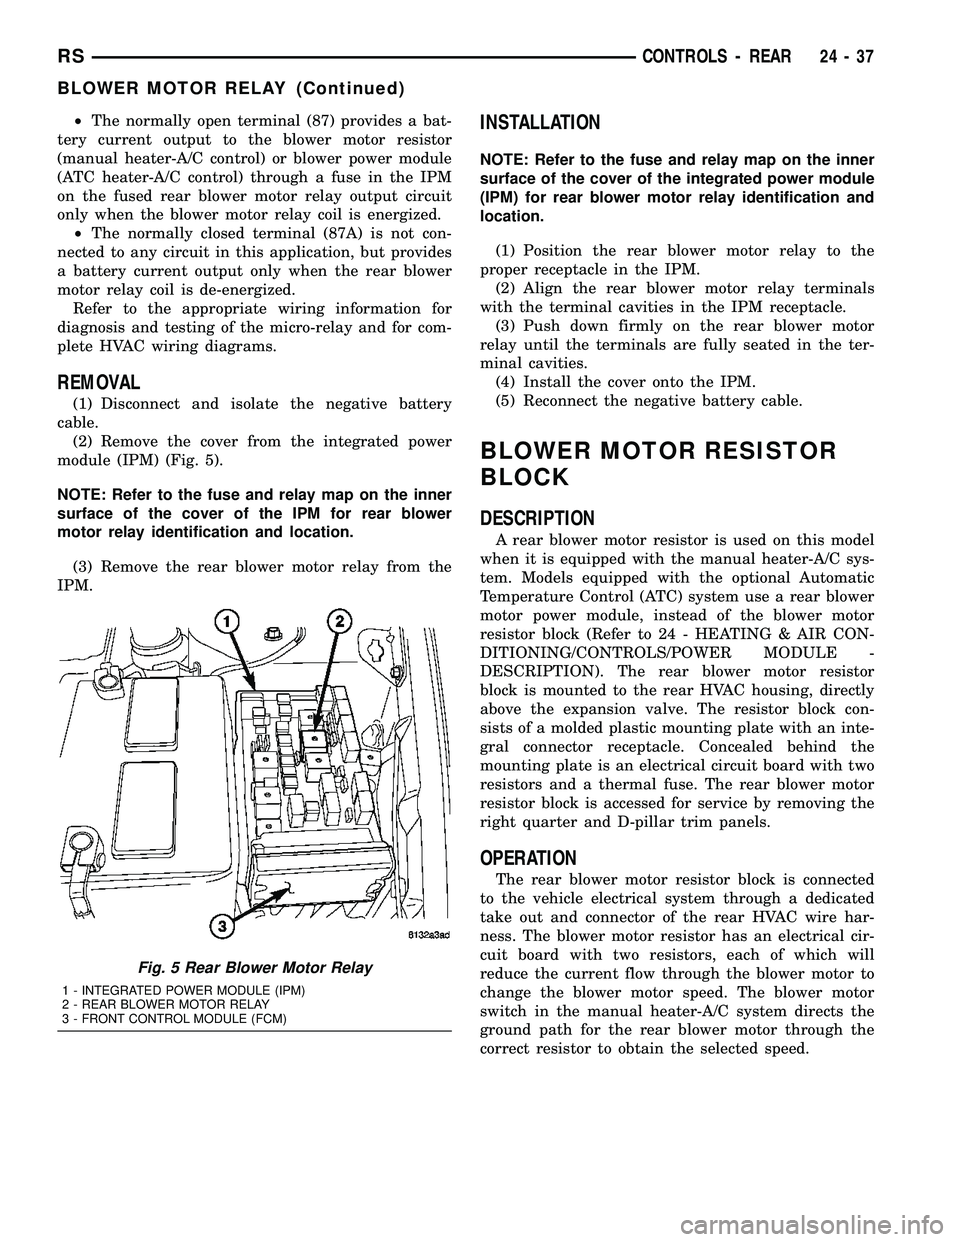
(2) Remove the cover from the integrated power
module (IPM) (Fig. 5).
NOTE: Refer to the fuse and relay map on the inner
surface of the cover of the IPM for rear blower
motor relay identification and location.
(3) Remove the rear blower motor relay from the
IPM.
INSTALLATION
NOTE: Refer to the fuse and relay map on the inner
surface of the cover of the integrated power module
(IPM) for rear blower motor relay identification and
location.
(1) Position the rear blower motor relay to the
proper receptacle in the IPM.
(2) Align the rear blower motor relay terminals
with the terminal cavities in the IPM receptacle.
(3) Push down firmly on the rear blower motor
relay until the terminals are fully seated in the ter-
minal cavities.
(4) Install the cover onto the IPM.
(5) Reconnect the negative battery cable.
BLOWER MOTOR RESISTOR
BLOCK
DESCRIPTION
A rear blower motor resistor is used on this model
when it is equipped with the manual heater-A/C sys-
tem. Models equipped with the optional Automatic
Temperature Control (ATC) system use a rear blower
motor power module, instead of the blower motor
resistor block (Refer to 24 - HEATING & AIR CON-
DITIONING/CONTROLS/POWER MODULE -
DESCRIPTION). The rear blower motor resistor
block is mounted to the rear HVAC housing, directly
above the expansion valve. The resistor block con-
sists of a molded plastic mounting plate with an inte-
gral connector receptacle. Concealed behind the
mounting plate is an electrical circuit board with two
resistors and a thermal fuse. The rear blower motor
resistor block is accessed for service by removing the
right quarter and D-pillar trim panels.
OPERATION
The rear blower motor resistor block is connected
to the vehicle electrical system through a dedicated
take out and connector of the rear HVAC wire har-
ness. The blower motor resistor has an electrical cir-
cuit board with two resistors, each of which will
reduce the current flow through the blower motor to
change the blower motor speed. The blower motor
switch in the manual heater-A/C system directs the
ground path for the rear blower motor through the
correct resistor to obtain the selected speed.
Fig. 5 Rear Blower Motor Relay
1 - INTEGRATED POWER MODULE (IPM)
2 - REAR BLOWER MOTOR RELAY
3 - FRONT CONTROL MODULE (FCM)
RSCONTROLS - REAR24-37
BLOWER MOTOR RELAY (Continued)
Page 2197 of 2339
whenever the ignition switch is in the On position
and the A/C-heater control power is turned on.
The blower motor receives battery current when-
ever the front blower motor relay is energized. The
front blower motor relay output circuit is protected
by a fuse in the Integrated Power Module (IPM)
located in the engine compartment near the battery.
In the manual heater-A/C system, the blower motor
speed is controlled by regulating the path to ground
through the blower control switch and the blower
motor resistor. In the ATC system, the blower motor
speed is controlled by an electronic blower motor
power module, which uses a pulse width modulated
input from the ATC module and feedback from the
blower motor to regulate the blower motor ground
path it provides. The blower motor and wheel are
used to control the velocity of air moving through the
HVAC housing by spinning the blower wheel within
the housing at the selected speed or, in the ATC sys-
tem, at the selected or programmed speed.
DIAGNOSIS AND TESTING
FRONT BLOWER MOTOR
BLOWER MOTOR INOPERATIVE
WARNING: ON VEHICLES EQUIPPED WITH AIR-
BAGS, DISABLE THE AIRBAG SYSTEM BEFORE
ATTEMPTING ANY STEERING WHEEL, STEERING
COLUMN, OR INSTRUMENT PANEL COMPONENT
DIAGNOSIS OR SERVICE. DISCONNECT AND ISO-
LATE THE BATTERY NEGATIVE (GROUND) CABLE,
THEN WAIT TWO MINUTES FOR THE AIRBAG SYS-
TEM CAPACITOR TO DISCHARGE BEFORE PER-
FORMING FURTHER DIAGNOSIS OR SERVICE. THIS
IS THE ONLY SURE WAY TO DISABLE THE AIRBAG
SYSTEM. FAILURE TO TAKE THE PROPER PRE-
CAUTIONS COULD RESULT IN ACCIDENTAL AIR-
BAG DEPLOYMENT AND POSSIBLE PERSONAL
INJURY.
For circuit descriptions and diagrams, refer to the
appropriate wiring information. The wiring informa-
tion includes wiring, diagrams, proper wire and con-
nector repair procedures, further details on wire
harness routing and retention, as well as pin-out and
location views for the various wire harness connec-
tors, splices and grounds.BLOWER MOTOR ELECTRICAL DIAGNOSIS
(1) Check the fuse (Fuse 10 - 40 ampere) in the
Integrated Power Module (IPM). If OK, go to Step 2.
If not OK, repair the shorted circuit or component as
required and replace the faulty fuse.
(2) Turn the ignition switch to the On position. Be
certain that the A/C-heater control power is turned
on. Check for battery voltage at the fuse (Fuse 10 -
40 ampere) in the IPM. If OK, go to Step 3. If not
OK, check the front blower motor relay.
(3) Turn the ignition switch to the Off position.
Disconnect and isolate the battery negative cable.
Disconnect the front HVAC wire harness connector
for the front blower motor resistor block (Manual
Temperature Control) or the front blower motor
power module (Automatic Temperature Control) from
the resistor or module connector receptacle. Recon-
nect the battery negative cable. Turn the ignition
switch to the On position. Be certain that the A/C-
heater control power is turned on. Check for battery
voltage at the fused front blower motor relay output
circuit cavity of the front HVAC wire harness connec-
tor for the front blower motor resistor block (MTC) or
the front blower motor power module (ATC). If OK,
go to Step 4. If not OK, repair the open fused front
blower motor relay output circuit to the IPM as
required.
(4) Turn the ignition switch to the Off position.
Disconnect and isolate the battery negative cable.
Disconnect the front blower motor pigtail wire con-
nector from the connector receptacle of the front
blower motor resistor block (MTC) or the front
blower motor power module (ATC). Use jumper wires
to connect a battery and ground feeds to the blower
motor pigtail wire connector. The blower motor
should operate. If OK with MTC, proceed to diagno-
sis of the front blower motor resistor block (Refer to
24 - HEATING & AIR CONDITIONING/CONTROLS
- FRONT/BLOWER MOTOR RESISTOR - DIAGNO-
SIS AND TESTING). If OK with ATC, use a DRBIII
scan tool to diagnose the front blower motor power
module. Refer to Body Diagnostic information. If not
OK with MTC or ATC, replace the faulty front blower
motor.
BLOWER MOTOR NOISE OR VIBRATION
Refer to the Blower Motor Noise/Vibration Diagno-
sis chart for basic checks of the blower motor when a
vibration or noise is present (Fig. 7).
24 - 46 DISTRIBUTION - FRONTRS
BLOWER MOTOR (Continued)
Page 2208 of 2339
DISTRIBUTION DUCT
REMOVAL
(1) Remove the trim from the right quarter inner
panel and the right D pillaR (Refer to 23 - BODY/IN-
TERIOR/RIGHT QUARTER TRIM PANEL -
REMOVAL).
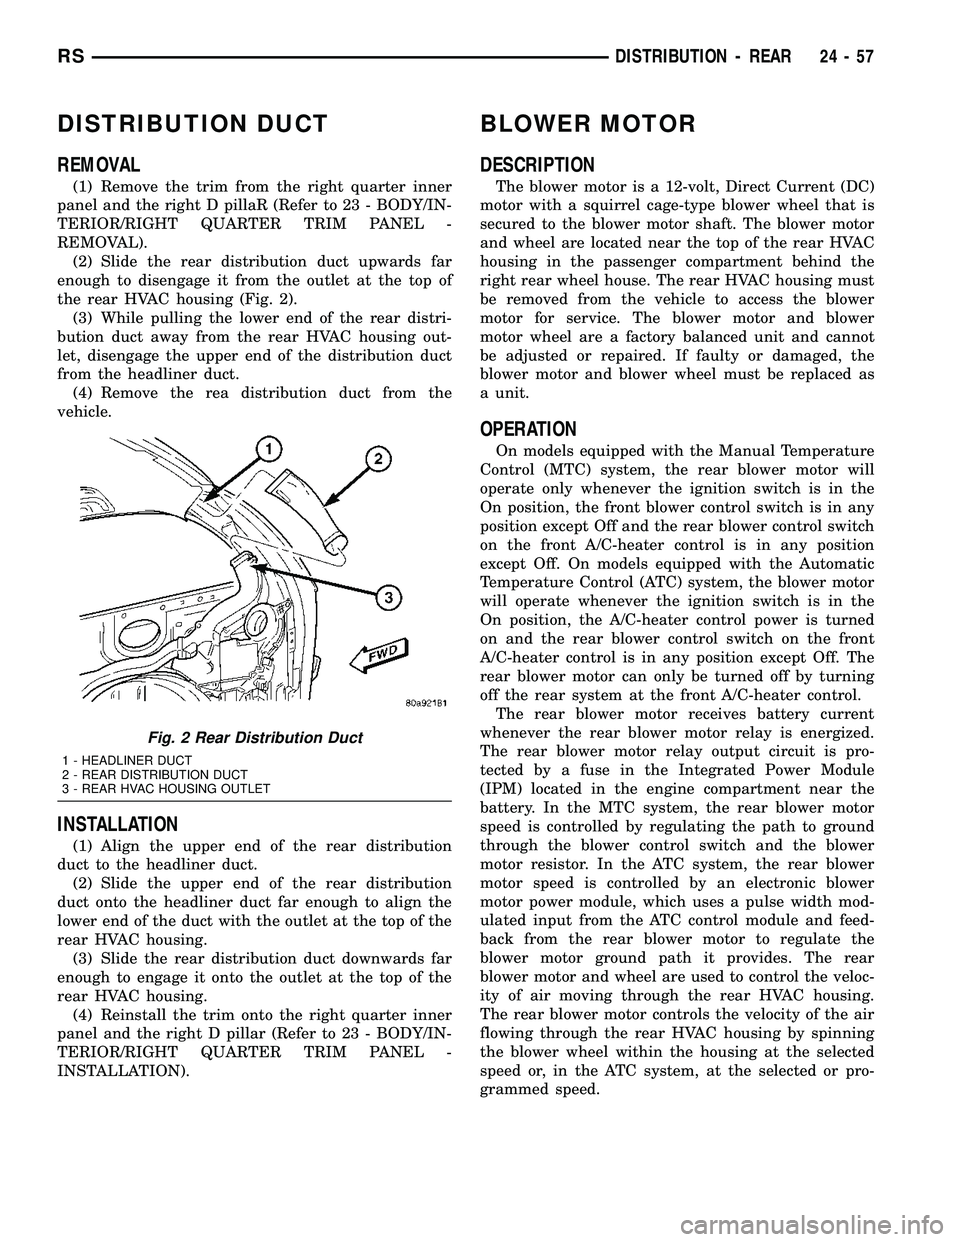
(2) Slide the rear distribution duct upwards far
enough to disengage it from the outlet at the top of
the rear HVAC housing (Fig. 2).
(3) While pulling the lower end of the rear distri-
bution duct away from the rear HVAC housing out-
let, disengage the upper end of the distribution duct
from the headliner duct.
(4) Remove the rea distribution duct from the
vehicle.
INSTALLATION
(1) Align the upper end of the rear distribution
duct to the headliner duct.
(2) Slide the upper end of the rear distribution
duct onto the headliner duct far enough to align the
lower end of the duct with the outlet at the top of the
rear HVAC housing.
(3) Slide the rear distribution duct downwards far
enough to engage it onto the outlet at the top of the
rear HVAC housing.
(4) Reinstall the trim onto the right quarter inner
panel and the right D pillar (Refer to 23 - BODY/IN-
TERIOR/RIGHT QUARTER TRIM PANEL -
INSTALLATION).
BLOWER MOTOR
DESCRIPTION
The blower motor is a 12-volt, Direct Current (DC)
motor with a squirrel cage-type blower wheel that is
secured to the blower motor shaft. The blower motor
and wheel are located near the top of the rear HVAC
housing in the passenger compartment behind the
right rear wheel house. The rear HVAC housing must
be removed from the vehicle to access the blower
motor for service. The blower motor and blower
motor wheel are a factory balanced unit and cannot
be adjusted or repaired. If faulty or damaged, the
blower motor and blower wheel must be replaced as
a unit.
OPERATION
On models equipped with the Manual Temperature
Control (MTC) system, the rear blower motor will
operate only whenever the ignition switch is in the
On position, the front blower control switch is in any
position except Off and the rear blower control switch
on the front A/C-heater control is in any position
except Off. On models equipped with the Automatic
Temperature Control (ATC) system, the blower motor
will operate whenever the ignition switch is in the
On position, the A/C-heater control power is turned
on and the rear blower control switch on the front
A/C-heater control is in any position except Off. The
rear blower motor can only be turned off by turning
off the rear system at the front A/C-heater control.
The rear blower motor receives battery current
whenever the rear blower motor relay is energized.
The rear blower motor relay output circuit is pro-
tected by a fuse in the Integrated Power Module
(IPM) located in the engine compartment near the
battery. In the MTC system, the rear blower motor
speed is controlled by regulating the path to ground
through the blower control switch and the blower
motor resistor. In the ATC system, the rear blower
motor speed is controlled by an electronic blower
motor power module, which uses a pulse width mod-
ulated input from the ATC control module and feed-
back from the rear blower motor to regulate the
blower motor ground path it provides. The rear
blower motor and wheel are used to control the veloc-
ity of air moving through the rear HVAC housing.
The rear blower motor controls the velocity of the air
flowing through the rear HVAC housing by spinning
the blower wheel within the housing at the selected
speed or, in the ATC system, at the selected or pro-
grammed speed.
Fig. 2 Rear Distribution Duct
1 - HEADLINER DUCT
2 - REAR DISTRIBUTION DUCT
3 - REAR HVAC HOUSING OUTLET
RSDISTRIBUTION - REAR24-57
Page 2209 of 2339
DIAGNOSIS AND TESTING
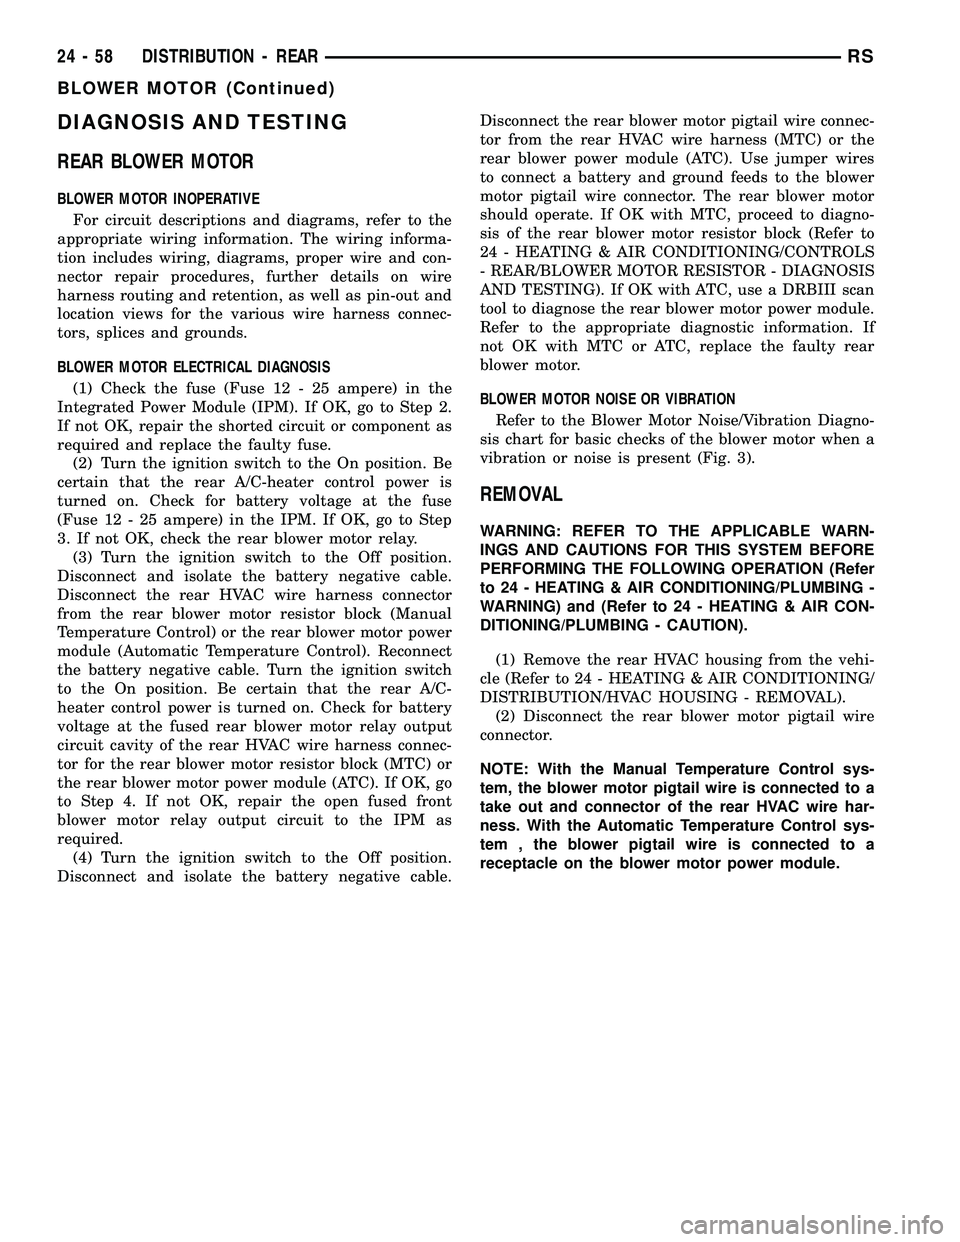
REAR BLOWER MOTOR
BLOWER MOTOR INOPERATIVE
For circuit descriptions and diagrams, refer to the
appropriate wiring information. The wiring informa-
tion includes wiring, diagrams, proper wire and con-
nector repair procedures, further details on wire
harness routing and retention, as well as pin-out and
location views for the various wire harness connec-
tors, splices and grounds.
BLOWER MOTOR ELECTRICAL DIAGNOSIS
(1) Check the fuse (Fuse 12 - 25 ampere) in the
Integrated Power Module (IPM). If OK, go to Step 2.
If not OK, repair the shorted circuit or component as
required and replace the faulty fuse.
(2) Turn the ignition switch to the On position. Be
certain that the rear A/C-heater control power is
turned on. Check for battery voltage at the fuse
(Fuse 12 - 25 ampere) in the IPM. If OK, go to Step
3. If not OK, check the rear blower motor relay.
(3) Turn the ignition switch to the Off position.
Disconnect and isolate the battery negative cable.
Disconnect the rear HVAC wire harness connector
from the rear blower motor resistor block (Manual
Temperature Control) or the rear blower motor power
module (Automatic Temperature Control). Reconnect
the battery negative cable. Turn the ignition switch
to the On position. Be certain that the rear A/C-
heater control power is turned on. Check for battery
voltage at the fused rear blower motor relay output
circuit cavity of the rear HVAC wire harness connec-
tor for the rear blower motor resistor block (MTC) or
the rear blower motor power module (ATC). If OK, go
to Step 4. If not OK, repair the open fused front
blower motor relay output circuit to the IPM as
required.
(4) Turn the ignition switch to the Off position.
Disconnect and isolate the battery negative cable.Disconnect the rear blower motor pigtail wire connec-
tor from the rear HVAC wire harness (MTC) or the
rear blower power module (ATC). Use jumper wires
to connect a battery and ground feeds to the blower
motor pigtail wire connector. The rear blower motor
should operate. If OK with MTC, proceed to diagno-
sis of the rear blower motor resistor block (Refer to
24 - HEATING & AIR CONDITIONING/CONTROLS
- REAR/BLOWER MOTOR RESISTOR - DIAGNOSIS
AND TESTING). If OK with ATC, use a DRBIII scan
tool to diagnose the rear blower motor power module.
Refer to the appropriate diagnostic information. If
not OK with MTC or ATC, replace the faulty rear
blower motor.
BLOWER MOTOR NOISE OR VIBRATION
Refer to the Blower Motor Noise/Vibration Diagno-
sis chart for basic checks of the blower motor when a
vibration or noise is present (Fig. 3).
REMOVAL
WARNING: REFER TO THE APPLICABLE WARN-
INGS AND CAUTIONS FOR THIS SYSTEM BEFORE
PERFORMING THE FOLLOWING OPERATION (Refer
to 24 - HEATING & AIR CONDITIONING/PLUMBING -
WARNING) and (Refer to 24 - HEATING & AIR CON-
DITIONING/PLUMBING - CAUTION).
(1) Remove the rear HVAC housing from the vehi-
cle (Refer to 24 - HEATING & AIR CONDITIONING/
DISTRIBUTION/HVAC HOUSING - REMOVAL).
(2) Disconnect the rear blower motor pigtail wire
connector.
NOTE: With the Manual Temperature Control sys-
tem, the blower motor pigtail wire is connected to a
take out and connector of the rear HVAC wire har-
ness. With the Automatic Temperature Control sys-
tem , the blower pigtail wire is connected to a
receptacle on the blower motor power module.
24 - 58 DISTRIBUTION - REARRS
BLOWER MOTOR (Continued)
Page 2316 of 2339
FRONT WIPER/WASHER SWITCH -DIAGNOSIS AND TESTING ..............8R-2
FRONT-WHEEL-DRIVE - INSTALLATION ....2-36
FRONT-WHEEL-DRIVE - REMOVAL ........2-36
FUEL CORRECTION OR ADAPTIVE MEMORIES, OPERATION ...............14-24
FUEL DELIVERY SYSTEM - DIAGNOSIS AND TESTING ........................ 14-2
FUEL DOSING PUMP - DESCRIPTION ....24-117
FUEL DOSING PUMP - INSTALLATION . . . 24-117
FUEL DOSING PUMP - OPERATION .....24-117
FUEL DOSING PUMP - REMOVAL .......24-117
FUEL ENGINE OIL - DESCRIPTION, FLEXIBLE .............................0-3
FUEL FILL DOOR - INSTALLATION .......23-52
FUEL FILL DOOR - REMOVAL ...........23-52
FUEL FILL DOOR BLOCKER LATCH - INSTALLATION ....................... 23-53
FUEL FILL DOOR BLOCKER LATCH - REMOVAL .......................... 23-53
FUEL FILL DOOR BLOCKER LATCH STRIKER - INSTALLATION ..............23-53
FUEL FILL DOOR BLOCKER LATCH STRIKER - REMOVAL .................23-53
FUEL FILL DOOR BLOCKER LOCKOUT LINK - INSTALLATION .................23-54
FUEL FILL DOOR BLOCKER LOCKOUT LINK - REMOVAL ..................... 23-54
FUEL FILLER CAP - DESCRIPTION .......25-13
FUEL FILLER CAP - OPERATION .........25-13
FUEL INJECTOR - DESCRIPTION .........14-30
FUEL INJECTOR - OPERATION ..........14-31
FUEL LEVEL SENDING UNIT / SENSOR - DESCRIPTION ........................ 14-5
FUEL LEVEL SENDING UNIT / SENSOR - INSTALLATION ........................ 14-6
FUEL LEVEL SENDING UNIT / SENSOR - OPERATION .......................... 14-5
FUEL LEVEL SENDING UNIT / SENSOR - REMOVAL ........................... 14-5
FUEL LINES/HOSES AND CLAMPS - DESCRIPTION ........................ 14-7
FUEL PRESSURE GAUGE - STANDARD PROCEDURE ......................... 14-3
FUEL PRESSURE REGULATOR - INSTALLATION ........................ 14-7
FUEL PRESSURE REGULATOR - OPERATION .......................... 14-7
FUEL PRESSURE REGULATOR - REMOVAL ........................... 14-7
FUEL PUMP - DESCRIPTION .............14-8
FUEL PUMP - OPERATION ..............14-8
FUEL PUMP MODULE - DESCRIPTION .....14-8
FUEL PUMP MODULE - OPERATION .......14-9
FUEL PUMP RELAY - DESCRIPTION ......14-32
FUEL PUMP RELAY - OPERATION ........14-32
FUEL REQUIREMENTS - DESCRIPTION ......0-4
FUEL REQUIREMENTS - DIESEL ENGINE - DESCRIPTION ........................0-6
FUEL, SPECIAL TOOLS ............14-27,14-4
FUEL SYSTEM PRESSURE RELEASE PROCEDURE - STANDARD
PROCEDURE ......................... 14-2
FUEL SYSTEM PRESSURE, SPECIFICATIONS ...................... 14-4
FUEL TANK - DESCRIPTION ............14-12
FUEL TANK - OPERATION ..............14-12
FUEL TANK - STANDARD PROCEDURE, DRAINING ........................... 14-2
FUEL TANK FILLER TUBE - INSTALLATION ....................... 14-17
FUEL TANK FILLER TUBE - REMOVAL ....14-16
FULL OPEN SWITCH - DESCRIPTION ....8N-11,
8N-52
FUNCTIONS - DESCRIPTION, CIRCUIT . . 8W-01-6
FUSE - DESCRIPTION, IOD ...........8W-97-3
FUSE - OPERATION, IOD .............8W-97-3
FUSES POWERING SEVERAL LOADS - STANDARD PROCEDURE, TESTING
FOR A SHORT TO GROUND ON ......8W-01-10
FWD - FOLD-IN-FLOOR SEATING - INSTALLATION ........................ 2-45
FWD - FOLD-IN-FLOOR SEATING - REMOVAL ........................... 2-45
FWD - INSTALLATION ..................2-45
FWD - INSTALLATION, REAR WHEEL SPEED SENSOR ....................... 5-93
FWD - INSTALLATION, SPRING ...........2-42FWD - REMOVAL
...................... 2-45
FWD - REMOVAL, REAR WHEEL SPEED SENSOR ............................ 5-93
FWD - REMOVAL, SPRING ..............2-40
GALLERY PLUGS - STANDARD PROCEDURE, ENGINE CORE AND OIL . 9-10,9-88
GAP AND FLUSH MEASUREMENTS - SPECIFICATIONS .................... 23-177
GAP, SPECIFICATIONS - WHEEL SPEED SENSOR AIR ......................... 5-91
GAS STRUT - SECOND ROW - FOLD-IN-FLOOR - INSTALLATION, SEAT . . 23-139
GAS STRUT - SECOND ROW - FOLD-IN-FLOOR - REMOVAL, SEAT ......23-138
GASKET - DIAGNOSIS AND TESTING, CYLINDER HEAD ................. 9-102,9-25
GASKET SURFACE PREPARATION - STANDARD PROCEDURE, ENGINE ....9-11,9-87
GASKETS AND SEALERS, STANDARD PROCEDURE - FORM-IN-PLACE ......9-11,9-86
GAUGE - STANDARD PROCEDURE, FUEL PRESSURE .......................... 14-3
GEAR - DESCRIPTION .................19-26
GEAR - INSTALLATION, LHD ............19-31
GEAR - INSTALLATION, RHD ............19-33
GEAR & LINK ROD - DESCRIPTION, LIFT . 8N-16
GEAR & LINK ROD - INSTALLATION, LIFT ............................... 8N-17
GEAR & LINK ROD - OPERATION, LIFT . . . 8N-16
GEAR & LINK ROD - REMOVAL, LIFT .....8N-16
GEAR - OPERATION .................... 19-26
GEAR - REMOVAL, LHD ...............19-26
GEAR - REMOVAL, RHD ...............19-29
GEAR SHIFT CABLE - INSTALLATION ....21-234
GEAR SHIFT CABLE - REMOVAL . . . 21-233,21-84
GEAR, SPECIAL TOOLS - POWER STEERING .......................... 19-34
GEARSHIFT CABLE ADJUSTMENT, ADJUSTMENTS ..................... 21-235
GEARTRAIN - DESCRIPTION, PLANETARY .................. 21-112,21-263
GEARTRAIN - OPERATION, PLANETARY . 21-112, 21-263
GENERAL - WARNINGS .............8W-01-7
GENERAL DIAGNOSIS - DIAGNOSIS AND TESTING, 4XTE TRANSAXLE .......21-149,21-5
GENERATOR - DESCRIPTION ...........8F-24
GENERATOR - OPERATION .............8F-24
GENERATOR DECOUPLER PULLEY - DESCRIPTION ....................... 8F-28
GENERATOR DECOUPLER PULLEY - DIAGNOSIS AND TESTING ..............8F-28
GENERATOR DECOUPLER PULLEY - INSTALLATION ....................... 8F-29
GENERATOR DECOUPLER PULLEY - OPERATION ......................... 8F-28
GENERATOR DECOUPLER PULLEY - REMOVAL .......................... 8F-29
GENERATOR, SPECIFICATIONS ..........8F-23
GLASS - DESCRIPTION, HEATED .........8G-1
GLASS - INSTALLATION, DOOR .........23-17
GLASS - INSTALLATION, LIFTGATE ......23-164
GLASS - INSTALLATION, SLIDING DOOR . 23-163
GLASS - OPERATION, HEATED ...........8G-2
GLASS - REMOVAL, DOOR .............23-16
GLASS - REMOVAL, LIFTGATE .........23-164
GLASS - REMOVAL, SLIDING DOOR .....23-163
GLASS INTEGRAL ANTENNA - EXPORT - DESCRIPTION, QUARTER ..............8A-13
GLASS INTEGRAL ANTENNA - EXPORT - OPERATION, QUARTER ................8A-13
GLASS INTEGRAL ANTENNA, EXPORT - QUARTER .......................... 8A-13
GLASS PANEL - INSTALLATION ........23-173
GLASS PANEL - REMOVAL ............23-173
GLASS PANEL ADJUSTMENT, ADJUSTMENTS - SUNROOF ...........23-173
GLASS RUN WEATHERSTRIP - INSTALLATION, FRONT DOOR ..........23-166
GLASS RUN WEATHERSTRIP - REMOVAL, FRONT DOOR .............23-166
GLASS-OUTSIDE REARVIEW MIRROR - INSTALLATION ....................... 23-61
GLASS-OUTSIDE REARVIEW MIRROR - REMOVAL .......................... 23-61
GLOVE BOX - INSTALLATION ...........23-66
GLOVE BOX - REMOVAL ...............23-66GLOVE BOX LAMP SWITCH -
INSTALLATION ....................... 8L-22
GLOVE BOX LAMP SWITCH - REMOVAL . . 8L-22
GLOVE BOX LATCH - INSTALLATION .....23-66
GLOVE BOX LATCH - REMOVAL .........23-66
GLOVE BOX LATCH STRIKER - INSTALLATION ....................... 23-66
GLOVE BOX LATCH STRIKER - REMOVAL . 23-66
GRID REPAIR PROCEDURE, STANDARD PROCEDURE ......................... 8G-5
GRILLE - DESCRIPTION ...............23-55
GRILLE - INSTALLATION ...............23-55
GRILLE - INSTALLATION, COWL .........23-50
GRILLE - REMOVAL ..................23-55
GRILLE - REMOVAL, COWL ............23-50
GROCERY BAG RETAINER - INSTALLATION, PLASTIC ..............23-149
GROCERY BAG RETAINER - REMOVAL, PLASTIC .......................... 23-149
GROMMET REPLACEMENT, STANDARD PROCEDURE - PUSH-PIN ..............8N-48
GROUND - OPERATION, PCM ...........8E-14
GROUND - STANDARD PROCEDURE, TESTING FOR A SHORT TO ..........8W-01-9
GROUND AND SPLICE INFORMATION - DESCRIPTION, CONNECTOR ..........8W-01-7
GROUND ON FUSES POWERING SEVERAL LOADS - STANDARD
PROCEDURE, TESTING FOR A SHORT
TO.............................8W -01-10
GUIDE - INSTALLATION, UNDER SEAT STORAGE BIN ...................... 23-150
GUIDE - REMOVAL, UNDER SEAT STORAGE BIN ...................... 23-150
GUIDE PIN BUSHINGS (CONTINENTAL TEVES BRAKES) - ASSEMBLY, CALIPER ....5-25
GUIDE PIN BUSHINGS (CONTINENTAL TEVES BRAKES) - DISASSEMBLY,
CALIPER ............................ 5-24
GUIDE PINS (TRW BRAKES) - INSTALLATION, DISC BRAKE CALIPER .....5-32
GUIDE PINS (TRW BRAKES) - REMOVAL, DISC BRAKE CALIPER .................. 5-31
HALF SHAFT - DIAGNOSIS AND TESTING . . . 3-1
HALF SHAFT - FRONT - DESCRIPTION ......3-1
HALF SHAFT - FRONT - INSTALLATION .....3-4
HALF SHAFT - FRONT - REMOVAL .........3-2
HALF SHAFT - FRONT - SPECIFICATIONS ....3-6
HANDLE - INSTALLATION, ASSIST .......23-79
HANDLE - INSTALLATION, EXTERIOR ....23-22,
23-40
HANDLE - INSTALLATION, INSIDE LATCH . . 23-34
HANDLE - INSTALLATION, OUTSIDE ......23-36
HANDLE - INSTALLATION, RECLINER ....23-108
HANDLE - REMOVAL, ASSIST ...........23-79
HANDLE - REMOVAL, EXTERIOR . . . 23-21,23-40
HANDLE - REMOVAL, INSIDE LATCH .....23-34
HANDLE - REMOVAL, OUTSIDE .........23-35
HANDLE - REMOVAL, RECLINER .......23-108
HANDLE ACTUATOR - INSTALLATION, INSIDE ............................. 23-27
HANDLE ACTUATOR - REMOVAL, INSIDE . . 23-27
HANDLE CABLE - INSTALLATION, INSIDE . . 23-38
HANDLE CABLE - INSTALLATION, OUTSIDE ........................... 23-37
HANDLE CABLE - REMOVAL, INSIDE .....23-37
HANDLE CABLE - REMOVAL, OUTSIDE ....23-37
HANDLE SWITCH - DESCRIPTION, EXTERIOR .......................... 8N-10
HANDLE SWITCH - INSTALLATION, EXTERIOR .......................... 8N-10
HANDLE SWITCH - OPERATION, EXTERIOR .......................... 8N-10
HANDLE SWITCH - REMOVAL, EXTERIOR . 8N-10
HANDLING AIRBAGS - STANDARD PROCEDURE ......................... 8O-6
HANDLING TUBING AND FITTINGS, STANDARD PROCEDURE ...............24-69
HANDS FREE MODULE - INSTALLATION ....8T-3
HANDS FREE MODULE - REMOVAL .......8T-3
HARNESS - DESCRIPTION, WIRING ......8N-59
HARNESS - DIAGNOSIS AND TESTING, WIRING ..........................8W -01-7
HARNESS - INSTALLATION, WIRING .....8N-59
HARNESS - OPERATION, WIRING ........8N-59
HARNESS - REMOVAL, WIRING .........8N-59
HCU (HYDRAULIC CONTROL UNIT) - DESCRIPTION ....................... 5-100
RS INDEX15
Description Group-Page Description Group-Page Description Group-Page
Page 2319 of 2339
INTERMEDIATE - INSTALLATION, CABLE- PARKING BRAKE ..................... 5-69
INTERMEDIATE - REMOVAL, CABLE - PARKING BRAKE ...................... 5-69
INTERNATIONAL SYMBOLS - DESCRIPTION .........................0-1
INTRODUCTION - DIAGNOSIS AND TESTING, ENGINE DIAGNOSIS ........9-3,9-78
IOD FUSE - DESCRIPTION ...........8W-97-3
IOD FUSE - OPERATION .............8W-97-3
JOINT - DESCRIPTION, LOWER BALL ......2-10
JOINT - DIAGNOSIS AND TESTING, LOWER BALL ........................ 2-10
JOINT - OPERATION, LOWER BALL .......2-10
JOINT MOLDING - INSTALLATION, ROOF . . 23-60
JOINT MOLDING - REMOVAL, ROOF ......23-60
JOUNCE BUMPER - DESCRIPTION ........2-35
JOUNCE BUMPER - OPERATION ..........2-35
JUMP STARTING - STANDARD PROCEDURE ......................... 0-25
JUNCTION BLOCK - DESCRIPTION, NON-ABS ............................ 5-33
JUNCTION BLOCK - INSTALLATION, NON-ABS ............................ 5-34
JUNCTION BLOCK - OPERATION, NON-ABS ............................ 5-33
JUNCTION BLOCK - REMOVAL, NON-ABS . . 5-34
KEY - DESCRIPTION, TRANSPONDER .....8Q-6
KEY - OPERATION, TRANSPONDER .......8Q-6
KEY LOCK TUMBLER - FOLD-IN-FLOOR - INSTALLATION, FLOOR CONSOLE ........23-90
KEY LOCK TUMBLER - FOLD-IN-FLOOR - REMOVAL, FLOOR CONSOLE ...........23-90
KEY REMOTE ENTRY MODULE - DESCRIPTION, SENTRY ................8Q-3
KEY REMOTE ENTRY MODULE - DIAGNOSIS AND TESTING, SENTRY .......8Q-5
KEY REMOTE ENTRY MODULE - INSTALLATION, SENTRY ................8Q-6
KEY REMOTE ENTRY MODULE - OPERATION, SENTRY .................. 8Q-4
KEY REMOTE ENTRY MODULE - REMOVAL, SENTRY ................... 8Q-6
KEY REMOTE ENTRY SYSTEM - DIAGNOSIS AND TESTING, SENTRY .......8Q-3
KEYLESS ENTRY TRANSMITTER, DIAGNOSIS AND TESTING .............8N-24
KEYLESS ENTRY TRANSMITTER PROGRAMMING - STANDARD
PROCEDURE, REMOTE ................8N-24
KEY/LOCK CYLINDER - DESCRIPTION ....19-20
KEY/LOCK CYLINDER - INSTALLATION ....19-20
KEY/LOCK CYLINDER - OPERATION ......19-20
KEY/LOCK CYLINDER - REMOVAL .......19-20
KNEE - INSTALLATION, BLOCKER- INFLATABLE ......................... 23-75
KNEE - REMOVAL, BLOCKER- INFLATABLE ......................... 23-75
KNEE BLOCKER AIRBAG - DESCRIPTION . . 8O-22
KNEE BLOCKER AIRBAG - INSTALLATION . 8O-23
KNEE BLOCKER AIRBAG - OPERATION . . . 8O-22
KNEE BLOCKER AIRBAG - REMOVAL .....8O-23
KNOB - INSTALLATION, SEAT BELT HEIGHT ADJUSTER ................... 8O-38
KNOB - REMOVAL, SEAT BELT HEIGHT ADJUSTER ......................... 8O-38
KNOCK SENSOR - DESCRIPTION ..........8I-8
KNOCK SENSOR - OPERATION ...........8I-8
KNUCKLE - DESCRIPTION ................2-6
KNUCKLE - INSPECTION, STEERING ........2-9
KNUCKLE - INSTALLATION, STEERING ......2-9
KNUCKLE - OPERATION .................2-7
KNUCKLE - REMOVAL, STEERING .........2-7
LABEL, DESCRIPTION - VEHICLE EMISSION CONTROL INFORMATION .......25-1
LAMP - DESCRIPTION, VTSS/SKIS INDICATOR .......................... 8Q-8
LAMP - DIAGNOSIS AND TESTING, FRONT FOG .......................... 8L-7
LAMP - INSTALLATION, CENTER CONSOLE ........................... 8L-21
LAMP - INSTALLATION, CENTER HIGH MOUNTED STOP ...................... 8L-6
LAMP - INSTALLATION, COURTESY ......8L-21
LAMP - INSTALLATION, DOME/CARGO ....8L-22
LAMP - INSTALLATION, FRONT FOG .......8L-8
LAMP - INSTALLATION, LICENSE ........8L-17
LAMP - INSTALLATION, LIFTGATE .......8L-22 LAMP - INSTALLATION, PARK/TURN
SIGNAL ............................ 8L-18
LAMP - INSTALLATION, READING ........8L-23
LAMP - INSTALLATION, TAIL ...........8L-19
LAMP - INSTALLATION, VANITY .........8L-24
LAMP - OPERATION, VTSS/SKIS INDICATOR .......................... 8Q-8
LAMP - REMOVAL, CENTER CONSOLE ....8L-21
LAMP - REMOVAL, CENTER HIGH MOUNTED STOP ...................... 8L-6
LAMP - REMOVAL, COURTESY ..........8L-21
LAMP - REMOVAL, DOME/CARGO .......8L-22
LAMP - REMOVAL, FRONT FOG ..........8L-8
LAMP - REMOVAL, LICENSE ............8L-17
LAMP - REMOVAL, LIFTGATE ...........8L-22
LAMP - REMOVAL, PARK/TURN SIGNAL . . 8L-18
LAMP - REMOVAL, READING ...........8L-22
LAMP - REMOVAL, TAIL ...............8L-18
LAMP - REMOVAL, VANITY .............8L-24
LAMP SWITCH - DESCRIPTION, BRAKE ....8L-4
LAMP SWITCH - DIAGNOSIS AND TESTING, BRAKE ...................... 8L-4
LAMP SWITCH - INSTALLATION, BRAKE . . . 8L-5
LAMP SWITCH - INSTALLATION, CENTER CONSOLE ........................... 8L-21
LAMP SWITCH - INSTALLATION, GLOVE BOX ............................... 8L-22
LAMP SWITCH - OPERATION, BRAKE ......8L-4
LAMP SWITCH - REMOVAL, BRAKE .......8L-5
LAMP SWITCH - REMOVAL, CENTER CONSOLE ........................... 8L-21
LAMP SWITCH - REMOVAL, GLOVE BOX . . 8L-22
LAMP UNIT - INSTALLATION, CENTER HIGH MOUNTED STOP .................8L-6
LAMP UNIT - INSTALLATION, TAIL .......8L-19
LAMP UNIT - REMOVAL, CENTER HIGH MOUNTED STOP ...................... 8L-6
LAMP UNIT - REMOVAL, TAIL ...........8L-19
LAMP UNIT ALIGNMENT - EXPORT - STANDARD PROCEDURE, FRONT FOG .....8L-9
LAMP UNIT ALIGNMENT - STANDARD PROCEDURE, FRONT FOG ...............8L-9
LAMPS - INSTALLATION, CLUSTER ILLUMINATION ...................... 8L-21
LAMPS - REMOVAL, CLUSTER ILLUMINATION ...................... 8L-21
LAMPS, SPECIFICATIONS - EXTERIOR .....8L-3
LAMPS, SPECIFICATIONS - INTERIOR ....8L-20
LAMPS/LIGHTING - EXTERIOR - DESCRIPTION ........................ 8L-2
LAMPS/LIGHTING - EXTERIOR - OPERATION .......................... 8L-2
LAMPS/LIGHTING - EXTERIOR - WARNING ........................... 8L-3
LAP BELT - FOLD-IN-FLOOR - INSTALLATION, SEAT BELT CENTER .....23-157
LAP BELT - FOLD-IN-FLOOR - REMOVAL, SEAT BELT CENTER .................. 23-157
LASH ADJUSTER NOISE DIAGNOSIS - DIAGNOSIS AND TESTING, HYDRAULIC ....9-34
LASH ADJUSTERS - INSTALLATION, HYDRAULIC .......................... 9-35
LASH ADJUSTERS - REMOVAL, HYDRAULIC .......................... 9-35
LATCH - DESCRIPTION ...........8N-12,8N-49
LATCH - FOLD-IN-FLOOR - INSTALLATION, FLOOR CONSOLE LID ....23-90
LATCH - FOLD-IN-FLOOR - REMOVAL, FLOOR CONSOLE LID .................23-90
LATCH - INSTALLATION .....23-18,23-41,23-63
LATCH - INSTALLATION ..........8N-13,8N-50
LATCH - INSTALLATION, FUEL FILL DOOR BLOCKER ..................... 23-53
LATCH - INSTALLATION, GLOVE BOX .....23-66
LATCH - INSTALLATION, HOLD OPEN .....23-25
LATCH / LOCK ASSEMBLY - INSTALLATION ....................... 23-27
LATCH / LOCK ASSEMBLY - REMOVAL ....23-26
LATCH - OPERATION ............8N-12,8N-49
LATCH - REMOVAL .........23-18,23-41,23-63
LATCH - REMOVAL ..............8N-12,8N-49
LATCH - REMOVAL, FUEL FILL DOOR BLOCKER ........................... 23-53
LATCH - REMOVAL, GLOVE BOX .........23-66
LATCH - REMOVAL, HOLD OPEN ........23-25
LATCH ACTUATOR - DESCRIPTION ......8N-13
LATCH ACTUATOR - INSTALLATION ......8N-14
LATCH ACTUATOR - OPERATION ........8N-13 LATCH ACTUATOR - REMOVAL
..........8N-13
LATCH CABLE - INSTALLATION, HOLD OPEN .............................. 23-38
LATCH CABLE - REMOVAL, HOLD OPEN . . . 23-38
LATCH HANDLE - INSTALLATION, INSIDE . . 23-34
LATCH HANDLE - REMOVAL, INSIDE .....23-34
LATCH LOCKING LINK - INSTALLATION, SEAT RISER ........................ 23-151
LATCH LOCKING LINK - REMOVAL, SEAT RISER ............................ 23-151
LATCH RELEASE CABLE - INSTALLATION . . 23-64
LATCH RELEASE CABLE - REMOVAL .....23-63
LATCH STRIKER - INSTALLATION . . 23-19,23-42, 23-64
LATCH STRIKER - INSTALLATION, FUEL FILL DOOR BLOCKER .................23-53
LATCH STRIKER - INSTALLATION, GLOVE BOX ............................... 23-66
LATCH STRIKER - INSTALLATION, HOLD OPEN .............................. 23-26
LATCH STRIKER - INSTALLATION, REAR . . 23-29
LATCH STRIKER - REMOVAL . 23-19,23-41,23-64
LATCH STRIKER - REMOVAL, FUEL FILL DOOR BLOCKER ..................... 23-53
LATCH STRIKER - REMOVAL, GLOVE BOX ............................... 23-66
LATCH STRIKER - REMOVAL, HOLD OPEN .............................. 23-26
LATCH STRIKER - REMOVAL, REAR ......23-29
LEAD - DIAGNOSIS AND TESTING, TIRE/VEHICLE ......................... 22-14
LEAF SPRING FRONT - INSTALLATION, BUSHING ............................ 2-30
LEAF SPRING FRONT - REMOVAL, BUSHING ............................ 2-29
LEAK DETECTION ASSY - INSTALLATION, NATURAL VAC ....................... 25-14
LEAK DETECTION ASSY - REMOVAL, NATURAL VAC ....................... 25-14
LEAK DETECTION PUMP - INSTALLATION . 25-15
LEAK DETECTION PUMP - REMOVAL .....25-15
LEAK INSPECTION - DIAGNOSIS AND TESTING, ENGINE OIL ...............9-8,9-84
LEAK REPAIRING - STANDARD PROCEDURE, TIRE ................... 22-17
LEAK TEST - DIAGNOSIS AND TESTING, COOLING SYSTEM .....................7-2
LEAKAGE - DIAGNOSIS AND TESTING, TORQUE CONVERTER HOUSING FLUID . . 21-154, 21-9
LEAKAGE TEST - DIAGNOSIS AND TESTING, CYLINDER COMBUSTION
PRESSURE ....................... 9-85,9-9
LEAKS - DIAGNOSIS AND TESTING, INTAKE MANIFOLD ...............9-147,9-60
LEAKS, DIAGNOSIS AND TESTING - REFRIGERANT SYSTEM ...............24-67
LEAKS, DIAGNOSIS AND TESTING - WATER ............................. 23-1
LEARN CYCLE, STANDARD PROCEDURE - POWER LIFTGATE ................... 8N-8
LEARN CYCLE, STANDARD PROCEDURE - POWER SLIDING DOOR ..............8N-48
LEARN PROCEDURE - STANDARD PROCEDURE, QUICK .................. 8E-15
LENS - INSTALLATION, CLUSTER ........8J-11
LENS - REMOVAL, CLUSTER ............8J-11
LEVEL AND CONDITION CHECK, STANDARD PROCEDURE - FLUID . . 21-230,21-82
LEVEL CHECK - STANDARD PROCEDURE, COOLANT .................7-4
LEVEL CHECK - STANDARD PROCEDURE, ENGINE OIL ..............9-140
LEVEL CHECK, STANDARD PROCEDURE - ENGINE OIL ........................ 9-54
LEVEL CHECKING - STANDARD PROCEDURE, BRAKE FLUID .............5-33
LEVEL CHECKING - STANDARD PROCEDURE, POWER STEERING FLUID . . . 19-44
LEVEL SENDING UNIT / SENSOR - DESCRIPTION, FUEL ................... 14-5
LEVEL SENDING UNIT / SENSOR - INSTALLATION, FUEL .................. 14-6
LEVEL SENDING UNIT / SENSOR - OPERATION, FUEL ..................... 14-5
LEVEL SENDING UNIT / SENSOR - REMOVAL, FUEL ...................... 14-5
18 INDEXRS
Description Group-Page Description Group-Page Description Group-Page
Page 2325 of 2339
POWER MODULE - INSTALLATION,INTEGRATED ......................8W -97-2
POWER MODULE - OPERATION, INTEGRATED ......................8W -97-2
POWER MODULE - REAR BLOWER MOTOR - DESCRIPTION ...............24-40
POWER MODULE - REAR BLOWER MOTOR - INSTALLATION ...............24-41
POWER MODULE - REAR BLOWER MOTOR - OPERATION .................24-40
POWER MODULE - REAR BLOWER MOTOR - REMOVAL .................. 24-41
POWER MODULE - REMOVAL, INTEGRATED ......................8W -97-2
POWER OUTLET - DESCRIPTION ......8W-97-3
POWER OUTLET - DIAGNOSIS & TESTING .........................8W -97-3
POWER OUTLET - OPERATION ........8W-97-3
POWER SEAT SYSTEM, DESCRIPTION ....8N-31
POWER SEAT SYSTEM, DIAGNOSIS AND TESTING ........................... 8N-33
POWER SEAT SYSTEM, OPERATION .....8N-32
POWER SEAT TRACK - DESCRIPTION ....8N-37
POWER SEAT TRACK - OPERATION ......8N-38
POWER SEAT TRACK, DIAGNOSIS AND TESTING ........................... 8N-38
POWER SLIDING DOOR ADJUSTMENT, STANDARD PROCEDURE ..............8N-49
POWER SLIDING DOOR LEARN CYCLE, STANDARD PROCEDURE ..............8N-48
POWER SLIDING DOOR SYSTEM - DESCRIPTION ........................ 8N-40
POWER SLIDING DOOR SYSTEM - OPERATION ......................... 8N-41
POWER SLIDING DOOR SYSTEM, DIAGNOSIS AND TESTING .............8N-42
POWER STEERING BELT TENSION - STANDARD PROCEDURE, CHECKING .......7-8
POWER STEERING FASTENER TORQUE, SPECIFICATIONS ...................... 19-9
POWER STEERING FLUID LEVEL CHECKING - STANDARD PROCEDURE ....19-44
POWER STEERING GEAR, SPECIAL TOOLS ............................. 19-34
POWER STEERING PUMP INITIAL OPERATION - STANDARD PROCEDURE . . . 19-37
POWER STEERING PUMP, SPECIAL TOOLS ............................. 19-44
POWER STEERING, SPECIAL TOOLS ......19-9
POWER STEERING SYSTEM - DESCRIPTION ........................ 19-1
POWER STEERING SYSTEM - OPERATION .......................... 19-1
POWER STEERING SYSTEM FLOW AND PRESSURE TEST - DIAGNOSIS AND
TESTING ............................ 19-1
POWER TRANSFER UNIT FLUID - DESCRIPTION, AWD ....................0-6
POWER WINDOWS - DESCRIPTION ......8N-61
POWER WINDOWS - OPERATION ........8N-61
POWER WINDOWS, DIAGNOSIS AND TESTING ........................... 8N-61
POWERING SEVERAL LOADS - STANDARD PROCEDURE, TESTING
FOR A SHORT TO GROUND ON FUSES . 8W-01-10
PRELOAD - ADJUSTMENT, DIFFERENTIAL BEARING ..............21-228
PRELOAD MEASUREMENT AND ADJUSTMENT, ADJUSTMENTS -
DIFFERENTIAL BEARING ...............21-79
PREPARATION - STANDARD PROCEDURE, ENGINE GASKET
SURFACE ........................ 9-11,9-87
PRESSURE - DIAGNOSIS AND TESTING, CHECKING ENGINE OIL .................9-53
PRESSURE - DIAGNOSIS AND TESTING, ENGINE OIL ......................... 9-138
PRESSURE CAP - DESCRIPTION, RADIATOR ........................... 7-27
PRESSURE CAP - OPERATION, RADIATOR ........................... 7-27
PRESSURE CAP TESTING - DIAGNOSIS AND TESTING, COOLING SYSTEM ........7-28
PRESSURE FOR HIGH SPEED OPERATION - STANDARD PROCEDURE,
TIRE ............................... 22-17
PRESSURE GAUGE - STANDARD PROCEDURE, FUEL .................... 14-3PRESSURE LEAKAGE TEST - DIAGNOSIS
AND TESTING, CYLINDER
COMBUSTION ..................... 9-85,9-9
PRESSURE MONITORING - DESCRIPTION, TIRE ................... 22-9
PRESSURE MONITORING - OPERATION, TIRE ............................... 22-10
PRESSURE REGULATOR - INSTALLATION, FUEL .................. 14-7
PRESSURE REGULATOR - OPERATION, FUEL ............................... 14-7
PRESSURE REGULATOR - REMOVAL, FUEL ............................... 14-7
PRESSURE RELEASE PROCEDURE - STANDARD PROCEDURE, FUEL
SYSTEM ............................ 14-2
PRESSURE RELIEF VALVE - INSTALLATION, OIL ................... 9-144
PRESSURE RELIEF VALVE - REMOVAL, OIL................................ 9-143
PRESSURE RELIEF VALVE, DESCRIPTION - HIGH ............................. 24-72
PRESSURE RELIEF VALVE, OPERATION - HIGH .............................. 24-72
PRESSURE SENSOR - DESCRIPTION, SEAT WEIGHT BLADDER ...............8O-43
PRESSURE SENSOR - DIAGNOSIS AND TESTING, TIRE ...................... 22-11
PRESSURE SENSOR - OPERATION, SEAT WEIGHT BLADDER ................... 8O-44
PRESSURE, SPECIFICATIONS - FUEL SYSTEM ............................ 14-4
PRESSURE SWITCH - DESCRIPTION, OIL . 9-144
PRESSURE SWITCH - INSTALLATION, OIL ........................... 9-144,9-56
PRESSURE SWITCH - OPERATION, OIL . . . 9-144
PRESSURE SWITCH - REMOVAL, OIL ....9-144,
9-56
PRESSURE TEST - DIAGNOSIS AND TESTING, CYLINDER COMPRESSION . . . 9-85,9-9
PRESSURE TEST - DIAGNOSIS AND TESTING, POWER STEERING SYSTEM
FLOW ............................... 19-1
PRESSURE TESTS - DIAGNOSIS AND TESTING, CLUTCH AIR ...........21-153,21-8
PRESSURE TESTS - DIAGNOSIS AND TESTING, HYDRAULIC ............21-150,21-6
PRESSURE TRANSDUCER - DESCRIPTION, A/C ................... 24-20
PRESSURE TRANSDUCER - OPERATION, A/C................................ 24-20
PRESSURE TRANSDUCER, DIAGNOSIS AND TESTING - A/C ................... 24-21
PRESSURES - STANDARD PROCEDURE, TIRE INFLATION ..................... 22-16
PROGRAMMABLE COMMUNICATIONS INTERFACE (PCI) BUS, OPERATION ......14-25
PROGRAMMING - STANDARD PROCEDURE, PCM/SKIM ................8E-1
PROGRAMMING - STANDARD PROCEDURE, REMOTE KEYLESS
ENTRY TRANSMITTER ................8N-24
PROGRAMMING - STANDARD PROCEDURE, TRANSPONDER ...........8Q-6
PROGRAMMING, STANDARD PROCEDURE - ELECTRONIC VEHICLE
INFORMATION CENTER ................8M-8
PROP ROD - SECOND ROW - FOLD-IN- FLOOR - INSTALLATION, SEAT .........23-140
PROP ROD - SECOND ROW - FOLD-IN- FLOOR - REMOVAL, SEAT .............23-139
PROPORTIONING - DESCRIPTION, ELECTRONIC VARIABLE BRAKE ..........5-88
PROPORTIONING - OPERATION, ELECTRONIC VARIABLE BRAKE ..........5-89
PROPORTIONING VALVE (HEIGHT SENSING) - DESCRIPTION ..............5-53
PROPORTIONING VALVE (HEIGHT SENSING) - DIAGNOSIS AND TESTING .....5-54
PROPORTIONING VALVE (HEIGHT SENSING) - INSTALLATION ..............5-55
PROPORTIONING VALVE (HEIGHT SENSING) - OPERATION ................5-53
PROPORTIONING VALVE (HEIGHT SENSING) - REMOVAL .................5-55
PULLEY - DESCRIPTION, GENERATOR DECOUPLER ........................ 8F-28PULLEY - DIAGNOSIS AND TESTING,
GENERATOR DECOUPLER ..............8F-28
PULLEY - INSTALLATION, GENERATOR DECOUPLER ........................ 8F-29
PULLEY - INSTALLATION, TIMING BELT TENSIONER .......................... 9-70
PULLEY - OPERATION, GENERATOR DECOUPLER ........................ 8F-28
PULLEY - REMOVAL, GENERATOR DECOUPLER ........................ 8F-29
PULLEY - REMOVAL, TIMING BELT TENSIONER .......................... 9-69
PUMP - 2.4L - CLEANING, WATER ........7-32
PUMP - 2.4L - DESCRIPTION, WATER .....7-32
PUMP - 2.4L - INSPECTION, WATER ......7-32
PUMP - 2.4L - INSTALLATION, WATER .....7-32
PUMP - 2.4L - REMOVAL, WATER ........7-32
PUMP - 3.3/3.8L - CLEANING, WATER .....7-35
PUMP - 3.3/3.8L - DESCRIPTION, WATER ............................. 7-34
PUMP - 3.3/3.8L - INSPECTION, WATER . . . 7-35
PUMP - 3.3/3.8L - INSTALLATION, WATER ............................. 7-35
PUMP - 3.3/3.8L - REMOVAL, WATER .....7-34
PUMP - ASSEMBLY, OIL ...........9-146,9-58
PUMP - ASSEMBLY, OIL ........21-112,21-263
PUMP - CLEANING, OIL ...........9-145,9-57
PUMP - DESCRIPTION, FUEL ............14-8
PUMP - DESCRIPTION, FUEL DOSING . . . 24-117
PUMP - DESCRIPTION, OIL .............9-144
PUMP - DESCRIPTION, OIL ......21-110,21-261
PUMP - DISASSEMBLY, OIL ........9-145,9-57
PUMP - DISASSEMBLY, OIL .....21-110,21-261
PUMP - INSPECTION, OIL ..........9-145,9-58
PUMP - INSTALLATION, FUEL DOSING . . . 24-117
PUMP - INSTALLATION, LEAK DETECTION ......................... 25-15
PUMP - INSTALLATION, OIL ........9-146,9-59
PUMP - INSTALLATION, SEAL - OIL ....21-113,
21-264
PUMP - OPERATION, FUEL ..............14-8
PUMP - OPERATION, FUEL DOSING .....24-117
PUMP - OPERATION, OIL .......21-110,21-261
PUMP - REMOVAL, FUEL DOSING ......24-117
PUMP - REMOVAL, LEAK DETECTION ....25-15
PUMP - REMOVAL, OIL ............9-144,9-56
PUMP - REMOVAL, SEAL - OIL . . . 21-113,21-264
PUMP (2.4L ENGINE) - INSTALLATION ....19-43
PUMP (2.4L ENGINE) - REMOVAL .......19-38
PUMP (2.4L/3.3L/3.8L ENGINE) - DESCRIPTION ....................... 19-36
PUMP (3.3L/3.8L ENGINE) - INSTALLATION ....................... 19-43
PUMP (3.3L/3.8L ENGINE) - REMOVAL . . . 19-40
PUMP (DIESEL) - DESCRIPTION .........19-37
PUMP (DIESEL) - INSTALLATION ........19-43
PUMP (DIESEL) - REMOVAL ............19-41
PUMP INITIAL OPERATION - STANDARD PROCEDURE, POWER STEERING ........19-37
PUMP INLET TUBE - 2.4L - DESCRIPTION, WATER .................7-36
PUMP INLET TUBE - 2.4L - INSTALLATION, WATER .................7-36
PUMP INLET TUBE - 2.4L - REMOVAL, WATER ............................. 7-36
PUMP INLET TUBE - 3.3/3.8L - INSTALLATION, WATER .................7-37
PUMP INLET TUBE - 3.3/3.8L - REMOVAL, WATER .................... 7-37
PUMP MODULE - DESCRIPTION, FUEL ....14-8
PUMP MODULE - OPERATION, FUEL ......14-9
PUMP MOTOR - INSTALLATION, WASHER ........................... 8R-12
PUMP MOTOR - REMOVAL, WASHER ....8R-12
PUMP (PULLEY) - ASSEMBLY ..........19-42
PUMP (PULLEY) - DISASSEMBLY ........19-41
PUMP RELAY - DESCRIPTION, FUEL .....14-32
PUMP RELAY - OPERATION, FUEL .......14-32
PUMP, SPECIAL TOOLS - POWER STEERING .......................... 19-44
PUSH-PIN GROMMET REPLACEMENT, STANDARD PROCEDURE ..............8N-48
PUSHRODS - DESCRIPTION ............9-112
PUSHRODS - OPERATION ..............9-112
QUAD BUCKET - INSTALLATION, BUCKET SEAT BACK ........................ 23-141
QUAD BUCKET - INSTALLATION, SEAT BELT BUCKLE - FIRST ROW INBOARD ....8O-36
24 INDEXRS
Description Group-Page Description Group-Page Description Group-Page