2005 CHRYSLER CARAVAN seat adjustment
[x] Cancel search: seat adjustmentPage 424 of 2339

POWER SYSTEMS
TABLE OF CONTENTS
page page
POWER LIFTGATE SYSTEM.................. 1
POWER LOCKS........................... 20
POWER MIRRORS........................ 26POWER SEAT SYSTEM..................... 31
POWER SLIDING DOOR SYSTEM............ 40
POWER WINDOWS........................ 61
POWER LIFTGATE SYSTEM
TABLE OF CONTENTS
page page
POWER LIFTGATE SYSTEM
DESCRIPTION..........................2
OPERATION............................2
DIAGNOSIS AND TESTING
POWER LIFTGATE SYSTEM..............3
STANDARD PROCEDURE
LIFTGATE ADJUSTMENT................8
POWER LIFTGATE LEARN CYCLE.........8
CHIME/THERMISTOR
DESCRIPTION..........................8
OPERATION............................8
REMOVAL.............................8
INSTALLATION..........................9
ENGAGE ACTUATOR
DESCRIPTION..........................9
OPERATION............................9
REMOVAL.............................9
INSTALLATION.........................10
EXTERIOR HANDLE SWITCH
DESCRIPTION.........................10
OPERATION...........................10
REMOVAL.............................10
INSTALLATION.........................10
FULL OPEN SWITCH
DESCRIPTION.........................11
OPERATION...........................11
REMOVAL.............................11
INSTALLATION.........................11
LATCH
DESCRIPTION.........................12OPERATION...........................12
REMOVAL.............................12
INSTALLATION.........................13
LATCH ACTUATOR
DESCRIPTION.........................13
OPERATION...........................13
REMOVAL.............................13
INSTALLATION.........................14
LIFTGATE MOTOR
DESCRIPTION.........................15
OPERATION...........................15
REMOVAL.............................15
INSTALLATION.........................16
LIFT GEAR & LINK ROD
DESCRIPTION.........................16
OPERATION...........................16
REMOVAL.............................16
INSTALLATION.........................17
PINCH SENSOR
DESCRIPTION.........................17
OPERATION...........................17
REMOVAL.............................18
INSTALLATION.........................18
TRANSVERSE BRACKET
DESCRIPTION.........................19
OPERATION...........................19
REMOVAL.............................19
INSTALLATION.........................19
RSPOWER SYSTEMS8N-1
Page 460 of 2339

DIAGNOSIS AND TESTING
MEMORY SWITCH
(1) Remove the memory switch from the drivers
door panel (Refer to 8 - ELECTRICAL/POWER
SEATS/MEMORY SET SWITCH - REMOVAL).
(2) Using an ohmmeter, check the continuity of the
memory select switch MUX circuit between the C2
wire harness connector for the Body Control Module
(BCM) and the wire harness connector for the mem-
ory switch. There should be continuity. If OK, go to
Step 3. If not OK, repair the open or shorted MUX
circuit as required.
(3) Using an ohmmeter, check the continuity of the
memory select switch return circuit between the C2
wire harness connector for the BCM and the wire
harness connector for the memory switch. There
should be continuity. If OK, go to Step 4. If not OK,
repair the open or shorted return circuit as required.
(4) Using an ohmmeter, test the resistances of the
memory switch, refer to the MEMORY SWITCH
TEST TABLE. If OK, (Refer to 8 - ELECTRICAL/
POWER SEATS - DIAGNOSIS AND TESTING -
MEMORY SYSTEM). If not OK, replace the memory
switch, (Refer to 8 - ELECTRICAL/POWER SEATS/
MEMORY SET SWITCH - REMOVAL).
MEMORY SWITCH TEST TABLE
MEMORY
SWITCH
POSITIONRESISTANCE
BETWEEN
PINSRESISTANCE
RANGE
(OHMS)
NEUTRAL 1&2 24650 5%
(24.65 k)
MEMORY 1 1&2 6850 5%
(6.85 k)
MEMORY 2 1&2 2100 5%
(2.10 k)
SET 1&2 4490 5%
(4.49 k)
REMOVAL
(1) Disconnect and isolate the battery negative
cable.
(2) Remove the front door trim panel switch bezel
from the driver side front door. Using a thin flat-
bladed pry tool, gently pry the switch bezel away
from the drivers door trim panel.
(3) Disconnect the memory switch wire harness
connector from the memory switch.
(4) Remove the two screws that secure the memory
switch to the back of the driver side front door trim
panel switch bezel.
(5) Remove the memory switch.
INSTALLATION
(1) Position the memory switch and install and
tighten the two screws that secure the memory
switch to the back of the driver side front door trim
panel switch bezel. Tighten the screws to 2.2 N´m (20
in. lbs.).
(2) Reconnect the memory switch wire harness
connector to the memory switch.
(3) Install the trim panel switch bezel onto the
driver side front door.
(4) Reconnect the battery negative cable.
POWER SEAT TRACK
DESCRIPTION
The power seat option includes an electrically oper-
ated power seat track located under the front seat. If
equipped with Memory System, the front power seat
track on the driver side of the vehicle also provides
the mounting location for the Memory Seat/Mirror
Module (MSMM). The power seat circuit breakers are
mounted on the rear of the power seat track, just
behind the seat rear trim panel. The lower half of the
power seat track is secured to the floor panel via four
studs and nuts that must be accessed from the
underside of the vehicle. Four bolts secure the bot-
tom of the seat cushion pan to the upper half of the
power seat track unit. Four additional bolts secure
the seat back frame to the power seat track unit.
The eight-way power seat track unit includes four
reversible electric motors that are secured to the
upper half of the track unit. Each motor moves the
seat adjuster through a combination of worm-drive
gearboxes and screw-type drive units. Each of the
four power seat track motors used on models
equipped with the optional memory system incorpo-
rate a position potentiometer integral to the motor
assembly, which electronically monitors the motor
position. This enables the memory system to function
by referencing the motor positions programmed into
the memory seat/mirror module.
The front and rear of the seat are operated by two
separate vertical adjustment motors. These motors
can be operated independently of each other, tilting
the entire seat assembly forward or rearward. They
can also be operated in unison by selecting the
proper power seat switch functions, which will raise
or lower the entire seat assembly. A third motor is
the horizontal adjustment motor, which moves the
seat track in the forward and aft directions. The
forth motor is the recliner adjustment motor, which
moves the seat back in the forward and rearward
directions.
The four-way power seat track unit includes two
reversible electric motors that are secured to the
RSPOWER SEAT SYSTEM8N-37
MEMORY SWITCH (Continued)
Page 461 of 2339

upper half of the track unit. Each motor moves the
seat adjuster through a combination of worm-drive
gearboxes and screw-type drive units. The horizontal
adjustment motor moves the seat track in the for-
ward and aft directions. The recliner adjustment
motor moves the seat back in the forward and rear-
ward directions.
The power seat track unit cannot be repaired, and
is serviced only as a complete unit. If any component
in this unit is faulty or damaged, the entire power
seat track unit must be replaced.
OPERATION
When the power seat switch control knob or knobs
are actuated, a battery feed and a ground path are
applied through the switch contacts to the power seat
track or recliner adjuster motor. The selected
adjuster motor operates to move the seat track or
recliner through its drive unit in the selected direc-
tion until the switch is released, or until the travel
limit of the adjuster is reached. When the switch is
moved in the opposite direction, the battery feed and
ground path to the motor are reversed through the
switch contacts. This causes the adjuster motor to
run in the opposite direction.
No power seat switch should be held applied in any
direction after the adjuster has reached its travel
limit. The power seat adjuster motors each contain a
self-resetting circuit breaker to protect them from
overload. However, consecutive or frequent resetting
of the circuit breaker must not be allowed to con-
tinue, or the motor may be damaged.
DIAGNOSIS AND TESTING
POWER SEAT TRACK
WARNING: SOME VEHICLES ARE EQUIPPED WITH
SEATBACK MOUNTED AIRBAGS. BEFORE
ATTEMPTING TO DIAGNOSE OR SERVICE ANY
SEAT OR POWER SEAT SYSTEM COMPONENT
YOU MUST FIRST DISCONNECT AND ISOLATE THE
BATTERY NEGATIVE CABLE. THEN WAIT TWO MIN-
UTES FOR THE SYSTEM CAPACITOR TO DIS-
CHARGE BEFORE FURTHER SYSTEM SERVICE.
THIS IS THE ONLY SURE WAY TO DISABLE THE
AIRBAG SYSTEM. FAILURE TO DO SO COULD
RESULT IN ACCIDENTAL AIRBAG DEPLOYMENT
AND POSSIBLE PERSONAL INJURY.
Actuate the power seat switch to move the power
seat track adjusters in each direction. The power seat
track adjusters should move in each of the selected
directions. If a power seat track adjuster operates in
one direction only, move the adjuster a short distance
in the opposite direction and test again to be certainthat the adjuster is not at its travel limit. If the
power seat track adjuster still operates in one direc-
tion only, (Refer to 8 - ELECTRICAL/POWER
SEATS/DRIVER SEAT SWITCH - DIAGNOSIS AND
TESTING). If the power seat track adjuster does not
operate in more than one direction, perform the fol-
lowing tests.
TESTING POWER SEAT TRACK MOTORS
(1) Check the power seat circuit breaker under the
seat. If OK, go to Step 2. If not OK, replace the
faulty power seat circuit breaker.
(2) Check for battery voltage at the power seat cir-
cuit breaker under the seat. If OK, go to Step 3. If
not OK, repair the open fused B(+) circuit to the fuse
in the Integrated Power Module (IPM) as required.
(3) Remove the outboard seat cushion side cover,
(Refer to 23 - BODY/SEATS/SEAT CUSHION SIDE
COVERS - REMOVAL). Disconnect the wire harness
connector from the power seat switch. Check for bat-
tery voltage at the fused B(+) circuit cavity of the
power seat switch wire harness connector. If OK, go
to Step 4. If not OK, repair the open fused B(+) cir-
cuit to the power seat circuit breaker under the seat
as required.
(4) Check for continuity between the ground cir-
cuit cavity of the power seat switch wire harness con-
nector and a known good ground. There should be
continuity. If OK, go to Step 5. If not OK, repair the
open ground circuit as required.
(5) Test the power seat switch, (Refer to 8 - ELEC-
TRICAL/POWER SEATS/DRIVER SEAT SWITCH -
DIAGNOSIS AND TESTING). If the switch tests OK,
test the circuits of the power seat wire harness
between the inoperative power seat track adjuster
motor and the power seat switch for shorts or opens.
If the circuits check OK, replace the faulty power
seat track unit. If the circuits are not OK, repair the
power seat wire harness as required.
REMOVAL
WARNING: SOME VEHICLES ARE EQUIPPED WITH
SEATBACK MOUNTED AIRBAGS. BEFORE
ATTEMPTING TO DIAGNOSE OR SERVICE ANY
SEAT OR POWER SEAT SYSTEM COMPONENT
YOU MUST FIRST DISCONNECT AND ISOLATE THE
BATTERY NEGATIVE CABLE. THEN WAIT TWO MIN-
UTES FOR THE SYSTEM CAPACITOR TO DIS-
CHARGE BEFORE FURTHER SYSTEM SERVICE.
THIS IS THE ONLY SURE WAY TO DISABLE THE
AIRBAG SYSTEM. FAILURE TO DO SO COULD
RESULT IN ACCIDENTAL AIRBAG DEPLOYMENT
AND POSSIBLE PERSONAL INJURY.
(1) Disconnect and isolate the battery negative
cable.
8N - 38 POWER SEAT SYSTEMRS
POWER SEAT TRACK (Continued)
Page 1542 of 2339
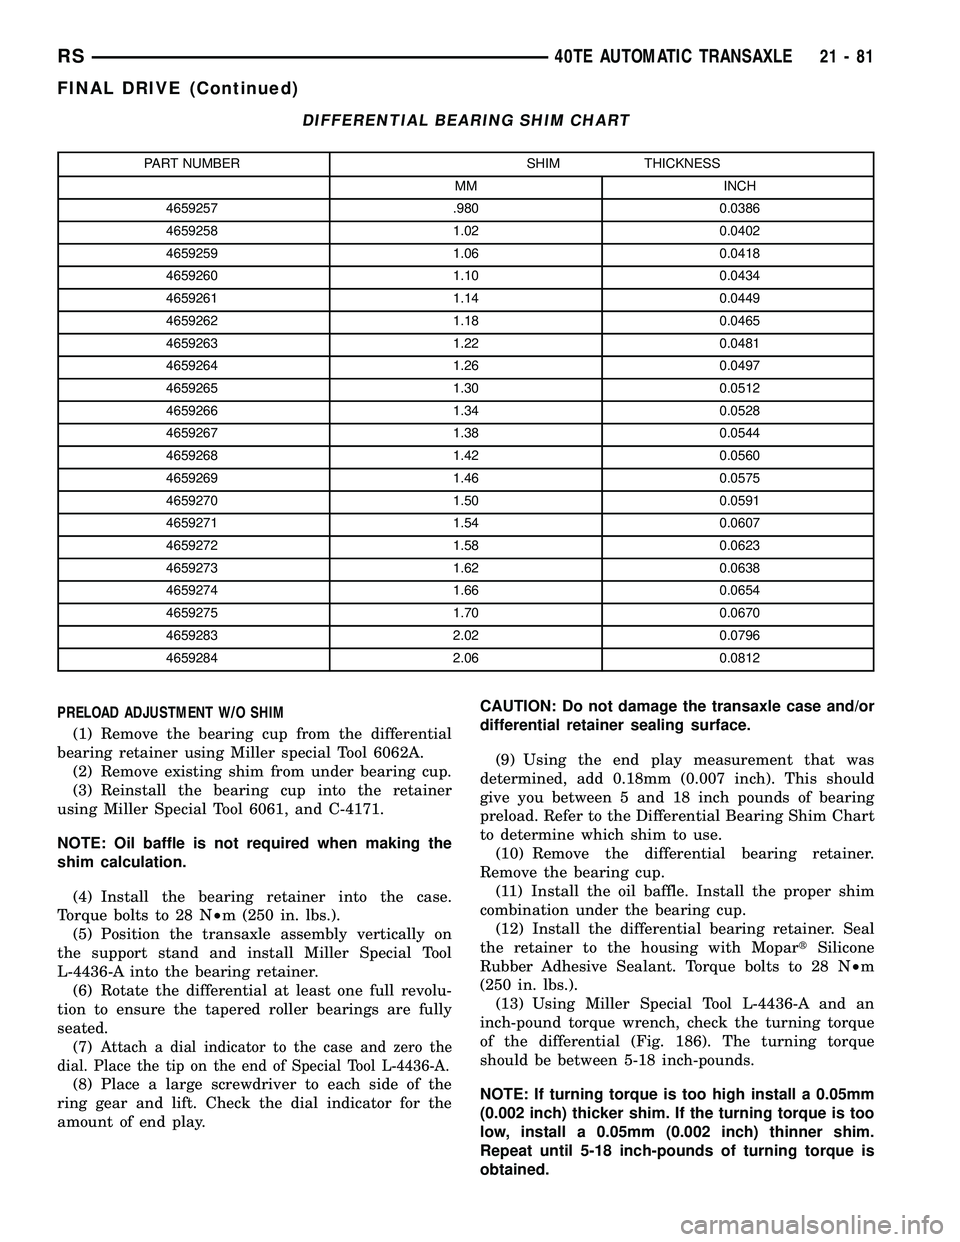
DIFFERENTIAL BEARING SHIM CHART
PART NUMBER SHIM THICKNESS
MM INCH
4659257 .980 0.0386
4659258 1.02 0.0402
4659259 1.06 0.0418
4659260 1.10 0.0434
4659261 1.14 0.0449
4659262 1.18 0.0465
4659263 1.22 0.0481
4659264 1.26 0.0497
4659265 1.30 0.0512
4659266 1.34 0.0528
4659267 1.38 0.0544
4659268 1.42 0.0560
4659269 1.46 0.0575
4659270 1.50 0.0591
4659271 1.54 0.0607
4659272 1.58 0.0623
4659273 1.62 0.0638
4659274 1.66 0.0654
4659275 1.70 0.0670
4659283 2.02 0.0796
4659284 2.06 0.0812
PRELOAD ADJUSTMENT W/O SHIM
(1) Remove the bearing cup from the differential
bearing retainer using Miller special Tool 6062A.
(2) Remove existing shim from under bearing cup.
(3) Reinstall the bearing cup into the retainer
using Miller Special Tool 6061, and C-4171.
NOTE: Oil baffle is not required when making the
shim calculation.
(4) Install the bearing retainer into the case.
Torque bolts to 28 N²m (250 in. lbs.).
(5) Position the transaxle assembly vertically on
the support stand and install Miller Special Tool
L-4436-A into the bearing retainer.
(6) Rotate the differential at least one full revolu-
tion to ensure the tapered roller bearings are fully
seated.
(7)
Attach a dial indicator to the case and zero the
dial. Place the tip on the end of Special Tool L-4436-A.
(8) Place a large screwdriver to each side of the
ring gear and lift. Check the dial indicator for the
amount of end play.CAUTION: Do not damage the transaxle case and/or
differential retainer sealing surface.
(9) Using the end play measurement that was
determined, add 0.18mm (0.007 inch). This should
give you between 5 and 18 inch pounds of bearing
preload. Refer to the Differential Bearing Shim Chart
to determine which shim to use.
(10) Remove the differential bearing retainer.
Remove the bearing cup.
(11) Install the oil baffle. Install the proper shim
combination under the bearing cup.
(12) Install the differential bearing retainer. Seal
the retainer to the housing with MopartSilicone
Rubber Adhesive Sealant. Torque bolts to 28 N²m
(250 in. lbs.).
(13) Using Miller Special Tool L-4436-A and an
inch-pound torque wrench, check the turning torque
of the differential (Fig. 186). The turning torque
should be between 5-18 inch-pounds.
NOTE: If turning torque is too high install a 0.05mm
(0.002 inch) thicker shim. If the turning torque is too
low, install a 0.05mm (0.002 inch) thinner shim.
Repeat until 5-18 inch-pounds of turning torque is
obtained.
RS40TE AUTOMATIC TRANSAXLE21-81
FINAL DRIVE (Continued)
Page 1689 of 2339
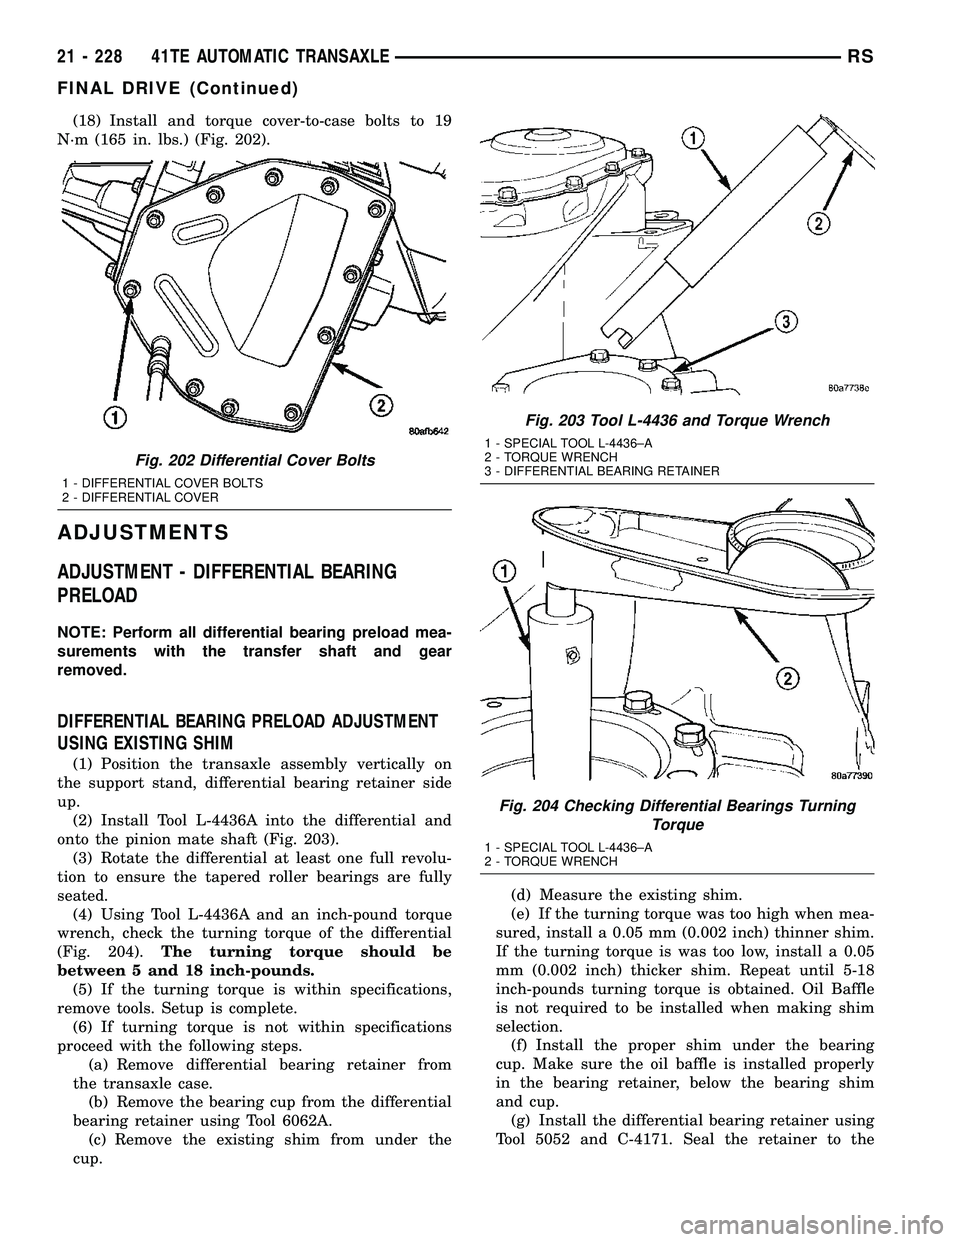
(18) Install and torque cover-to-case bolts to 19
N´m (165 in. lbs.) (Fig. 202).
ADJUSTMENTS
ADJUSTMENT - DIFFERENTIAL BEARING
PRELOAD
NOTE: Perform all differential bearing preload mea-
surements with the transfer shaft and gear
removed.
DIFFERENTIAL BEARING PRELOAD ADJUSTMENT
USING EXISTING SHIM
(1) Position the transaxle assembly vertically on
the support stand, differential bearing retainer side
up.
(2) Install Tool L-4436A into the differential and
onto the pinion mate shaft (Fig. 203).
(3) Rotate the differential at least one full revolu-
tion to ensure the tapered roller bearings are fully
seated.
(4) Using Tool L-4436A and an inch-pound torque
wrench, check the turning torque of the differential
(Fig. 204).The turning torque should be
between 5 and 18 inch-pounds.
(5) If the turning torque is within specifications,
remove tools. Setup is complete.
(6) If turning torque is not within specifications
proceed with the following steps.
(a) Remove differential bearing retainer from
the transaxle case.
(b) Remove the bearing cup from the differential
bearing retainer using Tool 6062A.
(c) Remove the existing shim from under the
cup.(d) Measure the existing shim.
(e) If the turning torque was too high when mea-
sured, install a 0.05 mm (0.002 inch) thinner shim.
If the turning torque is was too low, install a 0.05
mm (0.002 inch) thicker shim. Repeat until 5-18
inch-pounds turning torque is obtained. Oil Baffle
is not required to be installed when making shim
selection.
(f) Install the proper shim under the bearing
cup. Make sure the oil baffle is installed properly
in the bearing retainer, below the bearing shim
and cup.
(g) Install the differential bearing retainer using
Tool 5052 and C-4171. Seal the retainer to the
Fig. 202 Differential Cover Bolts
1 - DIFFERENTIAL COVER BOLTS
2 - DIFFERENTIAL COVER
Fig. 203 Tool L-4436 and Torque Wrench
1 - SPECIAL TOOL L-4436±A
2 - TORQUE WRENCH
3 - DIFFERENTIAL BEARING RETAINER
Fig. 204 Checking Differential Bearings Turning
Torque
1 - SPECIAL TOOL L-4436±A
2 - TORQUE WRENCH
21 - 228 41TE AUTOMATIC TRANSAXLERS
FINAL DRIVE (Continued)
Page 1690 of 2339
housing with MOPARtSilicone Rubber Adhesive
Sealant and torque bolts to 28 N´m (250 in. lbs.).
(7) Using Tool L-4436A and an inch-pound torque
wrench, recheck the turning torque of the differential
(Fig. 204).The turning torque should be within
5-18 inch-pounds.
Shim thickness need be determined only if any of
the following parts are replaced:²Transaxle case
²Differential carrier
²Differential bearing retainer
²Extension housing
²Differential bearing cups and cones
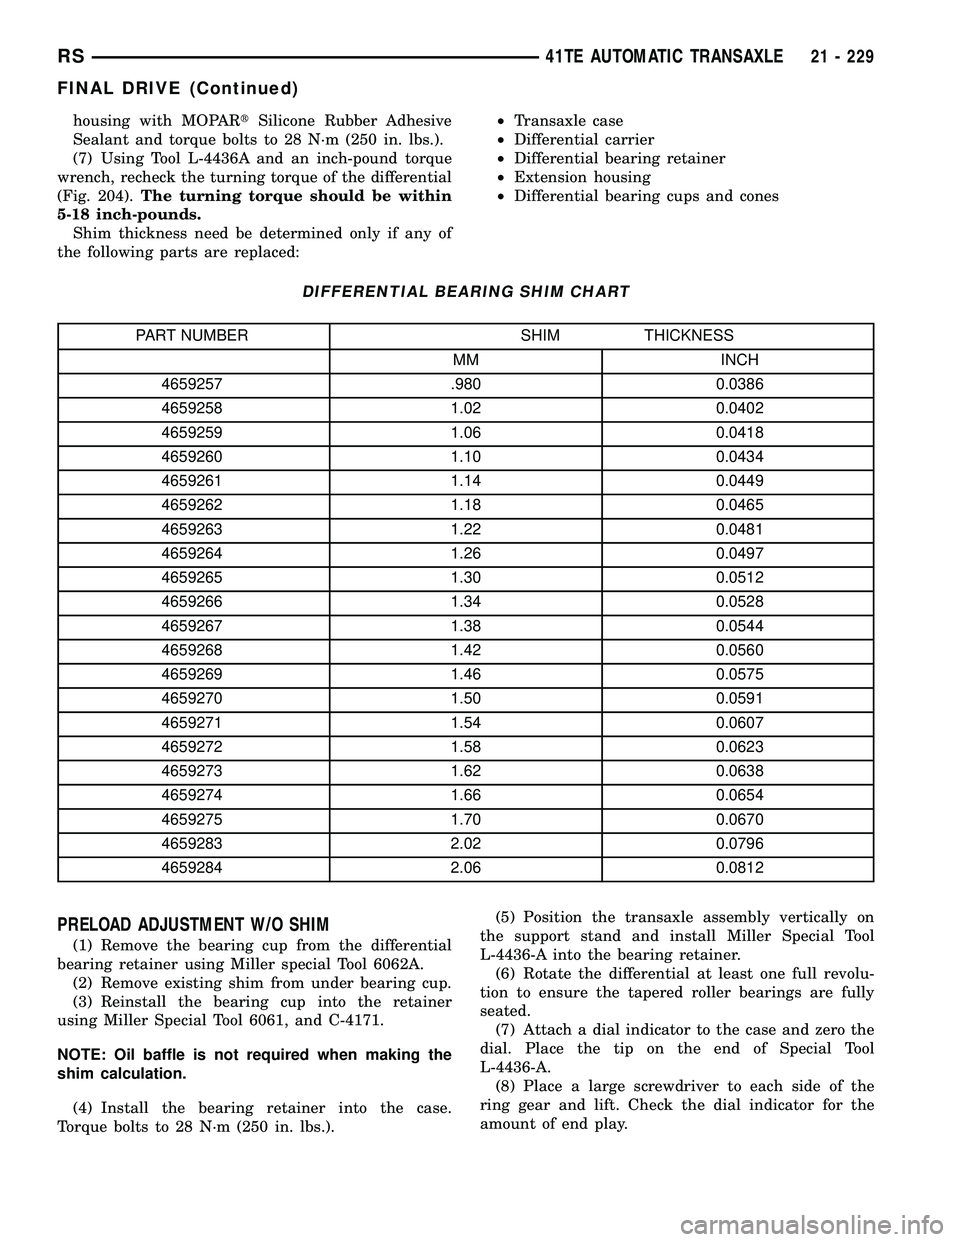
DIFFERENTIAL BEARING SHIM CHART
PART NUMBER SHIM THICKNESS
MM INCH
4659257 .980 0.0386
4659258 1.02 0.0402
4659259 1.06 0.0418
4659260 1.10 0.0434
4659261 1.14 0.0449
4659262 1.18 0.0465
4659263 1.22 0.0481
4659264 1.26 0.0497
4659265 1.30 0.0512
4659266 1.34 0.0528
4659267 1.38 0.0544
4659268 1.42 0.0560
4659269 1.46 0.0575
4659270 1.50 0.0591
4659271 1.54 0.0607
4659272 1.58 0.0623
4659273 1.62 0.0638
4659274 1.66 0.0654
4659275 1.70 0.0670
4659283 2.02 0.0796
4659284 2.06 0.0812
PRELOAD ADJUSTMENT W/O SHIM
(1) Remove the bearing cup from the differential
bearing retainer using Miller special Tool 6062A.
(2) Remove existing shim from under bearing cup.
(3) Reinstall the bearing cup into the retainer
using Miller Special Tool 6061, and C-4171.
NOTE: Oil baffle is not required when making the
shim calculation.
(4) Install the bearing retainer into the case.
Torque bolts to 28 N´m (250 in. lbs.).(5) Position the transaxle assembly vertically on
the support stand and install Miller Special Tool
L-4436-A into the bearing retainer.
(6) Rotate the differential at least one full revolu-
tion to ensure the tapered roller bearings are fully
seated.
(7) Attach a dial indicator to the case and zero the
dial. Place the tip on the end of Special Tool
L-4436-A.
(8) Place a large screwdriver to each side of the
ring gear and lift. Check the dial indicator for the
amount of end play.
RS41TE AUTOMATIC TRANSAXLE21 - 229
FINAL DRIVE (Continued)
Page 1881 of 2339
SEATS
TABLE OF CONTENTS
page page
CHILD SEAT MODULE, BENCH SEAT
REMOVAL............................104
INSTALLATION
INSTALLATION......................105
SYNCHRONIZING CABLE ADJUSTMENT . . 105
QUAD CHILD SEAT
REMOVAL............................106
INSTALLATION........................106
HEADREST
REMOVAL............................106
INSTALLATION........................106
HEADREST SLEEVE
REMOVAL............................107
INSTALLATION........................107
RECLINER HANDLE
REMOVAL............................108
INSTALLATION........................108
ARMREST
REMOVAL............................108
INSTALLATION........................108
FRONT SEAT
REMOVAL............................108
INSTALLATION........................110
FRONT SEAT BACK
REMOVAL............................111
INSTALLATION........................111
FRONT SEAT BACK ASSIST STRAP
REMOVAL............................112
INSTALLATION........................112
FRONT SEAT BACK PANEL
REMOVAL............................112
INSTALLATION........................113
FRONT SEAT BACK COVER
REMOVAL............................113
INSTALLATION........................116
FRONT SEAT CUSHION
REMOVAL............................117
INSTALLATION........................118
FRONT SEAT CUSHION - OCS
REMOVAL............................119
INSTALLATION........................120
FRONT SEAT CUSHION SIDE COVER
REMOVAL............................120
INSTALLATION........................121
FRONT SEAT CUSHION SIDE COVER - OCS
REMOVAL............................121
INSTALLATION........................122
FRONT SEAT RISER - MANUAL - OCS
REMOVAL............................123INSTALLATION........................123
FRONT SEAT TRACK POWER ADJUSTER
REMOVAL............................124
INSTALLATION........................124
FRONT SEAT TRACK ADJUSTER/POWER -
OCS
REMOVAL............................124
INSTALLATION........................125
FRONT SEAT TRACK MANUAL ADJUSTER
REMOVAL............................125
INSTALLATION........................126
FRONT SEAT TRACK ADJUSTER/MANUAL -
OCS
REMOVAL............................126
INSTALLATION........................128
FRONT SEAT TRACK - REAR COVER
REMOVAL............................128
INSTALLATION........................128
FRONT SEAT TRACK REAR COVER - OCS
REMOVAL............................129
INSTALLATION........................129
ARMREST - SECOND ROW - FOLD-IN-FLOOR
REMOVAL............................130
INSTALLATION........................130
ARMREST ROTATING ASSEMBLY - SECOND
ROW - FOLD-IN-FLOOR
REMOVAL............................130
INSTALLATION........................130
HEADREST SLEEVE - SECOND ROW -
FOLD-IN-FLOOR
REMOVAL............................131
INSTALLATION........................131
SEAT - SECOND ROW - FOLD-IN-FLOOR
REMOVAL............................132
INSTALLATION........................132
SEAT BACK COVER/FOAM - SECOND ROW -
FOLD-IN-FLOOR
REMOVAL............................133
INSTALLATION........................133
SEAT BACK FRAME - SECOND ROW -
FOLD-IN-FLOOR
REMOVAL............................134
INSTALLATION........................134
SEAT BACK PANEL - SECOND ROW -FOLD-IN-
FLOOR
REMOVAL............................134
INSTALLATION........................134
23 - 102 SEATSRS
Page 1882 of 2339
SEAT BASE RISER - SECOND ROW - FOLD-IN-
FLOOR
REMOVAL............................134
INSTALLATION........................135
SEAT CUSHION COVER/FOAM -SECOND ROW
- FOLD-IN-FLOOR
REMOVAL............................136
INSTALLATION........................136
SEAT RECLINER/FORWARD FOLDING
MECHANISM -SECOND ROW -FOLD-IN-
FLOOR
REMOVAL............................137
INSTALLATION........................137
SEAT CUSHION SIDE SHIELD - SECOND ROW
- FOLD-IN-FLOOR
REMOVAL............................138
INSTALLATION........................138
SEAT GAS STRUT - SECOND ROW - FOLD-IN-
FLOOR
REMOVAL............................138
INSTALLATION........................139
SEAT PROP ROD - SECOND ROW - FOLD-IN-
FLOOR
REMOVAL............................139
INSTALLATION........................140
BUCKET SEAT BACK - QUAD BUCKET
REMOVAL............................140
INSTALLATION........................141
QUAD SEAT CUSHION
REMOVAL............................141
INSTALLATION........................141
QUAD BUCKET SEAT SIDE SHIELD/CUP
HOLDER
REMOVAL............................141
INSTALLATION........................142
QUAD BUCKET SEAT SIDE SHIELD - NO CUP
HOLDER
REMOVAL............................143
INSTALLATION........................143
QUAD BUCKET SEAT RISER
REMOVAL............................143
INSTALLATION........................143
BENCH SEAT BACK PANEL
REMOVAL............................143
INSTALLATION........................144
SEAT CUSHION COVER - QUAD BUCKET,
50/50 SPLIT, BENCH
REMOVAL............................144
INSTALLATION........................144
BENCH SEAT RISER - 50/50 SPLIT
REMOVAL............................145
INSTALLATION........................145
BENCH SEAT RISER - SECOND ROW
REMOVAL............................145
INSTALLATION........................145BENCH SEAT RISER - THIRD ROW
REMOVAL............................145
INSTALLATION........................145
SEAT BACK HINGE COVERS - QUAD BUCKET,
50/50 SPLIT, BENCH
REMOVAL............................146
INSTALLATION........................146
BENCH SEAT BACK HINGE
REMOVAL............................146
INSTALLATION
INSTALLATION......................146
SYNCHRONIZING CABLE ADJUSTMENT . . 147
BENCH SEAT BACK
REMOVAL............................147
INSTALLATION........................147
BENCH SEAT BACK COVER
REMOVAL............................148
INSTALLATION........................148
BENCH SEAT TRACK
REMOVAL............................148
INSTALLATION........................148
PLASTIC GROCERY BAG RETAINER
REMOVAL............................149
INSTALLATION........................149
UNDER SEAT STORAGE BIN
REMOVAL............................149
INSTALLATION........................149
UNDER SEAT STORAGE BIN GUIDE
REMOVAL............................150
INSTALLATION........................150
UNDER SEAT STORAGE BIN LOCK/LATCH
REMOVAL............................150
INSTALLATION........................150
LUMBAR SUPPORT
REMOVAL............................150
INSTALLATION........................150
SEAT RISER LATCH LOCKING LINK
REMOVAL............................151
INSTALLATION........................151
QUAD BUCKET SEAT SIDE SHIELD/CUP
HOLDER - FLAP AND SPRING ASSEMBLY
REMOVAL............................151
INSTALLATION........................151
BOTTOM OF SEAT CUSHION PAN PANEL-
THIRD ROW - FOLD-IN-FLOOR
REMOVAL............................152
INSTALLATION........................152
HEADREST SLEEVE - THIRD ROW - FOLD-IN-
FLOOR
REMOVAL............................152
INSTALLATION........................153
SEAT - THIRD ROW - FOLD-IN-FLOOR
REMOVAL............................153
INSTALLATION........................154
RSSEATS23 - 103