2005 CHEVROLET VENTURE steering wheel
[x] Cancel search: steering wheelPage 323 of 470
Following Distance
Stay at least twice as far behind the vehicle ahead as
you would when driving your vehicle without a trailer.
This can help you avoid situations that require
heavy braking and sudden turns.
Passing
You will need more passing distance up ahead when you
are towing a trailer. And, because you are a good deal
longer, you will need to go much farther beyond the
passed vehicle before you can return to your lane.
Backing Up
Hold the bottom of the steering wheel with one hand.
Then, to move the trailer to the left, just move that hand
to the left. To move the trailer to the right, move your
hand to the right. Always back up slowly and, if possible,
have someone guide you.
Making Turns
Notice:Making very sharp turns while trailering
could cause the trailer to come in contact with the
vehicle. Your vehicle could be damaged. Avoid
making very sharp turns while trailering.
When you are turning with a trailer, make wider turns
than normal. Do this so your trailer will not strike
soft shoulders, curbs, road signs, trees, or other objects.
Avoid jerky or sudden maneuvers. Signal well in
advance.
Turn Signals When Towing a Trailer
When you tow a trailer, your vehicle has to have
extra wiring.
The arrows on your instrument panel will �ash whenever
you signal a turn or lane change. Properly hooked up,
the trailer lamps will also �ash, telling other drivers
you are about to turn, change lanes, or stop.
When towing a trailer, the arrows on your instrument
panel will �ash for turns even if the bulbs on the trailer
are burned out. Thus, you may think drivers behind
you are seeing your signal when they are not. It
is important to check occasionally to be sure the trailer
bulbs are still working.
4-41
Page 327 of 470

Service............................................................5-3
Doing Your Own Service Work.........................5-4
Adding Equipment to the Outside of
Your Vehicle..............................................5-5
Fuel................................................................5-5
Gasoline Octane............................................5-5
Gasoline Speci�cations....................................5-5
California Fuel...............................................5-6
Additives.......................................................5-6
Fuels in Foreign Countries...............................5-7
Filling Your Tank............................................5-8
Filling a Portable Fuel Container.....................5-10
Checking Things Under the Hood....................5-10
Hood Release..............................................5-11
Engine Compartment Overview.......................5-12
Engine Oil...................................................5-13
Engine Oil Life System..................................5-16
Engine Air Cleaner/Filter................................5-17
Automatic Transaxle Fluid..............................5-19
Engine Coolant.............................................5-22
Radiator Pressure Cap..................................5-25
Engine Overheating.......................................5-25
Overheated Engine Protection Operating Mode . . .5-27
Cooling System............................................5-28
Power Steering Fluid.....................................5-34
Windshield Washer Fluid................................5-35Brakes........................................................5-36
Battery........................................................5-39
Jump Starting...............................................5-40
Bulb Replacement..........................................5-45
Halogen Bulbs..............................................5-45
Headlamps..................................................5-46
Front Turn Signal, Sidemarker and
Parking Lamps..........................................5-48
Taillamps, Turn Signal, Stoplamps and
Back-up Lamps.........................................5-50
Replacement Bulbs.......................................5-51
Windshield Wiper Blade Replacement..............5-52
Tires..............................................................5-53
Tire Sidewall Labelling...................................5-54
Tire Terminology and De�nitions.....................5-56
In�ation - Tire Pressure.................................5-59
Tire Inspection and Rotation...........................5-60
When It Is Time for New Tires.......................5-61
Buying New Tires.........................................5-62
Uniform Tire Quality Grading..........................5-63
Wheel Alignment and Tire Balance..................5-64
Wheel Replacement......................................5-64
Tire Chains..................................................5-66
Accessory In�ator.........................................5-66
If a Tire Goes Flat........................................5-68
Changing a Flat Tire.....................................5-69
Section 5 Service and Appearance Care
5-1
Page 382 of 470
Tire Size
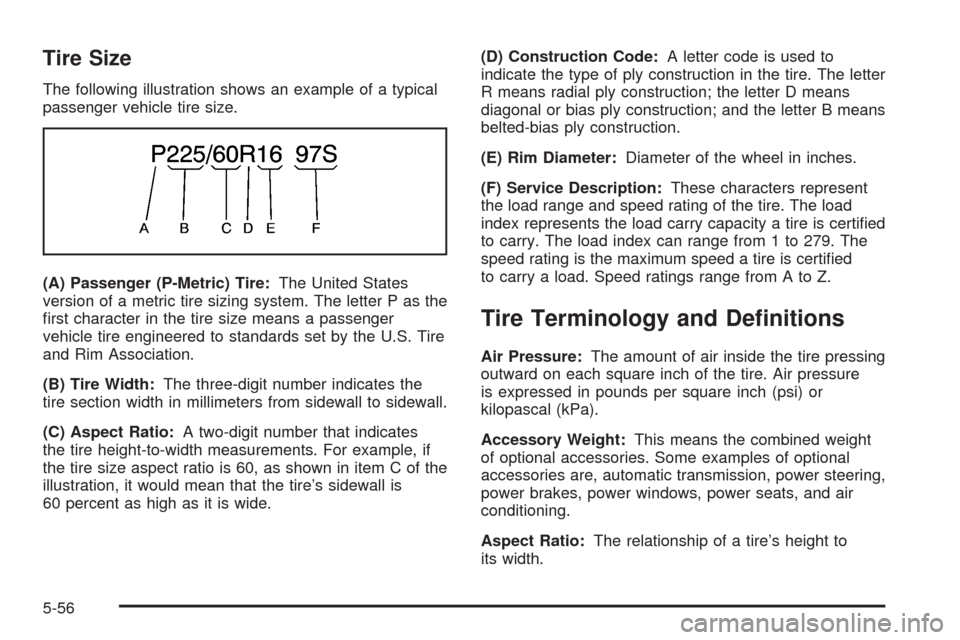
The following illustration shows an example of a typical
passenger vehicle tire size.
(A) Passenger (P-Metric) Tire:The United States
version of a metric tire sizing system. The letter P as the
�rst character in the tire size means a passenger
vehicle tire engineered to standards set by the U.S. Tire
and Rim Association.
(B) Tire Width:The three-digit number indicates the
tire section width in millimeters from sidewall to sidewall.
(C) Aspect Ratio:A two-digit number that indicates
the tire height-to-width measurements. For example, if
the tire size aspect ratio is 60, as shown in item C of the
illustration, it would mean that the tire’s sidewall is
60 percent as high as it is wide.(D) Construction Code:A letter code is used to
indicate the type of ply construction in the tire. The letter
R means radial ply construction; the letter D means
diagonal or bias ply construction; and the letter B means
belted-bias ply construction.
(E) Rim Diameter:Diameter of the wheel in inches.
(F) Service Description:These characters represent
the load range and speed rating of the tire. The load
index represents the load carry capacity a tire is certi�ed
to carry. The load index can range from 1 to 279. The
speed rating is the maximum speed a tire is certi�ed
to carry a load. Speed ratings range from A to Z.
Tire Terminology and De�nitions
Air Pressure:The amount of air inside the tire pressing
outward on each square inch of the tire. Air pressure
is expressed in pounds per square inch (psi) or
kilopascal (kPa).
Accessory Weight:This means the combined weight
of optional accessories. Some examples of optional
accessories are, automatic transmission, power steering,
power brakes, power windows, power seats, and air
conditioning.
Aspect Ratio:The relationship of a tire’s height to
its width.
5-56
Page 394 of 470
If a Tire Goes Flat
It’s unusual for a tire to “blowout” while you’re driving,
especially if you maintain your tires properly. If air goes
out of a tire, it’s much more likely to leak out slowly.
But if you should ever have a “blowout,” here are a
few tips about what to expect and what to do:
If a front tire fails, the �at tire will create a drag that
pulls the vehicle toward that side. Take your foot off the
accelerator pedal and grip the steering wheel �rmly.
Steer to maintain lane position, and then gently brake to
a stop well out of the traffic lane.
A rear blowout, particularly on a curve, acts much like a
skid and may require the same correction you’d use
in a skid. In any rear blowout, remove your foot from the
accelerator pedal. Get the vehicle under control by
steering the way you want the vehicle to go. It may be
very bumpy and noisy, but you can still steer. Gently
brake to a stop, well off the road if possible.{CAUTION:
Lifting a vehicle and getting under it to do
maintenance or repairs is dangerous without
the appropriate safety equipment and training.
The jack provided with your vehicle is
designed only for changing a �at tire. If it is
used for anything else, you or others could be
badly injured or killed if the vehicle slips off
the jack. Use the jack provided with your
vehicle only for changing a �at tire.
If a tire goes �at, the next part shows how to use your
jacking equipment to change a �at tire safely.
5-68
Page 419 of 470
If you ever have a problem on the road and do not have
a spare fuse, you can borrow one that has the same
amperage or use one of the spare fuses in the
underhood fuse block. Just pick some feature of your
vehicle that you can get along without – like the radio or
cigarette lighter – and use its fuse, if it is the right
amperage. Replace it as soon as you can.
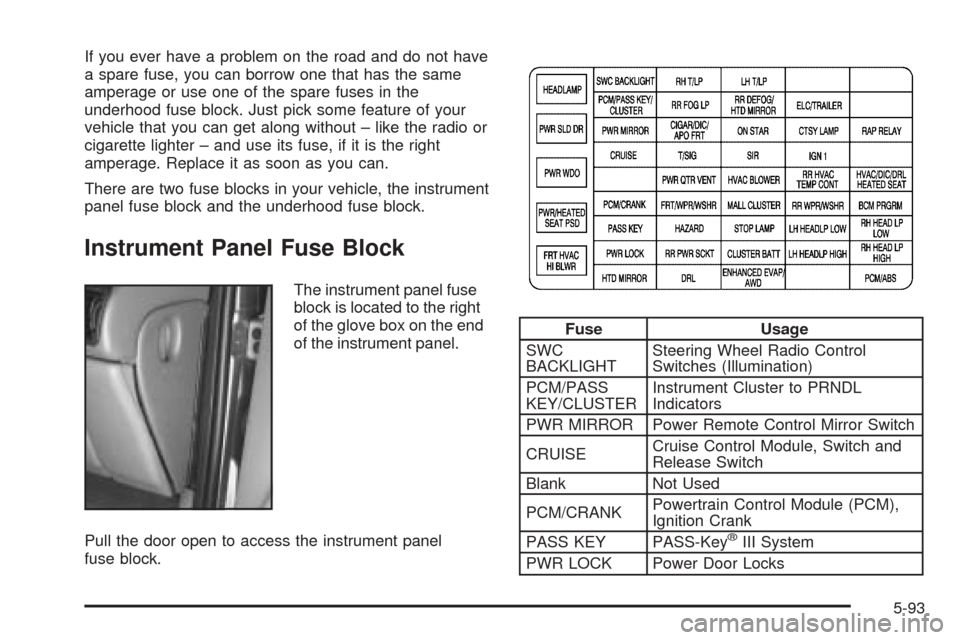
There are two fuse blocks in your vehicle, the instrument
panel fuse block and the underhood fuse block.
Instrument Panel Fuse Block
The instrument panel fuse
block is located to the right
of the glove box on the end
of the instrument panel.
Pull the door open to access the instrument panel
fuse block.
Fuse Usage
SWC
BACKLIGHTSteering Wheel Radio Control
Switches (Illumination)
PCM/PASS
KEY/CLUSTERInstrument Cluster to PRNDL
Indicators
PWR MIRROR Power Remote Control Mirror Switch
CRUISECruise Control Module, Switch and
Release Switch
Blank Not Used
PCM/CRANKPowertrain Control Module (PCM),
Ignition Crank
PASS KEY PASS-Key
®III System
PWR LOCK Power Door Locks
5-93
Page 433 of 470
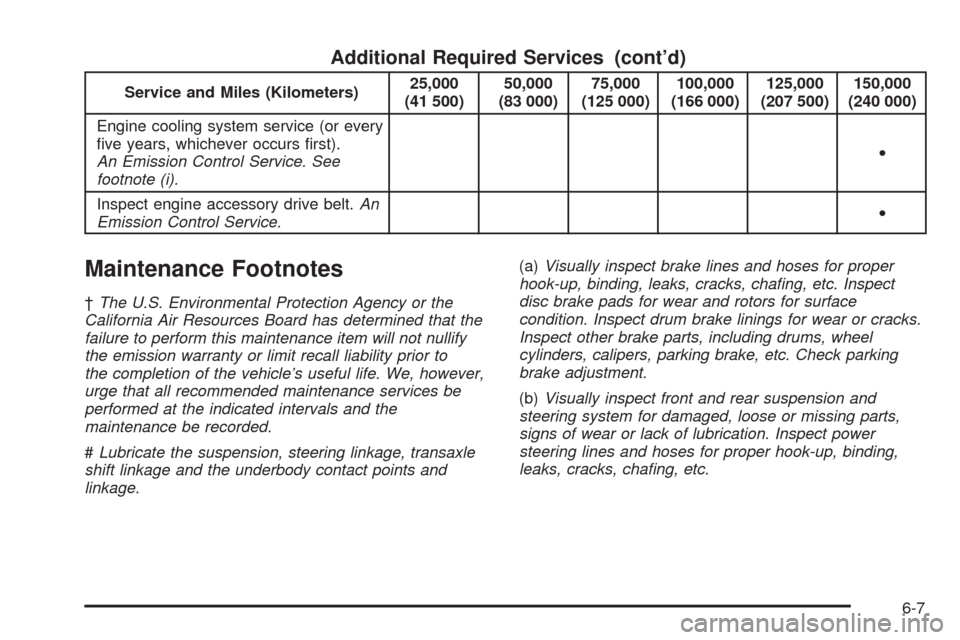
Additional Required Services (cont’d)
Service and Miles (Kilometers)25,000
(41 500)50,000
(83 000)75,000
(125 000)100,000
(166 000)125,000
(207 500)150,000
(240 000)
Engine cooling system service (or every
�ve years, whichever occurs �rst).
An Emission Control Service. See
footnote (i).•
Inspect engine accessory drive belt.An
Emission Control Service.•
Maintenance Footnotes
†The U.S. Environmental Protection Agency or the
California Air Resources Board has determined that the
failure to perform this maintenance item will not nullify
the emission warranty or limit recall liability prior to
the completion of the vehicle’s useful life. We, however,
urge that all recommended maintenance services be
performed at the indicated intervals and the
maintenance be recorded.
#Lubricate the suspension, steering linkage, transaxle
shift linkage and the underbody contact points and
linkage.(a)Visually inspect brake lines and hoses for proper
hook-up, binding, leaks, cracks, cha�ng, etc. Inspect
disc brake pads for wear and rotors for surface
condition. Inspect drum brake linings for wear or cracks.
Inspect other brake parts, including drums, wheel
cylinders, calipers, parking brake, etc. Check parking
brake adjustment.
(b)Visually inspect front and rear suspension and
steering system for damaged, loose or missing parts,
signs of wear or lack of lubrication. Inspect power
steering lines and hoses for proper hook-up, binding,
leaks, cracks, cha�ng, etc.
6-7
Page 457 of 470
A
Accessory In�ator...........................................5-66
Accessory Power Outlets.................................3-23
Additives, Fuel................................................. 5-6
Add-On Electrical Equipment............................5-92
Air Cleaner/Filter, Engine.................................5-17
Air Conditioning..............................................3-24
Airbag
Readiness Light..........................................3-38
Airbag Sensing and Diagnostic Module (SDM)...... 7-9
Airbag System................................................1-78
How Does an Airbag Restrain?......................1-85
Servicing Your Airbag-Equipped Vehicle..........1-88
What Makes an Airbag In�ate?......................1-85
What Will You See After an Airbag In�ates?....1-86
When Should an Airbag In�ate?....................1-83
Where Are the Airbags?...............................1-81
AM-FM Radio.................................................3-57
Antenna, Fixed Mast......................................3-121
Antenna, XM™ Satellite Radio Antenna System . . . 3-121
Anti-Lock Brake System (ABS)........................... 4-6
Anti-Lock Brake, System Warning Light..............3-40
Appearance Care............................................5-83
Aluminum Wheels........................................5-88
Care of Safety Belts and Built-in Child
Restraint Harness.....................................5-86
Chemical Paint Spotting...............................5-89
Child Restraint Pad......................................5-85
Cleaning Exterior Lamps/Lenses....................5-86Appearance Care (cont.)
Fabric/Carpet..............................................5-83
Finish Care.................................................5-87
Finish Damage............................................5-89
Glass Surfaces............................................5-85
Instrument Panel.........................................5-85
Interior Plastic Components...........................5-85
Leather......................................................5-85
Sheet Metal Damage...................................5-89
Tires..........................................................5-88
Underbody Maintenance...............................5-89
Vehicle Care/Appearance Materials................5-90
Vinyl..........................................................5-85
Washing Your Vehicle...................................5-86
Weatherstrips..............................................5-86
Windshield, Backglass, and Wiper Blades.......5-87
Arming and Disarming the Content
Theft-Deterrent System.................................2-62
Audio System(s).............................................3-56
AM-FM Radio.............................................3-57
Audio Steering Wheel Controls....................3-118
Care of Your Cassette Tape Player...............3-120
Care of Your CD and DVD Player................3-121
Care of Your CDs and DVDs.......................3-121
Fixed Mast Antenna...................................3-121
Radio with Cassette and CD.........................3-84
Radio with CD....................................3-59, 3-69
Radio with Six-Disc CD................................3-94
Rear Seat Audio (RSA).....................3-114, 3-116
1
Page 468 of 470
Sheet Metal Damage.......................................5-89
Shifting Into Park (P).......................................2-37
Shifting Out of Park (P)...................................2-38
Shoulder Belt Height Adjuster...........................1-41
Side Window Latches......................................2-23
Signals, Turn and Lane-Change.......................... 3-7
Sliding Door, Power........................................2-15
Sliding Doors, Dual.........................................2-12
Spare Tire
Installing....................................................5-73
Removing...................................................5-70
Storing.......................................................5-80
Speci�cations, Capacities.................................5-99
Speedometer..................................................3-35
Split Bench Seats............................................. 1-8
Starting Your Engine.......................................2-31
Steering........................................................4-10
Steering Wheel Controls, Audio.......................3-118
Steering Wheel, Tilt Wheel................................. 3-6
Storage Areas................................................2-47
Convenience Center.....................................2-53
Convenience Net.........................................2-52
Cupholder(s)...............................................2-48
Front Seat Storage Net................................2-50
Glove Box..................................................2-47
Luggage Carrier..........................................2-50
Overhead Console.......................................2-48
Rear Storage Area.......................................2-51
Stowable Seat................................................1-25Stuck in Sand, Mud, Ice or Snow......................4-28
Sun Visors.....................................................2-24
Switchbanks...................................................3-19
Overhead Console.......................................3-20
Switchbanks, Instrument Panel..........................3-19
T
Tachometer....................................................3-37
Taillamps
Turn Signal, Stoplamps and Back-up Lamps....5-50
TCS Warning Light..........................................3-40
Theft-Deterrent, Radio....................................3-118
Theft-Deterrent Systems...................................2-25
Content Theft-Deterrent................................2-25
PASS-Key
®III .............................................2-27
PASS-Key®III Operation..............................2-27
Tilt Wheel........................................................ 3-6
Tires.............................................................5-53
Aluminum Wheels, Cleaning..........................5-88
Buying New Tires........................................5-62
Chains.......................................................5-66
Changing a Flat Tire....................................5-69
Cleaning....................................................5-88
Compact Spare Tire.....................................5-82
If a Tire Goes Flat.......................................5-68
In�ation -- Tire Pressure...............................5-59
Inspection and Rotation................................5-60
Installing the Spare Tire................................5-73
12