2005 CHEVROLET TAHOE fuel cap
[x] Cancel search: fuel capPage 1 of 536

Seats and Restraint Systems........................... 1-1
Front Seats
............................................... 1-3
Rear Seats
............................................... 1-8
Safety Belts
.............................................1-23
Child Restraints
.......................................1-44
Airbag System
.........................................1-68
Restraint System Check
............................1-83
Features and Controls..................................... 2-1
Keys
........................................................ 2-3
Doors and Locks
....................................... 2-8
Windows
.................................................2-15
Theft-Deterrent Systems
............................2-17
Starting and Operating Your Vehicle
...........2-19
Mirrors
....................................................2-41
OnStar
®System
......................................2-50
HomeLink®Wireless Control System
...........2-52
Storage Areas
.........................................2-56
Sunroof
..................................................2-60
Vehicle Personalization
.............................2-61
Instrument Panel............................................. 3-1
Instrument Panel Overview
.......................... 3-4
Climate Controls
......................................3-21
Warning Lights, Gages, and Indicators
........3-36
Driver Information Center (DIC)
..................3-56
Audio System(s)
.......................................3-78Driving Your Vehicle....................................... 4-1
Your Driving, the Road, and Your Vehicle
..... 4-2
Towing
...................................................4-62
Service and Appearance Care.......................... 5-1
Service
..................................................... 5-3
Fuel
......................................................... 5-5
Checking Things Under the Hood
...............5-10
All-Wheel Drive
........................................5-47
Rear Axle
...............................................5-48
Four-Wheel Drive
.....................................5-49
Front Axle
...............................................5-50
Bulb Replacement
....................................5-52
Windshield Wiper Blade Replacement
.........5-59
Tires
......................................................5-60
Appearance Care
.....................................5-97
Vehicle Identi�cation
...............................5-106
Electrical System
....................................5-107
Capacities and Speci�cations
...................5-116
Maintenance Schedule..................................... 6-1
Maintenance Schedule
................................ 6-2
Customer Assistance and Information.............. 7-1
Customer Assistance and Information
........... 7-2
Reporting Safety Defects
...........................7-10
Index................................................................ 1
2005 Chevrolet Tahoe/Suburban Owner ManualM
Page 202 of 536

If the Light is Flashing
The following may prevent more serious damage to
your vehicle:
Reducing vehicle speed
Avoiding hard accelerations
Avoiding steep uphill grades
If you are towing a trailer, reduce the amount of
cargo being hauled as soon as it is possible
If the light stops �ashing and remains on steady, see “If
the Light Is On Steady” following.
If the light continues to �ash, when it is safe to do so,
stop the vehicle. Find a safe place to park your vehicle.
Turn the key off, wait at least 10 seconds and restart
the engine. If the light remains on steady, see “If
the Light Is On Steady” following. If the light is still
�ashing, follow the previous steps, and see your dealer
for service as soon as possible.
If the Light Is On Steady
You may be able to correct the emission system
malfunction by considering the following:
Did you recently put fuel into your vehicle?
If so, reinstall the fuel cap, making sure to fully install
the cap. SeeFilling the Tank on page 5-8. The
diagnostic system can determine if the fuel cap has
been left off or improperly installed. A loose or missing
fuel cap will allow fuel to evaporate into the atmosphere.
A few driving trips with the cap properly installed
should turn the light off.
Did you just drive through a deep puddle of water?
If so, your electrical system may be wet. The condition
will usually be corrected when the electrical system
dries out. A few driving trips should turn the light off.
3-50
Page 207 of 536
Here are some situations you may experience with your
fuel gage. None of these indicate a problem with the
fuel gage.
At the gas station, the fuel pump shuts off before
the gage reads full.
It takes a little more or less fuel to �ll up than the
fuel gage indicated. For example, the gage may
have indicated the tank was half full, but it actually
took a little more or less than half the tank’s
capacity to �ll the tank.
The gage goes back to empty when you turn off the
ignition.
Low Fuel Warning Light
The light next to the fuel gage will come on brie�y when
you are starting the engine.
This light comes on when the fuel tank is low on fuel.
To turn it off, add fuel to the fuel tank. SeeFuel on
page 5-5.
3-55
Page 221 of 536

STABILITY SYS (System) DISABLED
The STABILITY SYS DISABLED message will turn on
when you press the StabiliTrak®button, or when
the stability control has been automatically disabled. To
limit wheel spin and realize the full bene�ts of the
stability enhancement system, you should normally
leave StabiliTrak
®on. However, you should turn
StabiliTrak®off if your vehicle gets stuck in sand, mud,
ice, or snow and you want to “rock” your vehicle to
attempt to free it, or if you are driving in extreme off-road
conditions and require more wheel spin. SeeIf Your
Vehicle is Stuck in Sand, Mud, Ice or Snow on
page 4-50. To turn the StabiliTrak
®system back on,
press the StabiliTrak®button again.
There are several conditions that can cause this
message to appear.
One condition is overheating, which could occur if
StabiliTrak®activates continuously for an extended
period of time.
The message will also be displayed if the brake
system warning light is on. SeeBrake System
Warning Light on page 3-43.
The message could be displayed if the stability
system takes longer than usual to complete its
diagnostic checks due to driving conditions.
If an engine or vehicle related problem has been
detected and the vehicle needs service, the
message will appear. See your GM dealer.
The message will also appear if the vehicle is
shifted into 4LO.
The message will turn off as soon as the conditions that
caused the message to be displayed are no longer
present.
TIGHTEN FUEL CAP
If the vehicle’s fuel cap is not tightened properly, this
message may appear along with the check engine light
on the instrument panel cluster. SeeMalfunction
Indicator Lamp on page 3-48. Reinstall the fuel cap
fully. SeeFilling the Tank on page 5-8. The diagnostic
system can determine if the fuel cap has been left off or
improperly installed. A loose or missing fuel cap will
allow fuel to evaporate into the atmosphere. A few
driving trips with the cap properly installed should turn
this light and message off.
3-69
Page 345 of 536
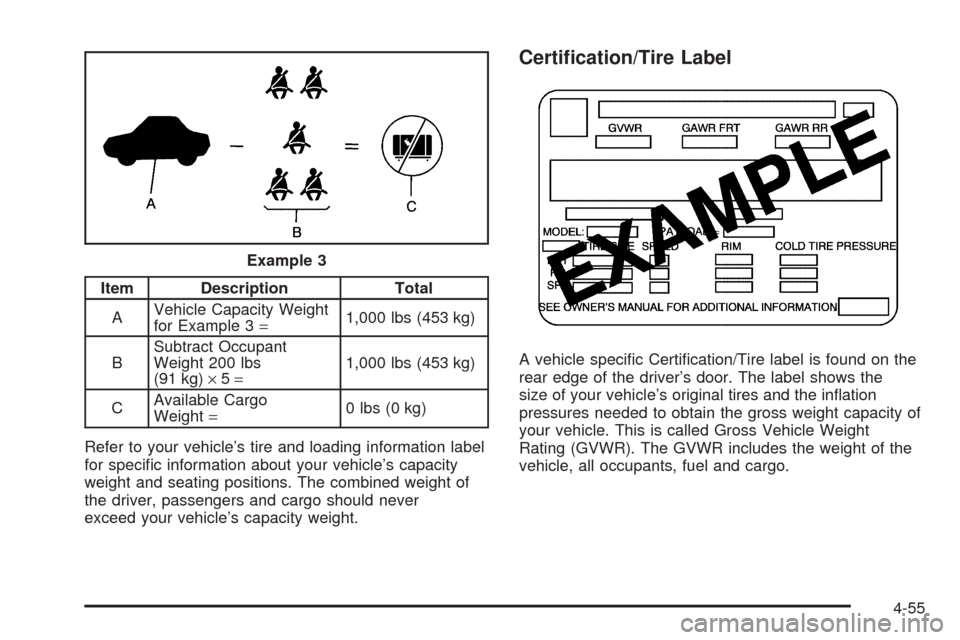
Item Description Total
AVehicle Capacity Weight
for Example 3=1,000 lbs (453 kg)
BSubtract Occupant
Weight 200 lbs
(91 kg)×5=1,000 lbs (453 kg)
CAvailable Cargo
Weight=0 lbs (0 kg)
Refer to your vehicle’s tire and loading information label
for speci�c information about your vehicle’s capacity
weight and seating positions. The combined weight of
the driver, passengers and cargo should never
exceed your vehicle’s capacity weight.
Certi�cation/Tire Label
A vehicle speci�c Certi�cation/Tire label is found on the
rear edge of the driver’s door. The label shows the
size of your vehicle’s original tires and the in�ation
pressures needed to obtain the gross weight capacity of
your vehicle. This is called Gross Vehicle Weight
Rating (GVWR). The GVWR includes the weight of the
vehicle, all occupants, fuel and cargo. Example 3
4-55
Page 349 of 536
Q:What is front axle reserve capacity, and how do
I calculate it?
A:Front axle reserve capacity is the difference
between your front gross axle weight rating (GAWR)
and the front axle weight of your vehicle with full
fuel and passengers. Basically, it is the amount of
weight you can add to your front axle before
reaching your front GAWR.
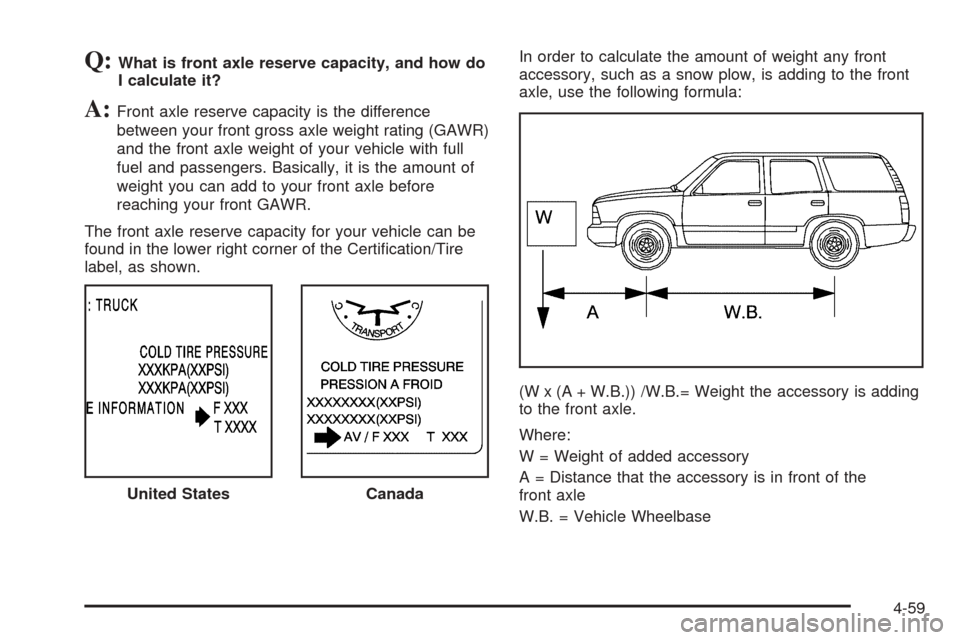
The front axle reserve capacity for your vehicle can be
found in the lower right corner of the Certi�cation/Tire
label, as shown.In order to calculate the amount of weight any front
accessory, such as a snow plow, is adding to the front
axle, use the following formula:
(W x (A + W.B.)) /W.B.= Weight the accessory is adding
to the front axle.
Where:
W = Weight of added accessory
A = Distance that the accessory is in front of the
front axle
W.B. = Vehicle Wheelbase United States
Canada
4-59
Page 351 of 536
Q:What is total vehicle reserve capacity?
A:This is the difference between your GVWR and the
weight of your vehicle with full fuel and passengers.
It is the amount of weight you can add to your
vehicle before reaching your GVWR. Keep in mind
that reserve capacity numbers are intended as
a guide when selecting the amount of equipment or
cargo your vehicle can carry. If you are unsure
of your vehicle’s front, rear, or total weight, go to a
weigh station and weigh your vehicle. Your
dealer can also help you with this.
The total vehicle reserve capacity for your vehicle
can be found in the lower right corner of the
Certi�cation/Tire label as shown previously.
See your dealer for additional advice and information
about using a snow plow on your vehicle. Also,
seeLoading Your Vehicle on page 4-52.
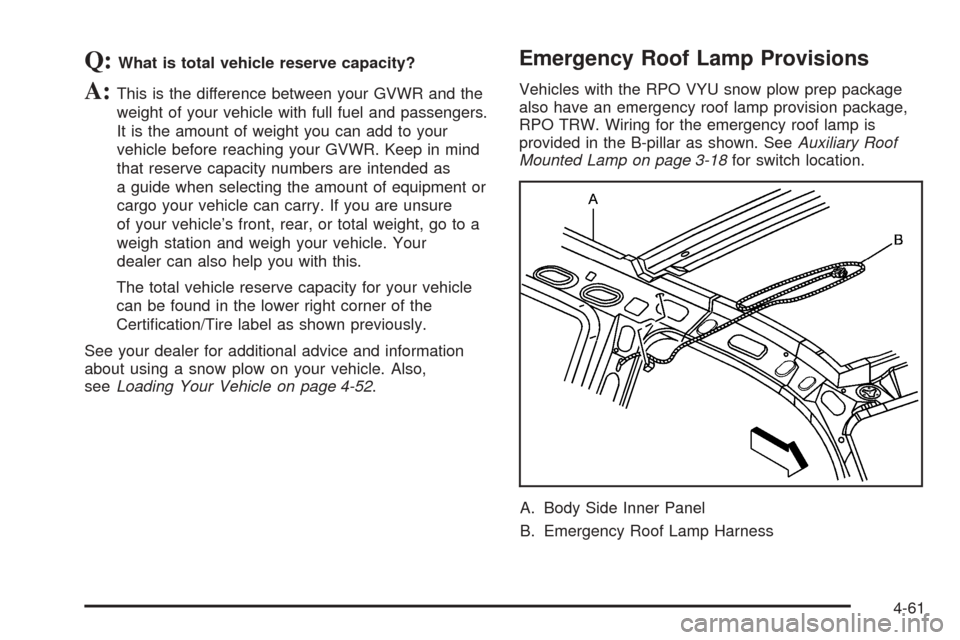
Emergency Roof Lamp Provisions
Vehicles with the RPO VYU snow plow prep package
also have an emergency roof lamp provision package,
RPO TRW. Wiring for the emergency roof lamp is
provided in the B-pillar as shown. SeeAuxiliary Roof
Mounted Lamp on page 3-18for switch location.
A. Body Side Inner Panel
B. Emergency Roof Lamp Harness
4-61
Page 357 of 536
Towing a Trailer
Do not tow a trailer during break-in. SeeNew Vehicle
Break-In on page 2-19for more information.
{CAUTION:
If you do not use the correct equipment and
drive properly, you can lose control when you
pull a trailer. For example, if the trailer is too
heavy, the brakes may not work well — or even
at all. You and your passengers could be
seriously injured. Pull a trailer only if you have
followed all the steps in this section. Ask your
dealer for advice and information about towing
a trailer with your vehicle.Notice:Pulling a trailer improperly can damage
your vehicle and result in costly repairs not covered
by your warranty. To pull a trailer correctly, follow
the advice in this part, and see your dealer for
important information about towing a trailer with
your vehicle.
To identify the vehicle trailering capacity of your vehicle,
you should read the information in “Weight of the
Trailer” that appears later in this section.
If yours was built with trailering options, as many are,
it’s ready for heavier trailers. But trailering is different
than just driving your vehicle by itself. Trailering means
changes in acceleration, braking, handling, durability
and fuel economy. Successful, safe trailering takes
correct equipment, and it has to be used properly.
That’s the reason for this part. In it are many time-tested,
important trailering tips and safety rules. Many of
these are important for your safety and that of your
passengers. So please read this section carefully before
you pull a trailer.
4-67