2005 CHEVROLET SUBURBAN transmission
[x] Cancel search: transmissionPage 91 of 536
Keys...............................................................2-3
Remote Keyless Entry System.........................2-5
Remote Keyless Entry System Operation...........2-6
Doors and Locks.............................................2-8
Door Locks....................................................2-8
Power Door Locks..........................................2-9
Delayed Locking...........................................2-10
Programmable Automatic Door Locks..............2-11
Rear Door Security Locks..............................2-13
Lockout Protection........................................2-13
Liftgate........................................................2-14
Windows........................................................2-15
Manual Windows..........................................2-15
Power Windows............................................2-16
Sun Visors...................................................2-17
Theft-Deterrent Systems..................................2-17
Content Theft-Deterrent.................................2-17
Passlock
®....................................................2-19Starting and Operating
Your Vehicle...............................................2-19
New Vehicle Break-In....................................2-19
Ignition Positions..........................................2-20
Retained Accessory Power (RAP)...................2-21
Starting the Engine.......................................2-21
Adjustable Throttle and Brake Pedal................2-22
Engine Coolant Heater..................................2-23
Automatic Transmission Operation...................2-24
Tow/Haul Mode............................................2-27
Four-Wheel Drive..........................................2-28
All-Wheel Drive with StabiliTrak
®.....................2-32
Parking Brake..............................................2-35
Shifting Into Park (P).....................................2-36
Shifting Out of Park (P).................................2-38
Parking Over Things That Burn.......................2-38
Engine Exhaust............................................2-39
Running the Engine While Parked...................2-40
Section 2 Features and Controls
2-1
Page 101 of 536
Programmable Automatic
Door Locks
Your vehicle is equipped with an automatic lock/unlock
feature which enables you to program your vehicle’s
power door locks. You can program this feature through
the Driver Information Center (DIC), or by the following
method.
Programmable Locking Feature
Following are the two available programming options:
Mode 1:All doors lock when the transmission is shifted
into gear.
Mode 2:All doors lock when the vehicle speed is
greater than 8 mph (13 km/h).
The automatic door locks were pre-programmed at the
factory to lock all the doors when the transmission
is shifted into gear. The following instructions detail how
to program your door locks differently than the factory
setting. Choose one of the two programming options
listed above before entering the program mode.To enter the program mode, do the following:
1. Begin with the ignition off. Then pull the turn
signal/multifunction lever toward you and hold
it there while you perform the next step.
2. Turn the key to RUN and LOCK twice. Then, with the
key in LOCK, release the turn signal/multifunction
lever. Once you do this, you will hear the lock switch
lock and unlock, the horn will chirp twice, and a
30 second program timer will begin. You are now
ready to program the automatic door locks.
3. Select one of the two programming options listed
previously, and press the lock side of the power
door lock switch to cycle through the lock options.
You will have 30 seconds to begin programming.
If you exceed the 30 second limit, the locks will
automatically lock and unlock and the horn will chirp
twice to indicate that you have left the program
mode. If this occurs, repeat the procedure beginning
with Step 1 to re-enter the programming mode.
You can exit the program mode any time by turning the
ignition to RUN (the locks will automatically lock and
unlock and the horn will chirp twice to indicate that you
are leaving the program mode). If the lock/unlock
switches are not pressed while in the programming
mode, the current auto lock/unlock setting will not
be modi�ed.
See your dealer for more information.
2-11
Page 102 of 536
Programmable Unlocking Feature
The following is the list of available programming
options:
Mode 1:Driver’s door unlocks when the transmission is
shifted into PARK (P).
Mode 2:All doors unlock when the transmission is
shifted into PARK (P).
Mode 3:All doors unlock when the key is removed
from the ignition.
Mode 4:No automatic door unlock.
The automatic door locks were pre-programmed
at the factory to unlock the driver’s door once the
transmission is shifted to PARK (P). The following
instructions detail how to program your door locks
differently than the factory setting. Choose one of the
four programming options listed above before entering
the program mode.
To enter the program mode, do the following:
1. Begin with the ignition off. Then pull the turn
signal/multifunction lever toward you and hold
it there while you perform the next step.2. Turn the key to RUN and LOCK twice. Then, with the
key in LOCK, release the turn signal/multifunction
lever. Once you do this, you will hear the lock switch
lock and unlock, the horn will chirp twice, and a
30-second program timer will begin.
3. You are now ready to program the automatic door
locks. Select one of the four programming options
listed previously, and press the unlock side of
the power door lock switch to cycle through the
unlocking options. You will have 30 seconds
to begin programming. If you exceed the 30-second
limit, the locks will automatically lock and unlock
and the horn will chirp twice to indicate that
you have left the program mode. If this occurs,
repeat the procedure beginning with Step 1
to re-enter the programming mode.
You can exit the program mode any time by turning the
ignition to RUN. The locks will automatically lock and
unlock and the horn will chirp twice to indicate that you
are leaving the program mode. If the lock/unlock
switches are not pressed while in the programming
mode, the current auto lock/unlock setting will not be
modi�ed.
See your dealer for more information.
2-12
Page 110 of 536
Ignition Positions
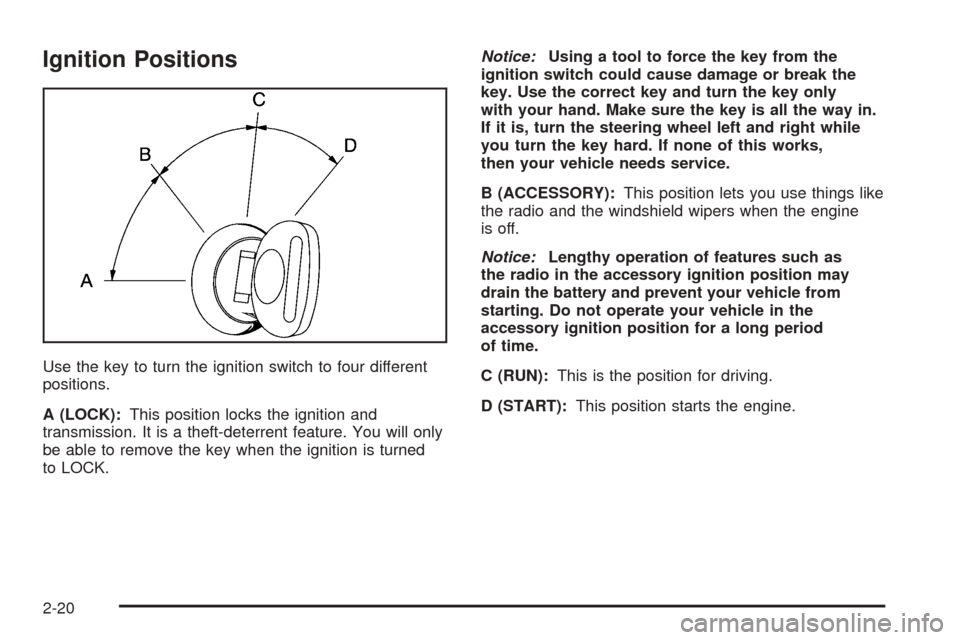
Use the key to turn the ignition switch to four different
positions.
A (LOCK):This position locks the ignition and
transmission. It is a theft-deterrent feature. You will only
be able to remove the key when the ignition is turned
to LOCK.Notice:Using a tool to force the key from the
ignition switch could cause damage or break the
key. Use the correct key and turn the key only
with your hand. Make sure the key is all the way in.
If it is, turn the steering wheel left and right while
you turn the key hard. If none of this works,
then your vehicle needs service.
B (ACCESSORY):This position lets you use things like
the radio and the windshield wipers when the engine
is off.
Notice:Lengthy operation of features such as
the radio in the accessory ignition position may
drain the battery and prevent your vehicle from
starting. Do not operate your vehicle in the
accessory ignition position for a long period
of time.
C (RUN):This is the position for driving.
D (START):This position starts the engine.
2-20
Page 111 of 536
Retained Accessory Power (RAP)
Your vehicle may be equipped with a Retained
Accessory Power (RAP) feature which will allow certain
features on your vehicle to continue to work up to
10 minutes after the ignition key is turned to OFF.
Your radio, power windows, sunroof (if equipped), and
OnStar
®System (if equipped) will work when the ignition
key is in RUN or ACCESSORY. Once the key is
turned from RUN to LOCK, these features will continue
to work for up to 10 minutes or until a door is opened.
Starting the Engine
Your vehicle is equipped with Starter Motor Control.
This feature assists in starting the engine and protects
the electrical system. This feature may cause the
engine to crank even after the ignition key is not
in START.
Move your shift lever to PARK (P) or NEUTRAL (N).
Your engine will not start in any other position — that
is a safety feature. To restart when you are already
moving, use NEUTRAL (N) only.Notice:Do not try to shift to PARK (P) if your
vehicle is moving. If you do, you could damage the
transmission. Shift to PARK (P) only when your
vehicle is stopped.
1. With your foot off the accelerator pedal, turn the
ignition key to START. When the engine starts,
let go of the key. The idle speed will go down as
your engine gets warm.
Notice:Holding your key in START for longer than
15 seconds at a time will disengage the starter
motor, cause your battery to be drained much
sooner, and add excessive heat that can damage
your starter motor. Try not to hold the key in
START for longer than 15 seconds and wait about
15 seconds between each try to help avoid draining
your battery or damaging your starter.
2. If it does not start within 10 seconds, push the
accelerator pedal all the way to the �oor, while
you hold the ignition key in START. When
the engine starts, let go of the key and let up
on the accelerator pedal. Wait about 15 seconds
between each try.
2-21
Page 114 of 536
Automatic Transmission Operation
There are several different positions for your shift lever.
Your vehicle is equipped with an automatic transmission
and features an electronic shift position indicator
within the instrument panel cluster. This display must
be powered anytime the shift lever is capable of
being moved out of PARK (P).
PARK (P):This position locks your rear wheels.
It is the best position to use when you start your
engine because your vehicle cannot move easily.{CAUTION:
It is dangerous to get out of your vehicle if
the shift lever is not fully in PARK (P) with the
parking brake �rmly set. Your vehicle can roll.
Do not leave your vehicle when the engine
is running unless you have to. If you have
left the engine running, the vehicle can move
suddenly. You or others could be injured.
To be sure your vehicle will not move, even
when you are on fairly level ground, always
set your parking brake and move the shift
lever to PARK (P). SeeShifting Into Park (P)
on page 2-36. If you are pulling a trailer, see
Towing a Trailer on page 4-67.
2-24
Page 115 of 536
{CAUTION:
If you have four-wheel drive, your vehicle
will be free to roll — even if your shift lever
is in PARK (P) — if your transfer case is in
NEUTRAL. So, be sure the transfer case is in a
drive gear, two-wheel high (2H) or four-wheel
high (4H) or four-wheel low (4L) — not in
NEUTRAL. SeeShifting Into Park (P) on
page 2-36.
REVERSE (R):Use this gear to back up.
Notice:Shifting to REVERSE (R) while your vehicle
is moving forward could damage the transmission.
The repairs would not be covered by your warranty.
Shift to REVERSE (R) only after your vehicle is
stopped.
To rock your vehicle back and forth to get out of snow,
ice or sand without damaging your transmission,
seeIf Your Vehicle is Stuck in Sand, Mud, Ice or
Snow on page 4-50.NEUTRAL (N):In this position, your engine does not
connect with the wheels. To restart when you are
already moving, use NEUTRAL (N) only. Also, use
NEUTRAL (N) when your two-wheel drive vehicle
is being towed.
{CAUTION:
Shifting into a drive gear while your engine is
running at high speed is dangerous. Unless
your foot is �rmly on the brake pedal, your
vehicle could move very rapidly. You could
lose control and hit people or objects. Do not
shift into a drive gear while your engine is
running at high speed.
Notice:Shifting out of PARK (P) or NEUTRAL (N)
with the engine running at high speed may damage
the transmission. The repairs would not be covered
by your warranty. Be sure the engine is not running
at high speed when shifting your vehicle.
2-25
Page 116 of 536
DRIVE (D):This position is for normal driving. If you
need more power for passing, and you are:
Going less than about 35 mph (56 km/h), push your
accelerator pedal about halfway down.
Going about 35 mph (56 km/h) or more, push the
accelerator all the way down.
You will shift down to the next gear and have more
power.
DRIVE (D) can be used when towing a trailer, carrying
a heavy load, driving on steep hills or for off-road
driving. You may want to shift the transmission to
THIRD (3) or, if necessary, a lower gear selection if the
transmission shifts too often.
THIRD (3):This position is also used for normal driving,
however it offers more power and lower fuel economy
than DRIVE (D).
SECOND (2):This position gives you more power but
lower fuel economy. You can use SECOND (2) on
hills. It can help control your speed as you go down
steep mountain roads, but then you would also want to
use your brakes off and on.If you manually select SECOND (2) in a light duty
automatic transmission, the transmission will drive in
second gear. You may use this feature for reducing the
speed of the rear wheels when you are trying to start
your vehicle from a stop on slippery road surfaces.
FIRST (1):This position gives you even more power
(but lower fuel economy) than SECOND (2). You
can use it on very steep hills, or in deep snow or mud.
If the shift lever is put in FIRST (1) while the vehicle
is moving forward, the transmission will not shift into �rst
gear until the vehicle is going slowly enough.
Notice:Spinning the tires or holding the vehicle
in one place on a hill using only the accelerator
pedal may damage the transmission. If you
are stuck, do not spin the tires. When stopping on
a hill, use the brakes to hold the vehicle in place.
On cold days, approximately 32°F (0°C) or colder, your
transmission is designed to shift differently until the
engine reaches normal operating temperature. This is
intended to improve heater performance.
2-26