Page 282 of 536

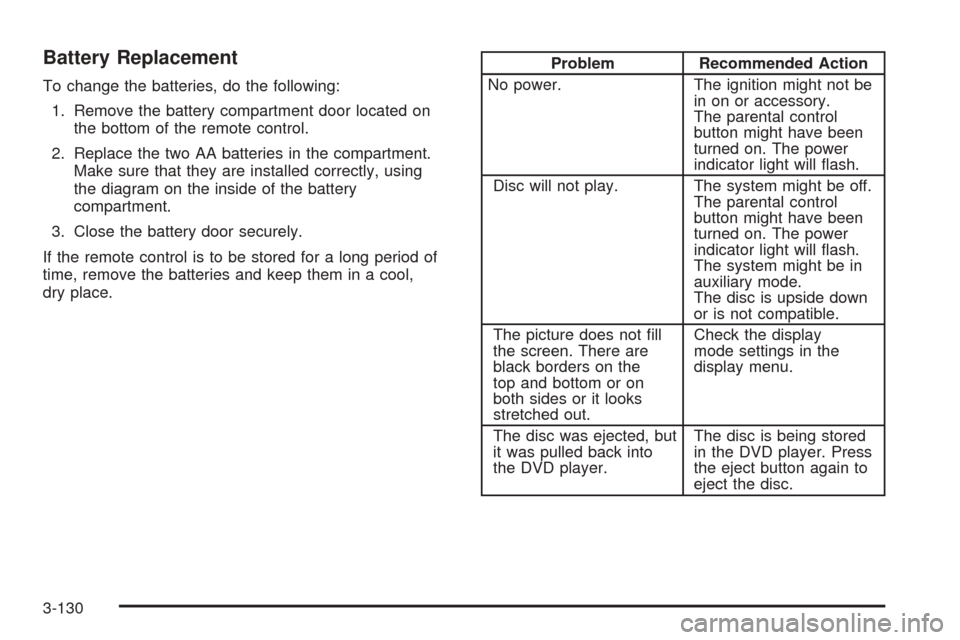
Battery Replacement
To change the batteries, do the following:
1. Remove the battery compartment door located on
the bottom of the remote control.
2. Replace the two AA batteries in the compartment.
Make sure that they are installed correctly, using
the diagram on the inside of the battery
compartment.
3. Close the battery door securely.
If the remote control is to be stored for a long period of
time, remove the batteries and keep them in a cool,
dry place.
Problem Recommended Action
No power. The ignition might not be
in on or accessory.
The parental control
button might have been
turned on. The power
indicator light will �ash.
Disc will not play. The system might be off.
The parental control
button might have been
turned on. The power
indicator light will �ash.
The system might be in
auxiliary mode.
The disc is upside down
or is not compatible.
The picture does not �ll
the screen. There are
black borders on the
top and bottom or on
both sides or it looks
stretched out.Check the display
mode settings in the
display menu.
The disc was ejected, but
it was pulled back into
the DVD player.The disc is being stored
in the DVD player. Press
the eject button again to
eject the disc.
3-130
Page 283 of 536

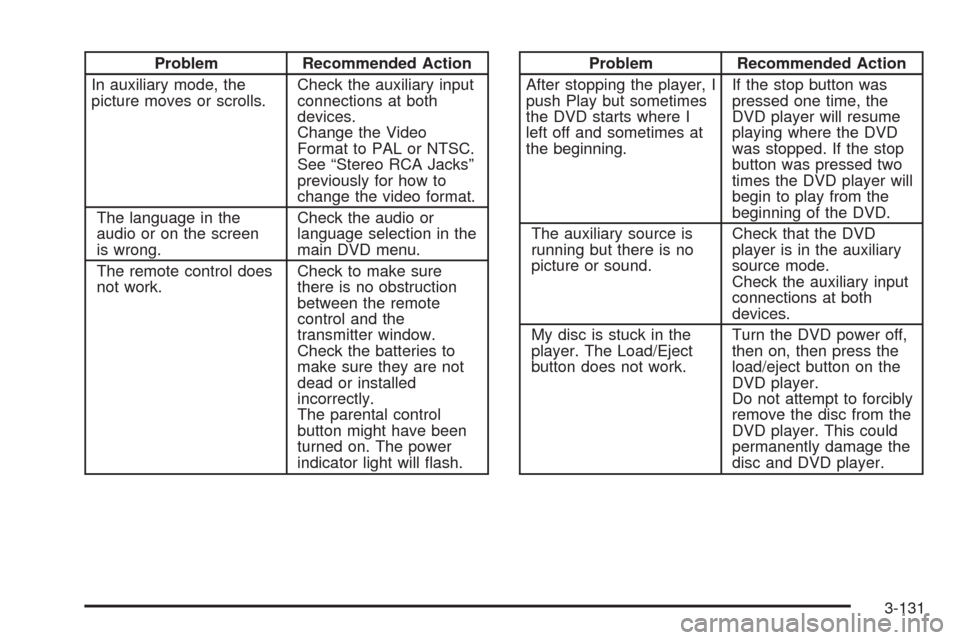
Problem Recommended Action
In auxiliary mode, the
picture moves or scrolls.Check the auxiliary input
connections at both
devices.
Change the Video
Format to PAL or NTSC.
See “Stereo RCA Jacks”
previously for how to
change the video format.
The language in the
audio or on the screen
is wrong.Check the audio or
language selection in the
main DVD menu.
The remote control does
not work.Check to make sure
there is no obstruction
between the remote
control and the
transmitter window.
Check the batteries to
make sure they are not
dead or installed
incorrectly.
The parental control
button might have been
turned on. The power
indicator light will �ash.Problem Recommended Action
After stopping the player, I
push Play but sometimes
the DVD starts where I
left off and sometimes at
the beginning.If the stop button was
pressed one time, the
DVD player will resume
playing where the DVD
was stopped. If the stop
button was pressed two
times the DVD player will
begin to play from the
beginning of the DVD.
The auxiliary source is
running but there is no
picture or sound.Check that the DVD
player is in the auxiliary
source mode.
Check the auxiliary input
connections at both
devices.
My disc is stuck in the
player. The Load/Eject
button does not work.Turn the DVD power off,
then on, then press the
load/eject button on the
DVD player.
Do not attempt to forcibly
remove the disc from the
DVD player. This could
permanently damage the
disc and DVD player.
3-131
Page 351 of 536

Q:What is total vehicle reserve capacity?
A:This is the difference between your GVWR and the
weight of your vehicle with full fuel and passengers.
It is the amount of weight you can add to your
vehicle before reaching your GVWR. Keep in mind
that reserve capacity numbers are intended as
a guide when selecting the amount of equipment or
cargo your vehicle can carry. If you are unsure
of your vehicle’s front, rear, or total weight, go to a
weigh station and weigh your vehicle. Your
dealer can also help you with this.
The total vehicle reserve capacity for your vehicle
can be found in the lower right corner of the
Certi�cation/Tire label as shown previously.
See your dealer for additional advice and information
about using a snow plow on your vehicle. Also,
seeLoading Your Vehicle on page 4-52.
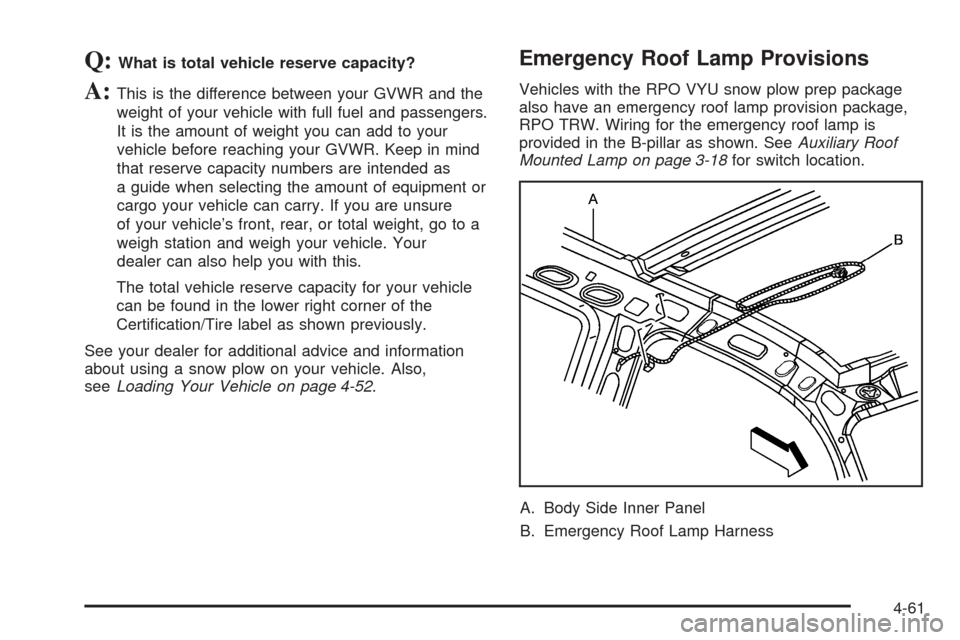
Emergency Roof Lamp Provisions
Vehicles with the RPO VYU snow plow prep package
also have an emergency roof lamp provision package,
RPO TRW. Wiring for the emergency roof lamp is
provided in the B-pillar as shown. SeeAuxiliary Roof
Mounted Lamp on page 3-18for switch location.
A. Body Side Inner Panel
B. Emergency Roof Lamp Harness
4-61
Page 482 of 536
Instrument Panel Fuse Block
The fuse block access
door is on the driver’s side
edge of the instrument
panel. Pull off the cover to
access the fuse block.
To remove fuses, hold the end of the fuse between your
thumb and index �nger and pull straight out.
You may have spare fuses located behind the fuse
block access door. These can be used to replace a bad
fuse. However, make sure it is of the correct amperage.
Fuses Usage
RR WPR Rear Window Wiper Switch
SEO ACCYSpecial Equipment Option
Accessory
WS WPR Windshield Wipers
TBC ACCYTruck Body Controller
Accessory
IGN 3 Ignition, Heated Seats
4WDFour-Wheel Drive System,
Auxiliary Battery
5-108
Page 483 of 536

Fuses Usage
HTR A/C Climate Control System
LOCKPower Door Lock Relay
(Lock Function)
HVAC 1Inside Rearview Mirror,
Climate Control System
L DOORDriver’s Door Harness
Connection
CRUISE Cruise Control
UNLOCKPower Door Lock Relay
(Unlock Function)
RR FOG LP Rear Fog Lamp (Export Only)
BRAKE Anti-Lock Brake System
DRIVER UNLOCKPower Door Lock Relay
(Driver’s Door Unlock
Function)
IGN 0 PCM, TCM
TBC IGN 0 Truck Body Controller
VEH CHMSLVehicle and Trailer High
Mounted Stoplamp
LT TRLR ST/TRN Left Turn Signal/Stop TrailerFuses Usage
LT TRNLeft Turn Signals and
Sidemarkers
VEH STOPVehicle Stoplamps, Brake
Module, Electronic Throttle
Control Module
RT TRLR ST/TRN Right Turn Signal/Stop Trailer
RT TRNRight Turn Signals and
Sidemarkers
BODY Harness Connector
DDM Driver Door Module
AUX PWR 2Rear Cargo Area Power
Outlets
LOCKS Power Door Lock System
ECCRear Electronic Climate
Control, Liftgate
TBC 2C Truck Body Controller
FLASH Flasher Module
CB LT DOORSLeft Power Window Circuit
Breaker
TBC 2B Truck Body Controller
TBC 2A Truck Body Controller
5-109
Page 487 of 536

*1— Gasoline Engine and Fuel Injection Rail #2.
*2— Gasoline Engine and Fuel Injection Rail #1.
*3— Gasoline Engine; Oxygen Sensors.
*4— Gasoline Engine; Oxygen Sensors.
*5— PCM Ignition
Fuses Usage
GLOW PLUG Not Used
CUST FEED Gasoline Accessory Power
HYBRID Hybrid
STUD #1Auxiliary Power
(Single Battery and Diesels
Only)/Dual Battery (TP2)
Do not install fuse.
MBECMid Bussed Electrical Center
Power Feed, Front Seats,
Right Doors
BLOWER Front Climate Control Fan
LBECLeft Bussed Electrical
Center, Door Modules,
Door Locks, Auxiliary Power
Outlet — Rear Cargo Area
and Instrument Panel
STUD 2Accessory Power/Trailer
Wiring Brake Feed
ABS Anti-Lock Brakes
Fuses Usage
VSES/ECAS Vehicle Stability
IGN A Ignition Power
IGN B Ignition Power
LBEC 1Left Bussed Electrical Center,
Left Doors, Truck Body
Controller, Flasher Module
TRL PARK Parking Lamps Trailer Wiring
RR PARKRight Rear Parking and
Sidemarker Lamps
LR PARKLeft Rear Parking and
Sidemarker Lamps
PARK LP Parking Lamps Relay
STRTR Starter Relay
INTPARK Interior Lamps
STOP LP Stoplamps
TBC BATTTruck Body Controller Battery
Feed
S/ROOF Sunroof
SEO B2 Off-Road Lamps
4WSVent Solenoid
Canister/Quadrasteer Module
Power
RR HVAC Rear Climate Control
AUX PWRAuxiliary Power
Outlet — Console
5-113
Page 489 of 536
Fuses Usage
CRNK Starting System
LO HDLP - RT Headlamp Low Beam - Right
FOG LP Fog Lamp Relay
FOG LP Fog Lamps
HORN Horn Fuse
HORN Horn Relay
W/S WASHWindshield and Rear Window
Washer Pump Relay
W/S WASHWindshield and Rear Window
Washer Pump
INFOOnStar
®/Rear Seat
Entertainment
RADIO AMP Radio Ampli�er
RH HID Not Used
EAP Electric Adjustable Pedals
TREC All-Wheel Drive Module
SBA Supplemental Brake Assist
Auxiliary Electric Cooling Fan
Fuse Block
The auxiliary electric
cooling fan fuse block is
located in the engine
compartment on the
driver’s side of the vehicle
next to the underhood
fuse block.
Lift the cover for access to the fuse/relay block.
Fuses Usage
COOL/FAN Cooling Fan
COOL/FAN Cooling Fan Relay Fuse
COOL/FAN Cooling Fan Fuse
Relays Usage
COOL/FAN 1 Cooling Fan Relay 1
COOL/FAN 3 Cooling Fan Relay 3
COOL/FAN 2 Cooling Fan Relay 2
5-115
Page 524 of 536

Audio System(s).............................................3-78
AM-FM Radio.............................................3-79
Audio Steering Wheel Controls....................3-135
Care of Your Cassette Tape Player...............3-136
Care of Your CD and DVD Player................3-137
Care of Your CDs and DVDs.......................3-137
Chime Level Adjustment.............................3-138
Fixed Mast Antenna...................................3-138
Navigation/Radio System, see Navigation
Manual.................................................3-121
Radio with Cassette and CD.........................3-93
Radio with CD............................................3-82
Radio with Six-Disc CD..............................3-108
Rear Seat Audio (RSA)...............................3-133
Setting the Time for Radios with Radio Data
Systems (RDS)........................................3-79
Setting the Time for Radios without Radio
Data Systems (RDS)................................3-78
Theft-Deterrent Feature...............................3-134
Understanding Radio Reception...................3-136
XM™ Satellite Radio Antenna System...........3-138
Automatic Headlamp System............................3-16
Automatic Transmission
Fluid..........................................................5-23
Operation...................................................2-24
Autoride
®™ ....................................................4-66
Auxiliary Roof Mounted Lamp Switch.................3-18
B
Battery..........................................................5-41
Run-Down Protection...................................3-20
Battery Warning Light......................................3-42
Before Leaving on a Long Trip.........................4-42
Bench Seat....................................................1-16
Bench Seat Split (50/50)..................................1-11
Bench Seat, Split (60/40)................................... 1-9
Brake
Anti-Lock Brake System (ABS)........................ 4-7
Emergencies................................................ 4-8
Parking......................................................2-35
System Warning Light..................................3-43
Brake Pedal, Throttle.......................................2-22
Brakes..........................................................5-38
Braking........................................................... 4-6
Braking in Emergencies..................................... 4-8
Break-In, New Vehicle.....................................2-19
Bucket Seats, Rear.........................................1-21
Bulb Replacement...........................................5-52
Front Turn Signal, Sidemarker and Daytime
Running Lamps........................................5-53
Halogen Bulbs............................................5-52
Headlamps.................................................5-52
Replacement Bulbs......................................5-58
Roof Marker Lamps.....................................5-55
2