2005 CHEVROLET MALIBU service reset
[x] Cancel search: service resetPage 116 of 434
Automatic Dimming Rearview Mirror
with OnStar
®and Compass
Your vehicle may have an automatic dimming rearview
mirror with a compass and OnStar®controls. For
more information about OnStar®, seeOnStar®System
on page 2-38.
The automatic dimming feature turns on each time the
vehicle is started. To turn automatic dimming off or
on, press the left button below the mirror. A green
indicator light will be on when automatic dimming is on.
There are also three OnStar
®buttons located at the
bottom of the mirror. See your dealer for more
information on the system and how to subscribe to
OnStar
®. SeeOnStar®System on page 2-38for more
information about the service OnStar®provides.
Compass Operation
Press the on/off button once to turn the compass on
or off.
When the ignition and the compass feature are on,
the compass will show two character boxes for a
few seconds. After a few seconds, the mirror will
display the current compass direction.
Compass Calibration
If after a few seconds the display does not show a
compass direction, (N for North for example), there may
be a strong magnetic �eld interfering with the compass.
Such interference may be caused by a magnetic
antenna mount, note pad holder, or similar object. If the
letter C appears in the compass window, the compass
may need to be reset or calibrated.
The mirror can be calibrated by driving the vehicle in
circles at 5 mph (8 km/h) or less until the display reads a
direction.
Compass Variance
Compass variance is the difference between earth’s
magnetic north and true geographic north. If the mirror
is not adjusted for compass variance, the compass
could give false readings.
The mirror is set in zone eight upon leaving the factory.
It will be necessary to adjust the compass to
compensate for compass variance if the vehicle is
driven outside zone eight. Under certain circumstances,
such as a long distance, cross-country trip, it will be
necessary to adjust the compass variance.
2-34
Page 171 of 434
The Driver Information Center (DIC) may display a
Low Brake Fluid or Push Park Pedal message. These
messages might help to determine why the brake
system warning light is on. SeeDIC Warnings and
Messages on page 3-55.
If the light comes on while you are driving, pull off the
road and stop carefully. You may notice that the pedal
is harder to push. Or, the pedal may go closer to the �oor.
It may take longer to stop. If the light is still on, have the
vehicle towed for service. SeeTowing Your Vehicle on
page 4-34.
{CAUTION:
Your brake system may not be working
properly if the brake system warning light is
on. Driving with the brake system warning light
on can lead to an accident. If the light is still
on after you have pulled off the road and
stopped carefully, have the vehicle towed
for service.
Anti-Lock Brake System Warning
Light
If your vehicle has the
anti-lock brake system, the
light will come on when
your engine is started and
may stay on for several
seconds. That’s normal.
If the light stays on, turn the ignition to off. If the light
comes on and the chime sounds when you are driving,
stop as soon as possible and turn the ignition off.
Then start the engine again to reset the system. If the
light still stays on, or comes on again while you are
driving, your vehicle needs service. If the regular brake
system warning light is not on, you still have brakes,
but you do not have anti-lock brakes. If the regular
brake system warning light is also on, you do not have
anti-lock brakes and there is a problem with your
regular brakes. SeeBrake System Warning Light on
page 3-40earlier in this section.
The anti-lock brake system warning light will come on
brie�y when you turn the ignition key to ON. This is
normal. If the light does not come on then, have it �xed
so it will be ready to warn you if there is a problem.
3-41
Page 186 of 434
DIC Warnings and Messages
These messages will appear if there is a problem
detected in one of your vehicle’s systems.
Any message will clear when the vehicle’s condition is
no longer present. The warning message will come back
on the next time the vehicle is turned off and back on
if the condition is still present. With most messages,
a warning chime will sound when the message is
displayed. Your vehicle may have other warning
messages.
AUTO LIGHTS OFF:This message is displayed if the
automatic headlamp system is disabled with the
headlamp switch.
AUTO LIGHTS ON:This message is displayed if the
automatic headlamp system is enabled with the
headlamp switch.
BRAKE FLUID:This message will display if the ignition
is in ON to inform the driver that the brake �uid level
is low. Have the brake system serviced by your
GM dealer as soon as possible.CHANGE OIL SOON:This message is displayed when
the life of the engine oil has expired and it should be
changed.
When you acknowledge the Change Engine Oil
message by clearing it from the display, you still must
reset the engine oil life system separately. See
Engine Oil Life System on page 5-18,Engine Oil on
page 5-15, andScheduled Maintenance on page 6-4for
more information.
CHECK GAS CAP:This message will appear if the gas
cap has not been fully tightened. You should recheck
your gas cap to make sure that it is on properly. A few
driving trips with the cap properly installed should
turn the display off.
DOOR AJAR:This message is displayed if one or
more of the vehicle’s doors are not closed properly.
When this message appears, you should make sure that
the door is closed completely.
ENGINE DISABLED:This message is displayed if the
starting of the engine is disabled. Have your vehicle
serviced by your GM dealer immediately.
3-56
Page 201 of 434
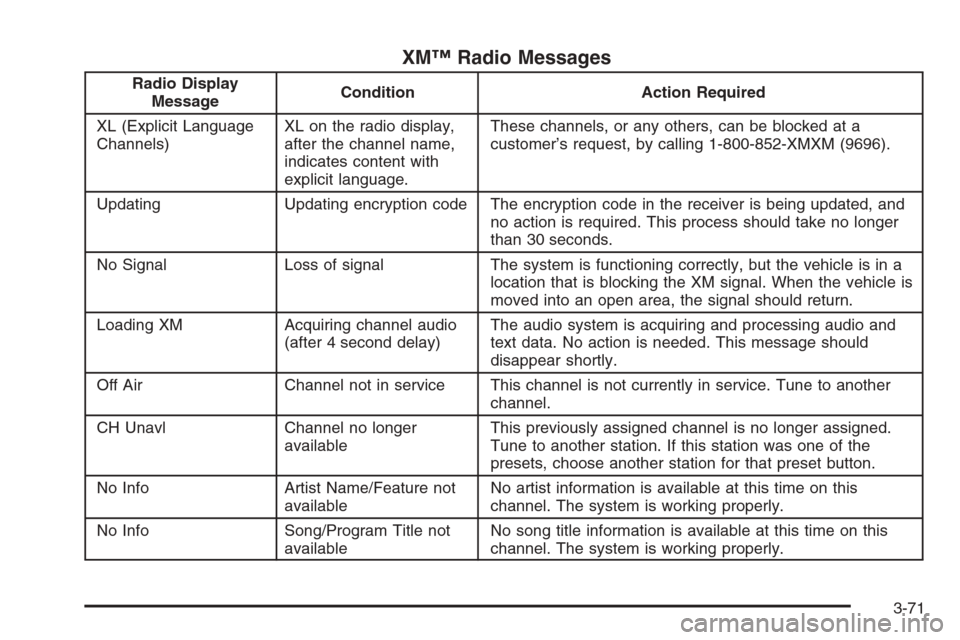
XM™ Radio Messages
Radio Display
MessageCondition Action Required
XL (Explicit Language
Channels)XL on the radio display,
after the channel name,
indicates content with
explicit language.These channels, or any others, can be blocked at a
customer’s request, by calling 1-800-852-XMXM (9696).
Updating Updating encryption code The encryption code in the receiver is being updated, and
no action is required. This process should take no longer
than 30 seconds.
No Signal Loss of signal The system is functioning correctly, but the vehicle is in a
location that is blocking the XM signal. When the vehicle is
moved into an open area, the signal should return.
Loading XM Acquiring channel audio
(after 4 second delay)The audio system is acquiring and processing audio and
text data. No action is needed. This message should
disappear shortly.
Off Air Channel not in service This channel is not currently in service. Tune to another
channel.
CH Unavl Channel no longer
availableThis previously assigned channel is no longer assigned.
Tune to another station. If this station was one of the
presets, choose another station for that preset button.
No Info Artist Name/Feature not
availableNo artist information is available at this time on this
channel. The system is working properly.
No Info Song/Program Title not
availableNo song title information is available at this time on this
channel. The system is working properly.
3-71
Page 212 of 434
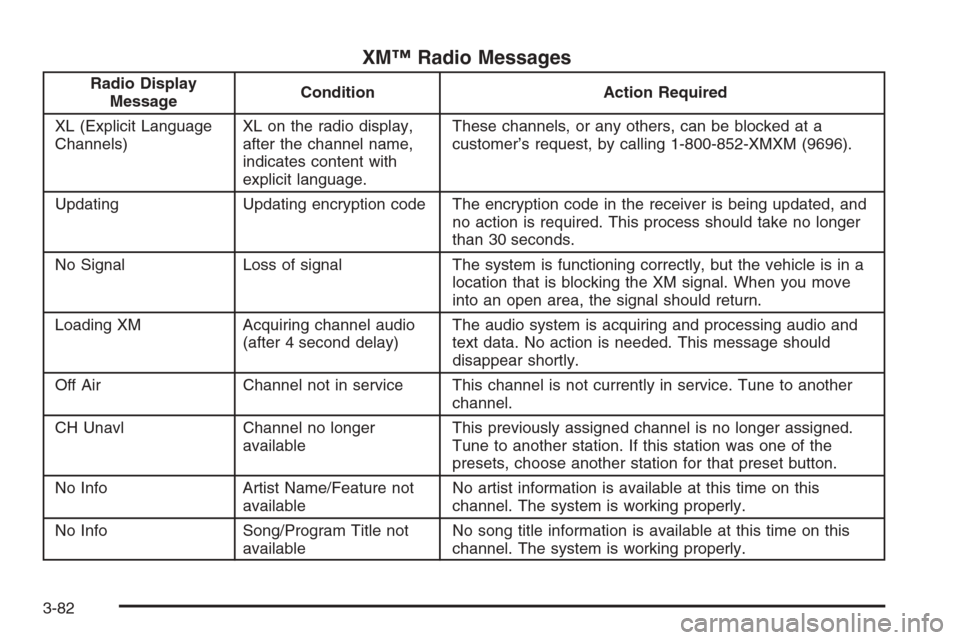
XM™ Radio Messages
Radio Display
MessageCondition Action Required
XL (Explicit Language
Channels)XL on the radio display,
after the channel name,
indicates content with
explicit language.These channels, or any others, can be blocked at a
customer’s request, by calling 1-800-852-XMXM (9696).
Updating Updating encryption code The encryption code in the receiver is being updated, and
no action is required. This process should take no longer
than 30 seconds.
No Signal Loss of signal The system is functioning correctly, but the vehicle is in a
location that is blocking the XM signal. When you move
into an open area, the signal should return.
Loading XM Acquiring channel audio
(after 4 second delay)The audio system is acquiring and processing audio and
text data. No action is needed. This message should
disappear shortly.
Off Air Channel not in service This channel is not currently in service. Tune to another
channel.
CH Unavl Channel no longer
availableThis previously assigned channel is no longer assigned.
Tune to another station. If this station was one of the
presets, choose another station for that preset button.
No Info Artist Name/Feature not
availableNo artist information is available at this time on this
channel. The system is working properly.
No Info Song/Program Title not
availableNo song title information is available at this time on this
channel. The system is working properly.
3-82
Page 225 of 434
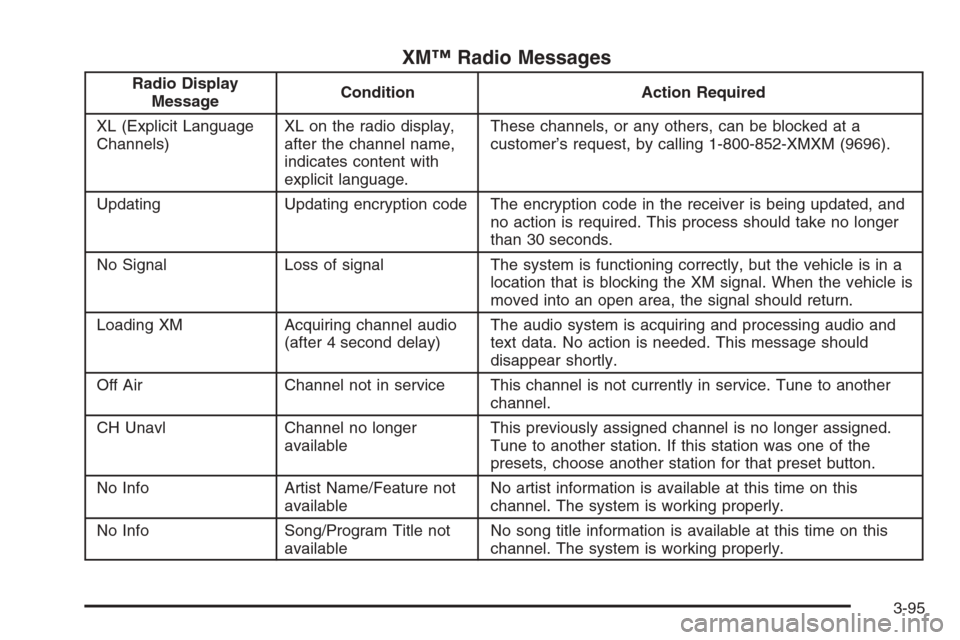
XM™ Radio Messages
Radio Display
MessageCondition Action Required
XL (Explicit Language
Channels)XL on the radio display,
after the channel name,
indicates content with
explicit language.These channels, or any others, can be blocked at a
customer’s request, by calling 1-800-852-XMXM (9696).
Updating Updating encryption code The encryption code in the receiver is being updated, and
no action is required. This process should take no longer
than 30 seconds.
No Signal Loss of signal The system is functioning correctly, but the vehicle is in a
location that is blocking the XM signal. When the vehicle is
moved into an open area, the signal should return.
Loading XM Acquiring channel audio
(after 4 second delay)The audio system is acquiring and processing audio and
text data. No action is needed. This message should
disappear shortly.
Off Air Channel not in service This channel is not currently in service. Tune to another
channel.
CH Unavl Channel no longer
availableThis previously assigned channel is no longer assigned.
Tune to another station. If this station was one of the
presets, choose another station for that preset button.
No Info Artist Name/Feature not
availableNo artist information is available at this time on this
channel. The system is working properly.
No Info Song/Program Title not
availableNo song title information is available at this time on this
channel. The system is working properly.
3-95
Page 254 of 434
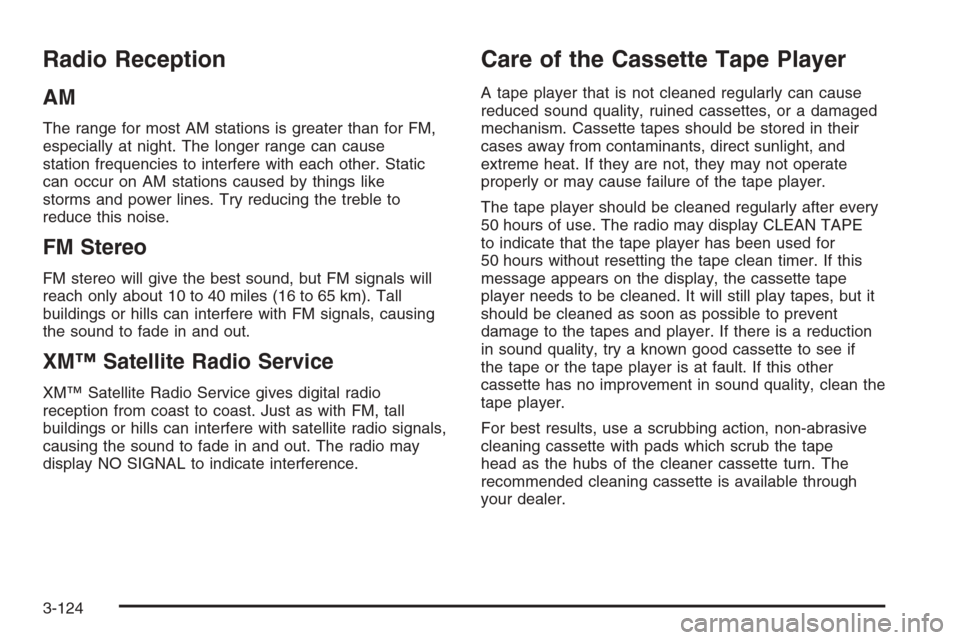
Radio Reception
AM
The range for most AM stations is greater than for FM,
especially at night. The longer range can cause
station frequencies to interfere with each other. Static
can occur on AM stations caused by things like
storms and power lines. Try reducing the treble to
reduce this noise.
FM Stereo
FM stereo will give the best sound, but FM signals will
reach only about 10 to 40 miles (16 to 65 km). Tall
buildings or hills can interfere with FM signals, causing
the sound to fade in and out.
XM™ Satellite Radio Service
XM™ Satellite Radio Service gives digital radio
reception from coast to coast. Just as with FM, tall
buildings or hills can interfere with satellite radio signals,
causing the sound to fade in and out. The radio may
display NO SIGNAL to indicate interference.
Care of the Cassette Tape Player
A tape player that is not cleaned regularly can cause
reduced sound quality, ruined cassettes, or a damaged
mechanism. Cassette tapes should be stored in their
cases away from contaminants, direct sunlight, and
extreme heat. If they are not, they may not operate
properly or may cause failure of the tape player.
The tape player should be cleaned regularly after every
50 hours of use. The radio may display CLEAN TAPE
to indicate that the tape player has been used for
50 hours without resetting the tape clean timer. If this
message appears on the display, the cassette tape
player needs to be cleaned. It will still play tapes, but it
should be cleaned as soon as possible to prevent
damage to the tapes and player. If there is a reduction
in sound quality, try a known good cassette to see if
the tape or the tape player is at fault. If this other
cassette has no improvement in sound quality, clean the
tape player.
For best results, use a scrubbing action, non-abrasive
cleaning cassette with pads which scrub the tape
head as the hubs of the cleaner cassette turn. The
recommended cleaning cassette is available through
your dealer.
3-124
Page 255 of 434
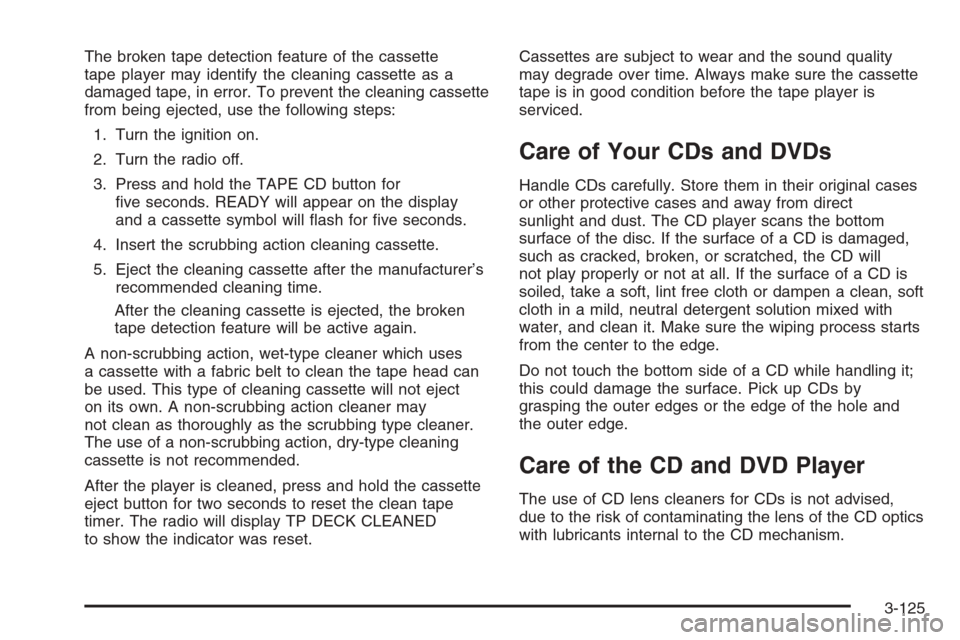
The broken tape detection feature of the cassette
tape player may identify the cleaning cassette as a
damaged tape, in error. To prevent the cleaning cassette
from being ejected, use the following steps:
1. Turn the ignition on.
2. Turn the radio off.
3. Press and hold the TAPE CD button for
�ve seconds. READY will appear on the display
and a cassette symbol will �ash for �ve seconds.
4. Insert the scrubbing action cleaning cassette.
5. Eject the cleaning cassette after the manufacturer’s
recommended cleaning time.
After the cleaning cassette is ejected, the broken
tape detection feature will be active again.
A non-scrubbing action, wet-type cleaner which uses
a cassette with a fabric belt to clean the tape head can
be used. This type of cleaning cassette will not eject
on its own. A non-scrubbing action cleaner may
not clean as thoroughly as the scrubbing type cleaner.
The use of a non-scrubbing action, dry-type cleaning
cassette is not recommended.
After the player is cleaned, press and hold the cassette
eject button for two seconds to reset the clean tape
timer. The radio will display TP DECK CLEANED
to show the indicator was reset.Cassettes are subject to wear and the sound quality
may degrade over time. Always make sure the cassette
tape is in good condition before the tape player is
serviced.
Care of Your CDs and DVDs
Handle CDs carefully. Store them in their original cases
or other protective cases and away from direct
sunlight and dust. The CD player scans the bottom
surface of the disc. If the surface of a CD is damaged,
such as cracked, broken, or scratched, the CD will
not play properly or not at all. If the surface of a CD is
soiled, take a soft, lint free cloth or dampen a clean, soft
cloth in a mild, neutral detergent solution mixed with
water, and clean it. Make sure the wiping process starts
from the center to the edge.
Do not touch the bottom side of a CD while handling it;
this could damage the surface. Pick up CDs by
grasping the outer edges or the edge of the hole and
the outer edge.
Care of the CD and DVD Player
The use of CD lens cleaners for CDs is not advised,
due to the risk of contaminating the lens of the CD optics
with lubricants internal to the CD mechanism.
3-125