2005 CHEVROLET MALIBU ECU
[x] Cancel search: ECUPage 123 of 434
HomeLink®Wireless Control
System Operation
Do not use the HomeLink®Transmitter with any garage
door opener that does not have the “stop and reverse”
feature. This includes any garage door opener model
manufactured before April 1, 1982. If you have a newer
garage door opener with rolling codes, please be
sure to follow Steps 6 through 8 to complete the
programming of your HomeLink
®Transmitter.
Read the instructions completely before attempting to
program the HomeLink
®Transmitter. Because of the
steps involved, it may be helpful to have another person
available to assist you in programming the transmitter.
Keep the original transmitter for use in other vehicles as
well as for future HomeLink
®programming. It is also
recommended that upon the sale of the vehicle,
the programmed HomeLink
®buttons should be erased
for security purposes. Refer to “Erasing HomeLink®
Buttons” or, for assistance, contact HomeLink®on the
Internet at: www.homelink.com or by calling
1-800-355-3515.
Be sure that people and objects are clear of the garage
door or gate operator you are programming. When
programming a garage door, it is advised to park outside
of the garage.It is recommended that a new battery be installed in
your hand-held transmitter for quicker and more
accurate transmission of the radio frequency.
Programming HomeLink®
Your vehicle’s engine should be turned off while
programming the transmitter. Follow these steps to
program up to three channels:
1. Press and hold down the two outside buttons,
releasing only when the indicator light begins to
�ash, after 20 seconds. Do not hold down the
buttons for longer than 30 seconds and do not
repeat this step to program a second and/or third
transmitter to the remaining two HomeLink
®buttons.
2. Position the end of your hand-held transmitter about
1 to 3 inches (3 to 8 cm) away from the HomeLink
®
buttons while keeping the indicator light in view.
3. Simultaneously press and hold both the desired
button on HomeLink
®and the hand-held transmitter
button. Do not release the buttons until Step 4
has been completed.
Some entry gates and garage door openers may
require you to substitute Step 3 with the procedure
noted in “Gate Operator and Canadian
Programming” later in this section.
2-41
Page 127 of 434
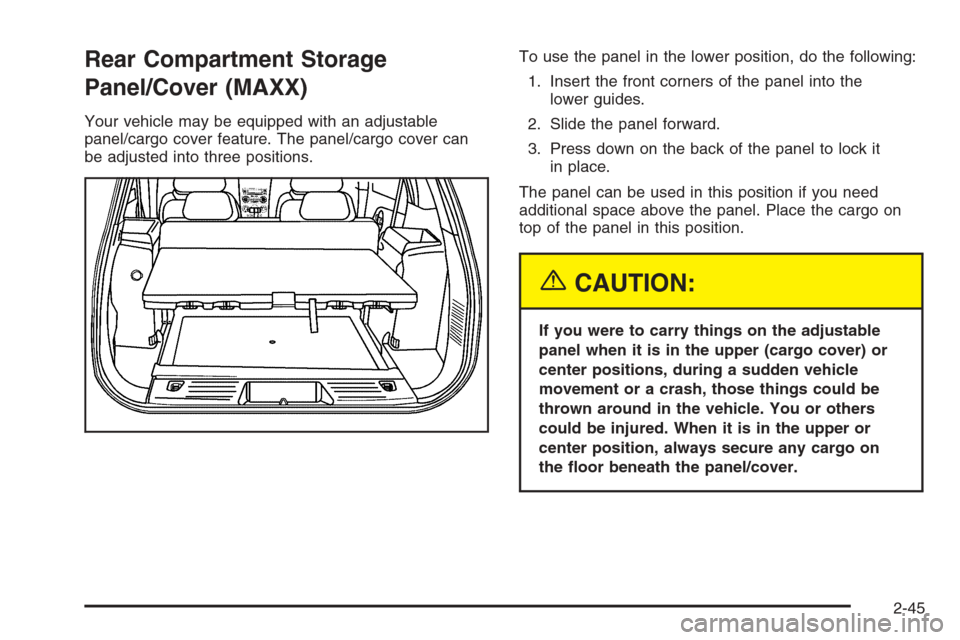
Rear Compartment Storage
Panel/Cover (MAXX)
Your vehicle may be equipped with an adjustable
panel/cargo cover feature. The panel/cargo cover can
be adjusted into three positions.To use the panel in the lower position, do the following:
1. Insert the front corners of the panel into the
lower guides.
2. Slide the panel forward.
3. Press down on the back of the panel to lock it
in place.
The panel can be used in this position if you need
additional space above the panel. Place the cargo on
top of the panel in this position.
{CAUTION:
If you were to carry things on the adjustable
panel when it is in the upper (cargo cover) or
center positions, during a sudden vehicle
movement or a crash, those things could be
thrown around in the vehicle. You or others
could be injured. When it is in the upper or
center position, always secure any cargo on
the �oor beneath the panel/cover.
2-45
Page 128 of 434
To use the panel in the center position, do the following:
1. Insert the front corners of the panel into the
middle guides.
2. Slide the panel forward.
3. Press down and pull rearward on the back of the
panel to lock it in place.
The panel can be used in this position when you have
to place a �at or spare tire in the rear cargo area.
To use the panel in the upper position, do the following:
1. Insert the front corners of the panel into the top
guides.
2. Slide the panel forward.
3. Press down and pull rearward on the back of the
panel to lock it in place.
This can be used as a cargo cover for the rear area.
The panel may be installed either carpet or plastic side
up. The panel may also be used as a table in this
position. See “Table” following for more information.Table (MAXX)
Your vehicle will be equipped with an adjustable panel
that also functions as a table. The maximum load
for the table is 100 lbs distributed (45 kg).
To set up the table, do the following:
1. With the adjustable panel in the upper position
extend it out, with the plastic side up. The panel
will only extend in the upper position.
2. Rotate the knob to release the leg from the plastic
side of the table and rotate leg outward.
3. Set the table leg onto the liftgate lock striker at the
rear edge of the vehicle.
Make sure to place the table leg securely onto the
liftgate lock striker.
Notice:Driving with the panel extended into the
table position could damage your vehicle. Always
have the panel in the stored position while you
are driving.
Notice:Placing hot items on the surface of the
table could damage it. Always be sure that the items
that are placed on the surface of the table are of
moderate temperature.
There are four grocery hooks located on the table for
your convenience.
2-46
Page 132 of 434
Oil Pressure Light.........................................3-44
Security Light...............................................3-44
Cruise Control Light......................................3-45
Highbeam On Light.......................................3-45
Service Vehicle Soon Light............................3-45
Fuel Gage...................................................3-46
Driver Information Center (DIC).......................3-47
DIC Operation and Displays...........................3-47
DIC Warnings and Messages.........................3-52
Audio System(s).............................................3-54
Setting the Time for Radios without Radio
Data Systems (RDS)..................................3-54
Setting the Time for Radios with Radio Data
Systems (RDS).........................................3-55
Radio with CD (Base Level)...........................3-55
Radio with CD (Up Level)..............................3-60Radio with Cassette and CD..........................3-71
Radio with Six-Disc CD.................................3-84
Rear Seat Entertainment System....................3-99
Rear Seat Audio (RSA) (Without Rear
Seat Entertainment).................................3-115
Rear Seat Audio (RSA) (With Entertainment
System)..................................................3-117
Theft-Deterrent Feature................................3-118
Audio Steering Wheel Controls......................3-119
Radio Reception.........................................3-120
Care of the Cassette Tape Player.................3-120
Care of Your CDs and DVDs........................3-121
Care of the CD and DVD Player...................3-121
Fixed Mast Antenna (MAXX Only).................3-122
Backglass Antenna (Sedan Only)..................3-122
XM™ Satellite Radio Antenna System............3-122
Section 3 Instrument Panel
3-2
Page 169 of 434
{CAUTION:
Even though the passenger sensing system
is designed to turn off the passenger’s frontal
airbag if the system detects a rear-facing child
restraint, no system is failsafe, and no one can
guarantee that an airbag will not deploy under
some unusual circumstance, even though it
is turned off. We recommend that rear-facing
child restraints be secured in the rear seat,
even if the airbag is off.
If the word OFF or the off symbol is lit on the airbag
status indicator, it means that the passenger sensing
system has turned off the right front passenger’s frontal
airbag. SeePassenger Sensing System on page 1-70
for more on this, including important safety information.If, after several seconds, all status indicator lights
remain on, or if there are no lights at all, there may be
a problem with the lights or the passenger sensing
system. See your dealer for service.
{CAUTION:
If the off indicator and the airbag readiness
light ever come on together, it means that
something may be wrong with the airbag
system. If this ever happens, have the vehicle
serviced promptly, because an adult-size
person sitting in the right front passenger seat
may not have the protection of the frontal
airbag. SeeAirbag Readiness Light on
page 3-36.
3-39
Page 179 of 434

Security Light
This light will come on
brie�y when you turn the
key toward start. The
light will stay on until the
engine starts.
If the light comes on continuously while driving
and stays on, there may be a problem with the
PASS-Key
®III + system. Your vehicle will not be
protected by PASS-Key®III +, and you should see
your dealer.
If your vehicle has the content theft-deterrent alarm
system, the security light will also turn on to indicate that
arming has been initiated. SeeContent Theft-Deterrent
on page 2-18for more information.
Cruise Control Light
This light comes on
whenever you set your
cruise control.
The light will go out when the cruise control is turned off.
SeeCruise Control on page 3-11for more information.
Highbeam On Light
This light will come on
when the high-beam
headlamps are in use.
SeeHeadlamp High/Low-Beam Changer on page 3-8.
Service Vehicle Soon Light
This light will come on and
a chime will sound if it
detects a problem on the
vehicle.
The Driver Information Center (DIC) may display a
message such as Low Coolant, Power Steering, Engine
Reduced Power, etc. These messages may help you
determine why the service vehicle soon indicator is on.
SeeDIC Warnings and Messages on page 3-56.If
this happens, see your GM dealer for necessary repairs
to maintain top vehicle performance.
3-49
Page 183 of 434
In addition to the engine oil life system monitoring the
oil life, additional maintenance is recommended in the
Maintenance Schedule in this manual. SeeEngine Oil
on page 5-15andScheduled Maintenance on page 6-4.
Always reset the engine oil life system after an oil
change. See “How to Reset the Engine Oil Life System”
underEngine Oil Life System on page 5-18.
Personalization
The following options can be accessed in order by
pressing the MENU button anytime while the vehicle
is in on. Press this button to scroll through each option.
All of the personalization options may not be available
on your vehicle. Only the options available will be
displayed on your DIC.
Oil Life Reset
Units Selection (English/Metric)
Remote Start Capability
Horn Chirp During Remote Keyless Entry Locking
Horn Chirp During Remote Keyless Entry Unlocking
Exterior Light Flash During Remote Keyless
Entry Locking or Unlocking
Delayed Locking
Automatic Vehicle Unlocking: Speci�c Doors
Automatic Vehicle Unlocking: When Key is Off or
When Shift To Park
Exterior Perimeter Lighting During Remote Keyless
Entry Unlock
Security System Passive or Remote Keyless Entry
Arming
Select Language: (English, French, Spanish or
German)
When the desired option is reached, use the ENTER
button to toggle between the modes of that option.
To make a selection, press the MENU button again.
If no selection is made within ten seconds, the display
will revert back to the previous information displayed.
The MENU mode is exited when the INFO button is
pressed, a ten second time period has elapsed, the
ignition is turned to off or the end of the MENU list is
reached.
The following display messages may appear on your
vehicle’s audio display by pressing the MENU button:
OIL LIFE RESET:When this option is displayed, you
can reset the engine oil life system. To reset the system
to 100%, press and hold the ENTER button for at least
one second. An ACKNOWLEDGED display message
will appear for three seconds or until the next button is
pressed. This will tell you the system has been reset.
SeeEngine Oil Life System on page 5-18for more
information.
3-53
Page 185 of 434
AUTO UNLK (Unlock):The automatic door unlocking
feature, which allows the vehicle to automatically
unlock certain doors can be enabled or disabled. When
AUTO UNLK appears on the display, use the ENTER
button to move between: ALL, DRIVER or NONE. When
you have made your choice, press and the MENU
button to record your selection. The initial setting from
the factory is ALL.
UNLK (Unlock):This feature determines when the
automatic door unlocking will occur, when either the key
is turned to OFF or the vehicle is shifted into PARK (P).
When UNLK appears on the display, use the ENTER
button to move between KEY OFF and SHIFT TO P.
When you have made your choice, press the MENU
button to record your selection. The initial setting from the
factory is SHIFT TO P.
EXT (Exterior) LIGHTS:If your vehicle has remote
keyless entry, this feature, which allows the vehicle’s
exterior perimeter lighting to turn on each time the
unlock button on the remote keyless entry transmitter is
pressed, can be enabled or disabled. When EXT
LIGHTS appears on the display, use the ENTER button
to move between ON and OFF. When you have
made your choice, press the MENU button to record
your selection. The initial setting from the factory is ON.SECURITY:If your vehicle has the remote keyless
entry system, this feature allows you to select the
method used to arm the vehicle’s security system. When
SECURITY appears on the display, use the ENTER
button to move between RKE and PASSIVE. When you
have made your choice, press the MENU button to
record your selection. SeeContent Theft-Deterrent on
page 2-18for more information.
LANGUAGE:To select your choice of language, use
the ENTER button to move between the optional
languages.
The languages are English, French, German and
Spanish.
Choosing a language will display all of the information
on the DIC in the desired language.
When you have made your choice, press the MENU
button for at least one second to record your selection.
The initial setting from the factory is ENGLISH.
ENTER:The ENTER button is used to reset certain
functions and turn off or acknowledge messages on the
DIC display. The ENTER button also toggles through
the options available in each personalization menu.
3-55