2005 CHEVROLET KODIAK oil type
[x] Cancel search: oil typePage 221 of 374

What Fuel to Use in Canada
Canadian fuels are blended for seasonal changes.
Diesel Type “A” fuel is blended for better cold weather
starting (below 0°F or−18°C); however, you may
notice some power and fuel economy loss. If Type “A”
fuel is used in warmer temperatures, stalling and
hard starting may occur. Diesel Type “B” fuel is blended
for temperatures above 0°F (−18°C). The emission
control system requires the use of diesel fuel with
low-sulfur (.05% by weight) content. Both low- and
higher-sulfur fuels will be available in Canada. Only
low-sulfur diesel fuels are available in the United States.
It is important that diesel-powered trucks are refueled
only with low-sulfur fuel. Use of fuels with higher-sulfur
content will affect the function of the emission
components and may cause reduced performance,
excessive smoke and unpleasant odor.
At a minimum, the diesel fuel you use should meet
specifications CAN/CGSB-3.517-2000 (Low Sulfur
Diesel) in Canada. In addition, the Engine Manufacturers
Association (EMA) has identified properties of an
improved diesel fuel for better engine performance and
durability (FQP-1A). Diesel fuels corresponding to
the EMA description could provide better starting, less
noise and better vehicle performance. If there are
questions about the fuel you are using, contact your
fuel supplier.If your vehicle has the 6.6L engine, it is acceptable to
use diesel fuel containing up to 5% biodiesel (B5),
but the final blended fuel must meet the same
specification, CAN/CGSB-3.517-2000 (Low Sulfur
Diesel) in Canada, as other fuels used in your vehicle,
and the biodiesel used for making this fuel must
meet the ASTM D6751-03 specification. Biodiesel is
produced from vegetable oils or animal fat that
have been chemically modified to reduce the
possibility of damage to your fuel system and
engine. Higher concentration (i.e., greater than B5)
biodiesel-containing fuels or the use of unmodified
bio-oils blended into diesel fuel at any concentration is
not recommended and could damage your fuel
system and engine. Such damage would not be covered
by your warranty. If there are questions about the
biodiesel-containing fuels you are using, contact your
fuel supplier.
5-9
Page 265 of 374

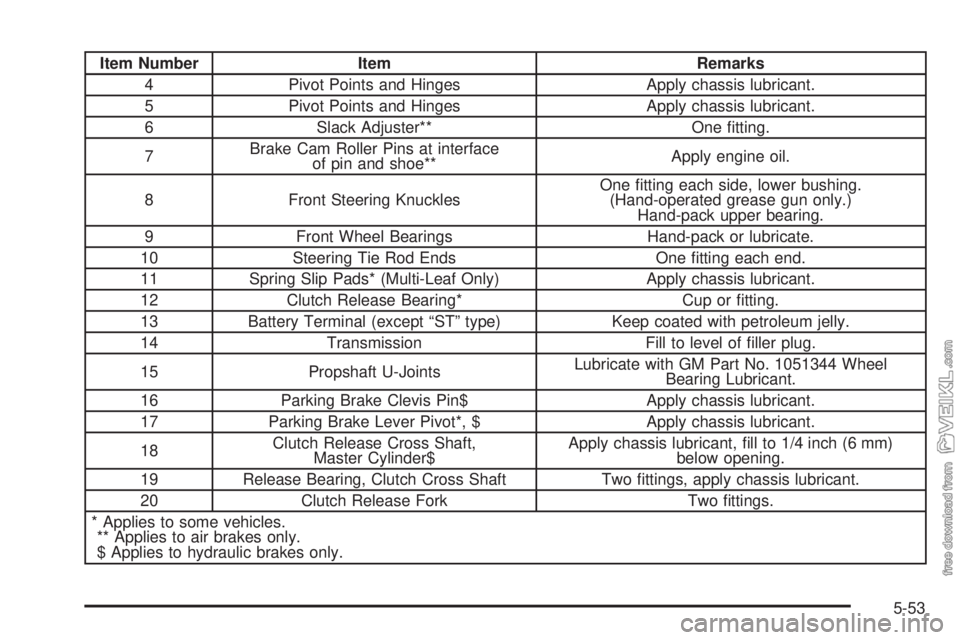
Item Number Item Remarks
4 Pivot Points and Hinges Apply chassis lubricant.
5 Pivot Points and Hinges Apply chassis lubricant.
6 Slack Adjuster** One fitting.
7Brake Cam Roller Pins at interface
of pin and shoe**Apply engine oil.
8 Front Steering KnucklesOne fitting each side, lower bushing.
(Hand-operated grease gun only.)
Hand-pack upper bearing.
9 Front Wheel Bearings Hand-pack or lubricate.
10 Steering Tie Rod Ends One fitting each end.
11 Spring Slip Pads* (Multi-Leaf Only) Apply chassis lubricant.
12 Clutch Release Bearing* Cup or fitting.
13 Battery Terminal (except “ST” type) Keep coated with petroleum jelly.
14 Transmission Fill to level of filler plug.
15 Propshaft U-JointsLubricate with GM Part No. 1051344 Wheel
Bearing Lubricant.
16 Parking Brake Clevis Pin$ Apply chassis lubricant.
17 Parking Brake Lever Pivot*, $ Apply chassis lubricant.
18Clutch Release Cross Shaft,
Master Cylinder$Apply chassis lubricant, fill to 1/4 inch (6 mm)
below opening.
19 Release Bearing, Clutch Cross Shaft Two fittings, apply chassis lubricant.
20 Clutch Release Fork Two fittings.
* Applies to some vehicles.
** Applies to air brakes only.
$ Applies to hydraulic brakes only.
5-53
Page 274 of 374

Rear Axle Shift Motor
When to Check and Change Fluid
If you have an optional air-shift two-speed, controlled
traction, or locking differential type rear axle, a good time
to check the fluid level in the axle shift motor is when
the rear axle lubricant is checked. Use refrigerant
oil (shift motor only).
How to Check Fluid
Remove the plug on the front plate of the axle shift
motor, add enough fluid to raise the level to the bottom
of the filler plug hole, then replace the plug.
What to Use
Refer to your Maintenance Schedule to determine what
kind of lubricant to use. SeePart C: Recommended
Fluids and Lubricants on page 6-32.
Four-Wheel Drive
Transfer Case
When to Check Lubricant
It is not necessary to regularly check transfer case fluid
unless you suspect there is a leak or you hear an
unusual noise. A fluid loss could indicate a problem.
Have it inspected and repaired.
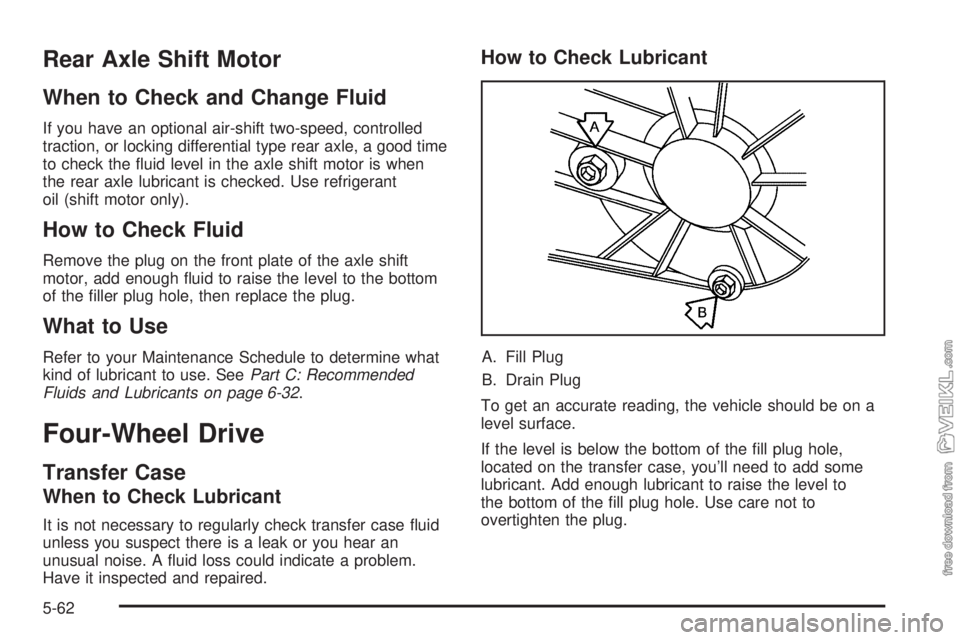
How to Check Lubricant
A. Fill Plug
B. Drain Plug
To get an accurate reading, the vehicle should be on a
level surface.
If the level is below the bottom of the fill plug hole,
located on the transfer case, you’ll need to add some
lubricant. Add enough lubricant to raise the level to
the bottom of the fill plug hole. Use care not to
overtighten the plug.
5-62
Page 286 of 374

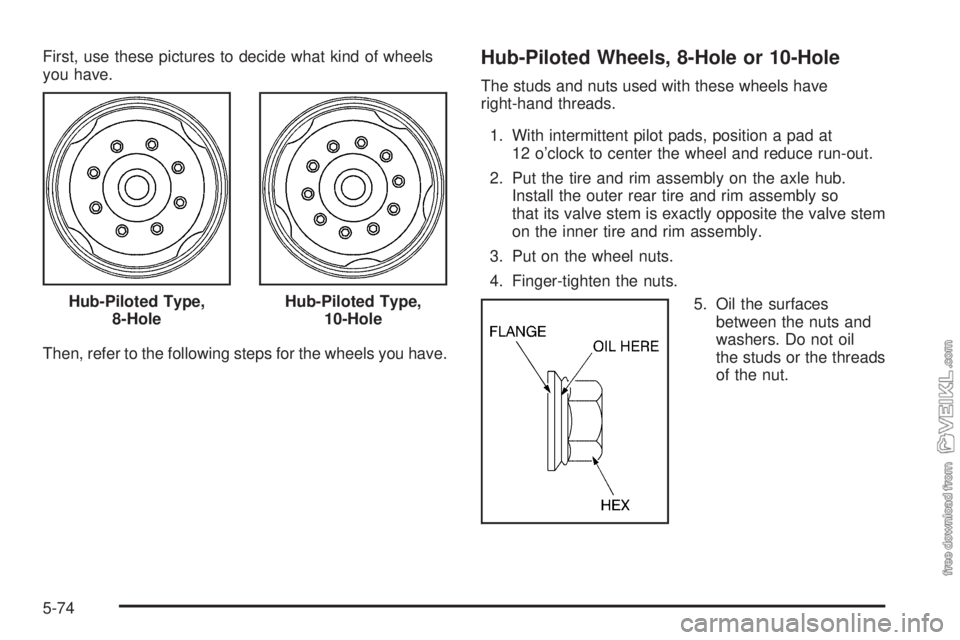
First, use these pictures to decide what kind of wheels
you have.
Then, refer to the following steps for the wheels you have.Hub-Piloted Wheels, 8-Hole or 10-Hole
The studs and nuts used with these wheels have
right-hand threads.
1. With intermittent pilot pads, position a pad at
12 o’clock to center the wheel and reduce run-out.
2. Put the tire and rim assembly on the axle hub.
Install the outer rear tire and rim assembly so
that its valve stem is exactly opposite the valve stem
on the inner tire and rim assembly.
3. Put on the wheel nuts.
4. Finger-tighten the nuts.
5. Oil the surfaces
between the nuts and
washers. Do not oil
the studs or the threads
of the nut. Hub-Piloted Type,
8-Hole
Hub-Piloted Type,
10-Hole
5-74
Page 312 of 374

Engine Speci�cations
Engine RPO Type
6.6LV8 DURAMAX®6600 LLY Common Rail Fuel System
7.2L L6 Caterpillar®C7 LG5 HEUI Fuel System
7.8L L6 DURAMAX®7800 LG4 Common Rail Fuel System
8.1L V8 Vortec 8100 L18 SPFI Fuel System
Normal Maintenance Replacement Parts
Replacement parts identified by name, part number, or specification can be obtained from your dealer.
Part GM Part Number ACDelco®Part Number
Air Compressor Filter
Bendix Tu-Flo 550 (13.2 CFM)2467368 —
Engine Air Cleaner/Filter
6.6L; 7.8L (C4/C5 Models) 88937527 —
6.6L; 7.8L (C6/C7/C8 Models) 88937548*** —
7.2L — P522606†
8.1L 25313349 A1518C
Engine Oil Filter
6.6L 88917036 PF2232
7.2L — 1R0739††
7.8L 94392475 —
8.1L 25324052 PF454
5-100
Page 322 of 374

22,500 Miles (36 000 km)
❑Gasoline Engine Only: Check engine oil life system. If
engine oil and filter are changed, reset system. See
“Engine Oil (Gasoline Engine)” in the Index.(2) (8)
❑Check fluid levels (or every 3 months, whichever
occurs first).(1) (5)
❑Chassis lubrication service (or every 6 months,
whichever occurs first).(11)
❑Inspect door hinge pins and bushings and replace as
necessary.
❑Cooling system service. Clean the cooling system filter
cap with clean water, clean the core, pressure test the
cap and the system for proper pressure capability, and
inspect condition of cooling and heater hoses and
clamps. Replace hoses if cracked, swollen, or
damaged.
❑Wheel bearing (grease type) service (or every
24 months, whichever occurs first, and whenever
hubs are removed).(22) (36)
❑Wheels and tires service.(14)
❑Hydraulic brake service (or every 6 months, whichever
occurs first).(6) (36)❑Parking brake service (or every 6 months, whichever
occurs first).(21)
❑Air brake service (or every 6 months, whichever
occurs first).(32)
❑Air brake automatic slack adjuster service (or every
500 hours, whichever occurs first).(33)
❑Check air brake relay valve operation and check for
leaks (or every month, or every 300 hours, whichever
occurs first).
❑Clean air brake application valve (or every 3 months,
or every 300 hours, whichever occurs first). Lubricate
linkage.
❑Air brake chamber service (or every 2 months,
whichever occurs first).(34)
❑Air brake system valve service (or every 3 months, or
every 900 hours, whichever occurs first).(37)
❑Air intake system service (or every 24 months,
whichever occurs first).(3) (4) (23)
❑Evaporative Control System service, if equipped, (or
every 24 months, whichever occurs first).(2) (24) †
❑Rear axle air shift motor service.(10)
6-8
Page 325 of 374

❑Parking brake service (or every 6 months, whichever
occurs first).(21)
❑Air brake service (or every 6 months, whichever
occurs first).(32)
❑Air brake automatic slack adjuster service (or every
500 hours, whichever occurs first).(33)
❑Check air brake relay valve operation and check for
leaks (or every month, or every 300 hours, whichever
occurs first).
❑Clean air brake application valve (or every 3 months,
or every 300 hours, whichever occurs first). Lubricate
linkage.
❑Air brake chamber service (or every 2 months,
whichever occurs first).(34)
45,000 Miles (72 000 km)
❑Gasoline Engine Only: Check engine oil life system. If
engine oil and filter are changed, reset system. See
“Engine Oil (Gasoline Engine)” in the Index.(2) (8)
❑6.6L DURAMAX
®Diesel Without Engine Oil Life
System Only: Change engine oil and filter (or every
12 months, or every 750 hours of engine operation,
whichever occurs first).(2)
❑6.6L DURAMAX
®Diesel With Engine Oil Life System
Only: Check oil life system. If engine oil and filter are
changed, reset system. See “Engine Oil (DURAMAX
®
Diesel)” in the Index.(2) (9)❑Check fluid levels (or every 3 months, whichever
occurs first).(1) (5)
❑Gasoline Engine: Replace engine air cleaner filter.
SeeEngine Air Cleaner/Filter on page 5-33for more
information.
❑Diesel Engine: Inspect engine air cleaner filter change
indicator. If necessary, replace the filter. If vehicle is
driven in dusty/dirty conditions, inspect filter change
indicator at every engine oil change. SeeEngine Air
Cleaner/Filter on page 5-33for more information.
❑DURAMAX
®Diesel Only: Replace fuel filter (or every
750 hours of engine operation, whichever occurs first).
❑Chassis lubrication service (or every 6 months,
whichever occurs first).(11)
❑Cooling system service. Clean the cooling system filler
cap with clean water, clean the core, pressure test the
cap and the system for proper pressure capability, and
inspect condition of cooling and heater hoses and
clamps. Replace hoses if cracked, swollen, or
damaged.
❑Wheel bearing (grease type) service (or every
24 months, whichever occurs first, and whenever hubs
are removed.)(22) (36)
❑Inspect door hinge pins and bushings and replace as
necessary.
❑Steering system service.(12)
6-11
Page 329 of 374

67,500 Miles (108 000 km)
❑Gasoline Engine Only: Check engine oil life system. If
engine oil and filter are changed, reset system. See
“Engine Oil (Gasoline Engine)” in the Index.(2) (8)
❑Check fluid levels (or every 3 months, whichever
occurs first).(1) (5)
❑Chassis lubrication service (or every 6 months,
whichever occurs first).(11)
❑Cooling system service. Clean the cooling system filler
cap with clean water, clean the core, pressure test the
cap and the system for proper pressure capability, and
inspect condition of cooling and heater hoses and
clamps. Replace hoses if cracked, swollen, or
damaged.
❑Wheel bearing (grease type) service (or every
24 months, whichever occurs first, and whenever
hubs are removed).(22) (36)
❑Wheels and tires service.(14)
❑Hydraulic brake service (or every 6 months, whichever
occurs first).(6) (36)
❑Parking brake service (or every 6 months, whichever
occurs first).(21)
❑Air brake service (or every 6 months, whichever
occurs first).(32)
❑Air brake automatic slack adjuster service (or every
500 hours, whichever occurs first).(33)❑Check air brake relay valve operation and check for
leaks (or every month, or every 300 hours, whichever
occurs first).
❑Clean air brake application valve (or every 3 months,
or every 300 hours, whichever occurs first). Lubricate
linkage.
❑Air brake chamber service (or every 2 months,
whichever occurs first).(34)
❑Air brake system valve service (or every 3 months, or
every 900 hours, whichever occurs first).(37)
❑Rear axle air shift motor service.(10)
❑Air intake system service (or every 24 months,
whichever occurs first).(3) (4) (23)
❑Evaporative Control System service, if equipped, (or
every 24 months, whichever occurs first).(2) (24) †
72,000 Miles (115 000 km)
❑7.8L DURAMAX®Diesel Without Engine Oil Life
System Only: Change engine oil and filter (or
every 12 months, or every 600 hours of engine
operation, whichever occurs first).(2)
❑7.8L DURAMAX
®Diesel With Engine Oil Life System
Only: Check oil life system (or every 600 hours of
engine operation, whichever occurs first). If engine oil
and filter are changed, reset system. See “Engine
Oil (DURAMAX
®Diesel)” in the Index.(2) (7)
6-15