Page 267 of 388

Engine Overheating
You will �nd an engine coolant temperature gage on
your vehicle’s instrument panel. SeeEngine Coolant
Temperature Gage on page 3-33for more information.
If Steam Is Coming From Your
Engine
{CAUTION:
Steam from an overheated engine can burn
you badly, even if you just open the hood. Stay
away from the engine if you see or hear steam
coming from it. Just turn it off and get
everyone away from the vehicle until it cools
down. Wait until there is no sign of steam or
coolant before you open the hood.
If you keep driving when your engine is
overheated, the liquids in it can catch �re. You
or others could be badly burned. Stop your
engine if it overheats, and get out of the
vehicle until the engine is cool.Notice:If your engine catches �re because you
keep driving with no coolant, your vehicle can
be badly damaged. The costly repairs would not be
covered by your warranty.
If No Steam Is Coming From Your
Engine
If you get an engine overheat warning but see or hear
no steam, the problem may not be too serious.
Sometimes the engine can get a little too hot when you:
Climb a long hill on a hot day.
Stop after high-speed driving.
Idle for long periods in traffic.
Tow a trailer. See “Driving on Grades” under
Towing a Trailer on page 4-38.
If you get the overheat warning with no sign of steam,
try this for a minute or so:
1. In heavy traffic, let the engine idle in NEUTRAL (N)
while stopped. If it is safe to do so, pull off the road,
shift to PARK (P) or NEUTRAL (N) and let the
engine idle.
2. Turn on your heater to full hot at the highest fan
speed and open the windows as necessary.
5-25
Page 274 of 388

Engine Fan Noise
Your vehicle has a clutched engine cooling fan. When
the clutch is engaged, the fan spins faster to provide
more air to cool the engine. In most everyday driving
conditions, the fan is spinning slower and the clutch is
not fully engaged. This improves fuel economy and
reduces fan noise. Under heavy vehicle loading, trailer
towing, and/or high outside temperatures, the fan
speed increases as the clutch more fully engages, so
you may hear an increase in fan noise. This is
normal and should not be mistaken as the transmission
slipping or making extra shifts. It is merely the cooling
system functioning properly. The fan will slow down
when additional cooling is not required and the clutch
partially disengages.
You may also hear this fan noise when you start the
engine. It will go away as the fan clutch partially
disengages.
Power Steering Fluid
The power steering �uid
reservoir is located in the
engine compartment
on the driver’s side of the
vehicle. SeeEngine
Compartment Overview on
page 5-12for reservoir
location.
When to Check Power Steering Fluid
It is not necessary to regularly check power steering �uid
unless you suspect there is a leak in the system or
you hear an unusual noise. A �uid loss in this system
could indicate a problem. Have the system inspected
and repaired.
5-32
Page 306 of 388

After the tires have been rotated, adjust the front and
rear in�ation pressures as shown on the Tire and
Loading Information label. SeeLoading Your Vehicle on
page 4-31. Make certain that all wheel nuts are
properly tightened. See “Wheel Nut Torque” under
Capacities and Speci�cations on page 5-100.
{CAUTION:
Rust or dirt on a wheel, or on the parts to
which it is fastened, can make wheel nuts
become loose after a time. The wheel could
come off and cause an accident. When you
change a wheel, remove any rust or dirt from
places where the wheel attaches to the vehicle.
In an emergency, you can use a cloth or a
paper towel to do this; but be sure to use a
scraper or wire brush later, if needed, to get all
the rust or dirt off. SeeChanging a Flat Tire on
page 5-70.
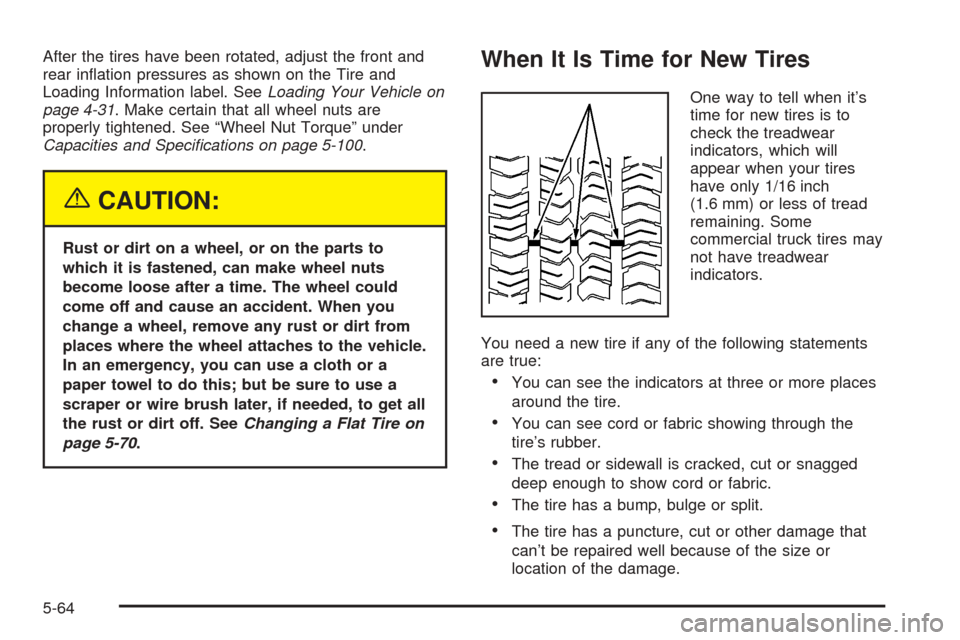
When It Is Time for New Tires
One way to tell when it’s
time for new tires is to
check the treadwear
indicators, which will
appear when your tires
have only 1/16 inch
(1.6 mm) or less of tread
remaining. Some
commercial truck tires may
not have treadwear
indicators.
You need a new tire if any of the following statements
are true:
You can see the indicators at three or more places
around the tire.
You can see cord or fabric showing through the
tire’s rubber.
The tread or sidewall is cracked, cut or snagged
deep enough to show cord or fabric.
The tire has a bump, bulge or split.
The tire has a puncture, cut or other damage that
can’t be repaired well because of the size or
location of the damage.
5-64
Page 312 of 388

If a Tire Goes Flat
It is unusual for a tire to blowout while you’re driving,
especially if you maintain your tires properly. If air goes
out of a tire, it is much more likely to leak out slowly.
But if you should ever have a blowout, here are a
few tips about what to expect and what to do:
If a front tire fails, the �at tire will create a drag that
pulls the vehicle toward that side. Take your foot off the
accelerator pedal and grip the steering wheel �rmly.
Steer to maintain lane position, and then gently brake to
a stop well out of the traffic lane.
A rear blowout, particularly on a curve, acts much like a
skid and may require the same correction you would;
use in a skid. In any rear blowout, remove your foot from
the accelerator pedal. Get the vehicle under control
by steering the way you want the vehicle to go. It may
be very bumpy and noisy, but you can still steer. Gently
brake to a stop, well off the road if possible.{CAUTION:
Lifting a vehicle and getting under it to do
maintenance or repairs is dangerous without
the appropriate safety equipment and training.
The jack provided with your vehicle is
designed only for changing a �at tire. If it is
used for anything else, you or others could be
badly injured or killed if the vehicle slips off
the jack. Use the jack provided with your
vehicle only for changing a �at tire.
If a tire goes �at, the next part shows how to use your
jacking equipment to change a �at tire safely.
Changing a Flat Tire
If a tire goes �at, avoid further tire and wheel damage
by driving slowly to a level place. Turn on your vehicle’s
hazard warning �ashers. SeeHazard Warning Flashers
on page 3-5for more information.
5-70
Page 316 of 388
3. Turn the ratchet counterclockwise to lower the
spare tire to the ground. If the spare tire does
not lower to the ground, the secondary latch
is engaged causing the tire not to lower. See
Secondary Latch System on page 5-80.4. When the tire has been lowered, pull the tire toward
you so you can reach the tire retainer and pull it up
through the wheel opening.
If you have a vehicle which was completed from a cab
and chassis, refer to the information from the body
supplier/installer.
The spare tire is a full-size tire, like the other tires on
your vehicle.
5-74
Page 321 of 388
{CAUTION:
Rust or dirt on the wheel, or on the parts to
which it is fastened, can make the wheel nuts
become loose after a time. The wheel could
come off and cause an accident. When you
change a wheel, remove any rust or dirt from
the places where the wheel attaches to the
vehicle. In an emergency, you can use a cloth
or a paper towel to do this; but be sure to use
a scraper or wire brush later, if you need to, to
get all the rust or dirt off.
7. Remove any rust or dirt
from the wheel bolts,
mounting surfaces
and spare wheel.
{CAUTION:
Never use oil or grease on studs or nuts. If you
do, the nuts might come loose. Your wheel
could fall off, causing a serious accident.
8. Put the wheel nuts
back on with the
rounded end of the
nuts toward the wheel.
Tighten each wheel
nut by hand until
the wheel is held
against the hub.
5-79
Page 322 of 388

9. Lower the vehicle by turning the jack handle
counterclockwise. Lower the jack completely.
{CAUTION:
Incorrect wheel nuts or improperly tightened
wheel nuts can cause the wheel to come loose
and even come off. This could lead to an
accident. Be sure to use the correct wheel
nuts. If you have to replace them, be sure to
get new GM original equipment wheel nuts.
Stop somewhere as soon as you can and have
the nuts tightened with a torque wrench to the
proper torque speci�cation. SeeCapacities
and Specifications on page 5-100for wheel nut
torque speci�cation.
Notice:Improperly tightened wheel nuts can lead
to brake pulsation and rotor damage. To avoid
expensive brake repairs, evenly tighten the wheel
nuts in the proper sequence and to the proper
torque speci�cation. SeeCapacities and
Specifications on page 5-100for the wheel nut
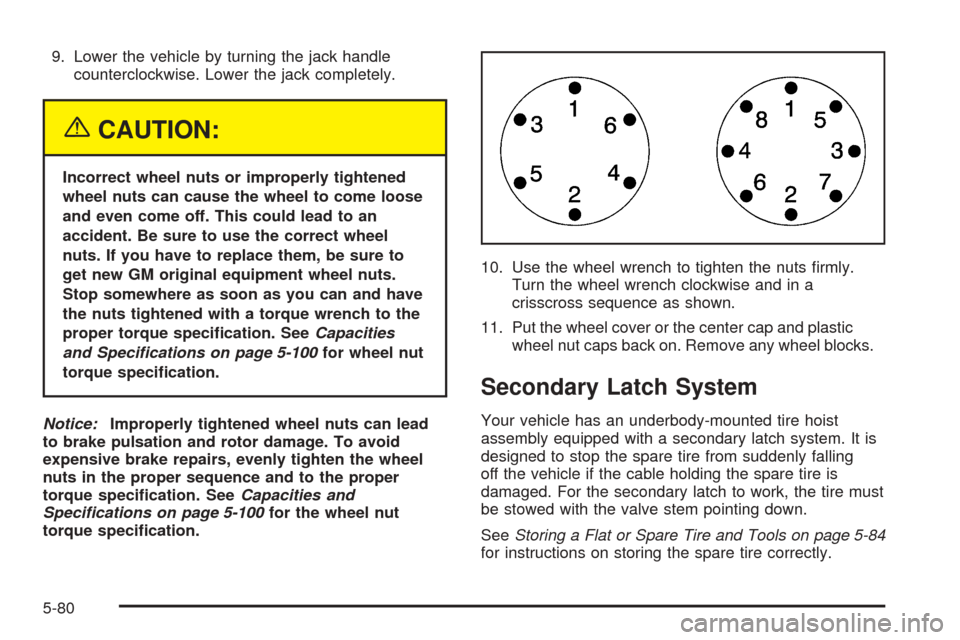
torque speci�cation.10. Use the wheel wrench to tighten the nuts �rmly.
Turn the wheel wrench clockwise and in a
crisscross sequence as shown.
11. Put the wheel cover or the center cap and plastic
wheel nut caps back on. Remove any wheel blocks.
Secondary Latch System
Your vehicle has an underbody-mounted tire hoist
assembly equipped with a secondary latch system. It is
designed to stop the spare tire from suddenly falling
off the vehicle if the cable holding the spare tire is
damaged. For the secondary latch to work, the tire must
be stowed with the valve stem pointing down.
SeeStoring a Flat or Spare Tire and Tools on page 5-84
for instructions on storing the spare tire correctly.
5-80
Page 327 of 388
3. Pull the wheel toward the rear of the vehicle,
keeping the cable tight.
4. With the UP side facing you, attach the ratchet to
the wheel wrench.5. Put the �at end of the wheel wrench on an angle
through the hole in the rear door frame, above the
bumper.
6. Raise the tire fully against the underside of the
vehicle. Continue turning the ratchet until the tire
is secure and the cable is tight. The spare tire hoist
cannot be overtightened.
7. Make sure the tire is stored securely. Push, pull,
and then try to rotate or turn the tire. If the tire
moves, use the ratchet to tighten the cable.
You will hear two clicks when the tire is up all the way.
Return the jacking equipment to the proper location.
Secure the items and replace the jack cover.
5-85