2005 CHEVROLET EXPRESS PASSANGER maintenance
[x] Cancel search: maintenancePage 287 of 388

Front Axle
When to Check and Change Lubricant
Refer to the Maintenance Schedule to determine how
often to check the lubricant and when to change it.
SeeScheduled Maintenance on page 6-4.
How to Check Lubricant
To get an accurate reading, the vehicle should be on a
level surface.
If the level is below the
bottom of the �ller plug
hole, you may need to add
some lubricant.
When the differential is cold, add enough lubricant to
raise the level to 3/8 inch (10 mm) below the �ller
plug hole.When the differential is at operating temperature (warm),
add enough lubricant to raise the level to the bottom of
the �ller plug hole.
What to Use
Refer to the Maintenance Schedule to determine what
kind of lubricant to use. SeeRecommended Fluids
and Lubricants on page 6-13.
Noise Control System
Tampering with Noise Control
System Prohibited
The following information relates to compliance with
federal noise emission standards for vehicles with a
Gross Vehicle Weight Rating (GVWR) of more than
10,000 lbs (4 536 kg). The Maintenance Schedule
provides information on maintaining the noise control
system to minimize degradation of the noise emission
control system during the life of your vehicle. The noise
control system warranty is given in your warranty booklet.
These standards apply only to vehicles sold in the
United States.
5-45
Page 288 of 388

Federal law prohibits the following acts or the causing
thereof:
1. The removal or rendering inoperative by any
person, other than for purposes of maintenance,
repair or replacement, of any device or element of
design incorporated into any new vehicle for
the purpose of noise control, prior to its sale or
delivery to the ultimate purchaser or while it is in
use; or
2. The use of the vehicle after such device or element
of design has been removed or rendered inoperative
by any person.
Among those acts presumed to constitute tampering are
the acts listed below.
Insulation:
Removal of the noise shields or any underhood
insulation.
Engine:
Removal or rendering engine speed governor (if
equipped) inoperative so as to allow engine
speed to exceed manufacturer speci�cations.
Fan and Drive:
Removal of fan clutch (if equipped) or rendering
clutch inoperative.
Removal of the fan shroud (if equipped).
Air Intake:
Removal of the air cleaner silencer.
Modi�cation of the air cleaner.
Exhaust:
Removal of the muffler and/or resonator.
Removal of the exhaust pipes and exhaust pipe
clamps.
5-46
Page 294 of 388

Windshield Wiper Blade
Replacement
Windshield wiper blades should be inspected at least
twice a year for wear and cracking. SeeScheduled
Maintenance on page 6-4for more information on wiper
blade inspection.
Replacement blades come in different types and are
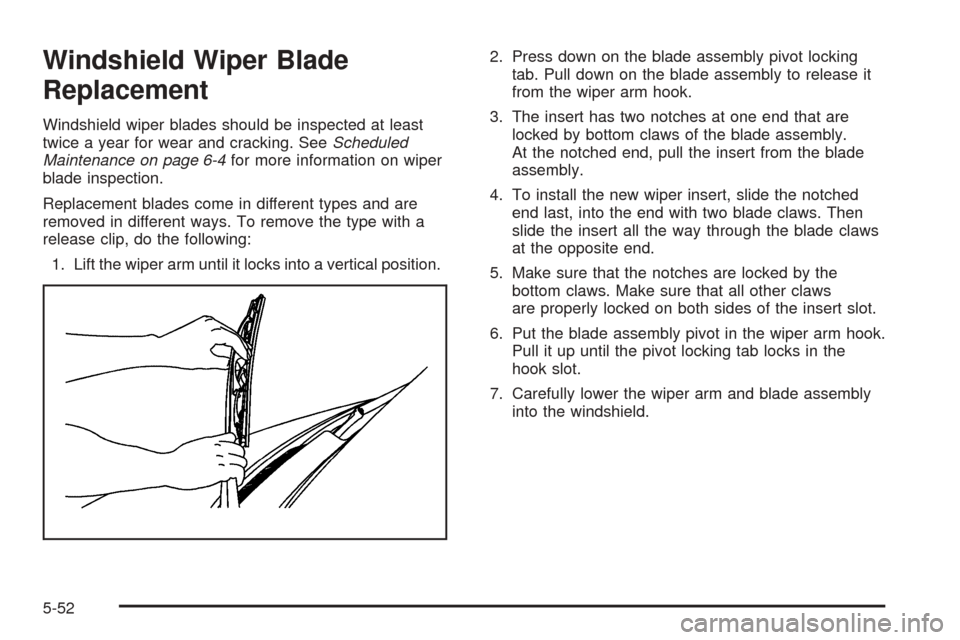
removed in different ways. To remove the type with a
release clip, do the following:
1. Lift the wiper arm until it locks into a vertical position.2. Press down on the blade assembly pivot locking
tab. Pull down on the blade assembly to release it
from the wiper arm hook.
3. The insert has two notches at one end that are
locked by bottom claws of the blade assembly.
At the notched end, pull the insert from the blade
assembly.
4. To install the new wiper insert, slide the notched
end last, into the end with two blade claws. Then
slide the insert all the way through the blade claws
at the opposite end.
5. Make sure that the notches are locked by the
bottom claws. Make sure that all other claws
are properly locked on both sides of the insert slot.
6. Put the blade assembly pivot in the wiper arm hook.
Pull it up until the pivot locking tab locks in the
hook slot.
7. Carefully lower the wiper arm and blade assembly
into the windshield.
5-52
Page 304 of 388

Dual Tire Operation
When the vehicle is new, or whenever a wheel, wheel
bolt or wheel nut is replaced, check the wheel nut torque
after 100, 1,000 and 6,000 miles (160, 1 600 and
10 000 km) of driving. For proper wheel nut tightening
information, see “Removing the Flat Tire and Installing
the Spare Tire” later in this section, underChanging
a Flat Tire on page 5-70. Also see “Wheel Nut Torque”
underCapacities and Speci�cations on page 5-100.
The outer tire on a dual wheel setup generally wears
faster than the inner tire. Your tires will wear more
evenly and last longer if you rotate the tires periodically.
SeeTire Inspection and Rotation on page 5-62. Also
seeScheduled Maintenance on page 6-4.
{CAUTION:
If you operate your vehicle with a tire that is
badly underin�ated, the tire can overheat. An
overheated tire can lose air suddenly or catch
�re. You or others could be injured. Be sure all
tires (including the spare) are properly in�ated.
SeeTires on page 5-53andIn�ation - Tire Pressure on
page 5-60for more information on proper tire in�ation.
Tire Inspection and Rotation
Tires should be rotated every 5,000 to 8,000 miles
(8 000 to 13 000 km).
Any time you notice unusual wear, rotate your tires as
soon as possible and check wheel alignment. Also
check for damaged tires or wheels. SeeWhen It Is Time
for New Tires on page 5-64andWheel Replacement
on page 5-67for more information.
Make sure the spare tire is stored securely. Push, pull,
and then try to rotate or turn the tire. If it moves,
use the ratchet/wheel wrench to tighten the cable. See
Changing a Flat Tire on page 5-70.
If your vehicle has dual rear wheels, also seeDual Tire
Operation on page 5-62.
The purpose of regular rotation is to achieve more
uniform wear for all tires on the vehicle. The �rst rotation
is the most important. SeeScheduled Maintenance
on page 6-4.
5-62
Page 312 of 388

If a Tire Goes Flat
It is unusual for a tire to blowout while you’re driving,
especially if you maintain your tires properly. If air goes
out of a tire, it is much more likely to leak out slowly.
But if you should ever have a blowout, here are a
few tips about what to expect and what to do:
If a front tire fails, the �at tire will create a drag that
pulls the vehicle toward that side. Take your foot off the
accelerator pedal and grip the steering wheel �rmly.
Steer to maintain lane position, and then gently brake to
a stop well out of the traffic lane.
A rear blowout, particularly on a curve, acts much like a
skid and may require the same correction you would;
use in a skid. In any rear blowout, remove your foot from
the accelerator pedal. Get the vehicle under control
by steering the way you want the vehicle to go. It may
be very bumpy and noisy, but you can still steer. Gently
brake to a stop, well off the road if possible.{CAUTION:
Lifting a vehicle and getting under it to do
maintenance or repairs is dangerous without
the appropriate safety equipment and training.
The jack provided with your vehicle is
designed only for changing a �at tire. If it is
used for anything else, you or others could be
badly injured or killed if the vehicle slips off
the jack. Use the jack provided with your
vehicle only for changing a �at tire.
If a tire goes �at, the next part shows how to use your
jacking equipment to change a �at tire safely.
Changing a Flat Tire
If a tire goes �at, avoid further tire and wheel damage
by driving slowly to a level place. Turn on your vehicle’s
hazard warning �ashers. SeeHazard Warning Flashers
on page 3-5for more information.
5-70
Page 335 of 388

Finish Damage
Any stone chips, fractures or deep scratches in the
�nish should be repaired right away. Bare metal
will corrode quickly and may develop into major repair
expense.
Minor chips and scratches can be repaired with touch-up
materials available from your GM dealer. Larger areas
of �nish damage can be corrected in your GM
dealer’s body and paint shop.
Underbody Maintenance
Chemicals used for ice and snow removal and dust
control can collect on the underbody. If these are not
removed, corrosion and rust can develop on the
underbody parts such as fuel lines, frame, �oor pan,
and exhaust system even though they have corrosion
protection.
At least every spring, �ush these materials from the
underbody with plain water. Clean any areas where mud
and debris can collect. Dirt packed in close areas of
the frame should be loosened before being �ushed.
Your dealer or an underbody car washing system can
do this for you.
Chemical Paint Spotting
Some weather and atmospheric conditions can create a
chemical fallout. Airborne pollutants can fall upon and
attack painted surfaces on the vehicle. This damage can
take two forms: blotchy, ring-shaped discolorations, and
small, irregular dark spots etched into the paint surface.
Although no defect in the paint job causes this, GM will
repair, at no charge to the owner, the surfaces of
new vehicles damaged by this fallout condition within
12 months or 12,000 miles (20 000 km) of purchase,
whichever occurs �rst.
Vehicle Care/Appearance Materials
Description Usage
Polishing Cloth
Wax-TreatedInterior and exterior
polishing cloth.
Tar and Road Oil
RemoverRemoves tar, road oil,
and asphalt.
Chrome Cleaner and
PolishUse on chrome or
stainless steel.
White Sidewall Tire
CleanerRemoves soil and black
marks from whitewalls.
Vinyl Cleaner Cleans vinyl.
Glass CleanerRemoves dirt, grime,
smoke and �ngerprints.
5-93
Page 345 of 388

Maintenance Schedule......................................6-2
Introduction...................................................6-2
Maintenance Requirements..............................6-2
Your Vehicle and the Environment....................6-2
Using the Maintenance Schedule......................6-2
Scheduled Maintenance...................................6-4
Additional Required Services............................6-6
Maintenance Footnotes...................................6-7
Owner Checks and Services............................6-9At the First 100, 1,000 and 6,000 Miles
(160, 1 600 and 10 000 km).........................6-9
At Each Fuel Fill............................................6-9
At Least Once a Month.................................6-10
At Least Once a Year...................................6-10
Recommended Fluids and Lubricants...............6-13
Normal Maintenance Replacement Parts..........6-15
Maintenance Record.....................................6-16
Section 6 Maintenance Schedule
6-1
Page 346 of 388

Maintenance Schedule
Introduction
Important: Keep engine oil at the proper level and
change as recommended.
Have you purchased the GM Protection Plan? The Plan
supplements your new vehicle warranties. See your
Warranty and Owner Assistance booklet or your dealer
for details.
Maintenance Requirements
Notice:Maintenance intervals, checks, inspections,
replacement parts, and recommended �uids and
lubricants as prescribed in this manual are
necessary to keep your vehicle in good working
condition. Any damage caused by failure to follow
scheduled maintenance may not be covered by
warranty.
Your Vehicle and the Environment
Proper vehicle maintenance not only helps to keep your
vehicle in good working condition, but also helps the
environment. All recommended maintenance is
important. Improper vehicle maintenance can even
affect the quality of the air we breathe. Improper �uid
levels or the wrong tire in�ation can increase the level of
emissions from your vehicle. To help protect our
environment, and to keep your vehicle in good condition,
be sure to maintain your vehicle properly.
Using the Maintenance Schedule
We at General Motors want to help you keep your
vehicle in good working condition. But we do not know
exactly how you will drive it. You may drive very
short distances only a few times a week. Or you may
drive long distances all the time in very hot, dusty
weather. You may use your vehicle in making deliveries.
Or you may drive it to work, to do errands or in many
other ways.
Because of all the different ways people use their
vehicles, maintenance needs vary. You may need more
frequent checks and replacements. So please read
the following and note how you drive. If you have any
questions on how to keep your vehicle in good condition,
see your GM Goodwrench
®dealer.
6-2