2005 CHEVROLET EXPRESS battery
[x] Cancel search: batteryPage 269 of 370

Notice:Ignoring these steps could result in costly
damage to your vehicle that would not be covered
by your warranty.
Trying to start your vehicle by pushing or pulling it
will not work, and it could damage your vehicle.
1. Check the other vehicle. It must have a 12-volt
battery with a negative ground system.
Notice:If the other vehicle’s system is not a 12-volt
system with a negative ground, both vehicles can
be damaged. Only use vehicles with 12-volt systems
with negative grounds to jump start your vehicle.
2. Get the vehicles close enough so the jumper cables
can reach, but be sure the vehicles are not touching
each other. If they are, it could cause a ground
connection you do not want. You would not be able
to start your vehicle, and the bad grounding
could damage the electrical systems.To avoid the possibility of the vehicles rolling, set
the parking brake �rmly on both vehicles involved in
the jump start procedure. Put an automatic
transmission in PARK (P) or a manual transmission
in NEUTRAL before setting the parking brake.
Notice:If you leave your radio or other accessories
on during the jump starting procedure, they could
be damaged. The repairs would not be covered
by your warranty. Always turn off your radio and
other accessories when jump starting your vehicle.
3. Turn off the ignition on both vehicles. Unplug
unnecessary accessories plugged into the cigarette
lighter or the accessory power outlet. Turn off
the radio and all lamps that are not needed. This
will avoid sparks and help save both batteries. And
it could save the radio!
5-39
Page 270 of 370

4. Open the hoods and locate the positive (+) and
negative (−) terminal locations of the other vehicle.
Your vehicle has a remote positive (+) jump starting
terminal and a remote negative (−) jump starting
terminal. You should always use these remote
terminals instead of the terminals on the battery.
The remote positive (+) terminal is located behind a
red plastic cover near the engine accessory drive
bracket on the driver’s side of the engine
compartment, below the alternator. To uncover
the remote positive (+) terminal, open the red
plastic cover.
The remote negative (−) terminal is located on the
engine drive bracket on all V8 engines and is
marked GND.
On V6 engines the remote negative (−) terminal is
located on a tab attached to the engine accessory
drive bracket and is marked GND.
{CAUTION:
Using a match near a battery can cause battery
gas to explode. People have been hurt doing
this, and some have been blinded. Use a
�ashlight if you need more light.
CAUTION: (Continued)
CAUTION: (Continued)
Be sure the battery has enough water. You do
not need to add water to the battery installed
in your new vehicle. But if a battery has �ller
caps, be sure the right amount of �uid is there.
If it is low, add water to take care of that �rst.
If you do not, explosive gas could be present.
Battery �uid contains acid that can burn you.
Do not get it on you. If you accidentally get it
in your eyes or on your skin, �ush the place
with water and get medical help immediately.
{CAUTION:
Fans or other moving engine parts can injure
you badly. Keep your hands away from moving
parts once the engine is running.
5-40
Page 271 of 370

5. Check that the jumper cables do not have loose or
missing insulation. If they do, you could get a
shock. The vehicles could be damaged too.
Before you connect the cables, here are some
basic things you should know. Positive (+) will go to
positive (+) or to a remote positive (+) terminal if
the vehicle has one. Negative (−) will go to a heavy,
unpainted metal engine part or to a remote
negative (−) terminal if the vehicle has one.
Do not connect positive (+) to negative (−)oryou
will get a short that would damage the battery
and maybe other parts too. And do not connect the
negative (−) cable to the negative (−) terminal on
the dead battery because this can cause sparks.
6. Connect the red positive (+) cable to the positive (+)
terminal of the dead battery. Use a remote
positive (+) terminal if the vehicle has one.
7. Do not let the other end touch metal. Connect it to
the positive (+) terminal of the good battery. Use a
remote positive (+) terminal if the vehicle has one.
5-41
Page 272 of 370

8. Now connect the black negative (−) cable to the
negative (−) terminal of the good battery. Use a
remote negative (−) terminal if the vehicle has one.
Do not let the other end touch anything until the
next step. The other end of the negative (−) cable
does notgo to the dead battery. It goes to a
heavy, unpainted metal engine part or to a remote
negative (−) terminal on the vehicle with the
dead battery.
9. Connect the other end of the negative (−) cable to
the negative (−) terminal location on the vehicle with
the dead battery. Your vehicle has a remote
negative (−) terminal for this purpose. It is
marked GND.
10. Now start the vehicle with the good battery and run
the engine for a while.
11. Try to start the vehicle that had the dead battery. If
it will not start after a few tries, it probably needs
service.
Notice:If the jumper cables are removed in the
wrong order, electrical shorting may occur and
damage the vehicle. The repairs would not be
covered by your warranty. Remove the jumper
cables in the correct order, making sure that the
cables do not touch each other or other metal.A. Heavy, Unpainted Metal Engine Part or Remote
Negative (−) Terminal
B. Good Battery or Remote Positive (+) and Remote
Negative (−) Terminals
C. Dead Battery or Remote Positive (+) Terminal
To disconnect the jumper cables from both vehicles, do
the following:
1. Disconnect the black negative (−) cable from the
vehicle that had the dead battery.
2. Disconnect the black negative (−) cable from the
vehicle with the good battery.Jumper Cable Removal
5-42
Page 273 of 370

3. Disconnect the red positive (+) cable from the
vehicle with the good battery.
4. Disconnect the red positive (+) cable from the
other vehicle.
5. Return the remote positive (+) terminal cover to its
original position.
All-Wheel Drive
Lubricant checks in this section also apply to these
vehicles. However, there are two additional systems that
need lubrication.
Transfer Case
When to Check Lubricant
Refer to the Maintenance Schedule to determine how
often to check the lubricant. SeeScheduled
Maintenance on page 6-4.
How to Check Lubricant
To get an accurate reading, the vehicle should be on a
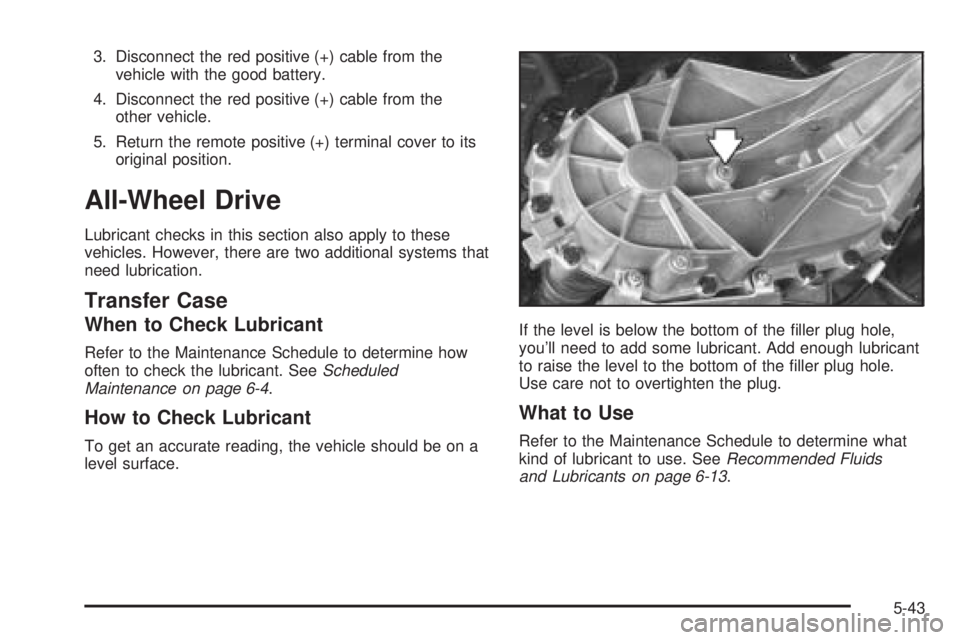
level surface.If the level is below the bottom of the �ller plug hole,
you’ll need to add some lubricant. Add enough lubricant
to raise the level to the bottom of the �ller plug hole.
Use care not to overtighten the plug.
What to Use
Refer to the Maintenance Schedule to determine what
kind of lubricant to use. SeeRecommended Fluids
and Lubricants on page 6-13.
5-43
Page 324 of 370

Fuse Usage
21 Trailer Park Lamp
22 Front Park Lamp
32 Auxilary 1
33 Auxilary 2
Relays Usage
23 Window Residual Accessory Power
24 Auxiliary
25 Right Rear Defogger
26 Courtesy Lamp
27 Cargo Unlock
28 Driver Unlock
29 Park Lamp
30 Door Locks
31 Passenger Unlock
Circuit Breaker Usage
34 Power Window
Engine Compartment Fuse Block
The fuse block is located in the engine compartment on
the driver’s side of the vehicle.
Fuse Usage
1 Radio Battery
2 Powertrain Control Module Battery
3 Left Rear Turn Lamp
4 Right Rear Turn Lamp
5 Back-up Lamps Trailer Wiring
5-94
Page 352 of 370

Roadside Assistance Program
As the owner of a new Chevrolet vehicle, you are
automatically enrolled in the Chevrolet Roadside
Assistance program. This value-added service is
intended to provide you with peace of mind as you drive
in the city or travel the open road. Call Chevrolet’s
Roadside Assistance at 1-800-CHEV-USA,
(1-800-243-8872) 24 hours a day, 365 days a year to
speak with a Chevrolet Roadside Assistance
representative.
We will provide the following services during the
Bumper-to-Bumper warranty period, at no expense
to you:
Fuel Delivery:Delivery of enough fuel
($5 maximum) for the customer to get to the
nearest service station.
Lock-out Service (identi�cation required):
Replacement keys or locksmith service will
be covered at no charge if you are unable to gain
entry into your vehicle. Delivery of the replacement
key will be covered within 10 miles (16 km).
Emergency Tow:Tow to the nearest dealership for
warranty service or in the event of a
vehicle-disabling accident. Assistance provided
when the vehicle is mired in sand, mud, or snow.
Flat Tire Change:Installation of a spare tire will be
covered at no charge. The customer is responsible
for the repair or replacement of the tire if not
covered by a warrantable failure.
Jump Start:No-start occurrences which require a
battery jump start will be covered at no charge.
Dealer Locator Service
In many instances, mechanical failures are covered
under Chevrolet’s Bumper-to-Bumper warranty.
However, when other services are utilized, our Roadside
Assistance Representatives will explain any payment
obligations you might incur.
For prompt and efficient assistance when calling, please
provide the following to the Roadside Assistance
Representative:
Your name, home address, and home
telephone number.
Telephone number of your location.
Location of the vehicle.
Model, year, color, and license plate number.
Mileage, Vehicle Identi�cation Number (VIN), and
delivery date of the vehicle.
Description of the problem.
7-6
Page 360 of 370

Audio System(s) (cont.)
Setting the Time for Radios with
Radio Data Systems (RDS).......................3-40
Setting the Time for Radios without
Radio Data Systems (RDS).......................3-40
Theft-Deterrent Feature................................3-71
Understanding Radio Reception.....................3-72
Automatic Transmission
Fluid..........................................................5-19
Operation...................................................2-22
B
Battery..........................................................5-37
Run-Down Protection...................................3-16
Before Leaving on a Long Trip.........................4-21
Brake
Anti-Lock Brake System (ABS)........................ 4-6
Emergencies................................................ 4-7
Parking......................................................2-24
System Warning Light..................................3-29
Brakes..........................................................5-34
Braking........................................................... 4-5
Braking in Emergencies..................................... 4-7
Break-In, New Vehicle.....................................2-18
Bulb Replacement...........................................5-46
Center High-Mounted Stoplamp (CHMSL)........5-49
Front Turn Signal, Sidemarker and
Parking Lamps.........................................5-48Bulb Replacement (cont.)
Halogen Bulbs............................................5-47
Headlamps.................................................5-47
Replacement Bulbs......................................5-50
Taillamps....................................................5-49
Buying New Tires...........................................5-62
C
California Fuel.................................................. 5-6
Canadian Owners................................................ ii
Capacities and Speci�cations............................5-97
Carbon Monoxide...........................2-27, 4-24, 4-34
Care of
Safety Belts................................................5-85
Your Cassette Tape Player............................3-72
Your CD Player...........................................3-74
Your CDs ...................................................3-74
Cargo Door Relocking....................................... 2-8
Center High-Mounted Stoplamp (CHMSL)...........5-49
Center Passenger Position, Safety Belts.......1-23, 1-24
Chains, Tire...................................................5-66
Charging System Light....................................3-28
Check
Engine Light...............................................3-32
Gages Warning Light...................................3-38
Checking Things Under the Hood......................5-10
Chemical Paint Spotting...................................5-89
2