2005 CHEVROLET EXPRESS CARGO VAN service
[x] Cancel search: servicePage 180 of 388
Setting Preset PTYs (RDS Only)
These pushbuttons have factory PTY presets. Up to
12 PTYs (six FM1 and six FM2), can be programmed on
the six numbered pushbuttons, by performing the
following steps:
1. Press BAND to select FM1 or FM2.
2. Press the TYPE button to activate program type
select mode. P-TYPE and the last selected PTY
will appear on the display.
3. Turn the TYPE knob or press and release the
TYPE button to select a PTY.
4. Press and hold one of the six numbered
pushbuttons until you hear a beep. Whenever that
numbered pushbutton is pressed, the PTY that
was set will return.
5. Repeat the steps for each pushbutton.
RDS Messages
INFO (Information):If the current station has a
message, INFO will appear on the display. Press this
button to see the message. The message may display
the artist, song title, call in phone numbers, etc.
If the entire message is not displayed, parts of the
message will appear every three seconds. To scroll
through the message, press and release the INFO
button. A new group of words will appear on the displayafter every press of this button. Once the complete
message has been displayed, INFO will disappear from
the display until another new message is received.
The last message can be displayed by pressing
the INFO button. You can view the last message until a
new message is received or a different station is
tuned to.
Radio Messages
CAL ERR (Calibration Error):The audio system has
been calibrated for your vehicle from the factory. If
CAL ERR appears on the display, it means that the radio
has not been con�gured properly for the vehicle and
must be returned to your GM dealer for service.
LOCKED:This message is displayed when the
THEFTLOCK
®system has locked up. Take the vehicle
to your GM dealer for service.
If any error occurs repeatedly, or if an error cannot be
corrected, contact your GM dealer.
3-64
Page 188 of 388
When cleaning the cassette tape player with the
recommended non-abrasive cleaning cassette, it is
possible that the cassette may eject, because the cut
tape detection feature on the radio may recognize it as a
broken tape, in error. To prevent the cleaning cassette
from being ejected, use the following steps:
1. Turn the ignition on.
2. Turn the radio off.
3. Press and hold the TAPE DISC button for
�ve seconds. READY will appear on the display
and the cassette symbol will �ash for �ve seconds.
4. Insert the scrubbing action cleaning cassette.
5. Eject the cleaning cassette after the manufacturer’s
recommended cleaning time.
When the cleaning cassette has been ejected, the
cut tape detection feature will be active again.
A non-scrubbing action, wet-type cleaner which uses a
cassette with a fabric belt to clean the tape head
can be used. This type of cleaning cassette will not
eject on its own. A non-scrubbing action cleaner may not
clean as thoroughly as the scrubbing type cleaner.
The use of a non-scrubbing action, dry-type cleaning
cassette is not recommended.After the player is cleaned, press and hold the eject
button for �ve seconds to reset the CLEAN indicator.
The radio will display --- or CLEANED to show the
indicator was reset.
Cassettes are subject to wear and the sound quality
may degrade over time. Always make sure the cassette
tape is in good condition before the tape player is
serviced.
Care of Your CDs
Handle CDs carefully. Store them in their original cases
or other protective cases and away from direct
sunlight and dust. If the surface of a CD is soiled,
dampen a clean, soft cloth in a mild, neutral detergent
solution and clean it, wiping from the center to the edge.
Be sure never to touch the side without writing when
handling CDs. Pick up CDs by grasping the outer edges
or the edge of the hole and the outer edge.
3-72
Page 199 of 388
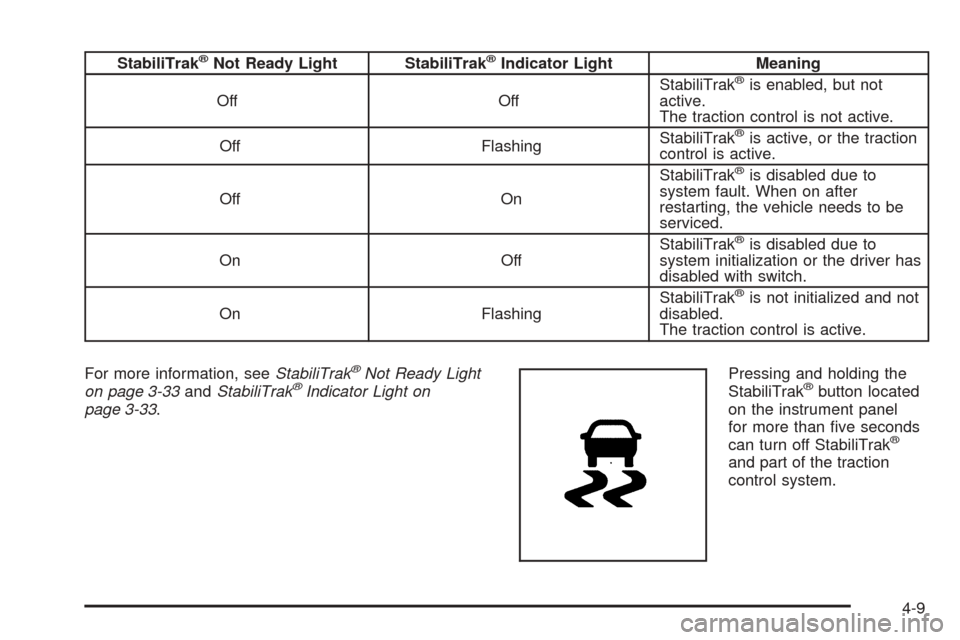
StabiliTrak®Not Ready Light StabiliTrak®Indicator Light Meaning
Off OffStabiliTrak®is enabled, but not
active.
The traction control is not active.
Off FlashingStabiliTrak
®is active, or the traction
control is active.
Off OnStabiliTrak
®is disabled due to
system fault. When on after
restarting, the vehicle needs to be
serviced.
On OffStabiliTrak
®is disabled due to
system initialization or the driver has
disabled with switch.
On FlashingStabiliTrak
®is not initialized and not
disabled.
The traction control is active.
For more information, seeStabiliTrak
®Not Ready Light
on page 3-33andStabiliTrak®Indicator Light on
page 3-33.Pressing and holding the
StabiliTrak®button located
on the instrument panel
for more than �ve seconds
can turn off StabiliTrak
®
and part of the traction
control system.
4-9
Page 200 of 388
For your safety, the system can only be disabled when
the vehicle speed is less than 20 mph (32 km/h).
You will hear three chimes and the StabiliTrak
®not
ready light will come on.
To turn on the StabiliTrak
®system, press the StabiliTrak®
button again. StabiliTrak®will automatically turn back on
when the vehicle speed exceeds 20 mph (32 km/h). You
will hear one chime and the StabiliTrak
®not ready light
will turn off.
When the StabiliTrak
®system has been turned off you
may still hear system noises as a result of the
brake-traction control coming on.
It is recommended to leave the system on for normal
driving conditions, but it may be necessary to turn
the system off if your vehicle is stuck in sand, mud, ice
or snow, and you want to “rock” your vehicle to
attempt to free it. SeeIf Your Vehicle is Stuck in Sand,
Mud, Ice or Snow on page 4-30.
StabiliTrak®System Operation
The StabiliTrak®system is normally on, except when
the system is initializing or has been disabled with
the StabiliTrak
®button. The StabiliTrak®system will
automatically activate to assist the driver in maintaining
vehicle directional control in most driving conditions.
When activated, the StabiliTrak
®system may reduce
engine power to the wheels and apply braking to
individual wheels as necessary to assist the driver with
vehicle directional control. If your vehicle is in cruise
control when the system activates, the StabiliTrak
®
indicator light on the instrument panel will �ash, and the
cruise control will automatically disengage. When the
StabiliTrak
®system is no longer active, you may
re-engage the cruise control. SeeCruise Control on
page 3-10.
The StabiliTrak
®system may also turn off automatically
if it determines that a problem exists with the system.
If the problem does not clear itself after restarting
the vehicle, you should see your dealer for service.
4-10
Page 212 of 388
At the entrance, there is usually a ramp that leads to the
freeway. If you have a clear view of the freeway as you
drive along the entrance ramp, you should begin to check
traffic. Try to determine where you expect to blend with
the �ow. Try to merge into the gap at close to the
prevailing speed. Switch on your turn signal, check your
mirrors, and glance over your shoulder as often as
necessary. Try to blend smoothly with the traffic �ow.
Once you are on the freeway, adjust your speed to the
posted limit or to the prevailing rate if it is slower.
Stay in the right lane unless you want to pass.
Before changing lanes, check your mirrors. Then use
your turn signal.
Just before you leave the lane, glance quickly over your
shoulder to make sure there is not another vehicle in
your blind spot.
Once you are moving on the freeway, make certain you
allow a reasonable following distance. Expect to move
slightly slower at night.
When you want to leave the freeway, move to the
proper lane well in advance. If you miss your exit, do
not, under any circumstances, stop and back up. Drive
on to the next exit.
The exit ramp can be curved, sometimes quite sharply.
The exit speed is usually posted.Reduce your speed according to your speedometer, not
to your sense of motion. After driving for any distance
at higher speeds, you may tend to think you are
going slower than you actually are.
Before Leaving on a Long Trip
Make sure you are ready. Try to be well rested. If you
must start when you are not fresh — such as after
a day’s work — do not plan to make too many miles that
�rst part of the journey. Wear comfortable clothing
and shoes you can easily drive in.
Is your vehicle ready for a long trip? If you keep it
serviced and maintained, it is ready to go. If it needs
service, have it done before starting out. Of course, you
will �nd experienced and able service experts in GM
dealerships all across North America. They will be ready
and willing to help if you need it.
Here are some things you can check before a trip:
Windshield Washer Fluid:Is the reservoir full?
Are all windows clean inside and outside?
Wiper Blades:Are they in good shape?
Fuel, Engine Oil, Other Fluids:Have you checked
all levels?
Lamps:Are they all working? Are the lenses clean?
4-22
Page 213 of 388
Tires:They are vitally important to a safe,
trouble-free trip. Is the tread good enough for
long-distance driving? Are the tires all in�ated to the
recommended pressure?
Weather Forecasts:What is the weather outlook
along your route? Should you delay your trip a
short time to avoid a major storm system?
Maps:Do you have up-to-date maps?
Highway Hypnosis
Is there actually such a condition as highway hypnosis?
Or is it just plain falling asleep at the wheel? Call it
highway hypnosis, lack of awareness, or whatever.
There is something about an easy stretch of road with
the same scenery, along with the hum of the tires on the
road, the drone of the engine, and the rush of the
wind against the vehicle that can make you sleepy.
Do not let it happen to you! If it does, your vehicle can
leave the road in less than a second, and you could
crash and be injured.What can you do about highway hypnosis? First, be
aware that it can happen.
Then here are some tips:
Make sure your vehicle is well ventilated, with a
comfortably cool interior.
Keep your eyes moving. Scan the road ahead and
to the sides. Check your mirrors and your
instruments frequently.
If you get sleepy, pull off the road into a rest,
service, or parking area and take a nap, get some
exercise, or both. For safety, treat drowsiness
on the highway as an emergency.
4-23
Page 226 of 388
Towing
Towing Your Vehicle
Consult your dealer or a professional towing service if
you need to have your disabled vehicle towed. See
Roadside Assistance Program on page 7-6.
If you want to tow your vehicle behind another vehicle
for recreational purposes (such as behind a motorhome),
see “Recreational Vehicle Towing” following.
Recreational Vehicle Towing
Recreational vehicle towing means towing your vehicle
behind another vehicle — such as behind a motorhome.
The two most common types of recreational vehicle
towing are known as “dinghy” (towing your vehicle with
all four wheels on the ground) and “dolly” (towing
your vehicle with two wheels on the ground and two
wheels up on a device known as a “dolly”).
With the proper preparation and equipment, many
vehicles can be towed in these ways. See “Dinghy
Towing” and “Dolly Towing” following.Here are some important things to consider before you
do recreational vehicle towing:
What’s the towing capacity of the towing vehicle?
Be sure you read the tow vehicle manufacturer’s
recommendations.
How far will you tow? Some vehicles have
restrictions on how far and how long they can tow.
Do you have the proper towing equipment?
See your dealer or trailering professional for
additional advice and equipment recommendations.
Is your vehicle ready to be towed? Just as you would
prepare your vehicle for a long trip, you’ll want to
make sure your vehicle is prepared to be towed.
Dinghy Towing
Two-Wheel Drive Vehicles
Notice:If you tow your vehicle with all four wheels
on the ground, the drivetrain components could
be damaged. The repairs would not be covered by
your warranty. Do not tow your vehicle with all
four wheels on the ground.
Two-wheel-drive vehicles should not be towed with all
four wheels on the ground. Two-wheel-drive
transmissions have no provisions for internal lubrication
while being towed.
4-36
Page 241 of 388
Maintenance When Trailer Towing
Your vehicle will need service more often when you’re
pulling a trailer. See the Maintenance Schedule for more
on this. Things that are especially important in trailer
operation are automatic transmission �uid (don’t over�ll),
engine oil, axle lubricant, belt, cooling system and brake
system. Each of these is covered in this manual, and the
Index will help you �nd them quickly. If you’re trailering,
it’s a good idea to review these sections before you start
your trip.
Check periodically to see that all hitch nuts and bolts
are tight.
Trailer Wiring Harness
The optional heavy-duty trailer wiring package includes
a seven-wire harness assembly at the rear of the
vehicle and a four-wire harness assembly under the left
hand side of the instrument panel. The seven-wire
harness assembly is taped together and located in a
frame pocket at the driver side rear left corner of
the frame. The seven-wire harness includes a 30-amp
feed wire. Both harnesses come without connectors and
should be wired by a quali�ed electrical technician.
The technician can use the following color code chart
when connecting the wiring harness to your trailer
and trailer brake controller.Seven-Wire Harness
Light Green: Back-up lamps
Brown: Parking lamps
Yellow: Left stoplamp and turn signal
Dark Green: Right stoplamp and turn signal
Dark Blue: Use for electric trailer brakes
Orange: Trailer accessory
White (heavy gage): Ground wire
Four-Wire Harness (Trailer Brake Controller)
Black: Ground
Red/White Stripe: Fused Battery
Dark Blue: Trailer Brake Feed
Light Blue: Fused Stoplamp/CHMSL
4-51