2005 CHEVROLET EPICA parking brake
[x] Cancel search: parking brakePage 174 of 340
Traction Control System (TCS)
Your vehicle may have a Traction Control System (TCS)
that limits wheel spin. This is especially useful in
slippery road conditions. The system operates only if it
senses that one or both of the front wheels are
spinning or beginning to lose traction. When this
happens, the system works the front brakes to limit
wheel spin.
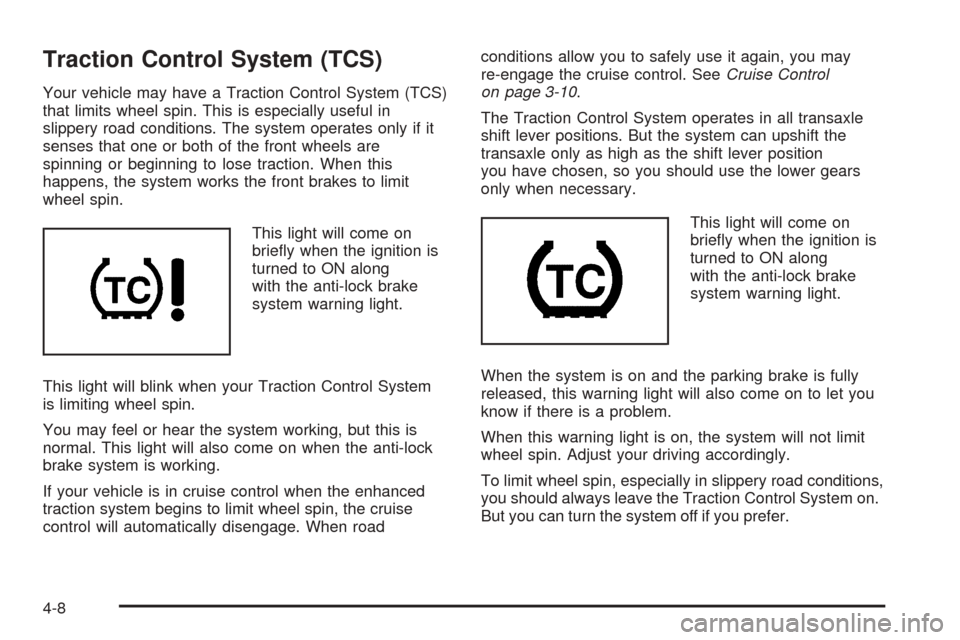
This light will come on
briefly when the ignition is
turned to ON along
with the anti-lock brake
system warning light.
This light will blink when your Traction Control System
is limiting wheel spin.
You may feel or hear the system working, but this is
normal. This light will also come on when the anti-lock
brake system is working.
If your vehicle is in cruise control when the enhanced
traction system begins to limit wheel spin, the cruise
control will automatically disengage. When roadconditions allow you to safely use it again, you may
re-engage the cruise control. SeeCruise Control
on page 3-10.
The Traction Control System operates in all transaxle
shift lever positions. But the system can upshift the
transaxle only as high as the shift lever position
you have chosen, so you should use the lower gears
only when necessary.
This light will come on
briefly when the ignition is
turned to ON along
with the anti-lock brake
system warning light.
When the system is on and the parking brake is fully
released, this warning light will also come on to let you
know if there is a problem.
When this warning light is on, the system will not limit
wheel spin. Adjust your driving accordingly.
To limit wheel spin, especially in slippery road conditions,
you should always leave the Traction Control System on.
But you can turn the system off if you prefer.
4-8
Page 201 of 340
Dolly Towing
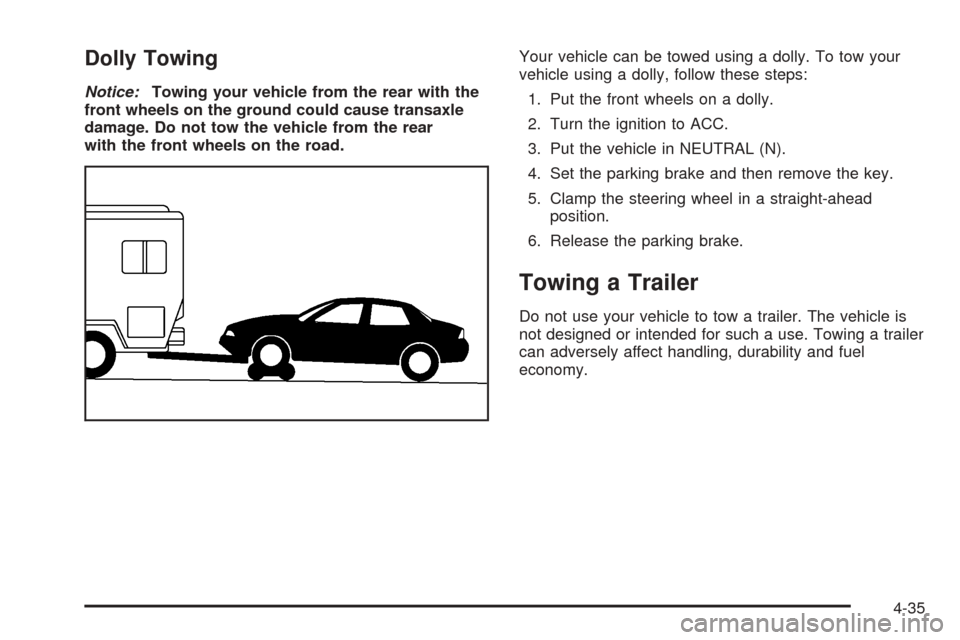
Notice:Towing your vehicle from the rear with the
front wheels on the ground could cause transaxle
damage. Do not tow the vehicle from the rear
with the front wheels on the road.Your vehicle can be towed using a dolly. To tow your
vehicle using a dolly, follow these steps:
1. Put the front wheels on a dolly.
2. Turn the ignition to ACC.
3. Put the vehicle in NEUTRAL (N).
4. Set the parking brake and then remove the key.
5. Clamp the steering wheel in a straight-ahead
position.
6. Release the parking brake.
Towing a Trailer
Do not use your vehicle to tow a trailer. The vehicle is
not designed or intended for such a use. Towing a trailer
can adversely affect handling, durability and fuel
economy.
4-35
Page 203 of 340
Service............................................................5-3
Doing Your Own Service Work.........................5-4
Adding Equipment to the Outside of
Your Vehicle..............................................5-5
Fuel................................................................5-5
Gasoline Octane............................................5-5
Gasoline Specifications....................................5-6
California Fuel...............................................5-6
Additives.......................................................5-7
Fuels in Foreign Countries...............................5-7
Filling Your Tank............................................5-8
Filling a Portable Fuel Container.....................5-10
Checking Things Under the Hood....................5-11
Hood Release..............................................5-11
Engine Compartment Overview.......................5-12
Engine Oil...................................................5-13
Engine Air Cleaner/Filter................................5-17
Automatic Transaxle Fluid..............................5-19
Engine Coolant.............................................5-19
Coolant Surge Tank Pressure Cap..................5-22Engine Overheating.......................................5-22
Cooling System............................................5-24
Power Steering Fluid.....................................5-29
Windshield Washer Fluid................................5-30
Brakes........................................................5-31
Battery........................................................5-34
Jump Starting...............................................5-35
Headlamp Aiming...........................................5-39
Bulb Replacement..........................................5-39
Halogen Bulbs..............................................5-39
Headlamps..................................................5-40
Front Turn Signal Lamps...............................5-41
Center High-Mounted Stoplamp (CHMSL).........5-42
Parking Lamps.............................................5-43
Taillamps, Turn Signal, Stoplamps and
Back-up Lamps.........................................5-44
Replacement Bulbs.......................................5-44
Windshield Wiper Blade Replacement..............5-45
Section 5 Service and Appearance Care
5-1
Page 237 of 340
Jump Starting
If your battery has run down, you may want to use
another vehicle and some jumper cables to start your
vehicle. Be sure to use the following steps to do it safely.
{CAUTION:
Batteries can hurt you. They can be dangerous
because:
They contain acid that can burn you.
They contain gas that can explode
or ignite.
They contain enough electricity to
burn you.
If you do not follow these steps exactly, some
or all of these things can hurt you.
Notice:Ignoring these steps could result in costly
damage to your vehicle that would not be covered
by your warranty.
Trying to start your vehicle by pushing or pulling it
will not work, and it could damage your vehicle.
1. Check the other vehicle. It must have a 12-volt
battery with a negative ground system.Notice:If the other vehicle’s system is not a 12-volt
system with a negative ground, both vehicles can
be damaged. Only use vehicles with 12-volt systems
with negative grounds to jump start your vehicle.
2. Get the vehicles close enough so the jumper cables
can reach, but be sure the vehicles are not touching
each other. If they are, it could cause a ground
connection you do not want. You would not be able
to start your vehicle, and the bad grounding
could damage the electrical systems.
To avoid the possibility of the vehicles rolling, set
the parking brake firmly on both vehicles involved in
the jump start procedure. Put an automatic
transaxle in PARK (P) or a manual transaxle in
NEUTRAL before setting the parking brake.
Notice:If you leave your radio or other accessories
on during the jump starting procedure, they could
be damaged. The repairs would not be covered
by your warranty. Always turn off your radio and
other accessories when jump starting your vehicle.
3. Turn off the ignition on both vehicles. Unplug
unnecessary accessories plugged into the cigarette
lighter or the accessory power outlet. Turn off
the radio and all lamps that are not needed. This
will avoid sparks and help save both batteries. And
it could save the radio!
5-35
Page 263 of 340
Changing a Flat Tire
If a tire goes flat, avoid further tire and wheel damage
by driving slowly to a level place. Turn on your
hazard warning flashers.
{CAUTION:
Changing a tire can be dangerous. The vehicle
can slip off the jack and roll over or fall on you
or other people. You and they could be badly
injured or even killed. Find a level place to
change your tire. To help prevent the vehicle
from moving:
1. Set the parking brake �rmly.
2. Put the shift lever in PARK (P).
3. Turn off the engine and do not restart
while the vehicle is raised.
4. Do not allow passengers to remain in the
vehicle.
CAUTION: (Continued)
CAUTION: (Continued)
To be even more certain the vehicle will not
move, you should put blocks at the front and
rear of the tire farthest away from the one
being changed. That would be the tire, on the
other side, at the opposite end of the vehicle.
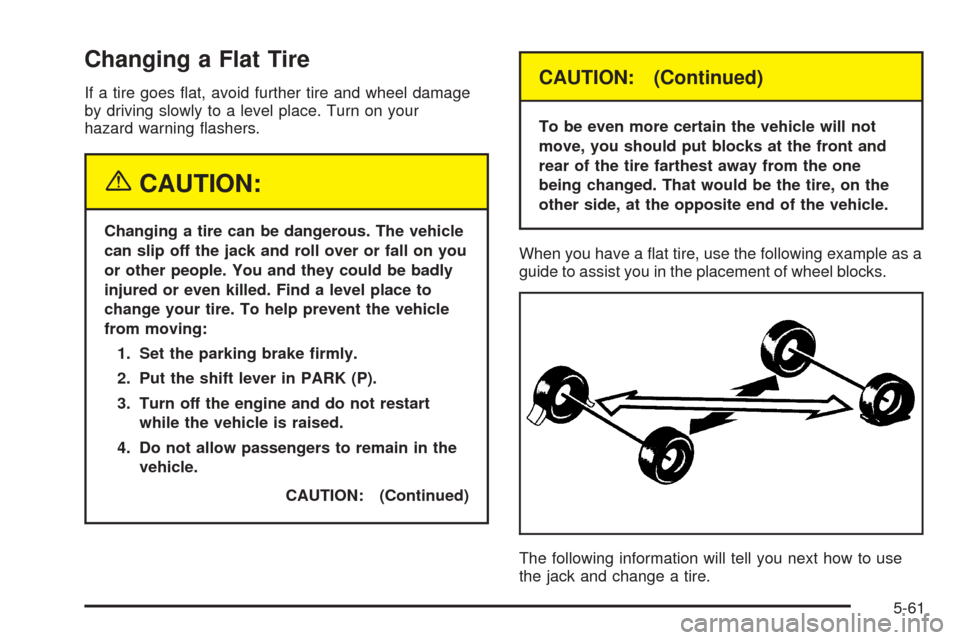
When you have a flat tire, use the following example as a
guide to assist you in the placement of wheel blocks.
The following information will tell you next how to use
the jack and change a tire.
5-61
Page 283 of 340
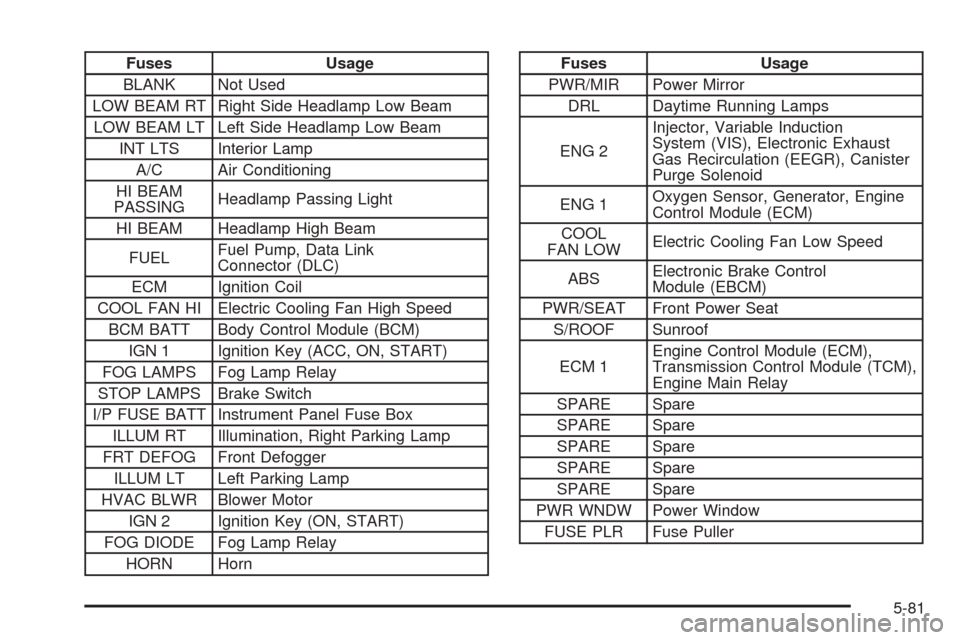
Fuses Usage
BLANK Not Used
LOW BEAM RT Right Side Headlamp Low Beam
LOW BEAM LT Left Side Headlamp Low Beam
INT LTS Interior Lamp
A/C Air Conditioning
HI BEAM
PASSINGHeadlamp Passing Light
HI BEAM Headlamp High Beam
FUELFuel Pump, Data Link
Connector (DLC)
ECM Ignition Coil
COOL FAN HI Electric Cooling Fan High Speed
BCM BATT Body Control Module (BCM)
IGN 1 Ignition Key (ACC, ON, START)
FOG LAMPS Fog Lamp Relay
STOP LAMPS Brake Switch
I/P FUSE BATT Instrument Panel Fuse Box
ILLUM RT Illumination, Right Parking Lamp
FRT DEFOG Front Defogger
ILLUM LT Left Parking Lamp
HVAC BLWR Blower Motor
IGN 2 Ignition Key (ON, START)
FOG DIODE Fog Lamp Relay
HORN HornFuses Usage
PWR/MIR Power Mirror
DRL Daytime Running Lamps
ENG 2Injector, Variable Induction
System (VIS), Electronic Exhaust
Gas Recirculation (EEGR), Canister
Purge Solenoid
ENG 1Oxygen Sensor, Generator, Engine
Control Module (ECM)
COOL
FAN LOWElectric Cooling Fan Low Speed
ABSElectronic Brake Control
Module (EBCM)
PWR/SEAT Front Power Seat
S/ROOF Sunroof
ECM 1Engine Control Module (ECM),
Transmission Control Module (TCM),
Engine Main Relay
SPARE Spare
SPARE Spare
SPARE Spare
SPARE Spare
SPARE Spare
PWR WNDW Power Window
FUSE PLR Fuse Puller
5-81
Page 307 of 340
Starter Switch Check
{CAUTION:
When you are doing this inspection, the
vehicle could move suddenly. If the vehicle
moves, you or others could be injured.
1. Before you start, be sure you have enough room
around the vehicle.
2. Firmly apply both the parking brake and the regular
brake. SeeParking Brake on page 2-24if
necessary.
Do not use the accelerator pedal, and be ready to
turn off the engine immediately if it starts.
3. Try to start the engine in each gear. The starter
should work only in PARK (P) or NEUTRAL (N).
If the starter works in any other position, your
vehicle needs service.
Automatic Transaxle Shift Lock Control
System Check
{CAUTION:
When you are doing this inspection, the
vehicle could move suddenly. If the vehicle
moves, you or others could be injured.
1. Before you start, be sure you have enough room
around the vehicle. It should be parked on a level
surface.
2. Firmly apply the parking brake. SeeParking Brake
on page 2-24if necessary.
Be ready to apply the regular brake immediately if
the vehicle begins to move.
3. With the engine off, turn the ignition to ON, but do
not start the engine. Without applying the regular
brake, try to move the shift lever out of PARK (P)
with normal effort. If the shift lever moves out
of PARK (P), your vehicle needs service.
6-21
Page 308 of 340
Ignition Transaxle Lock Check
While parked, and with the parking brake set, try to turn
the ignition to LOCK in each shift lever position.
•The ignition should turn to LOCK only when the
shift lever is in PARK (P).
•The key should come out only in LOCK.
Parking Brake and Automatic Transaxle
Park (P) Mechanism Check
{CAUTION:
When you are doing this check, your vehicle
could begin to move. You or others could be
injured and property could be damaged. Make
sure there is room in front of your vehicle in
case it begins to roll. Be ready to apply the
regular brake at once should the vehicle begin
to move.Park on a fairly steep hill, with the vehicle facing
downhill. Keeping your foot on the regular brake, set the
parking brake.
•To check the parking brake’s holding ability: With
the engine running and transaxle in NEUTRAL (N),
slowly remove foot pressure from the regular
brake pedal. Do this until the vehicle is held by the
parking brake only.
•To check the PARK (P) mechanism’s holding
ability: With the engine running, shift to PARK (P).
Then release the parking brake followed by the
regular brake.
Underbody Flushing Service
At least every spring, use plain water to flush any
corrosive materials from the underbody. Take care to
clean thoroughly any areas where mud and other debris
can collect.
6-22