2005 CHEVROLET COLORADO belt
[x] Cancel search: beltPage 168 of 414
SERV VEH (Service Vehicle)
This message will be displayed if your vehicle needs
service. You should have your vehicle serviced by your
GM dealer as soon as possible.
TURN SIGNAL
This message will be displayed when your turn signal is
on for approximately 0.75 miles (1.2 km) of travel.
Press the reset stem to acknowledge the message and
clear it from the display.
Audio System(s)
Notice:Before adding any sound equipment to
your vehicle, such as an audio system, CD player,
CB radio, mobile telephone, or two-way radio, make
sure that it can be added by checking with your
dealer. Also, check federal rules covering mobile
radio and telephone units. If sound equipment can
be added, it is very important to do it properly.
Added sound equipment may interfere with
the operation of your vehicle’s engine, radio, or
other systems, and even damage them. Your
vehicle’s systems may interfere with the operation
of sound equipment that has been added.Notice:The chime signals related to seat belts,
parking brake, and other functions of your vehicle
operate through the GM radio/entertainment
system. If that equipment is replaced or additional
equipment is added to your vehicle, the chimes may
not work. Make sure that replacement or additional
equipment is compatible with your vehicle before
installing it.
Figure out which audio system is in your vehicle, �nd
out what your audio system can do, and how to operate
all of its controls.
Setting the Time for Radios without
Radio Data Systems (RDS)
Press and hold HR until the correct hour appears on the
display. Press and hold MIN until the correct minute
appears on the display. There is an initial two-second
delay before the clock goes into time-set mode.
Display the time with the ignition off, by pressing RCL,
HR, or MIN.
3-42
Page 200 of 414
Your Driving, the Road, and
Your Vehicle
Defensive Driving
The best advice anyone can give about driving is: Drive
defensively.
Please start with a very important safety device in your
vehicle: Buckle up. SeeSafety Belts: They Are for
Everyone on page 1-11.
Defensive driving really means “be ready for anything.”
On city streets, rural roads, or freeways, it means
“always expect the unexpected.”
Assume that pedestrians or other drivers are going to
be careless and make mistakes. Anticipate what
they might do. Be ready for their mistakes.
Rear-end collisions are about the most preventable of
accidents. Yet they are common. Allow enough following
distance. It is the best defensive driving maneuver, in
both city and rural driving. You never know when the
vehicle in front of you is going to brake or turn suddenly.
Defensive driving requires that a driver concentrate
on the driving task. Anything that distracts from
the driving task — such as concentrating on a cellular
telephone call, reading, or reaching for something onthe �oor — makes proper defensive driving more
difficult and can even cause a collision, with resulting
injury. Ask a passenger to help do things like this, or
pull off the road in a safe place to do them yourself.
These simple defensive driving techniques could save
your life.Drunken Driving
Death and injury associated with drinking and driving is
a national tragedy. It is the number one contributor
to the highway death toll, claiming thousands of victims
every year.
Alcohol affects four things that anyone needs to drive a
vehicle:
Judgment
Muscular Coordination
Vision
Attentiveness
Police records show that almost half of all motor
vehicle-related deaths involve alcohol. In most cases,
these deaths are the result of someone who was
drinking and driving. In recent years, more than
16,000 annual motor vehicle-related deaths have been
associated with the use of alcohol, with more than
300,000 people injured.
4-2
Page 209 of 414
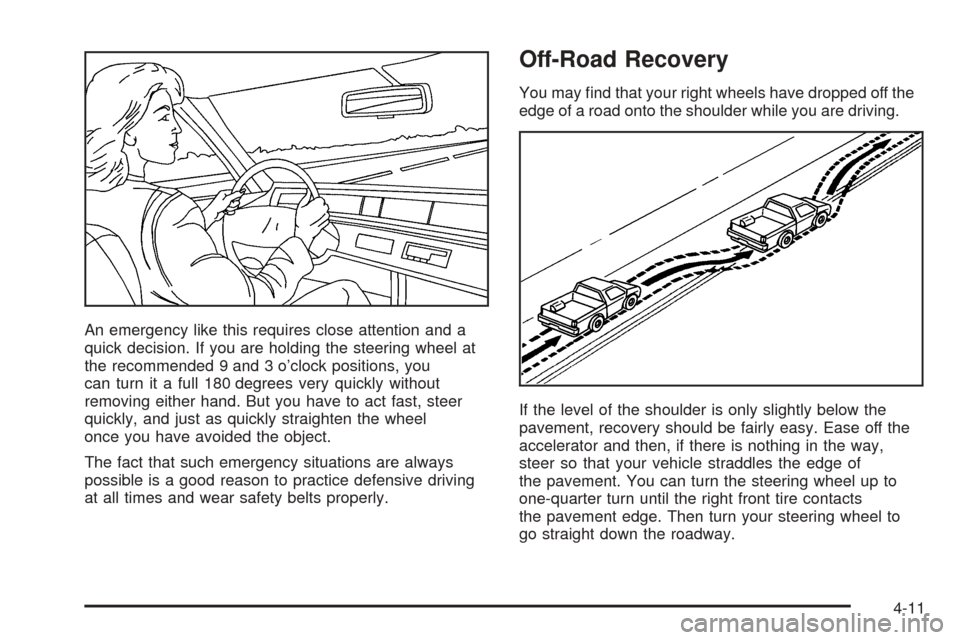
An emergency like this requires close attention and a
quick decision. If you are holding the steering wheel at
the recommended 9 and 3 o’clock positions, you
can turn it a full 180 degrees very quickly without
removing either hand. But you have to act fast, steer
quickly, and just as quickly straighten the wheel
once you have avoided the object.
The fact that such emergency situations are always
possible is a good reason to practice defensive driving
at all times and wear safety belts properly.
Off-Road Recovery
You may �nd that your right wheels have dropped off the
edge of a road onto the shoulder while you are driving.
If the level of the shoulder is only slightly below the
pavement, recovery should be fairly easy. Ease off the
accelerator and then, if there is nothing in the way,
steer so that your vehicle straddles the edge of
the pavement. You can turn the steering wheel up to
one-quarter turn until the right front tire contacts
the pavement edge. Then turn your steering wheel to
go straight down the roadway.
4-11
Page 215 of 414
Controlling your vehicle is the key to successful off-road
driving. One of the best ways to control your vehicle
is to control your speed. Here are some things to keep
in mind. At higher speeds:
you approach things faster and you have less time
to scan the terrain for obstacles.
you have less time to react.
you have more vehicle bounce when you drive over
obstacles.
you will need more distance for braking, especially
since you are on an unpaved surface.
{CAUTION:
When you are driving off-road, bouncing and
quick changes in direction can easily throw
you out of position. This could cause you to
lose control and crash. So, whether you are
driving on or off the road, you and your
passengers should wear safety belts.
Scanning the Terrain
Off-road driving can take you over many different kinds
of terrain. You need to be familiar with the terrain
and its many different features. Here are some things to
consider.
Surface Conditions:Off-roading can take you over
hard-packed dirt, gravel, rocks, grass, sand, mud, snow
or ice. Each of these surfaces affects the steering,
acceleration and braking of your vehicle in different
ways. Depending upon the kind of surface you are on,
you may experience slipping, sliding, wheel spinning,
delayed acceleration, poor traction and longer braking
distances.
Surface Obstacles:Unseen or hidden obstacles can
be hazardous. A rock, log, hole, rut or bump can startle
you if you are not prepared for them. Often these
obstacles are hidden by grass, bushes, snow or even
the rise and fall of the terrain itself. Here are some
things to consider:
Is the path ahead clear?
Will the surface texture change abruptly up ahead?
Does the travel take you uphill or downhill?
There is more discussion of these subjects later.
Will you have to stop suddenly or change direction
quickly?
4-17
Page 265 of 414
4. Reapply the regular brakes. Then apply your
parking brake, and then shift into PARK (P), or
REVERSE (R) for a manual transmission. See
Parking Brake on page 2-29for more information.
5. If you have a four-wheel-drive vehicle, be sure the
transfer case is in a drive gear and not in
NEUTRAL. SeeFour-Wheel Drive on page 2-25for
more information.
6. Release the regular brakes.
When You Are Ready to Leave After
Parking on a Hill
1. Apply your regular brakes and hold the pedal down
while you:
start your engine,
shift into a gear, and
release the parking brake.
2. Let up on the brake pedal.
3. Drive slowly until the trailer is clear of the chocks.
4. Stop and have someone pick up and store the
chocks.
Maintenance When Trailer Towing
Your vehicle will need service more often when you’re
pulling a trailer. SeeScheduled Maintenance on
page 6-4for more on this. Things that are especially
important in trailer operation are automatic transmission
�uid (don’t over�ll), engine oil, axle lubricant, belt,
cooling system and brake system. Each of these is
covered in this manual, and the Index will help you �nd
them quickly. If you’re trailering, it’s a good idea to
review these sections before you start your trip.
Check periodically to see that all hitch nuts and bolts
are tight.
Trailer Wiring Harness
Your vehicle may be equipped with a four-pin trailer
towing harness. This harness has a four-pin trailer
connector that is attached to a bracket on the hitch
platform. The four-wire harness contains the following
trailer circuits:
Yellow: Left Stop/Turn Signal
Green: Right Stop/Turn Signal
Brown: Taillamps/Park lamps
White: Ground
4-67
Page 268 of 414
Buying New Tires.........................................5-62
Uniform Tire Quality Grading..........................5-63
Wheel Alignment and Tire Balance..................5-64
Wheel Replacement......................................5-64
Tire Chains..................................................5-66
If a Tire Goes Flat........................................5-67
Changing a Flat Tire.....................................5-68
Removing the Spare Tire and Tools................5-69
Removing the Flat Tire and Installing
the Spare Tire..........................................5-73
Secondary Latch System...............................5-80
Storing a Flat or Spare Tire and Tools............5-83
Spare Tire...................................................5-86
Appearance Care............................................5-88
Cleaning the Inside of Your Vehicle.................5-88
Fabric/Carpet...............................................5-90
Leather.......................................................5-90
Instrument Panel, Vinyl, and Other Plastic
Surfaces..................................................5-91
Care of Safety Belts......................................5-91
Weatherstrips...............................................5-91
Washing Your Vehicle...................................5-92Cleaning Exterior Lamps/Lenses.....................5-92
Finish Care..................................................5-92
Windshield and Wiper Blades.........................5-93
Aluminum Wheels.........................................5-93
Tires...........................................................5-94
Sheet Metal Damage.....................................5-94
Finish Damage.............................................5-95
Underbody Maintenance................................5-95
Chemical Paint Spotting.................................5-95
Vehicle Care/Appearance Materials..................5-96
Vehicle Identi�cation......................................5-97
Vehicle Identi�cation Number (VIN).................5-97
Service Parts Identi�cation Label.....................5-97
Electrical System............................................5-98
Add-On Electrical Equipment..........................5-98
Windshield Wiper Fuses................................5-98
Power Windows and Other Power Options.......5-98
Fuses and Circuit Breakers............................5-99
Engine Compartment Fuse Block....................5-99
Capacities and Speci�cations........................5-103
Section 5 Service and Appearance Care
5-2
Page 322 of 414

(D) Construction Code:A letter code is used to
indicate the type of ply construction in the tire. The
letter R means radial ply construction; the letter D means
diagonal or bias ply construction; and the letter B means
belted-bias ply construction.
(E) Rim Diameter:Diameter of the wheel in inches.
(F) Service Description:These characters represent
the load range and speed rating of the tire. The load
index represents the load carry capacity a tire is certi�ed
to carry. The load index can range from 1 to 279. The
speed rating is the maximum speed a tire is certi�ed
to carry a load. Speed ratings range from A to Z.
Tire Terminology and De�nitions
Air Pressure:The amount of air inside the tire pressing
outward on each square inch of the tire. Air pressure
is expressed in pounds per square inch (psi) or
kilopascal (kPa).
Accessory Weight:This means the combined weight
of optional accessories. Some examples of optional
accessories are, automatic transmission, power steering,
power brakes, power windows, power seats, and air
conditioning.
Aspect Ratio:The relationship of a tire’s height to
its width.Belt:A rubber coated layer of cords that is located
between the plies and the tread. Cords may be made
from steel or other reinforcing materials.
Bead:The tire bead contains steel wires wrapped by
steel cords that hold the tire onto the rim.
Bias Ply Tire:A pneumatic tire in which the plies are
laid at alternate angles less than 90 degrees to the
centerline of the tread.
Cold In�ation Pressure:The amount of air pressure
in a tire, measured in pounds per square inch (psi)
or kilopascals (kPa) before a tire has built up heat from
driving. SeeIn�ation - Tire Pressure on page 5-58.
Curb Weight:This means the weight of a motor vehicle
with standard and optional equipment including the
maximum capacity of fuel, oil and coolant, but without
passengers and cargo.
DOT Markings:A code molded into the sidewall of a
tire signifying that the tire is in compliance with the
U.S. Department of Transportation (DOT) motor vehicle
safety standards. The DOT code includes the Tire
Identi�cation Number (TIN), an alphanumeric designator
which can also identify the tire manufacturer, production
plant, brand and date of production.
GVWR:Gross Vehicle Weight Rating, seeLoading
Your Vehicle on page 4-42.
5-56
Page 328 of 414
Buying New Tires
To �nd out what kind and size of tires you need, look
at the Tire and Loading Information label. For more
information about this label and its location on
your vehicle, SeeLoading Your Vehicle on page 4-42.
The tires installed on your vehicle when it was new had
a Tire Performance Criteria Speci�cation (TPC Spec)
number on each tire’s sidewall. When you get new tires,
GM recommends that you get tires with that same
TPC Spec number. That way your vehicle will continue
to have tires that are designed to give proper
endurance, handling, speed rating, traction, ride and
other things during normal service on your vehicle.
If your tires have an all-season tread design, the TPC
number will be followed by an “MS” (for mud and snow).
If you ever replace your tires with those not having
a TPC Spec number, make sure they are the same
size, load range, speed rating and construction
type (bias, bias-belted or radial) as your original tires.{CAUTION:
Mixing tires could cause you to lose control
while driving. If you mix tires of different sizes
or types (radial and bias-belted tires), the
vehicle may not handle properly, and you
could have a crash. Using tires of different
sizes may also cause damage to your vehicle.
Be sure to use the same size and type tires on
all wheels. It’s all right to drive with your
compact spare (if you have one). It was
developed for use on your vehicle.
{CAUTION:
If you use bias-ply tires on your vehicle, the
wheel rim �anges could develop cracks after
many miles of driving. A tire and/or wheel
could fail suddenly, causing a crash. Use only
radial-ply tires with the wheels on your vehicle.
5-62