2005 CHEVROLET COLORADO tow
[x] Cancel search: towPage 114 of 414
Shifting Out of Park (P)
(Automatic Transmission)
Your vehicle has an automatic transmission shift lock
control system which locks the shift lever in PARK (P)
when the ignition is in the LOCK position. In addition, you
have to fully apply the regular brakes before you can shift
from PARK (P) when the ignition is in ON. SeeAutomatic
Transmission Operation on page 2-21.
If you cannot shift out of PARK (P), ease pressure on
the shift lever by pushing the shift lever all the way into
PARK (P) as you maintain brake application. Then,
move the shift lever into the gear you want.
If you ever hold the brake pedal down but still cannot
shift out of PARK (P), try this:
1. Turn the key to ACC. There is no shift interlock
in this key position.
2. Apply and hold the brake until the end of Step 4.
3. Shift the transmission to NEUTRAL (N).
4. Start the vehicle and then shift to the gear
you want.
5. Have the system �xed as soon as you can.
Parking Your Vehicle
(Manual Transmission)
Your vehicle has a manual transmission. Before you
get out of your vehicle, move the shift lever into
REVERSE (R), and �rmly apply the parking brake. Once
the shift lever has been placed into REVERSE (R)
with the clutch pedal pressed in, you can turn the ignition
key to LOCK, remove the key and release the clutch.
If you are parking on a hill, or if your vehicle is pulling a
trailer, seeTowing a Trailer on page 4-54.
2-32
Page 117 of 414
Follow the proper steps to be sure your vehicle will
not move. SeeShifting Into Park (P) (Automatic
Transmission) on page 2-30.
If you are pulling a trailer, seeTowing a Trailer
on page 4-54.
Mirrors
Manual Rearview Mirror
While sitting in a comfortable driving position, adjust the
outside rearview mirror so you can see clearly behind
your vehicle. Grip the mirror in the center to move it up
or down and side to side. The control at the bottom
of the mirror is the day/night feature that allows
adjustment to the mirror so that the glare of headlamps
from behind is reduced. Push the control for daytime
use; pull it for night use.
The mirror may have lamps. Press the button next to
each lamp to turn it on or off.
Manual Rearview Mirror with
OnStar
®
Mirror Operation
Your vehicle may have a manual rearview mirror with
the OnStar®System and map lamps.
You can adjust the mirror for day or night driving. Press
the tab forward (away from you) for day driving. Pull
the tab back (toward you) for night driving.
There are also three OnStar
®buttons located at the
bottom of the mirror. See your dealer for more
information on the system and how to subscribe to
OnStar
®. SeeOnStar®System on page 2-39for more
information about the services OnStar®provides.
Map Lamps
The mirror has map lamps located at the bottom of the
mirror. To manually turn the lamps on or off, press
the button next to each lamp.
Cleaning the Mirror
When cleaning the mirror, use a paper towel or similar
material dampened with glass cleaner. Do not spray
glass cleaner directly on the mirror housing.
2-35
Page 120 of 414
Temperature Display Operation
The outside air temperature is displayed in the window
located at the lower center of the mirror face.
Press and hold the far right button for four seconds and
release. This will change the temperature reading
between degrees Fahrenheit, degrees Celsius, or turn
the display off.
Cleaning the Mirror
When cleaning the mirror, use a paper towel or similar
material dampened with glass cleaner. Do not spray
glass cleaner directly on the mirror as that may cause
the liquid cleaner to enter the mirror housing.
Outside Manual Mirrors
If the vehicle has manual outside mirrors, adjust them
by hand so that the side of the vehicle can be seen while
you are sitting in a comfortable driving position.
The mirrors can be folded inward to prevent damage
when going through an automatic car wash. To
fold, push the mirror toward the vehicle. To return the
mirror to its original position, push outward. Return both
mirrors to the unfolded position before driving.
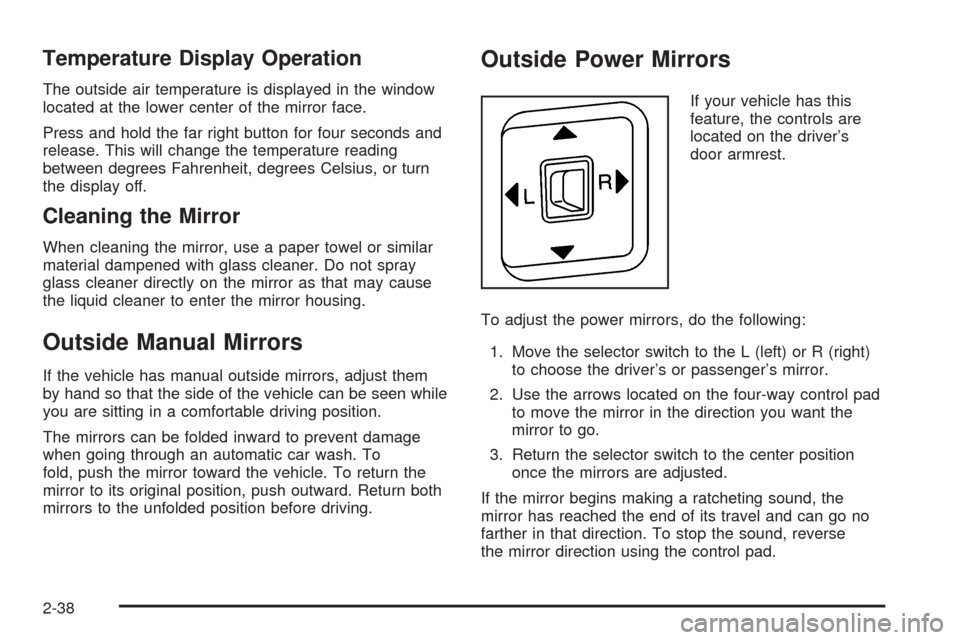
Outside Power Mirrors
If your vehicle has this
feature, the controls are
located on the driver’s
door armrest.
To adjust the power mirrors, do the following:
1. Move the selector switch to the L (left) or R (right)
to choose the driver’s or passenger’s mirror.
2. Use the arrows located on the four-way control pad
to move the mirror in the direction you want the
mirror to go.
3. Return the selector switch to the center position
once the mirrors are adjusted.
If the mirror begins making a ratcheting sound, the
mirror has reached the end of its travel and can go no
farther in that direction. To stop the sound, reverse
the mirror direction using the control pad.
2-38
Page 121 of 414
The mirrors can be manually folded inward to prevent
damage when going through an automatic car wash.
To fold, push the mirror toward the vehicle. To return the
mirror to its original position, push outward. Be sure
to return both mirrors to the unfolded position before
driving.
Outside Convex Mirror
Your passenger’s outside rearview mirror is convex.
A convex mirror’s surface is curved so you can see more
from the driver’s seat.
{CAUTION:
A convex mirror can make things (like other
vehicles) look farther away than they really are.
If you cut too sharply into the right lane, you
could hit a vehicle on your right. Check your
inside mirror or glance over your shoulder
before changing lanes.
OnStar®System
OnStar®uses global positioning system (GPS) satellite
technology, wireless communications, and call centers
to provide you with a wide range of safety, security,
information, and convenience services.
A complete OnStar
®user’s guide and the terms and
conditions of the OnStar®Subscription Service
Agreement are included in the vehicle’s glove box
literature. For more information, visit www.onstar.com
or www.onstarcanada.com. Contact OnStar
®at
1-888-4-ONSTAR (1-888-466-7827), or press the
OnStar
®button to speak to an OnStar®advisor
24 hours a day, 7 days a week.
Terms and conditions of the Subscription Service
Agreement can be found at www.onstar.com or
www.onstarcanada.com.
OnStar®Services
For new vehicles equipped with OnStar®, the Safe and
Sound Plan is included for the �rst year. You can
extend this plan beyond the �rst year, or upgrade to the
Directions and Connections Plan to meet your needs.
For more information, press the OnStar
®button to speak
with an advisor.
2-39
Page 133 of 414
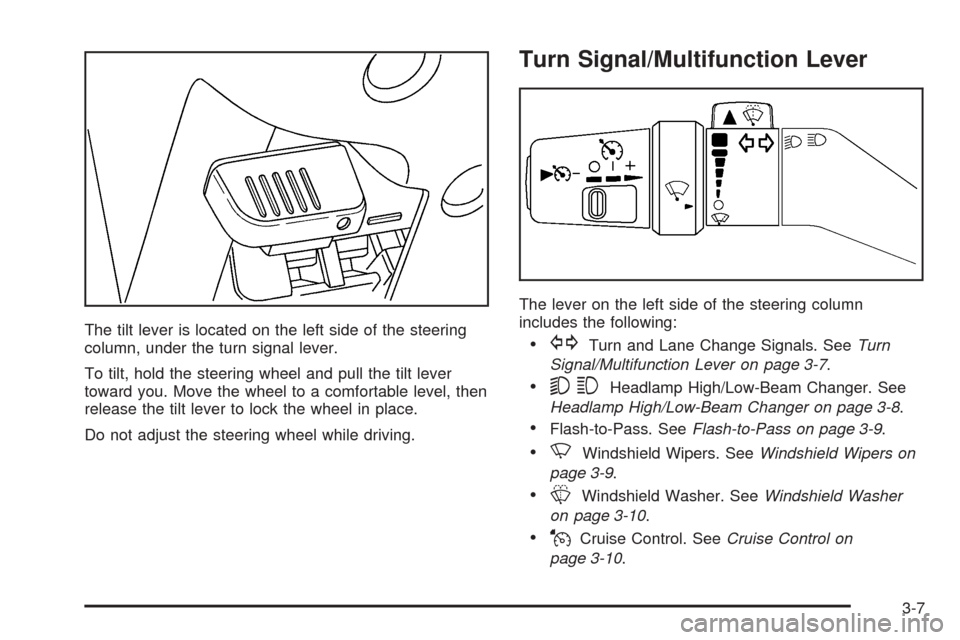
The tilt lever is located on the left side of the steering
column, under the turn signal lever.
To tilt, hold the steering wheel and pull the tilt lever
toward you. Move the wheel to a comfortable level, then
release the tilt lever to lock the wheel in place.
Do not adjust the steering wheel while driving.
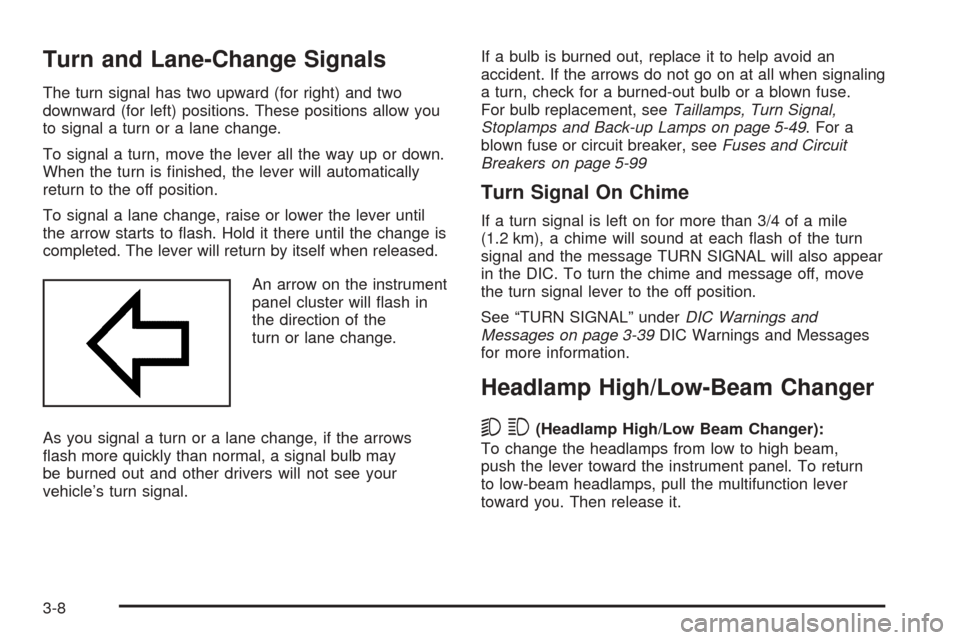
Turn Signal/Multifunction Lever
The lever on the left side of the steering column
includes the following:
GTurn and Lane Change Signals. SeeTurn
Signal/Multifunction Lever on page 3-7.
53Headlamp High/Low-Beam Changer. See
Headlamp High/Low-Beam Changer on page 3-8.
Flash-to-Pass. SeeFlash-to-Pass on page 3-9.
NWindshield Wipers. SeeWindshield Wipers on
page 3-9.
LWindshield Washer. SeeWindshield Washer
on page 3-10.
JCruise Control. SeeCruise Control on
page 3-10.
3-7
Page 134 of 414
Turn and Lane-Change Signals
The turn signal has two upward (for right) and two
downward (for left) positions. These positions allow you
to signal a turn or a lane change.
To signal a turn, move the lever all the way up or down.
When the turn is �nished, the lever will automatically
return to the off position.
To signal a lane change, raise or lower the lever until
the arrow starts to �ash. Hold it there until the change is
completed. The lever will return by itself when released.
An arrow on the instrument
panel cluster will �ash in
the direction of the
turn or lane change.
As you signal a turn or a lane change, if the arrows
�ash more quickly than normal, a signal bulb may
be burned out and other drivers will not see your
vehicle’s turn signal.If a bulb is burned out, replace it to help avoid an
accident. If the arrows do not go on at all when signaling
a turn, check for a burned-out bulb or a blown fuse.
For bulb replacement, seeTaillamps, Turn Signal,
Stoplamps and Back-up Lamps on page 5-49. For a
blown fuse or circuit breaker, seeFuses and Circuit
Breakers on page 5-99
Turn Signal On Chime
If a turn signal is left on for more than 3/4 of a mile
(1.2 km), a chime will sound at each �ash of the turn
signal and the message TURN SIGNAL will also appear
in the DIC. To turn the chime and message off, move
the turn signal lever to the off position.
See “TURN SIGNAL” underDIC Warnings and
Messages on page 3-39DIC Warnings and Messages
for more information.
Headlamp High/Low-Beam Changer
53(Headlamp High/Low Beam Changer):
To change the headlamps from low to high beam,
push the lever toward the instrument panel. To return
to low-beam headlamps, pull the multifunction lever
toward you. Then release it.
3-8
Page 135 of 414
When the high beams are
on, this indicator light on
the instrument panel
cluster will also be on.
Flash-to-Pass
This feature lets you use your high-beam headlamps to
signal a driver in front of you that you want to pass.
It works even if your headlamps are in the automatic
position.
To use it, pull the turn signal lever toward you, then
release it.
If your headlamps are in the automatic position or on
low beam, your high-beam headlamps will turn on.
They’ll stay on as long as you hold the lever toward you.
The high-beam indicator on the instrument panel
cluster will come on. Release the lever to return to
normal operation.
Windshield Wipers
You control the windshield wipers by turning the band
with the wiper symbol on it.
8(Mist):For a single wiping cycle, turn the band to
mist. Hold it there until the wipers start. Then let go. The
wipers will stop after one wipe. If you want more
wipes, hold the band on mist longer.
N(Delay):You can set the wiper speed for a long or
short delay between wipes. This can be very useful
in light rain or snow. Turn the band to choose the delay
time. The closer to the top of the lever, the shorter
the delay.
6(Low Speed):For steady wiping at low speed,
turn the band away from you to the �rst solid position
past the delay settings.
1(High Speed):For high-speed wiping, turn the
band to the second solid position past the delay settings.
9(Off):To stop the wipers, move the band to off.
Be sure to clear ice and snow from the wiper blades
before using them. If they’re frozen to the windshield,
carefully loosen or thaw them. If your blades do become
worn or damaged, get new blades or blade inserts.
3-9
Page 140 of 414

AUTO:Turn the knob to this position to automatically
turn on the headlamps at normal brightness, together
with the following:
Sidemarker Lamps
Taillamps
Parking Lamps
Instrument Panel Lights
SeeAutomatic Headlamp System on page 3-15for
more information.
;(Parking Lamps):Turn the knob to this position to
turn on the parking lamps, together with the following:
Sidemarker Lamps
Taillamps
License Plate Lamps
Instrument Panel Lights
2(Headlamps):Turn the knob to this position to turn
on the headlamps, together with the previously listed
lamps and lights.
You can switch your headlamps from low to high beam
by pushing the turn signal/multifunction lever toward
the instrument panel.
Headlamps on Reminder
If a door is open, a reminder chime will sound when
your headlamps or parking lamps are manually turned
on and your key is out of the ignition. To turn off
the chime, turn the headlamp switch to off and then
back on. In the automatic mode, the headlamps turn off
once the ignition is in LOCK.
Daytime Running Lamps (DRL)
Daytime Running Lamps (DRL) can make it easier for
others to see the front of your vehicle during the
day. DRL can be helpful in many different driving
conditions, but they can be especially helpful in the short
periods after dawn and before sunset. Fully functional
daytime running lamps are required on all vehicles
�rst sold in Canada.
The DRL system will come on when the following
conditions are met:
The ignition is on.
The exterior lamps control is in AUTO.
The transmission is not in PARK (P) if you have an
automatic transmission or the parking brake is not
set if you have a manual transmission.
The light sensor determines it is daytime.
3-14