2005 CHEVROLET AVEO steering
[x] Cancel search: steeringPage 154 of 316
•Do not get too close to the vehicle you want to
pass while you are awaiting an opportunity. For
one thing, following too closely reduces your area
of vision, especially if you are following a larger
vehicle. Also, you will not have adequate space if
the vehicle ahead suddenly slows or stops.
Keep back a reasonable distance.
•When it looks like a chance to pass is coming up,
start to accelerate but stay in the right lane and do
not get too close. Time your move so you will be
increasing speed as the time comes to move into the
other lane. If the way is clear to pass, you will have a
running start that more than makes up for the
distance you would lose by dropping back. And if
something happens to cause you to cancel your
pass, you need only slow down and drop back again
and wait for another opportunity.
•If other vehicles are lined up to pass a slow vehicle,
wait your turn. But take care that someone is not
trying to pass you as you pull out to pass the slow
vehicle. Remember to glance over your shoulder and
check the blind spot.
•Check your mirrors, glance over your shoulder,
and start your left lane change signal before moving
out of the right lane to pass. When you are far
enough ahead of the passed vehicle to see its
front in your inside mirror, activate your right lane
change signal and move back into the right lane.Remember that your right outside mirror is convex.
The vehicle you just passed may seem to be farther
away from you than it really is.
•Try not to pass more than one vehicle at a time on
two-lane roads. Reconsider before passing the next
vehicle.
•Do not overtake a slowly moving vehicle too rapidly.
Even though the brake lamps are not flashing, it may
be slowing down or starting to turn.
•If you are being passed, make it easy for the
following driver to get ahead of you. Perhaps you
can ease a little to the right.
Loss of Control
Let us review what driving experts say about what
happens when the three control systems — brakes,
steering, and acceleration — do not have enough friction
where the tires meet the road to do what the driver
has asked.
In any emergency, do not give up. Keep trying to steer
and constantly seek an escape route or area of less
danger.
4-12
Page 155 of 316
Skidding
In a skid, a driver can lose control of the vehicle.
Defensive drivers avoid most skids by taking reasonable
care suited to existing conditions, and by not overdriving
those conditions. But skids are always possible.
The three types of skids correspond to your vehicle’s
three control systems. In the braking skid, your wheels
are not rolling. In the steering or cornering skid, too
much speed or steering in a curve causes tires to slip
and lose cornering force. And in the acceleration
skid, too much throttle causes the driving wheels
to spin.
A cornering skid and an acceleration skid are best
handled by easing your foot off the accelerator pedal.
If your vehicle starts to slide, ease your foot off the
accelerator pedal and quickly steer the way you want
the vehicle to go. If you start steering quickly enough,
your vehicle may straighten out. Always be ready
for a second skid if it occurs.
Of course, traction is reduced when water, snow, ice,
gravel, or other material is on the road. For safety,
you will want to slow down and adjust your driving to
these conditions. It is important to slow down on slippery
surfaces because stopping distance will be longer and
vehicle control more limited.While driving on a surface with reduced traction, try
your best to avoid sudden steering, acceleration,
or braking, including engine braking by shifting to a
lower gear. Any sudden changes could cause the tires
to slide. You may not realize the surface is slippery
until your vehicle is skidding. Learn to recognize warning
clues — such as enough water, ice, or packed snow
on the road to make a mirrored surface — and
slow down when you have any doubt.
If you have the anti-lock braking system (ABS),
remember: It helps avoid only the braking skid. If you
do not have ABS, then in a braking skid, where the
wheels are no longer rolling, release enough pressure
on the brakes to get the wheels rolling again. This
restores steering control. Push the brake pedal down
steadily when you have to stop suddenly. As long as the
wheels are rolling, you will have steering control.
4-13
Page 167 of 316
Accelerate gently. Try not to break the fragile traction.
If you accelerate too fast, the drive wheels will spin and
polish the surface under the tires even more.
Unless you have the anti-lock braking system (ABS),
you will want to brake very gently, too. If you do
have ABS, seeAnti-Lock Brake System (ABS) on
page 4-6. This system improves your vehicle’s stability
when you make a hard stop on a slippery road.
Whether you have ABS or not, you will want to begin
stopping sooner than you would on dry pavement.
Without ABS, if you feel your vehicle begin to slide, let
up on the brakes a little. Push the brake pedal down
steadily to get the most traction you can.
Remember, unless you have ABS, if you brake so hard
that your wheels stop rolling, you will just slide. Brake
so your wheels always keep rolling and you can
still steer.
•Whatever your braking system, allow greater
following distance on any slippery road.
•Watch for slippery spots. The road might be
fine until you hit a spot that is covered with ice.
On an otherwise clear road, ice patches
may appear in shaded areas where the sun
cannot reach, such as around clumps of
trees, behind buildings, or under bridges.Sometimes the surface of a curve or an overpass
may remain icy when the surrounding roads
are clear. If you see a patch of ice ahead of you,
brake before you are on it. Try not to brake
while you are actually on the ice, and avoid sudden
steering maneuvers.
If You Are Caught in a Blizzard
If you are stopped by heavy snow, you could be in
a serious situation. You should probably stay with your
vehicle unless you know for sure that you are near
help and you can hike through the snow. Here are some
things to do to summon help and keep yourself and
your passengers safe:
•Turn on your hazard flashers.
•Tie a red cloth to your vehicle to alert police that
you have been stopped by the snow.
•Put on extra clothing or wrap a blanket around you.
If you do not have blankets or extra clothing, make
body insulators from newspapers, burlap bags,
rags, floor mats — anything you can wrap around
yourself or tuck under your clothing to keep warm.
4-25
Page 170 of 316
Rocking Your Vehicle to Get It Out
First, turn your steering wheel left and right. That
will clear the area around your front wheels. Then shift
back and forth between REVERSE (R) and a forward
gear, or with a manual transaxle, between FIRST (1)
or SECOND (2) and REVERSE (R), spinning the wheels
as little as possible. Release the accelerator pedal
while you shift, and press lightly on the accelerator pedal
when the transaxle is in gear. By slowly spinning your
wheels in the forward and reverse directions, you
will cause a rocking motion that may free your vehicle.
If that does not get you out after a few tries, you
may need to be towed out. If you do need to be towed
out, seeTowing Your Vehicle on page 4-34.
Loading Your Vehicle
It is very important to know how much weight your vehicle
can carry. This weight is called the vehicle capacity
weight or maximum load amount and includes the weight
of all occupants, cargo and all nonfactory-installed
options. Two labels on your vehicle show how much
weight it may properly carry, the Tire and Loading
Information label and the Certification label.
{CAUTION:
Do not load your vehicle any heavier than the
Gross Vehicle Weight Rating (GVWR), or either
the maximum front or rear Gross Axle Weight
Rating (GAWR). If you do, parts on your
vehicle can break, and it can change the way
your vehicle handles. These could cause you
to lose control and crash. Also, overloading
can shorten the life of your vehicle.
4-28
Page 177 of 316
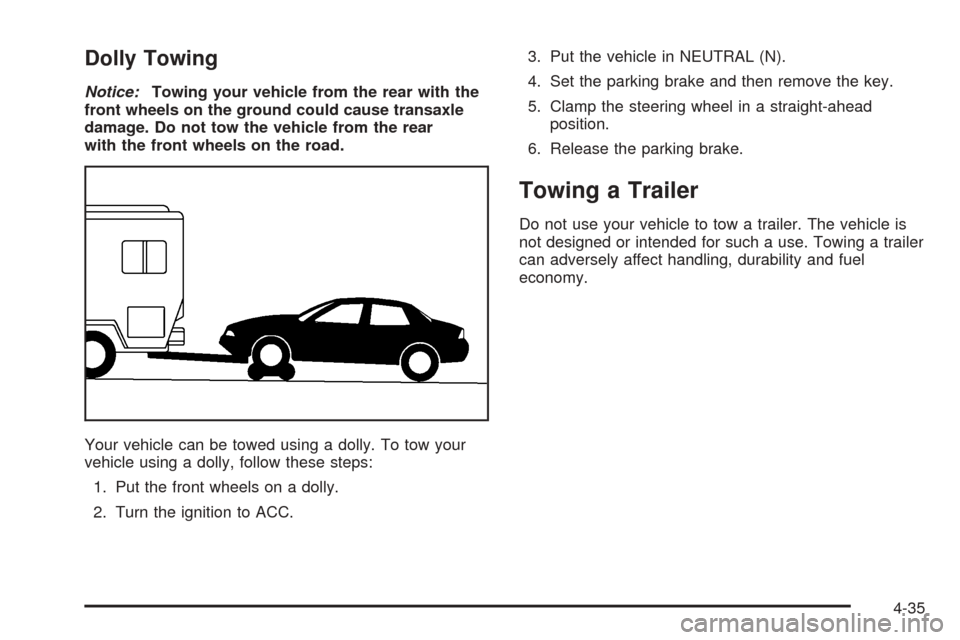
Dolly Towing
Notice:Towing your vehicle from the rear with the
front wheels on the ground could cause transaxle
damage. Do not tow the vehicle from the rear
with the front wheels on the road.
Your vehicle can be towed using a dolly. To tow your
vehicle using a dolly, follow these steps:
1. Put the front wheels on a dolly.
2. Turn the ignition to ACC.3. Put the vehicle in NEUTRAL (N).
4. Set the parking brake and then remove the key.
5. Clamp the steering wheel in a straight-ahead
position.
6. Release the parking brake.
Towing a Trailer
Do not use your vehicle to tow a trailer. The vehicle is
not designed or intended for such a use. Towing a trailer
can adversely affect handling, durability and fuel
economy.
4-35
Page 179 of 316
Service............................................................5-3
Doing Your Own Service Work.........................5-4
Adding Equipment to the Outside
of Your Vehicle...........................................5-4
Fuel................................................................5-5
Gasoline Octane............................................5-5
Gasoline Specifications....................................5-5
California Fuel...............................................5-5
Additives.......................................................5-6
Fuels in Foreign Countries...............................5-6
Filling the Tank..............................................5-7
Filling a Portable Fuel Container.......................5-9
Checking Things Under the Hood....................5-10
Hood Release..............................................5-10
Engine Compartment Overview.......................5-12
Engine Oil...................................................5-13
Engine Air Cleaner/Filter................................5-17
Automatic Transaxle Fluid..............................5-18
Manual Transaxle Fluid..................................5-20
Hydraulic Clutch...........................................5-20
Engine Coolant.............................................5-21
Coolant Surge Tank Pressure Cap..................5-24
Engine Overheating.......................................5-24
Cooling System............................................5-26
Power Steering Fluid.....................................5-30
Windshield Washer Fluid................................5-31Brakes........................................................5-32
Battery........................................................5-35
Jump Starting...............................................5-36
Headlamp Aiming...........................................5-39
Bulb Replacement..........................................5-40
Halogen Bulbs..............................................5-40
Headlamps..................................................5-40
Front Turn Signal and Parking Lamps..............5-42
Turn Signal Lamps (Side)..............................5-42
Fog Lamps..................................................5-43
Sidemarker Lamps (Front)..............................5-44
Sidemarker Lamps (Rear)..............................5-44
Taillamps, Turn Signal, Stoplamps and
Back-up Lamps.........................................5-45
Replacement Bulbs.......................................5-46
Windshield Wiper Blade Replacement..............5-46
Tires..............................................................5-47
Tire Sidewall Labelling...................................5-48
Tire Terminology and Definitions.....................5-50
Inflation - Tire Pressure.................................5-53
Tire Inspection and Rotation...........................5-54
When It Is Time for New Tires.......................5-55
Buying New Tires.........................................5-56
Uniform Tire Quality Grading..........................5-56
Wheel Alignment and Tire Balance..................5-58
Section 5 Service and Appearance Care
5-1
Page 191 of 316
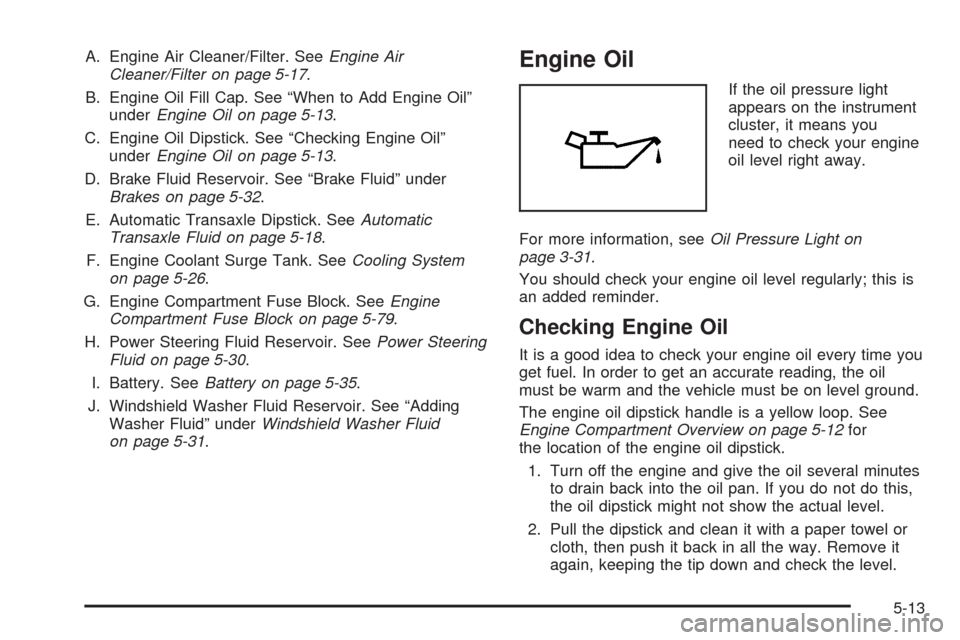
A. Engine Air Cleaner/Filter. SeeEngine Air
Cleaner/Filter on page 5-17.
B. Engine Oil Fill Cap. See “When to Add Engine Oil”
underEngine Oil on page 5-13.
C. Engine Oil Dipstick. See “Checking Engine Oil”
underEngine Oil on page 5-13.
D. Brake Fluid Reservoir. See “Brake Fluid” under
Brakes on page 5-32.
E. Automatic Transaxle Dipstick. SeeAutomatic
Transaxle Fluid on page 5-18.
F. Engine Coolant Surge Tank. SeeCooling System
on page 5-26.
G. Engine Compartment Fuse Block. SeeEngine
Compartment Fuse Block on page 5-79.
H. Power Steering Fluid Reservoir. SeePower Steering
Fluid on page 5-30.
I. Battery. SeeBattery on page 5-35.
J. Windshield Washer Fluid Reservoir. See “Adding
Washer Fluid” underWindshield Washer Fluid
on page 5-31.Engine Oil
If the oil pressure light
appears on the instrument
cluster, it means you
need to check your engine
oil level right away.
For more information, seeOil Pressure Light on
page 3-31.
You should check your engine oil level regularly; this is
an added reminder.
Checking Engine Oil
It is a good idea to check your engine oil every time you
get fuel. In order to get an accurate reading, the oil
must be warm and the vehicle must be on level ground.
The engine oil dipstick handle is a yellow loop. See
Engine Compartment Overview on page 5-12for
the location of the engine oil dipstick.
1. Turn off the engine and give the oil several minutes
to drain back into the oil pan. If you do not do this,
the oil dipstick might not show the actual level.
2. Pull the dipstick and clean it with a paper towel or
cloth, then push it back in all the way. Remove it
again, keeping the tip down and check the level.
5-13
Page 197 of 316
Wait at least 30 minutes before checking the transaxle
fluid level if you have been driving:
•When outside temperatures are above 90°F (32°C).
•At high speed for quite a while.
•In heavy traffic — especially in hot weather.
To get the right reading, the fluid should be at normal
operating temperature, which is 158°F to 176°F
(70°C to 80°C).
Get the vehicle warmed up by driving about
15 miles (24 km) when outside temperatures are
above 50°F (10°C). If it is colder than 50°F (10°C),
you may have to drive longer.
Checking the Fluid Level
Prepare your vehicle as follows:
•Park your vehicle on a level place. Keep the engine
running.
•With the parking brake applied, place the shift lever
in PARK (P).
•With your foot on the brake pedal, move the shift
lever through each gear range, pausing for about
three seconds in each range. Then, position the shift
lever in PARK (P).
•Let the engine run at idle for three to five minutes.Then, without shutting off the engine, follow these steps:
The automatic transaxle dipstick is located toward the
front of the engine compartment, near the power
steering fluid reservoir. SeeEngine Compartment
Overview on page 5-12for more information on location.
1. Pull out the dipstick and wipe it with a clean rag
or paper towel.
2. Push the dipstick back in all the way, wait three
seconds and then pull it back out again.
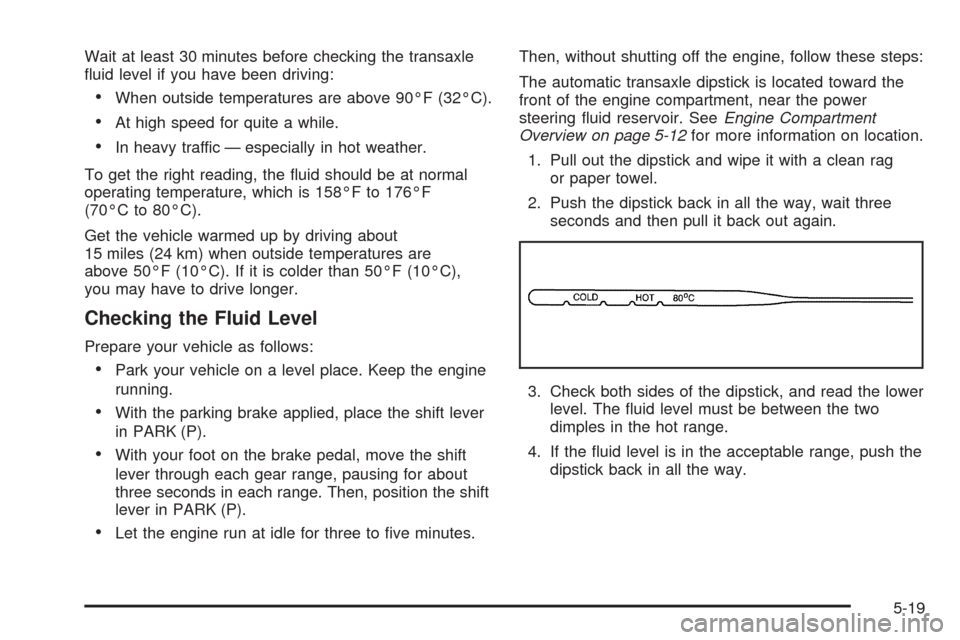
3. Check both sides of the dipstick, and read the lower
level. The fluid level must be between the two
dimples in the hot range.
4. If the fluid level is in the acceptable range, push the
dipstick back in all the way.
5-19