2005 CHEVROLET AVALANCHE tailgate
[x] Cancel search: tailgatePage 215 of 496

Lock Doors
Press the customization button until LOCK DOORS
appears in the display. To select your preference
for automatic locking, press the select button while
LOCK DOORS is displayed on the DIC. Pressing the
select button will scroll through the following choices:
LOCK DOORS: IN GEAR (default):The doors will lock
when the vehicle is shifted out of PARK (P).
LOCK DOORS: WITH SPEED:The doors will lock
when the vehicle speed is above 8 mph (13 km/h) for
three seconds.
Choose one of the available options and press the
customization button while it is displayed on the DIC to
select it and move on to the next feature. For more
information on automatic door locks, seeProgrammable
Automatic Door Locks on page 2-10.
Unlock Doors
Press the customization button until UNLOCK DOORS
appears in the display. To select your preference for
automatic unlocking, press the select button while
UNLOCK DOORS is displayed on the DIC. Pressing the
select button will scroll through the following choices:
UNLOCK DOORS: IN PARK (default):All of the doors
will unlock when the vehicle is shifted into PARK (P).UNLOCK DRIVER: IN PARK:The driver’s door will be
unlocked when the vehicle is shifted into PARK (P).
UNLOCK DOORS: KEY OUT:All of the doors
will unlock when the key is taken out of the ignition.
UNLOCK DOORS: MANUALLY:The doors will not be
unlocked automatically.
Choose one of the available options and press the
customization button while it is displayed on the DIC to
select it and move on to the next feature. For more
information on automatic door locks, seeProgrammable
Automatic Door Locks on page 2-10.
Door Lock Delay
If your DIC does not have this feature, you can still
program the delayed locking feature. SeeDelayed
Locking on page 2-9for more information.
When locking the doors with the power lock switch or
the remote keyless entry transmitter and a door or
the tailgate is open, the delayed locking feature
will delay locking the doors and tailgate until
�ve seconds after the last door is closed.
3-59
Page 216 of 496

Press the customization button until DOOR LOCK
DELAY appears in the display. To select your
preference for delayed locking, press the select button
while DOOR LOCK DELAY is displayed on the DIC.
Pressing the select button will scroll through the
following choices:
DOOR LOCK DELAY: OFF (default):The doors will
lock immediately when pressing the power lock switch or
the lock button on the remote keyless entry transmitter.
DOOR LOCK DELAY: ON:The doors will not lock
until �ve seconds after the last door or the tailgate is
closed. You will hear three chimes to signal that
the delayed locking feature is in use. You can
temporarily override delayed locking by pressing the
lock button on the door or the remote keyless entry
transmitter a second time.
Choose one of the available options and press the
customization button while it is displayed on the DIC to
select it and move on to the next feature.
This feature will not operate if the key is in the ignition.Lock Feedback
Press the customization button until LOCK FEEDBACK
appears in the display. To select your preference for
the feedback you receive when locking the vehicle with
the remote keyless entry transmitter, press the select
button while LOCK FEEDBACK is displayed on the DIC.
Pressing the select button will scroll through the
following choices:
LOCK FEEDBACK: BOTH (default):The parking
lamps will �ash each time you press the button with the
lock symbol on the remote keyless entry transmitter
and the horn will chirp the second time you press the
lock button.
LOCK FEEDBACK: LAMPS:The parking lamps will
�ash each time you press the button with the lock
symbol on the remote keyless entry transmitter.
LOCK FEEDBACK: HORN:The horn will chirp the
second time you press the button with the lock symbol
on the remote keyless entry transmitter.
LOCK FEEDBACK: OFF:There will be no feedback
when locking the vehicle.
Choose one of the available options and press the
customization button while it is displayed on the DIC to
select it and move on to the next feature.
3-60
Page 395 of 496

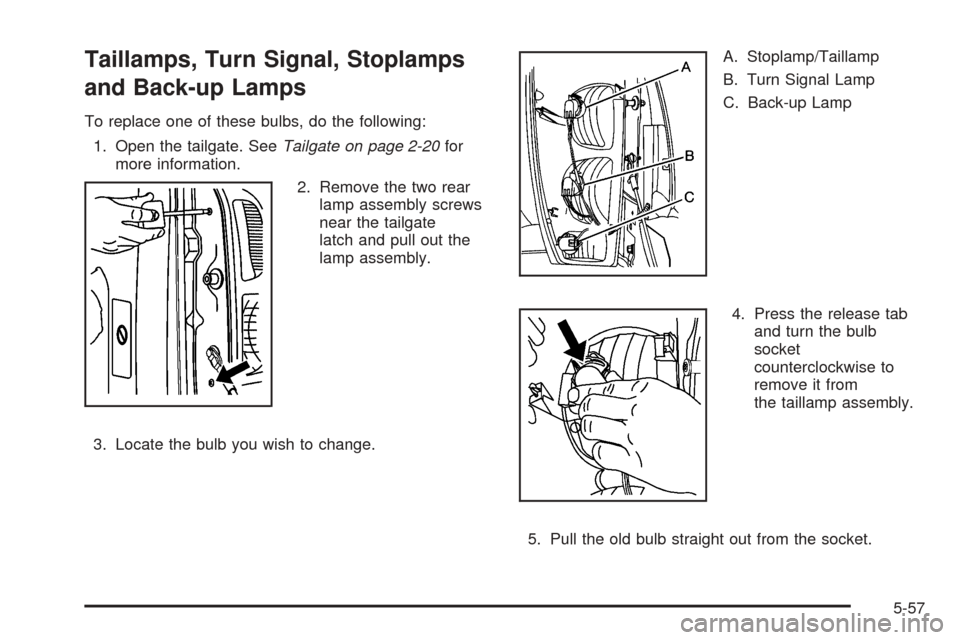
Taillamps, Turn Signal, Stoplamps
and Back-up Lamps
To replace one of these bulbs, do the following:
1. Open the tailgate. SeeTailgate on page 2-20for
more information.
2. Remove the two rear
lamp assembly screws
near the tailgate
latch and pull out the
lamp assembly.
3. Locate the bulb you wish to change.A. Stoplamp/Taillamp
B. Turn Signal Lamp
C. Back-up Lamp
4. Press the release tab
and turn the bulb
socket
counterclockwise to
remove it from
the taillamp assembly.
5. Pull the old bulb straight out from the socket.
5-57
Page 460 of 496

(b)Visually inspect front and rear suspension and
steering system for damaged, loose, or missing parts,
signs of wear or lack of lubrication. Inspect power
steering lines and hoses for proper hook-up, binding,
leaks, cracks, cha�ng, etc. Visually check constant
velocity joints, rubber boots, and axle seals for leaks.
(c)Visually inspect hoses and have them replaced
if they are cracked, swollen, or deteriorated. Inspect all
pipes, �ttings, and clamps; replace with genuine GM
parts as needed. To help ensure proper operation,
a pressure test of the cooling system and pressure cap
and cleaning the outside of the radiator and air
conditioning condenser is recommended at least once a
year.
(d)Visually inspect wiper blades for wear or cracking.
Replace wiper blades that appear worn or damaged
or that streak or miss areas of the windshield.
(e)Make sure the safety belt reminder light and all your
belts, buckles, latch plates, retractors, and anchorages
are working properly. Look for any other loose or
damaged safety belt system parts. If you see anything
that might keep a safety belt system from doing its
job, have it repaired. Have any torn or frayed safety belts
replaced. Also look for any opened or broken airbag
coverings, and have them repaired or replaced.
The airbag system does not need regular maintenance.(f)Lubricate all key lock cylinders, hood latch assembly,
secondary latch, pivots, spring anchor, release pawl,
midgate hinges, side storage box door hinges, tailgate
hinges, tailgate linkage, outer tailgate handle pivot
points, latch bolt, fuel door hinge, locks, and folding seat
hardware. More frequent lubrication may be required
when exposed to a corrosive environment. Applying
silicone grease on weatherstrips with a clean cloth will
make them last longer, seal better, and not stick or
squeak.
(g)Check vent hose at transfer case for kinks and
proper installation.
(h)Change automatic transmission �uid and �lter if the
vehicle is mainly driven under one or more of these
conditions:
�In heavy city traffic where the outside temperature
regularly reaches 90°F (32°C) or higher.
�In hilly or mountainous terrain.
�When doing frequent trailer towing.
�Uses such as found in taxi, police, or delivery
service.
(i)Drain, �ush, and re�ll cooling system. This service
can be complex; you should have your dealer perform
this service. See Engine Coolant on page 5-25 for
what to use. Inspect hoses. Clean radiator, condenser,
pressure cap, and �ller neck. Pressure test the
cooling system and pressure cap.
6-8
Page 466 of 496

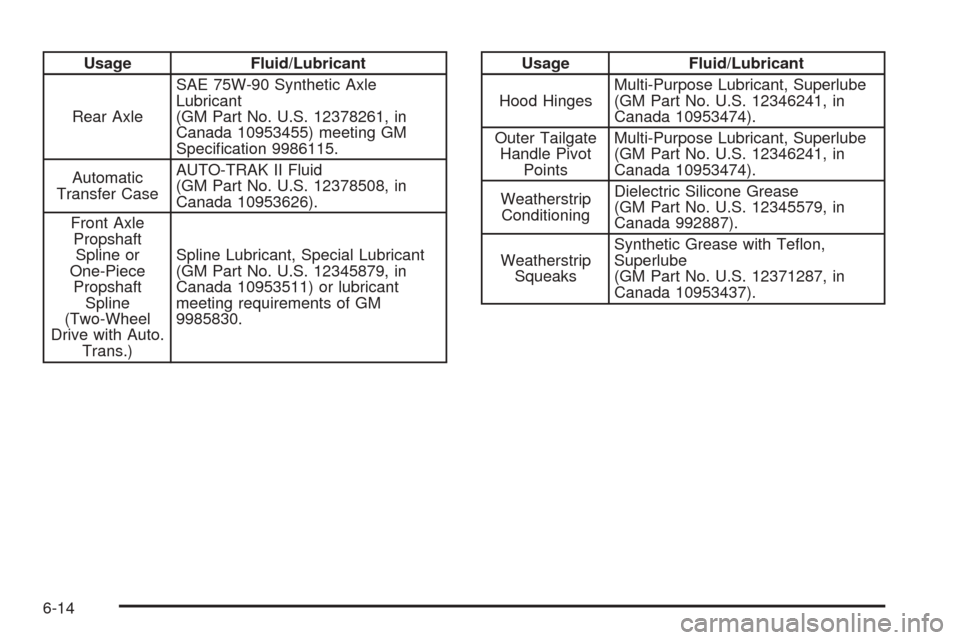
Usage Fluid/Lubricant
Rear AxleSAE 75W-90 Synthetic Axle
Lubricant
(GM Part No. U.S. 12378261, in
Canada 10953455) meeting GM
Speci�cation 9986115.
Automatic
Transfer CaseAUTO-TRAK II Fluid
(GM Part No. U.S. 12378508, in
Canada 10953626).
Front Axle
Propshaft
Spline or
One-Piece
Propshaft
Spline
(Two-Wheel
Drive with Auto.
Trans.)Spline Lubricant, Special Lubricant
(GM Part No. U.S. 12345879, in
Canada 10953511) or lubricant
meeting requirements of GM
9985830.Usage Fluid/Lubricant
Hood HingesMulti-Purpose Lubricant, Superlube
(GM Part No. U.S. 12346241, in
Canada 10953474).
Outer Tailgate
Handle Pivot
PointsMulti-Purpose Lubricant, Superlube
(GM Part No. U.S. 12346241, in
Canada 10953474).
Weatherstrip
ConditioningDielectric Silicone Grease
(GM Part No. U.S. 12345579, in
Canada 992887).
Weatherstrip
SqueaksSynthetic Grease with Te�on,
Superlube
(GM Part No. U.S. 12371287, in
Canada 10953437).
6-14
Page 494 of 496

Steering Wheel Controls, Audio.......................3-102
Steering Wheel, Tilt Wheel................................. 3-6
Storage Areas
All-Weather Cargo Area................................2-70
Center Console Storage Area........................2-58
Center Overhead Console.............................2-57
Front Armrest Storage Area...........................2-57
Glove Box..................................................2-57
Luggage Carrier..........................................2-58
Rear Storage Area.......................................2-59
Top-Box Storage..........................................2-74
Stuck in Sand, Mud, Ice or Snow......................4-45
Sun Visors.....................................................2-23
Sunroof.........................................................2-81
T
Tachometer....................................................3-31
Tailgate.........................................................2-20
Taillamps
Turn Signal, Stoplamps and Back-up Lamps....5-57
Theft-Deterrent, Radio....................................3-102
Theft-Deterrent Systems...................................2-24
Content Theft-Deterrent................................2-24
Passlock
®...................................................2-26
Throttle, Adjustable..........................................2-29Tilt Wheel........................................................ 3-6
Tires.............................................................5-59
Aluminum or Chrome-Plated Wheels,
Cleaning...............................................5-100
Buying New Tires........................................5-69
Chains.......................................................5-74
Changing a Flat Tire....................................5-75
Cleaning...................................................5-100
If a Tire Goes Flat.......................................5-74
In�ation -- Tire Pressure...............................5-66
Inspection and Rotation................................5-67
Installing the Spare Tire................................5-80
Removing the Flat Tire.................................5-80
Removing the Spare Tire and Tools...............5-76
Secondary Latch System..............................5-87
Spare Tire..................................................5-93
Storing a Flat or Spare Tire and Tools............5-91
Tire Sidewall Labelling..................................5-60
Tire Terminology and De�nitions....................5-63
Uniform Tire Quality Grading.........................5-71
Wheel Alignment and Tire Balance.................5-72
Wheel Replacement.....................................5-72
When It Is Time for New Tires......................5-69
Tonneau Cover...............................................2-75
Top Strap......................................................1-40
12