Page 261 of 470

Before You Go Off-Roading
There are some things to do before you go out. For
example, be sure to have all necessary maintenance
and service work done. Check to make sure all
underbody shields (if equipped) are properly attached.
Is there enough fuel? Is the spare tire fully in�ated? Are
the �uid levels up where they should be? What are
the local laws that apply to off-roading where you will be
driving? If you do not know, you should check with
law enforcement people in the area. Will you be
on someone’s private land? If so, be sure to get the
necessary permission.
Loading Your Vehicle for Off-Road
Driving
There are some important things to remember about
how to load your vehicle.
The heaviest things should be on the load �oor and
forward of your rear axle. Put heavier items as far
forward as you can.
Be sure the load is secured properly, so driving on
the off-road terrain does not toss things around.
{CAUTION:
Cargo on the load �oor piled higher than
the seatbacks can be thrown forward
during a sudden stop. You or your
passengers could be injured. Keep cargo
below the top of the seatbacks.
Unsecured cargo on the load �oor can be
tossed about when driving over rough
terrain. You or your passengers can be
struck by �ying objects. Secure the cargo
properly.
Heavy loads on the roof raise the vehicle’s
center of gravity, making it more likely to
roll over. You can be seriously or fatally
injured if the vehicle rolls over. Put heavy
loads inside the cargo area, not on the
roof. Keep cargo in the cargo area as far
forward and low as possible.
You will �nd other important information in this manual.
SeeLoading Your Vehicle on page 4-44,Luggage
Carrier on page 2-41andTires on page 5-59.
4-17
Page 282 of 470
Winter Driving
Here are some tips for winter driving:
Have your vehicle in good shape for winter.
You may want to put winter emergency supplies in
your vehicle.
Also seeTires on page 5-59.Include an ice scraper, a small brush or broom, a
supply of windshield washer �uid, a rag, some winter
outer clothing, a small shovel, a �ashlight, a red
cloth, and a couple of re�ective warning triangles. And,
if you will be driving under severe conditions, include
a small bag of sand, a piece of old carpet, or a couple of
burlap bags to help provide traction. Be sure you
properly secure these items in your vehicle.
Driving on Snow or Ice
Most of the time, those places where your tires meet
the road probably have good traction.
However, if there is snow or ice between your tires and
the road, you can have a very slippery situation. You
will have a lot less traction, or grip, and will need to be
very careful.
4-38
Page 292 of 470

Your dealer can help you with this. Be sure to spread
out your load equally on both sides of the centerline.
Never exceed the GVWR for your vehicle, or the GAWR
for either the front or rear axle.
And, if you do have a heavy load, you should spread
it out.
{CAUTION:
Do not load your vehicle any heavier than the
Gross Vehicle Weight Rating (GVWR), or either
the maximum front or rear Gross Axle Weight
Rating (GAWR). If you do, parts on your
vehicle can break, and it can change the way
your vehicle handles. These could cause you
to lose control and crash. Also, overloading
can shorten the life of your vehicle.
Your warranty does not cover parts or components that
fail because of overloading.
The label will help you decide how much cargo and
installed equipment your truck can carry.
Using heavier suspension components to get added
durability might not change your weight ratings. Ask your
dealer to help you load your vehicle the right way.If you put things inside your vehicle — like suitcases,
tools, packages, or anything else — they go as fast as
the vehicle goes. If you have to stop or turn quickly,
or if there is a crash, they’ll keep going.
{CAUTION:
Things you put inside your vehicle can strike
and injure people in a sudden stop or turn, or
in a crash.
Put things in the cargo area of your
vehicle. Try to spread the weight evenly.
Never stack heavier things, like suitcases,
inside the vehicle so that some of them
are above the tops of the seats.
Do not leave an unsecured child restraint
in your vehicle.
When you carry something inside the
vehicle, secure it whenever you can.
Do not leave a seat folded down unless
you need to.
There’s also important loading information for off-road
driving in this manual. See “Loading Your Vehicle
for Off-Road Driving” underOperating Your
All-Wheel-Drive Vehicle Off Paved Roads on page 4-16.
4-48
Page 301 of 470

Towing a trailer requires a certain amount of experience.
Before setting out for the open road, you’ll want to get
to know your rig. Acquaint yourself with the feel of
handling and braking with the added weight of the trailer.
And always keep in mind that the vehicle you are
driving is now a good deal longer and not nearly as
responsive as your vehicle is by itself.
Before you start, check all trailer hitch parts and
attachments, safety chains, electrical connector, lamps,
tires and mirror adjustment. If the trailer has electric
brakes, start your vehicle and trailer moving and then
apply the trailer brake controller by hand to be sure
the brakes are working. This lets you check your
electrical connection at the same time.
During your trip, check occasionally to be sure that the
load is secure, and that the lamps and any trailer
brakes are still working.Following Distance
Stay at least twice as far behind the vehicle ahead as
you would when driving your vehicle without a trailer.
This can help you avoid situations that require
heavy braking and sudden turns.
Passing
You’ll need more passing distance up ahead when
you’re towing a trailer. And, because you’re a good deal
longer, you’ll need to go much farther beyond the
passed vehicle before you can return to your lane.
Backing Up
Hold the bottom of the steering wheel with one hand.
Then, to move the trailer to the left, just move that hand
to the left. To move the trailer to the right, move your
hand to the right. Always back up slowly and, if possible,
have someone guide you.
4-57
Page 332 of 470

Coolant Surge Tank Pressure Cap
Notice:If the pressure cap is not tightly installed,
coolant loss and possible engine damage may
occur. Be sure the cap is properly and tightly
secured.
The coolant surge tank pressure cap must be fully
installed on the coolant surge tank. SeeEngine
Compartment Overview on page 5-12for more
information on location.
Engine Overheating
You will �nd a coolant temperature gage on your
vehicle’s instrument panel cluster. SeeEngine Coolant
Temperature Gage on page 3-41.
In addition, you will �nd an ENGINE COOLANT HOT,
ENGINE OVERHEATED and a REDUCED ENGINE
POWER message in the Driver Information Center (DIC)
on the instrument panel. SeeDIC Warnings and
Messages on page 3-53.
If Steam Is Coming From Your Engine
{CAUTION:
Steam from an overheated engine can burn
you badly, even if you just open the hood. Stay
away from the engine if you see or hear steam
coming from it. Just turn it off and get
everyone away from the vehicle until it cools
down. Wait until there is no sign of steam or
coolant before you open the hood.
If you keep driving when your engine is
overheated, the liquids in it can catch �re. You
or others could be badly burned. Stop your
engine if it overheats, and get out of the
vehicle until the engine is cool.
SeeOverheated Engine Protection Operating
Mode on page 5-28for information on driving
to a safe place in an emergency.
5-26
Page 376 of 470

Make sure the spare tire is stored securely. Push, pull,
and then try to rotate or turn the tire. If it moves,
use the ratchet/wheel wrench to tighten the cable. See
Changing a Flat Tire on page 5-77.
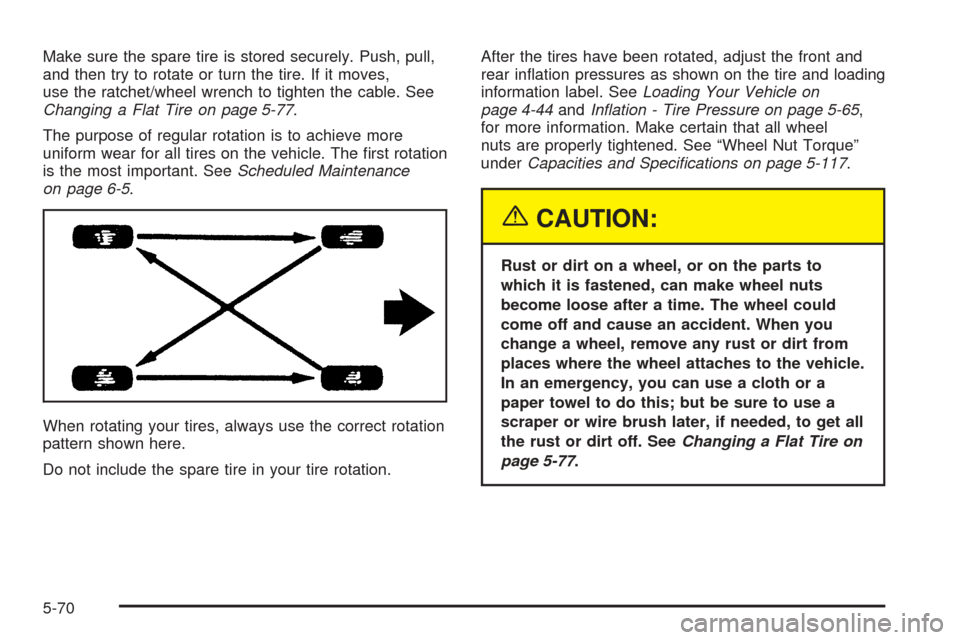
The purpose of regular rotation is to achieve more
uniform wear for all tires on the vehicle. The �rst rotation
is the most important. SeeScheduled Maintenance
on page 6-5.
When rotating your tires, always use the correct rotation
pattern shown here.
Do not include the spare tire in your tire rotation.After the tires have been rotated, adjust the front and
rear in�ation pressures as shown on the tire and loading
information label. SeeLoading Your Vehicle on
page 4-44andIn�ation - Tire Pressure on page 5-65,
for more information. Make certain that all wheel
nuts are properly tightened. See “Wheel Nut Torque”
underCapacities and Speci�cations on page 5-117.
{CAUTION:
Rust or dirt on a wheel, or on the parts to
which it is fastened, can make wheel nuts
become loose after a time. The wheel could
come off and cause an accident. When you
change a wheel, remove any rust or dirt from
places where the wheel attaches to the vehicle.
In an emergency, you can use a cloth or a
paper towel to do this; but be sure to use a
scraper or wire brush later, if needed, to get all
the rust or dirt off. SeeChanging a Flat Tire on
page 5-77.
5-70
Page 396 of 470
5. If the spare does not lower, turn the wrench
counterclockwise until approximately 6 inches
(15 cm) of cable is exposed.
6. Stand the wheel blocks on their shortest ends, with
the backs facing each other.
7. Place the bottom edge
of the jack (A) on the
wheel blocks (B),
separating them so that
the jack is balanced
securely.
8. Attach the jack handle, extension, and wheel
wrench to the jack and place it (with the wheel
blocks) under the vehicle toward the front of the
rear bumper.
5-90
Page 400 of 470
4. Insert the hoist
end (F) through the
hole (G) in the
rear bumper and into
the hoist shaft.
5. Raise the tire part way upward. Make sure the
retainer is seated in the wheel opening.
6. Raise the tire fully against the underside of the
vehicle by turning the wheel wrench clockwise
until you hear two clicks or feel it skip twice. You
cannot overtighten the cable.7. Make sure the tire is stored securely. Push, pull (A),
and then try to turn (B) the tire. If the tire moves,
use the wheel wrench to tighten the cable.
8. Reinstall the spare tire lock (if equipped).
5-94