2005 BUICK LACROSSE instrument panel
[x] Cancel search: instrument panelPage 125 of 410

Setting Cruise Control
{CAUTION:
If you leave your cruise control on when you
are not using cruise, you might hit a button
and go into cruise when you do not want to.
You could be startled and even lose control.
Keep the cruise control switch off until you
want to use cruise control.
1. Press the cruise on/off button. The indicator light in
the button will come on.
2. Get up to the speed you want.
3. Press the SET−button. The cruise symbol will
display in the instrument panel cluster when the
system is engaged.
4. Take your foot off the accelerator pedal.
Resuming a Set Speed
Suppose you set your cruise control at a desired speed
and then you apply the brake. This, of course,
disengages the cruise control. The cruise symbol in the
instrument panel cluster will go out, indicating cruise
control is no longer engaged.To return to your previously set speed, press the
RES + button once you are going about 25 mph
(40 km/h) or more.
You will go right back up to your chosen speed and
stay there.
If you hold the RES + button, the vehicle will keep
going faster until you release the button or apply the
brake. So unless you want to go faster, do not hold the
RES + button.
Increasing Speed While Using Cruise
Control
There are two ways to go to a higher speed:
Use the accelerator pedal to get to the higher
speed. Press the SET−button, then release
the button and the accelerator pedal. You’ll now
cruise at the higher speed.
Press the RES + button. Hold it there until you get
up to the speed you want, and then release the
button. To increase your speed in very small
amounts, press the button brie�y. Each time you do
this, your vehicle will go about 1 mph (1.6 km/h)
faster.
3-11
Page 127 of 410

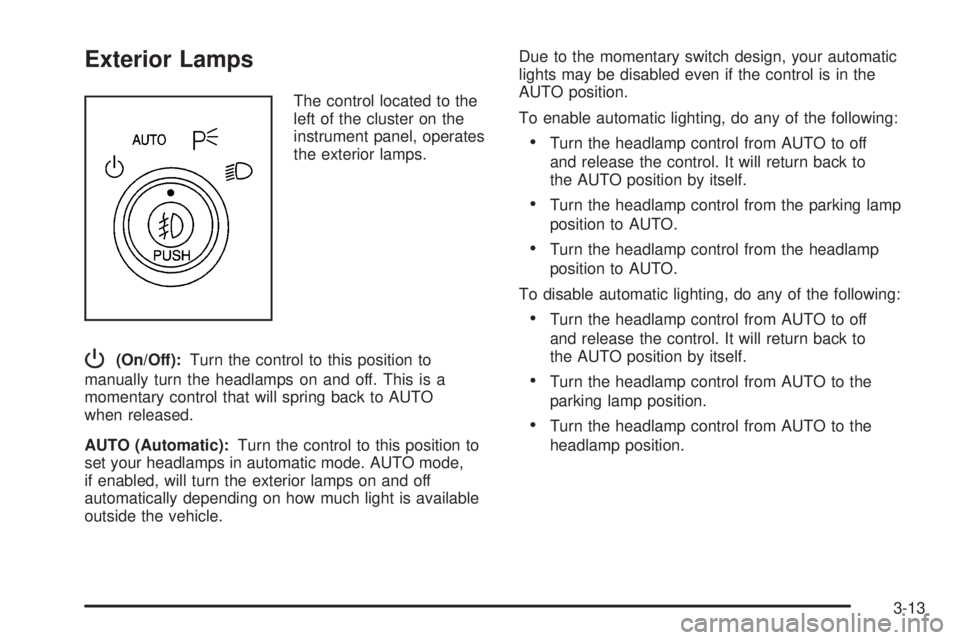
Exterior Lamps
The control located to the
left of the cluster on the
instrument panel, operates
the exterior lamps.
P(On/Off):Turn the control to this position to
manually turn the headlamps on and off. This is a
momentary control that will spring back to AUTO
when released.
AUTO (Automatic):Turn the control to this position to
set your headlamps in automatic mode. AUTO mode,
if enabled, will turn the exterior lamps on and off
automatically depending on how much light is available
outside the vehicle.Due to the momentary switch design, your automatic
lights may be disabled even if the control is in the
AUTO position.
To enable automatic lighting, do any of the following:
Turn the headlamp control from AUTO to off
and release the control. It will return back to
the AUTO position by itself.
Turn the headlamp control from the parking lamp
position to AUTO.
Turn the headlamp control from the headlamp
position to AUTO.
To disable automatic lighting, do any of the following:
Turn the headlamp control from AUTO to off
and release the control. It will return back to
the AUTO position by itself.
Turn the headlamp control from AUTO to the
parking lamp position.
Turn the headlamp control from AUTO to the
headlamp position.
3-13
Page 128 of 410

<(Parking Lamps):Turn the control to this
position to turn on the parking lamps together with
the following:
Taillamps
License Plate Lamps
Sidemarker Lamps
Instrument Panel Lights
2(Headlamps):Turn the control to this position to
turn your headlamps on, together with the previously
listed lamps and lights.
A warning chime will sound if the driver’s door is
opened when the ignition switch is turned to OFF or
ACCESSORY and the headlamps are on.
-(Foglamps):Press this button to turn the
foglamps on and off. SeeFog Lamps on page 3-15
for additional information.
Daytime Running Lamps
(DRL)/Automatic Headlamp System
Daytime Running Lamps (DRL) can make it easier
for others to see the front of your vehicle during the day.
DRL can be helpful in many different driving conditions,
but they can be especially helpful in the short periods
after dawn and before sunset. Daytime running
lamps are required to function at all times on all vehicles
�rst sold in Canada.
A light sensor on top of the instrument panel makes the
DRL work, so be sure it is not covered.
The DRL system will make the low-beam headlamps
come on at reduced brightness when the following
conditions are met:
The ignition is on.
The exterior lamps control is off.
The parking brake is released.
While the DRL are on, only the vehicle’s low-beam
headlamps will be on at reduced brightness. The turn
signal, taillamps, sidemarker and other lamps will not be
on. The instrument panel will not be lit up either.
When it is dark enough outside, the DRL will turn off
and the vehicle’s headlamps and parking lamps will turn
on. The other lamps that come on with the headlamps
will also come on.
3-14
Page 130 of 410

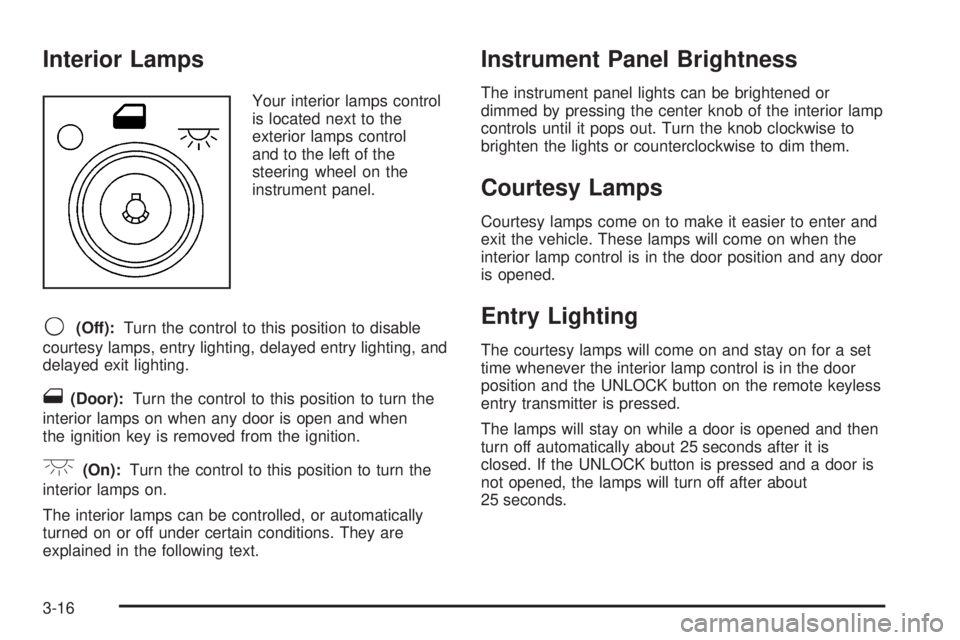
Interior Lamps
Your interior lamps control
is located next to the
exterior lamps control
and to the left of the
steering wheel on the
instrument panel.
9(Off):Turn the control to this position to disable
courtesy lamps, entry lighting, delayed entry lighting, and
delayed exit lighting.
1(Door):Turn the control to this position to turn the
interior lamps on when any door is open and when
the ignition key is removed from the ignition.
+(On):Turn the control to this position to turn the
interior lamps on.
The interior lamps can be controlled, or automatically
turned on or off under certain conditions. They are
explained in the following text.
Instrument Panel Brightness
The instrument panel lights can be brightened or
dimmed by pressing the center knob of the interior lamp
controls until it pops out. Turn the knob clockwise to
brighten the lights or counterclockwise to dim them.
Courtesy Lamps
Courtesy lamps come on to make it easier to enter and
exit the vehicle. These lamps will come on when the
interior lamp control is in the door position and any door
is opened.
Entry Lighting
The courtesy lamps will come on and stay on for a set
time whenever the interior lamp control is in the door
position and the UNLOCK button on the remote keyless
entry transmitter is pressed.
The lamps will stay on while a door is opened and then
turn off automatically about 25 seconds after it is
closed. If the UNLOCK button is pressed and a door is
not opened, the lamps will turn off after about
25 seconds.
3-16
Page 136 of 410

9(Fan):Turn the knob by this symbol, located on the
left side of the climate control panel, clockwise or
counterclockwise to increase or decrease the fan speed.
During the highest fan speed selections, the fan
speed will be temporarily reduced between the transition
to a new mode. The fan will resume the original
speed when the transition to the new mode is complete.
Temperature Control:Turn the center knob clockwise
or counterclockwise to increase or decrease the
temperature inside your vehicle.
Use the right knob to select from the following modes:
H(Vent):This mode directs outside air to the
instrument panel outlets. If driving in city traffic, and the
vehicle is stopped and idling, or the weather is hot,
switch from this mode to the recirculation mode.
To prevent the air inside the vehicle from becoming
stale, be sure to return to the vent mode periodically.
)(Bi-Level):This mode directs half of the air to the
instrument panel outlets, and the remaining air to
the �oor outlets. Some air may be directed toward the
windshield. Slightly cooler air is directed to the
instrument panel outlets and warmer air is directed to
the �oor outlets.
6(Floor):This mode directs most of the air to the
�oor outlets with some air directed toward the side
window outlets and a little air directed to the windshield.
In this mode, the system will automatically use outside
air. The air conditioning compressor will be engaged
unless the outside temperature is 40°F (4°C) or below.
Recirculation cannot be selected when in this mode.
You can also select modes by using the
following buttons:
h(Recirculate):Press this button to recirculate
cabin air through the vehicle. It can be used to prevent
outside air and odors from entering your vehicle or
to help heat or cool the air inside your vehicle more
quickly. An indicator light below the button will come on
in this mode. Operation in this mode during periods
of high humidity and cool outside temperatures
may result in increased window fogging. If window
fogging is experienced, select the defrost mode.
3-22
Page 139 of 410

2. Press the PASS button or the up or down arrows
on the passenger side to turn the passenger
temperature set on and off. When turned on, the
passenger temperature will be the same as
the driver setting. Press the up or down arrow on
passenger side to adjust the passenger temperature
setting.
When the passenger temperature set is off, the
passenger display will be off and the driver’s
set temperature will be for the driver and passenger.
In cold weather, the system will start at reduced
fan speeds to avoid blowing cold air into the vehicle
until warmer air is available. The system will start
out blowing air at the �oor but may change
modes automatically as the vehicle warms up to
maintain the chosen temperature setting. The length
of time needed for warm up will depend on the
outside temperature and the length of time that has
elapsed since the vehicle was last driven.
3. Wait for the system to regulate. This may take from
10 to 30 minutes. Then, adjust the temperature, if
necessary.
Do not cover the solar sensor located in the center
of the instrument panel, near the windshield. For
more information on the solar sensor, see “Sensors”
later in this section.4. Press OFF to turn the climate control system off.
Only the rear defog and heated seats will function.
Press AUTO or any other button except the
heated seats or rear defog to turn the climate
control system back on.
This control has 4 types of operation.
Automatic can set/change the temperature
only. AUTO and temperature only will appear
on the display.
Semi-Automatic Fan can set/change the
temperature and mode. The fan operates
automatically. The temperature and mode will
appear on the display.
Semi-Automatic Mode can set/change the
temperature and fan speed. The mode operates
automatically. The fan speed and temperature will
appear on the display.
Manual can set/change the temperature, mode and
fan. The fan speed, temperature and mode will
appear on the display.
If your vehicle has the remote start feature, the climate
control system will automatically regulate the inside
temperature of your vehicle when the remote start
system is activated. Normal operation and the last
setting of the climate control system will return after the
key is turned to the ON position.
3-25
Page 140 of 410

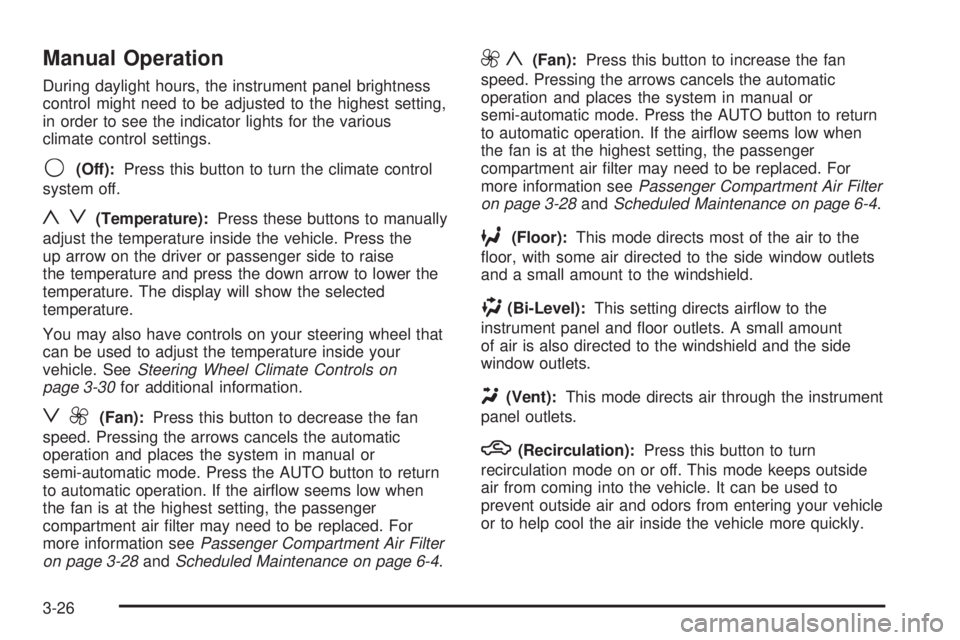
Manual Operation
During daylight hours, the instrument panel brightness
control might need to be adjusted to the highest setting,
in order to see the indicator lights for the various
climate control settings.
9(Off):Press this button to turn the climate control
system off.
yz(Temperature):Press these buttons to manually
adjust the temperature inside the vehicle. Press the
up arrow on the driver or passenger side to raise
the temperature and press the down arrow to lower the
temperature. The display will show the selected
temperature.
You may also have controls on your steering wheel that
can be used to adjust the temperature inside your
vehicle. SeeSteering Wheel Climate Controls on
page 3-30for additional information.
z9(Fan):Press this button to decrease the fan
speed. Pressing the arrows cancels the automatic
operation and places the system in manual or
semi-automatic mode. Press the AUTO button to return
to automatic operation. If the air�ow seems low when
the fan is at the highest setting, the passenger
compartment air �lter may need to be replaced. For
more information seePassenger Compartment Air Filter
on page 3-28andScheduled Maintenance on page 6-4.
9y(Fan):Press this button to increase the fan
speed. Pressing the arrows cancels the automatic
operation and places the system in manual or
semi-automatic mode. Press the AUTO button to return
to automatic operation. If the air�ow seems low when
the fan is at the highest setting, the passenger
compartment air �lter may need to be replaced. For
more information seePassenger Compartment Air Filter
on page 3-28andScheduled Maintenance on page 6-4.
6(Floor):This mode directs most of the air to the
�oor, with some air directed to the side window outlets
and a small amount to the windshield.
)(Bi-Level):This setting directs air�ow to the
instrument panel and �oor outlets. A small amount
of air is also directed to the windshield and the side
window outlets.
Y(Vent):This mode directs air through the instrument
panel outlets.
h(Recirculation):Press this button to turn
recirculation mode on or off. This mode keeps outside
air from coming into the vehicle. It can be used to
prevent outside air and odors from entering your vehicle
or to help cool the air inside the vehicle more quickly.
3-26
Page 141 of 410

Recirculation is not available while in the defrost or
�oor/defog modes. Using recirculation for long periods of
time may cause the air inside your vehicle to become too
dry. To prevent this from happening, after the air in your
vehicle has cooled, turn the recirculation mode off.
#(Air Conditioning):Press this button to turn the
air conditioning compressor on and off. The indicator
light on the button will come on when the air
conditioning is on.
((Heated Seats):Press this button to turn the driver
or passenger heated seats on and off. SeeHeated
Seats on page 1-5for additional information.
Defogging and Defrosting
Fog on the inside of windows is a result of high humidity
(moisture) condensing on the cool window glass. This
can be minimized if the climate control system is
used properly. There are two modes to clear fog or frost
from your windshield. Use the �oor/defog mode to
clear the windows of fog or moisture and warm
the passengers. Use defrost to remove fog or frost from
the windshield more quickly.
-(Floor/Defog):Press this button to direct the air
between the windshield, �oor outlets and side windows.
When you select this mode, the system turns
recirculation off and runs the air conditioning compressorunless the outside temperature is near or below
freezing. Pressing the recirculation button will have no
effect other than turning on the telltale light while in
�oor/defog mode.
1(Defrost):Press this button to direct most of the
air to the windshield, with some air directed to the
side windows. In this mode, the system will automatically
turn off the recirculation and run the air conditioning
compressor, unless the outside temperature is near or
below freezing. Pressing the recirculation button will
have no effect other than turning on the telltale
light while in defrost mode.
Do not drive the vehicle until all windows are clear.
Sensors
The solar sensor on the vehicle monitors the solar heat
and the air inside of the vehicle. This information is
used to maintain the selected temperature by initiating
needed adjustments to the temperature, the fan
speed, and the air delivery system. The system may
also supply cooler air to the side of the vehicle facing the
sun. The recirculation mode will also be activated, as
necessary. Do not cover the solar sensor located in the
center of the instrument panel, near the windshield,
or the system will not work properly.
3-27