2005 BMW Z4 ROADSTER 3.0I bulb
[x] Cancel search: bulbPage 15 of 120

At a glance
Controls
Driving tips
Mobility Reference
13
Colors
The indicator and warning lamps can light up in
various colors and combinations.
>Red:
Stop the vehicle immediately
or
an important reminder
>Red and yellow:
Continue driving cautiously
>Yellow:
Have the system checked soon
or
for your information
>Green or blue:
For your information. Engine oil pressure/Engine oil level/
Engine oil sensor
+86
Brake system
+
Parking brake released88
Parking brake applied37
With other warning lamps51
Brake warning lamp for Canadian
models
Antilock Brake System ABS/Driving
stability control systems
+50
Antilock Brake System ABS/Driving
stability control systems for Canadian
models
Dynamic Stability Control
DSC
+50
Dynamic Traction Control
DTC
+50
Flat Tire Monitor
+52
Automatic transmission/Sequential
manual gearbox SMG
+39, 41
Brake pads
+88
Add coolant87
Check gas cap
+76
Service engine soon
+90
Service engine soon indicator lamp for
Canadian models
Defective bulb56
Turn signal indicators42
Fog lamps57
Headlamp flasher/High beams42, 57
Electric Power Steering
+42
Doors or luggage compartment lid
open
Engine electronics
+
Malfunction in the engine electronics.
You can continue to drive with
reduced engine output or engine
speed. Please have the system
inspected by your BMW center.
Page 58 of 120

Lamps
56
Lamps
Parking lamps/Low beams
Parking lamps
The front, rear and side vehicle lighting
is switched on. You can use the parking
lamps to signal the position of the vehi-
cle when it is parked. For information on lighting
on one side of the vehicle for parking, which is
available as an additional feature, refer to
page57.
Low beams
When you switch off the ignition with
the low beam headlamps on, only the
parking lamps will remain on.
Defective bulb
The indicator lamp lights up:
At least one bulb of the vehicle's exte-
rior lighting has failed.
For replacing bulbs refer to page91.
Follow me home lamps
When you activate the headlamp flasher after
parking the vehicle and switching off the lights,
the low beams will come on for a brief period.
You can also have this function activated/
deactivated if you wish.<
LIGHTS ON warning
Whenever you open the driver's door after hav-
ing turned the ignition key to position 0, you will
hear an acoustic signal for a few seconds to remind you that the lamps have not been
switched off.
Daytime driving lamps*
If you desire, the light switch can be left in the
second position:
When the ignition is switched off, the external
lighting is also switched off.
You can have the activation settings for
the daytime driving lamps programmed
on your vehicle.<
Automatic headlamp control*
When the switch is set to this position,
the system automatically activates and
cancels the low beams in response to
changes in ambient light, for example in tun-
nels, at dusk, and when it is raining or snowing.
The low-beam headlamps remain on
regardless of the ambient light when you
switch on the fog lamps.<
Automatic headlamp control cannot
serve as a substitute for the driver's jud-
gement in determining when the vehicle lights
should be switched on. For example, the sen-
sors are not able to detect fog. To avoid safety
risks, you should respond to these kinds of low-
visibility situations by switching the headlamps
on manually.<
You can have the sensitivity of your vehi-
cle's automatic headlamp control
adjusted.<
Page 93 of 120

Reference
At a glance
Controls
Driving tips
Mobility
91
Replacement procedures
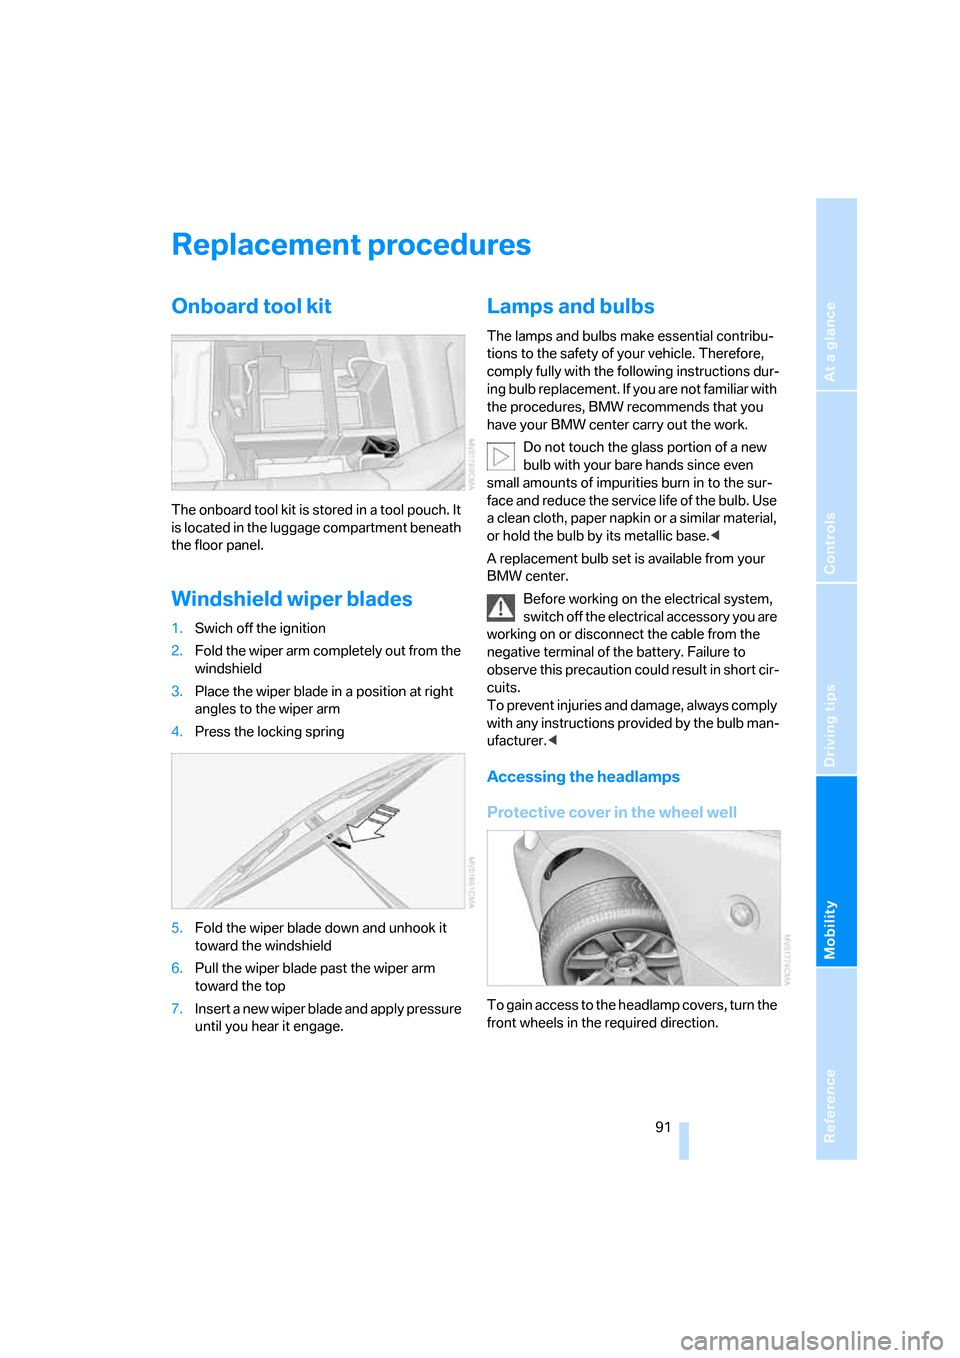
Onboard tool kit
The onboard tool kit is stored in a tool pouch. It
is located in the luggage compartment beneath
the floor panel.
Windshield wiper blades
1.Swich off the ignition
2.Fold the wiper arm completely out from the
windshield
3.Place the wiper blade in a position at right
angles to the wiper arm
4.Press the locking spring
5.Fold the wiper blade down and unhook it
toward the windshield
6.Pull the wiper blade past the wiper arm
toward the top
7.Insert a new wiper blade and apply pressure
until you hear it engage.
Lamps and bulbs
The lamps and bulbs make essential contribu-
tions to the safety of your vehicle. Therefore,
comply fully with the following instructions dur-
ing bulb replacement. If you are not familiar with
the procedures, BMW recommends that you
have your BMW center carry out the work.
Do not touch the glass portion of a new
bulb with your bare hands since even
small amounts of impurities burn in to the sur-
face and reduce the service life of the bulb. Use
a clean cloth, paper napkin or a similar material,
or hold the bulb by its metallic base.<
A replacement bulb set is available from your
BMW center.
Before working on the electrical system,
switch off the electrical accessory you are
working on or disconnect the cable from the
negative terminal of the battery. Failure to
observe this precaution could result in short cir-
cuits.
To prevent injuries and damage, always comply
with any instructions provided by the bulb man-
ufacturer.<
Accessing the headlamps
Protective cover in the wheel well
To gain access to the headlamp covers, turn the
front wheels in the required direction.
Page 94 of 120

Replacement procedures
92 1.Open the caps with a suitable object, e.g. a
coin or screwdriver
2.Fold up the protective cover in the wheel
well.
Headlamp cover
1.Pull the wire clamp out straight
2.Pull the wire clamp past the catches, see
arrows, and fold it down
3.Flip the headlamp cover open and remove.
Reinstall the headlamp cover carefully. If
it is not on tight, the headlamp installation
could be damaged.<
Reinstall the headlamp cover in reverse order.
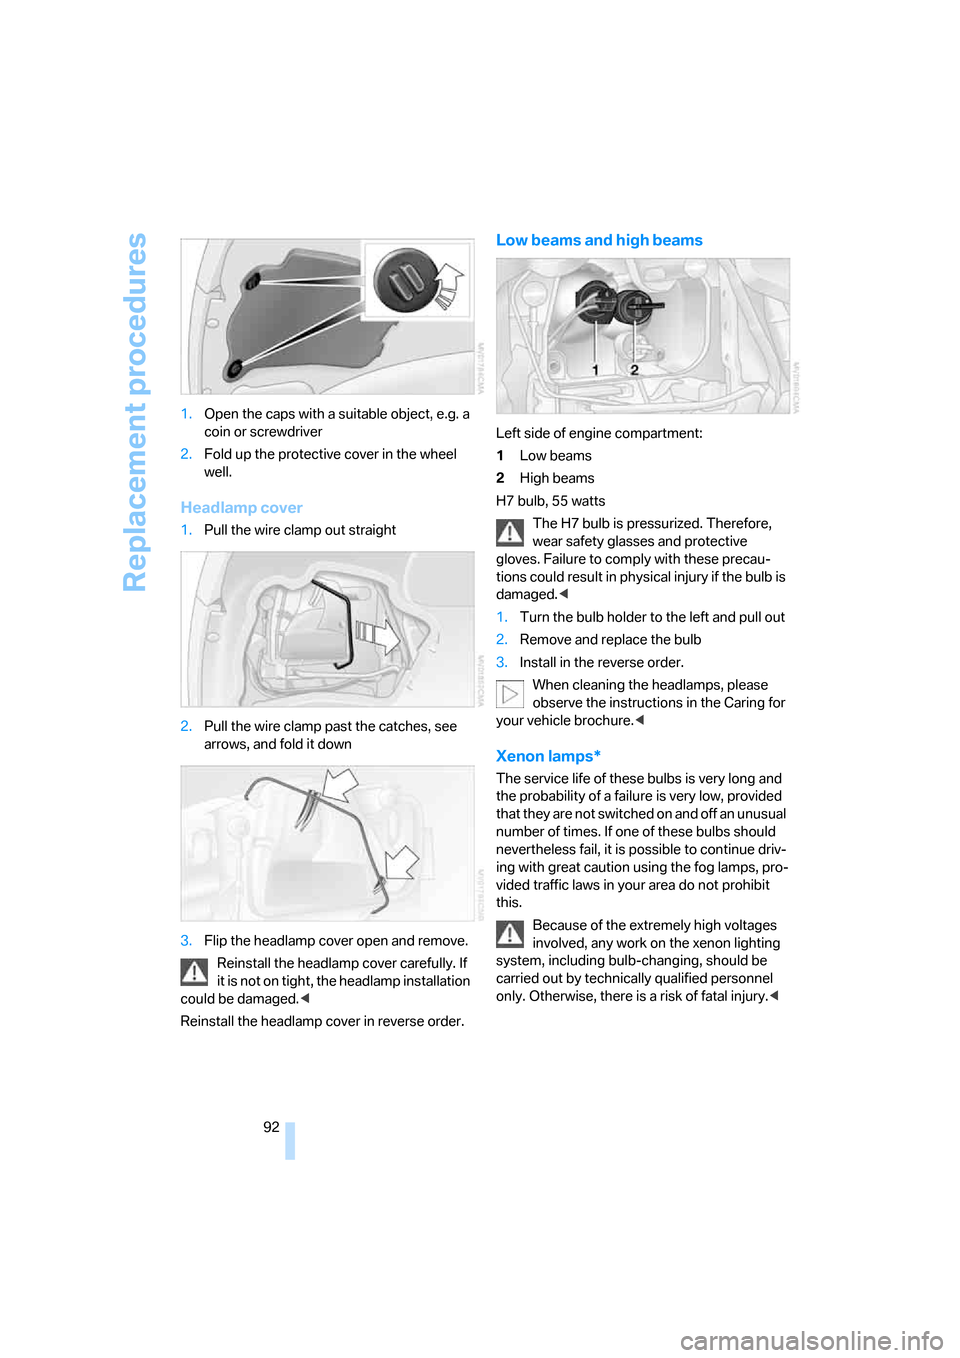
Low beams and high beams
Left side of engine compartment:
1Low beams
2High beams
H7 bulb, 55 watts
The H7 bulb is pressurized. Therefore,
wear safety glasses and protective
gloves. Failure to comply with these precau-
tions could result in physical injury if the bulb is
damaged.<
1.Turn the bulb holder to the left and pull out
2.Remove and replace the bulb
3.Install in the reverse order.
When cleaning the headlamps, please
observe the instructions in the Caring for
your vehicle brochure.<
Xenon lamps*
The service life of these bulbs is very long and
the probability of a failure is very low, provided
that they are not switched on and off an unusual
number of times. If one of these bulbs should
nevertheless fail, it is possible to continue driv-
ing with great caution using the fog lamps, pro-
vided traffic laws in your area do not prohibit
this.
Because of the extremely high voltages
involved, any work on the xenon lighting
system, including bulb-changing, should be
carried out by technically qualified personnel
only. Otherwise, there is a risk of fatal injury.<
Page 95 of 120

Reference
At a glance
Controls
Driving tips
Mobility
93
Front turn signal indicators
21 watt bulb
1.Insert a Phillips-head screwdriver from the
onboard toolkit into the appropriate open-
ing, arrows1
2.Turn the screwdriver to the left, arrows2
3.Use the Phillips-head screwdriver to pull
out the entire bulb holder
4.Replace the bulb
5.Install in the reverse order.
Side turn signal indicators
5 watt bulb
1.Turn the lamp to the left and remove
2.Apply gentle pressure to the bulb while
turning it to the left to remove
3.Install in the reverse order.
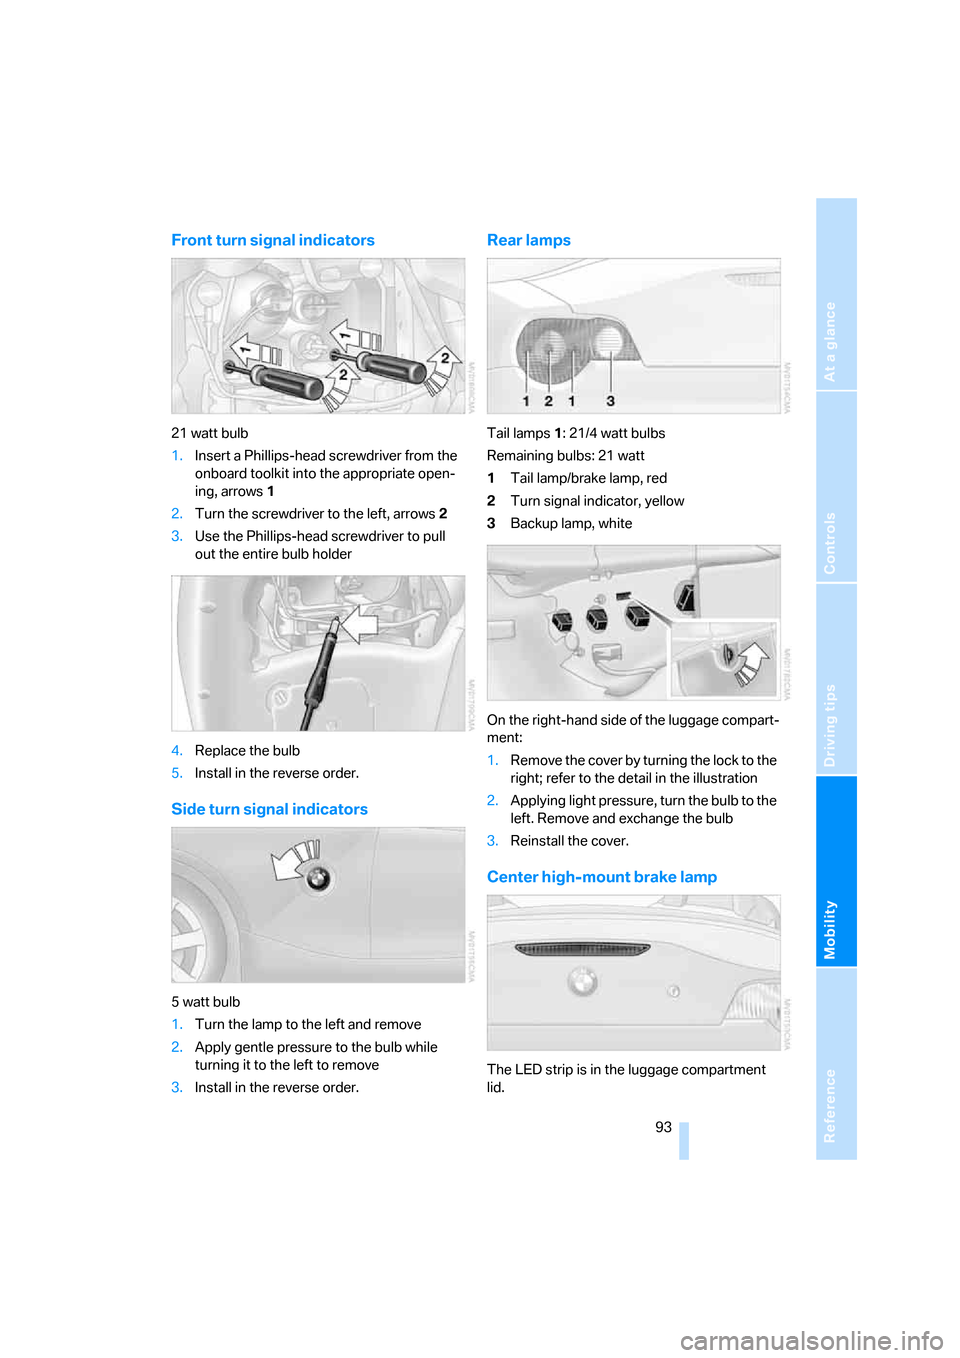
Rear lamps
Tail lamps1: 21/4 watt bulbs
Remaining bulbs: 21 watt
1Tail lamp/brake lamp, red
2Turn signal indicator, yellow
3Backup lamp, white
On the right-hand side of the luggage compart-
ment:
1.Remove the cover by turning the lock to the
right; refer to the detail in the illustration
2.Applying light pressure, turn the bulb to the
left. Remove and exchange the bulb
3.Reinstall the cover.
Center high-mount brake lamp
The LED strip is in the luggage compartment
lid.
Page 96 of 120

Replacement procedures
94 Please contact a BMW center in case of a mal-
function.
License plate lamps
5 watt bulb
1.Push out the lamp with a suitable object and
remove it
2.Replace the bulb.
Snap the lamp back into place.
Light-emitting diodes LEDs
Control elements, display units and other inte-
rior equipment in your vehicle use a light-emit-
ting diode behind a cover as a light source.
These light-emitting diodes are similar to con-
ventional lasers.
Do not remove the covers, and do not
look directly at the unfiltered light for sev-
eral hours. Otherwise, it can lead to retinal irrita-
tion of the eye.<
Changing a wheel
Run Flat tires
Your BMW is equipped with Run Flat tires.
Therefore, the wheel no longer has to be
changed immediately in the event of a loss in
inflation pressure.
Run Flat tires are labeled on the sidewall with a
circular symbol containing the letters RSC.
Refer to page82.
BMW recommends that you consult your BMW
center if you wish to replace the tires of your
B MW , o r change from summe r to winter tire s o r
vice versa.
Your BMW center knows how to work with Run Flat tires and is equipped with the necessary
special tools.
When mounting or replacing summer
tires with winter tires, or vice versa, use
only Run Flat tires since no spare wheel is avail-
able in the event of a flat.<
Jacking points
The jacking points are located at the positions
indicated in the illustration.
Your BMW center can provide you with a
suitable jack as an accessory.<
Vehicle battery
Maintenance
The battery is completely maintenance-free.
This means that the original electrolyte will nor-
mally last for the service life of the battery under
moderate climatic conditions. Your BMW cen-
ter will be happy to advise you if you have any
questions concerning the battery.
Indicator lamp
The indicator lamp lights up:
The battery is no longer being charged.
The alternator drive belt is defective or
there is a malfunction in the charging circuit of
the alternator. Please contact the nearest BMW
center.
If the drive belt is defective, pull over and
switch off the engine immediately to pre-
vent overheating and serious engine damage.
If the onboard supply voltage drops to a very
low level, increased steering effort may also be
necessary.<
Page 108 of 120

Everything from A to Z
106
A
ABS Antilock Brake
System50
– indicator lamp13
Acceleration assistant42
Accessories, refer to
– For your own safety6
– Your individual vehicle5
Accident, refer to Emergency
call96
Acknowledgment signal for
vehicle locking/unlocking16
Activated-charcoal filter63
Adjusting the thigh support29
Air, drying,
refer to Air conditioning
mode59,62
Airbags53
– deactivation33
– indicator lamp12
– passenger airbags indicator
lamp34
– reactivation33
– safe seating position27
Airbag switch33
Air conditioning58
Air conditioning mode
– air conditioning59
– automatic climate control62
Air conditioning mode
switching on/off
manually59,62
Air distribution
– air conditioning59
– automatic climate control62
Airing out, refer to
Ventilation59,63
Air outlets,
refer to Ventilation59,63
Air pressure, refer to Tire
inflation pressure78Air recirculation, refer to
Recirculated air
mode59,62
Air supply/blower
– air conditioning59
– automatic climate control62
AKI, refer to Fuel
specifications76
Alarm system25
– avoiding unintentional
alarms26
All-season tires, refer to
Winter tires81
Antenna, refer to the
Caring for your vehicle
brochure
Antifreeze86,87
– coolant87
– washing fluids86
Antilock Brake System
ABS50
– indicator lamp13
Anti-theft alarm system, refer
to Alarm system25
Anti-theft protection16,25
Approved axle load, refer to
Weights103
Approved engine oils87
Approved gross vehicle
weight, refer to Weights103
Artificial leather, refer to the
Caring for your vehicle
brochure
Ashtray65
Assistant systems,
refer to Dynamic Stability
Control DSC50
AUC Automatic recirculated
air control62Automatic
– air distribution62
– air supply/blower62
– cruise control44
– headlamp control56
– luggage compartment lid
operation19
Automatically dimming
interior rearview mirror31
Automatic car wash, refer to
the Caring for your vehicle
brochure
Automatic climate control61
Automatic recirculated air
control AUC62
Automatic transmission with
Steptronic38
– ignition36
– indicator lamp13
– interlock36
– selector lever lock38
– shiftlock38
– towing the vehicle99
– tow-starting99
AUTO program,
refer to Automatic air
distribution62
Average fuel consumption49
– setting unit of measure48
Average speed49
– setting unit of measure48
Avoiding unintentional
alarms26
Axle loads, refer to
Weights103
B
Backrest, refer to Seat
adjustment28
Backup lamps38
– bulb replacement93
Everything from A to Z
Index
Page 109 of 120

Reference
At a glance
Controls
Driving tips
Mobility
107
Bandages, refer to First-aid
kit97
Bar, towing99
Battery94
– charging95
– disposal95
– indicator lamp12,94
– jump-starting97
– power supply interruption95
– remote control16
Belts, refer to Safety belts30
Belt tensioner, refer to Safety
belts30
Beverage holders64
Blower
– air conditioning59
– automatic climate control62
Blower, refer to Air
supply59,62
BMW5
BMW Maintenance
System89
Bottle holders, refer to
Beverage holders64
Brake fluid88
– filling88
– indicator/warning
lamp13,88
– level88
Brake force display52
Brake hydraulic system88
– indicator/warning
lamp13,88
Brake lamps
– brake force display52
– bulb replacement93
– indicator lamp, defective
lamp13
Brake pads88
– break-in procedures68
– warning lamp88
Brake pad wear indicator
– brake pads88
– warning lamp13
Brake rotors
– brake system69
– break-in procedures68Brakes
– ABS50
– brake fluid88
– brake pads88
– break-in procedures68
– indicator/warning
lamps13,51
– parking brake37
Brake system
– brake fluid88
– brake pads88
– break-in procedures68
– disc brakes69
– indicator lamp13
Breakdown
– Flat Tire Monitor52
Breakdown service, refer to
Mobile Service96
Breaking in the differential,
refer to Engine and
differential68
Break-in procedures68
Bridging, refer to Jump-
starting97
Bulb replacement, refer to
Lamps and bulbs91
Buttons in the multifunction
steering wheel10
C
California laws
– Event Data Recorders90
– Proposition 65 warning6
Can holders, refer to Beverage
holders64
Capacities105
Capacity
– luggage compartment, refer
to Weights103
Car battery94
Car care, refer to the Caring
for your vehicle brochure
Car-care products, refer to the
Caring for your vehicle
brochure
Care, refer to the Caring for
your vehicle brochure
Car keys, refer to Keys16Carpet care, refer to the
Caring for your vehicle
brochure
Car radio, refer to the separate
Owner's Manual
Car telephone, refer to the
separate Owner's Manual
Car wash, refer to the Caring
for your vehicle brochure
Catalytic converter, refer to
Hot exhaust system69
CD changer, refer to Owner's
Manual for Radio/Onboard
Computer
CD operation, refer to Owner's
Manual for Radio/Onboard
Computer
Center high-mount brake
lamp, bulb replacement93
Central locking system16
– interior18
Changes, technical, refer to
For your own safety6
Changing a wheel94
– Run Flat tires94
Charge indicator lamp12,94
Check gas cap, indicator
lamp13
Child-restraint mounting
system, LATCH35
Child-restraint systems33
Child seat, refer to
Installing child-restraint
systems34
Chrome parts, refer to the
Caring for your vehicle
brochure
Cigarette lighter65
Cigarette lighter socket65
Cleaning the rear window,
refer to the Caring for your
vehicle brochure
Cleaning the vehicle, refer to
the Caring for your vehicle
brochure