2005 BMW X5 4.4I Rear end
[x] Cancel search: Rear endPage 147 of 200

147n
OverviewControlsMaintenanceRepairsDataIndex
Replacing wheels/tires Snow chains
*
Storage Store wheels or tires in a cool, dry
place, protecting them against light
whenever possible. Always protect tires
against all contact with oil, grease and
fuels.
Do not exceed the maximum tire infla-
tion pressure indicated on the side wall
of the tire.Only certain snow chains have been
tested by BMW and classified and
approved as safe. Consult your BMW
Sports Activity Vehicle center for
details. BMW recommends only using
these approved, narrow-link snow
chains. Use is only permitted in pairs on
the rear wheels with the following tire
sizes:
X5 4.8is: 255/55 R 18
All other models: 235/65 R 17
Observe the manufacturer's instruc-
tions when installing snow chains.
Do not exceed a maximum speed of
30 mph/50 km/h.
After mounting snow chains, do
not initialize the Flat Tire Monitor.
When you are driving with snow chains,
it can be beneficial to switch off DSC
briefly, refer to page96.<
Page 160 of 200

160n
Lamps and bulbs 2 Halogen high beams H1 bulb, 55 watts
The bulb is pressurized. There-
fore, wear safety glasses and pro-
tective gloves. Failure to comply with
this precaution could lead to injury if the
bulb is accidentally damaged during
replacement.<
1. Remove the cover
2. Disconnect the plug
3. Unhook wire spring
4. Remove and replace the bulb. 530de359
3 Parking lamps and roadside
parking lamps 10 watt bulb: H 10 W
1. Remove the cover
2. Disconnect the plug
3. Turn reflector module with bulb to
left and remove
4. Replace module with bulb.Xenon lamps
*
The operating life of these lamp units
is extremely long and the likelihood of
failure very low, provided that they are
not switched on and off a very great
number of times. If one of these bulbs
should nevertheless fail, it is possible
to continue driving with great caution
using the fog lamps, provided traffic
laws in your area do not prohibit this.
To avoid risk of potentially fatal
injuries: owing to the extremely
high voltages at which these units oper-
ate, service work should always be
entrusted to qualified personnel.< Front turn signals/side-marker
lamps S 8 bulb
Please contact a BMW Sports Activity
Vehicle center in case of a malfunction.
Side turn signals 5 watt bulb: W 5 W or WY 5 W
*
1. Use finger pressure against the rear
end of the lamp, refer to arrow, to
press it forward for removal
2. Apply gentle pressure to the bulb
while turning it to the left and pull it
out
3. Replace the bulb.530de304
Page 161 of 200
161n
OverviewControlsMaintenanceRepairsDataIndex
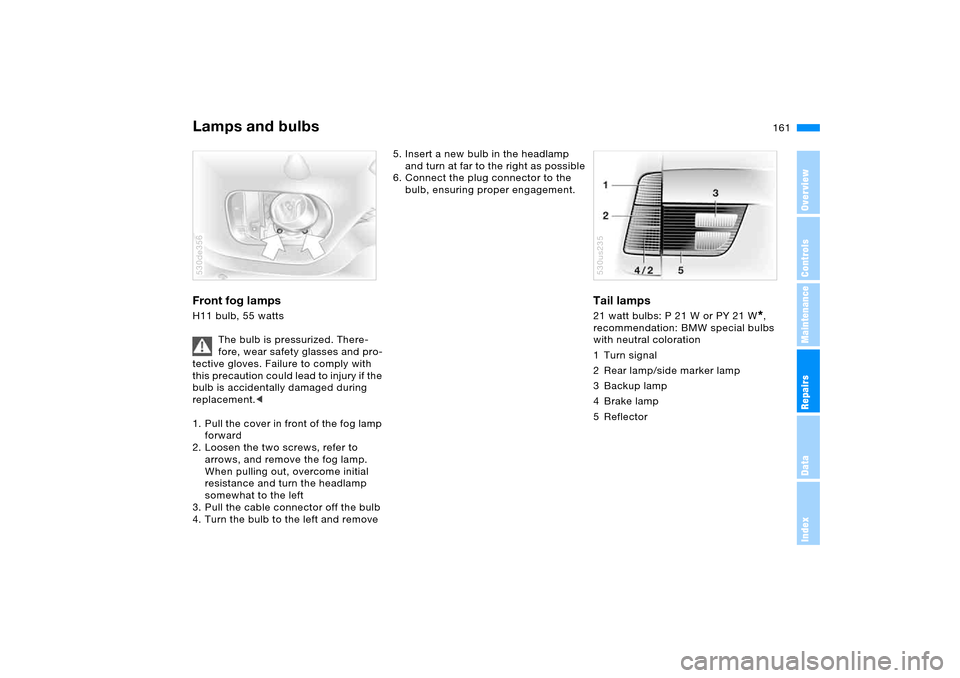
Lamps and bulbs Front fog lamps H11 bulb, 55 watts
The bulb is pressurized. There-
fore, wear safety glasses and pro-
tective gloves. Failure to comply with
this precaution could lead to injury if the
bulb is accidentally damaged during
replacement.<
1. Pull the cover in front of the fog lamp
forward
2. Loosen the two screws, refer to
arrows, and remove the fog lamp.
When pulling out, overcome initial
resistance and turn the headlamp
somewhat to the left
3. Pull the cable connector off the bulb
4. Turn the bulb to the left and remove530de356
5. Insert a new bulb in the headlamp
and turn at far to the right as possible
6. Connect the plug connector to the
bulb, ensuring proper engagement.
Tail lamps 21 watt bulbs: P 21 W or PY 21 W
*,
recommendation: BMW special bulbs
with neutral coloration
1 Turn signal
2 Rear lamp/side marker lamp
3 Backup lamp
4Brake lamp
5Reflector
530us235
Page 172 of 200

172n
Jump starting Tow-starting and towing Your BMW is equipped with a special
nut on the left side panel as a body
ground or negative terminal, refer to
arrow in illustration.
4. Attach one end of the negative/–
jumper cable to the negative terminal
of the battery or to an engine or body
ground of the vehicle providing
assistance
5. Connect the second terminal clamp
of the negative/– jumper cable to the
negative terminal of the battery or to
the engine or body ground of the
vehicle to be started.530us127
Starting engine1. Start the engine on the support vehi-
cle and allow it to run for several min-
utes at a fast idle
2. Start the engine on the other vehicle
in the usual way.
If the first start attempt is not suc-
cessful, wait a few minutes before
another attempt in order to allow the
discharged battery to recharge
3. Let the engines run for a few minutes
4. Disconnect the jumper cables by
reversing the connection sequence.
Depending on the cause of the fault,
have the battery recharged by your
BMW Sports Activity Vehicle center.
Never use spray fluids to start the
engine.<
Using tow fitting The screw-in tow fitting is stored
beneath the cargo floor cover. Carry it
with you at all times. It can be screwed
in at the front or rear of the vehicle.
To prevent damage to the tow fit-
ting and the vehicle, observe the
following: only use the tow fitting that
comes with the vehicle and screw it in
as far as it will go. Use the tow fitting for
towing only on the roadway. Avoid lat-
eral loading of the tow fitting, e.g. do
not lift the vehicle by the tow fitting.<
Page 173 of 200

173n
OverviewControlsMaintenanceRepairsDataIndex
Tow-starting and towingAccess to screw thread Front:
Use a screwdriver to press the right or
left cover out, refer to arrows. 530de370
Rear:
Pull the cover off. Being towed
Make sure that the ignition key is
in position 1, otherwise the steer-
ing lock could engage and it would not
be possible to steer the vehicle.
When the engine is stopped, there is no
power assist. This requires increased
braking and steering effort.<
Switch on the hazard warning flashers
depending on the local regulations.
If the electrical system fails, mark the
vehicle to be towed, e.g. with a sign or
warning triangle in the rear window.
530de318
Do not exceed a towing speed of
30 mph/50 km/h and a towing dis-
tance of 95 miles/150 km, as otherwise
the automatic transmission may be
damaged.<
Vehicles with manual transmission:
Gearshift lever in idle position
Vehicles with automatic transmission:
Selector lever in N.
Towing methodsIn some countries, towing with a tow
bar or rope on public roads is not per-
mitted.
Familiarize yourself with all regulations
on towing in the respective country.
With tow bar:
The towing vehicle may not be
lighter than the vehicle to be
towed, as otherwise handling will be
uncontrollable.<
The tow fitting of both vehicles should
be on the same side. If an angled posi-
tion of the bar cannot be avoided,
observe the following:
Page 188 of 200

Everything from A to ZE
EBV Electronic brake-force
distribution94
Electric steering wheel
adjustment52
Electrical malfunction
automatic transmission
with Steptronic69
door lock33
driver's door33
fuel filler door24
liftgate35
panorama glass
sunroof42
tailgate36
Electronic brake-force distri-
bution EBV94
Electronic Stability Program
ESP, refer to DSC Dynamic
Stability Control95
Emergency call170
Emergency operation, refer
to Manual operation
driver's door33
fuel filler door24
liftgate35
panorama glass
sunroof42
tailgate36
Emergency Service, refer to
Roadside Assistance170Energy control77
Energy-conscious driving,
refer to Energy control77
Engine
breaking-in136
data178
electronic circuitry22
speed77
switching off65
Engine compartment149
Engine coolant152
Engine oil150
additives, refer to
Specified engine oils151
filling capacity181
indicator/warning lamp19
specified engine oils151
Engine oil level150
indicator/warning lamp21
Engine oil pressure,
indicator/warning lamp19
Engine oil thermometer78
Engine output, refer to
Engine specifications178
Engine specifications178
Engine speed, refer to
Engine specifications178
Environmentally friendly
driving, refer to Energy
control77ESP Electronic Stability
Program, refer to DSC
Dynamic Stability
Control95
Event Data Recorders155
Exhaust system137
Extended immobilizer
function91
Exterior mirrors54
automatic dimming
feature138
folding in and out54
External air, automatic
climate control113
F
Failure messages, refer to
Check Control80
Failure of a current
consumer169
False alarms, refer to
Avoiding unintentional
alarms39
Fasten safety belts
refer to Safety belts49
warning lamp21,49
Fault displays, refer to Check
Control80
Fill pressure, refer to Tire
inflation pressure141Filter, refer to
Microfilter109
Microfilter/activated-
charcoal filter115
First aid, refer to First-aid
kit24
First-aid kit24
Flashlight120
Flat tire163
Flat Tire Monitor101
refer to Tire inflation
pressure141
refer to Wheel
changes163
spare wheel165
Flat Tire Monitor101
initializing102
warning lamp102
Flooding, refer to Driving
through water138
Floor mats, refer to Caring
for your vehicle brochure
Fluid level, indicator lamp21
Fog lamps, indicator lamp22
Folding floor cover up129
Folding rear backrest126
Folding rear seat back126
Footbrake, refer to General
driving notes137
Footwell lamps106
Page 190 of 200

Everything from A to ZIndependent ventilation116
activating/deactivating
switch-on times87
also refer to Owner's
Manual for Onboard
Computer
entering switch-on
times87
switching on and off
directly87
Indicating
elements15,17,18
Indicator lighting, refer to
Instrument lighting105
Indicator/warning lamp
airbags59
alarm system38
automatic transmission
with Steptronic69
brakes153
coolant temperature79
DSC95
engine temperature79
fasten safety belts49
Flat Tire Monitor102
front fog lamps105
reserve78
self-leveling
suspension98
Indicator/warning lamps,
overview19Individual air distribution112
Individual settings, refer to
Vehicle Memory, Key
Memory63
Inflation pressure
monitoring, refer to Flat
Tire Monitor101
Inflation pressure, tires141
INSPECTION79
Instrument cluster15,17,18
Instrument lighting105
Instrument panel, refer to
Cockpit14
Integrated universal remote
control117
Interface socket for Onboard
Diagnostics155
Interior lamps105
remote control31
Interior mirror, automatic
dimming feature138
Interior motion sensor39
switching off31,39
Interior rearview mirror55
compass55
Interlock, refer to Locking
steering64
Intermittent operation of
wipers71,73J
Jacking points167
Jump starting171
Jumpering, refer to Jump
starting171
K
Key Memory63
Keys30
Kick-down68
L
Lamps and bulbs159
Lamps, refer to Parking
lamps/low beams103
Lashing eyes, refer to
Securing load132
LATCH child-restraint fixing
system62
LEDs light-emitting
diodes163
Length, refer to
Dimensions179
License plate lamp
replacing bulbs162
Liftgate35
emergency operation,
refer to Unlocking
manually35
opening, remote
control31
remote control31Liftgate/tailgate
emergency operation,
refer to Unlocking
manually35,36
opening from inside35
opening from outside35
unlocking manually35,36
Light switch103
Light-alloy wheels, care,
refer to Caring for your
vehicle brochure
Light-emitting diodes
LEDs163
Lighter122,123
Lighting of instruments105
Lights on warning103
Limit88
Limit speed, refer to Speed
limit88
Load, refer to Cargo
loading131
Lock buttons, doors, refer to
Locking34
Locking
from inside34
from outside31
Locking and unlocking doors
from inside34
from outside31
Locking, vehicle
from inside34
from outside31
Page 198 of 200

So that you will have important specifi-
cations available when you stop to
refuel, we recommend that you supple-
ment this table with data which apply to
your vehicle.
Consult the index for individual specifi-
cations.
FuelPlease enter your preferred fuel here. Engine oilThe oil volume between the two marks
on the oil dipstick corresponds to
approx. 1.1 US quarts/1 liter. Designation
QualityTire inflation pressures
Summer tires Winter tires
Front Rear Front Rear
4 persons
5 persons or 4 plus luggage
Refueling