2005 BMW MOTORRAD K 1200 S lights
[x] Cancel search: lightsPage 66 of 165
Phase 2General warning light
lights up red.CHECK!
indicator appears
on the display.
If the 'General' warning light is
not displayed:
Some malfunctions can-
not be indicated if the
'General' warning light cannot
be displayed.
Check that the 'General'
warning light comes on, and
that it lights up yellow and
then red.
Have the fault rectified as
soon as possible by a spe-
cialist workshop, preferably
an authorised BMW Motor-
rad dealer.
ABS warning lightsThere are two country-
dependent versions of the
ABS warning light:
Country-dependent ver-
sion 1.
Country-dependent ver-
sion 2.
The description below is
based on country-dependent
version 1.ABS self-diagnosisBMW Integral ABS performs
self-diagnosis and a
pull-away test to ensure its
operability. Self-diagnosis
is performed automatically
when you switch on the
ignition. Self-diagnosis is
not performed unless both
brake levers are in their fully
released positions. Phase 1
Self-diagnosis is in progress.
General warning light
lights up red.
ABS warning light
flashes four times per
second.
Phase 2
Self-diagnosis is complete.
ABS warning light
flashes once per
second.
If self-diagnosis did not com-
plete:
Release the brake levers as
soon as possible.
If an error message appears
when self-diagnosis com-
pletes: See the section entitled
"Status indicators" for in-
formation on how to inter-
pret these messages.
564zRiding
Page 114 of 165
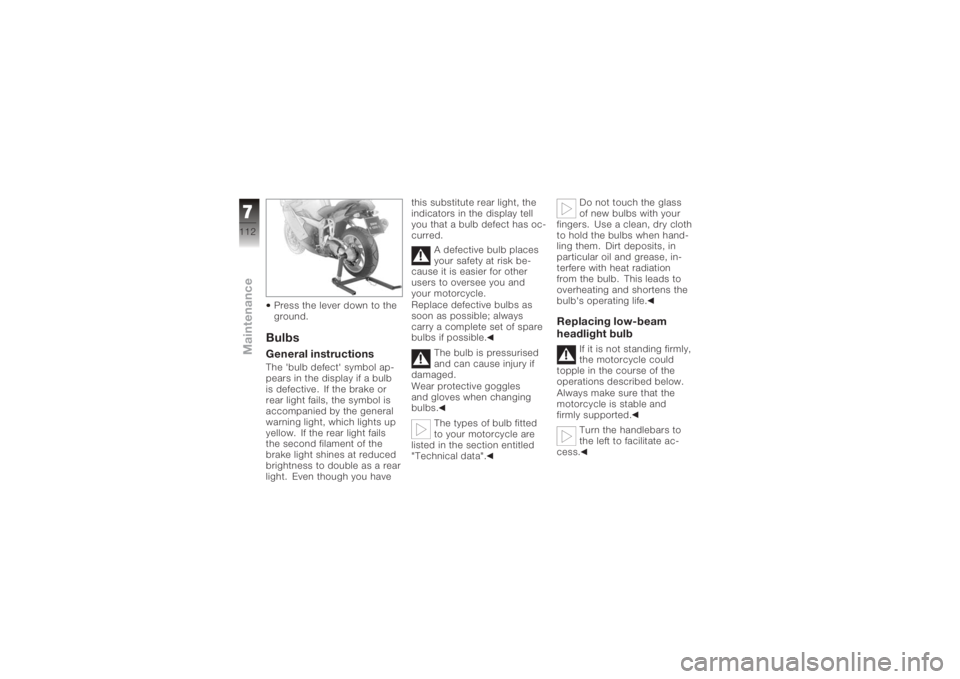
Press the lever down to the
ground.BulbsGeneral instructionsThe 'bulb defect' symbol ap-
pears in the display if a bulb
is defective. If the brake or
rear light fails, the symbol is
accompanied by the general
warning light, which lights up
yellow. If the rear light fails
the second filament of the
brake light shines at reduced
brightness to double as a rear
light. Even though you havethis substitute rear light, the
indicators in the display tell
you that a bulb defect has oc-
curred.
A defective bulb places
your safety at risk be-
cause it is easier for other
users to oversee you and
your motorcycle.
Replace defective bulbs as
soon as possible; always
carry a complete set of spare
bulbs if possible.
The bulb is pressurised
and can cause injury if
damaged.
Wear protective goggles
and gloves when changing
bulbs.
The types of bulb fitted
to your motorcycle are
listed in the section entitled
"Technical data". Do not touch the glass
of new bulbs with your
fingers. Use a clean, dry cloth
to hold the bulbs when hand-
ling them. Dirt deposits, in
particular oil and grease, in-
terfere with heat radiation
from the bulb. This leads to
overheating and shortens the
bulb's operating life.
Replacing low-beam
headlight bulb
If it is not standing firmly,
the motorcycle could
topple in the course of the
operations described below.
Always make sure that the
motorcycle is stable and
firmly supported.
Turn the handlebars to
the left to facilitate ac-
cess.
7112zMaintenance
Page 117 of 165
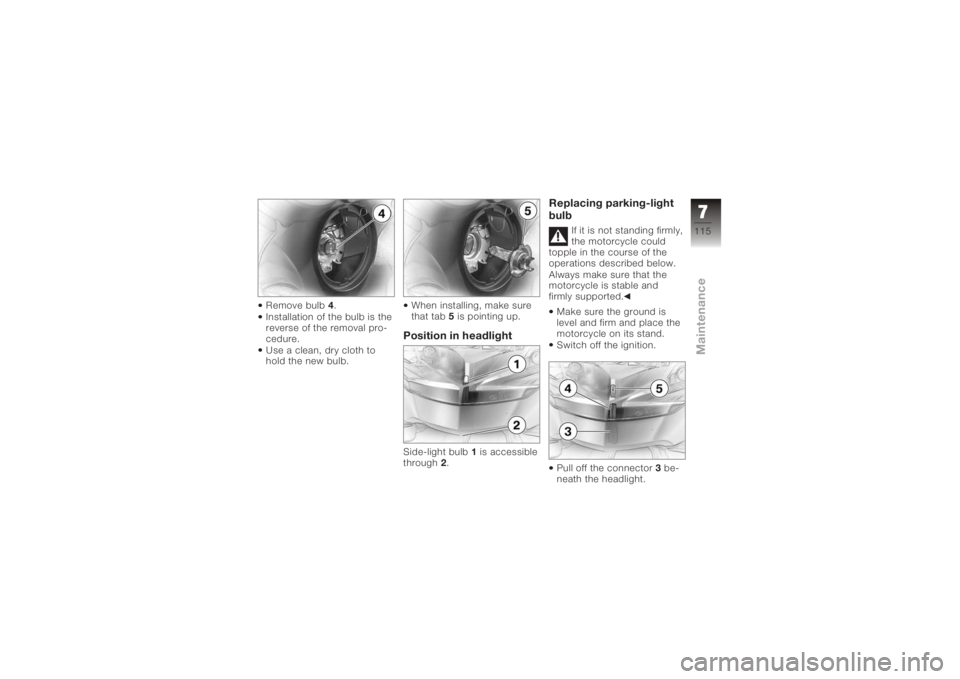
Remove bulb4.
Installation of the bulb is the
reverse of the removal pro-
cedure.
Use a clean, dry cloth to
hold the new bulb. When installing, make sure
that tab
5is pointing up.
Position in headlightSide-light bulb 1is accessible
through 2.
Replacing parking-light
bulb
If it is not standing firmly,
the motorcycle could
topple in the course of the
operations described below.
Always make sure that the
motorcycle is stable and
firmly supported.
Make sure the ground is
level and firm and place the
motorcycle on its stand.
Switch off the ignition.
Pull off the connector 3be-
neath the headlight.
7115zMaintenance
Page 122 of 165
Be sure to read and com-
ply with the instructions for
charging the battery on the
following pages
Do not turn the battery up-
side downIf the battery is not dis-
connected, the on-board
electronics (e.g. clock, etc.)
gradually drain the battery.
This can cause the battery to
run flat. If this happens, war-
ranty claims will not be ac-
cepted.
If the motorcycle is to be out
of use for more than four
weeks, disconnect the battery
or connect a suitable trickle
charger to the battery.
BMW Motorrad
has developed a
trickle-charger specially
designed for compatibility
with the electronics of your
motorcycle. Using this charger, you can keep the
battery charged during long
periods of disuse, without
having to disconnect the
battery from the motorcycle's
on-board systems. You can
obtain additional information
from your authorised
BMW Motorrad dealer.
Charging battery when
connected
Charging the connec-
ted battery directly at the
battery terminals can damage
the vehicle electronics.
Always disconnect the battery
from the on-board circuits be-
fore recharging it with a char-
ger connected directly to the
battery posts.
If you switch on the ig-
nition and the multifunc-
tion display and telltale lights
fail to light up, the battery is
completely flat. Attempting to charge a completely flat bat-
tery via the on-board socket
can cause damage to the mo-
torcycle's electronics.
If a battery has discharged to
the extent that it is completely
flat, it has to be disconnec-
ted from the on-board circuits
and charged with the char-
ger connected directly to the
battery posts.
Only chargers suitable
for this mode of char-
ging can be used to recharge
the battery via the on-board
socket. Unsuitable chargers
could cause damage to the
motorcycle's on-board elec-
trics.
Use BMW chargers with
the part numbers 71 60
7 688 864 (220 V) or, as
applicable, 71 60 7 688 865
(110 V). If you are in doubt,
disconnect the battery from
the on-board systems and
7120zMaintenance
Page 157 of 165
Engine oilChecking level, 93
Technical data, 135
Topping up, 94
Warning, engine oil pres-
sure, 25
ESA, 56 Adjusting spring preload, 57
Adjusting suspension
damping, 56
Calling up settings, 56
EWS Warning, 24
F
Final drive Technical data, 137
Frame Technical data, 141
Front-wheel stand Installing, 109 Fuel
Quantity reading, 20
Refuelling, 76
Technical data, 135
Warning, fuel down to
reserve, 24
Fuses, 139
G
Gear indicator, 20
Grip heating, 16, 45
H
Handlebar fittings General view, left side , 15
General view, right side, 16
Hazard warning flashers, 15, 16
Switching off, 39
Switching on, 38
Headlight Adjusting headlight beam
throw, 48
High-beam headlight, 18
Low-beam headlight, 18
Side lights, 18 Headlight flasher, 15
High-beam headlight, 15
Horn, 15
I
Ignition
Switching off, 36
Switching on, 36
Immobiliser Warning, 24
Instrument cluster Overview, 17
Sensor for lighting, 17
J
Jump starting, 118
L
Laying up, 128
11155zIndex
Page 158 of 165

LightsSwitching off the parking
lights, 48
Switching on the high-beam
headlight, 47
Switching on the low-beam
headlight, 47
Switching on the parking
lights, 48
Switching on the side
lights, 47
M
Multifunction display, 17, 20
O
On-board computer Ambient temperature, 43
Average consumption, 43
Average speed, 42
Pushbutton, 15
Resetting average con-
sumption, 43
Resetting average
speed, 42 Residual range, 42
Selecting readings, 41
Tripmaster function, 41
P
Power socket, 11, 13
Pre-ride check, 63
R
Rear wheel stand Installing, 111
Refuelling, 76
Reserve Warning, 24
Residual range, 40, 42
Restoring to use, 129
Rev. counter, 17
Running gear Technical data, 137
S
Seat Installation, 51
Lock, 11, 13
Removal, 50
Service, 144 Side stand
Starting the engine, 62
Speedometer, 17
Spring preload, rear Adjusting, 11, 13, 54
Starter, 16
Steering lock, 37
Suspension damping, rear Adjusting, 11, 13, 54
T
Technical data Brakes, 138
Bulbs, 140
Clutch, 136
Electrics, 139
Engine, 134
Engine oil, 135
Final drive, 137
Frame, 141
Fuel, 135
Running gear, 137
Transmission, 136
Wheels and tyres, 138
Telltale lights, 17
11156zIndex
Page 159 of 165
ToolkitOverview, basic kit, 92
Overview, supplementary
kit, 92
Torques, 131
Transmission Starting the engine, 62
Technical data, 136
Tripmaster, 20 Operation, 39
Resetting the tripmeter, 40
Residual range, 40
Selecting readings, 39
Troubleshooting chart, 132
Turn indicators Left, 15, 49
Right, 16, 49
Switching off, 16, 50
Tyres Checking tread depth, 101
Checking tyre pressures, 57
Technical data, 138 V
Vehicle
General view, left side, 11
General view, right side, 13
Laying up, 128
restoring to use, 129
W
Warning lights, 17
Warnings, 20 Mode of presentation, 21
Warnings, overview, 22, 29
Wheels Installing front wheel, 103
Installing rear wheel, 107
Removing front wheel, 101
Removing rear wheel, 105
Technical data, 138
11157zIndex
Page 163 of 165
BMW Motorrad Integral ABSE2
If the motorcycle is not to be
ridden for several weeks, a
trickle charger, which can be
obtained from your BMW
Motorrad dealer, should be
connected or the battery
disconnected and then
recharged before starting
riding again.
During rider safety training,
an unusual number of ABS-
controlled braking operations
take place in rapid succession
interspersed with periods of
waiting and assessment in
which the motorcycle is not
being ridden. The battery is
put under heavy load by the
ABS control actions, but at
the same time it is not being
recharged as practically no
riding is being done.
In isolated cases, in this
artificially created situation, braking operations in which
the brake lever is operated
with maximum force and
extreme speed, in combina-
tion with declining on-board
supply voltage, can bring the
ABS up to its technical limits in
which its control function is no
longer fulfilled.
Field observations carried out
by BMW Motorrad indicate
that a comparable situation
has not arisen in traffic or even
during training rides.
The following notes must
be observed during safety
training:
• check the warning and
indicator lamps before any
braking exercise
• ride the motorcycle over
sufficient distance to charge
the battery after a maximum
of five braking exercises• switch off consumers such
as seat and grip heating,
radio, navigation system and
accessories connected to
the power sockets
• in pauses and discussions,
switch off the ignition; if the
engine is switched off with
the emergency off switch,
the lights and all electronic
systems remain switched on
and drain the battery
How can I achieve the
shortest braking distance?
Dynamic load distribution
between the front and rear
wheels changes under
braking. The heavier the
brakes are applied, the more
load is transferred to the front
brake. The greater the load on
the wheel, the more braking
force can be transferred.Info_I_ABS_en_xx.fm Seite 2 Dienstag, 19. Juli 2005 2:48 14