2005 BMW 645I COUPE change time
[x] Cancel search: change timePage 82 of 217

Controls
81Reference
At a glance
Driving tips
Communications
Navigation
Entertainment
Mobility
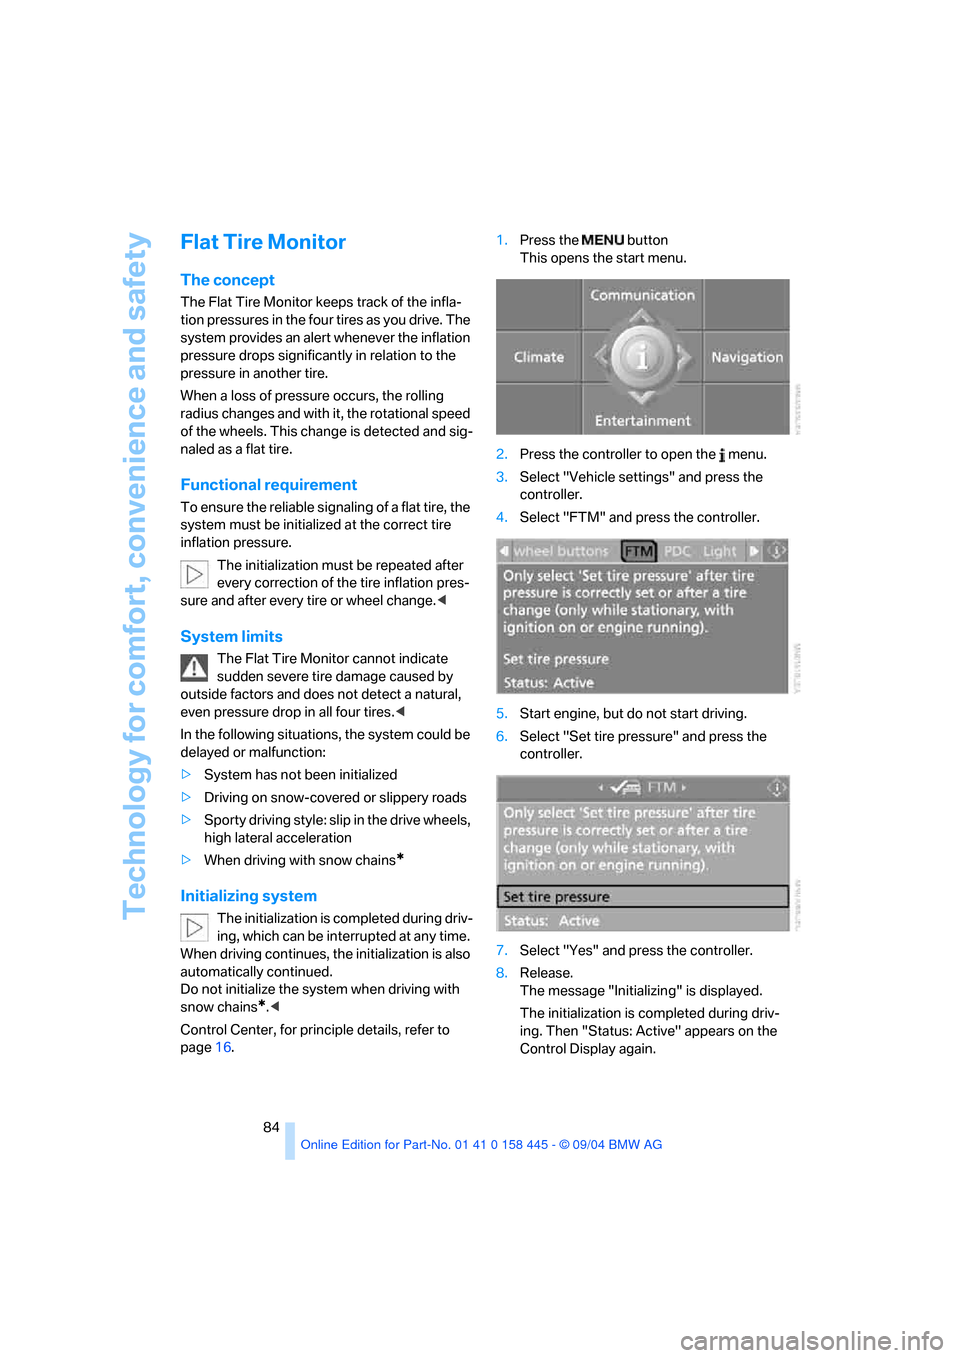
1.Press button.
This opens the start menu.
2.Press the controller to open the menu.
3.Select "Vehicle settings" and press the
controller.
4.Select "PDC" and press the controller.
5.Select "Monitor display on" and press the
controller.
The PDC screen is activated.
The display appears on the Control Display as
soon as PDC is activated.
The setting is stored for the remote control cur-
rently in use.
System limits
Even with PDC, final responsibility for
estimating the distance between the
vehicle and any obstructions always remains
with the driver. Even when sensors are involved,
there is a blind spot in which objects cannot be
detected. The system is also subject to the
physical limits that apply to all forms of ultra-
sonic measurement, such as those encoun-
tered with thin and wedge-shaped objects, etc.
Low objects already displayed, e.g. a curb, can
also disappear from the detection area of the sensors again before a continuous tone
sounds.
Loud noises from outside and inside your vehi-
cle may prevent you from hearing the PDC sig-
nal tone.<
Do not apply high pressure spray to the
sensors for a prolonged period of time.
Keep the spray at least 4 in/10 cm away from
the sensors.<
Driving stability control
systems
Your BMW is equipped with an extended array
of systems designed to enhance and maintain
vehicle stability under extreme conditions.
ABS Antilock Brake System
ABS prevents the wheels from locking during
braking. Safe steering response is maintained
even during hard braking. This increases active
driving safety.
ABS is operational every time you start the
engine. For information on safe braking, refer to
page109.
CBC Cornering Brake Control
This system provides further enhancements to
vehicle stability and steering response when
braking while cornering or when braking during
a lane change.
Electronic brake-force distribution
This system controls the brake system's appli-
cation pressure at the rear wheels to ensure
stable deceleration.
DBC Dynamic Brake Control
When you apply the brakes rapidly, this system
automatically produces the maximum braking
force boost and thus helps to achieve the short-
est possible braking distance during panic
stops. This system exploits all of the benefits
provided by ABS.
Page 85 of 217
Technology for comfort, convenience and safety
84
Flat Tire Monitor
The concept
The Flat Tire Monitor keeps track of the infla-
tion pressures in the four tires as you drive. The
system provides an alert whenever the inflation
pressure drops significantly in relation to the
pressure in another tire.
When a loss of pressure occurs, the rolling
radius changes and with it, the rotational speed
of the wheels. This change is detected and sig-
naled as a flat tire.
Functional requirement
To ensure the reliable signaling of a flat tire, the
system must be initialized at the correct tire
inflation pressure.
The initialization must be repeated after
every correction of the tire inflation pres-
sure and after every tire or wheel change.<
System limits
The Flat Tire Monitor cannot indicate
sudden severe tire damage caused by
outside factors and does not detect a natural,
even pressure drop in all four tires.<
In the following situations, the system could be
delayed or malfunction:
>System has not been initialized
>Driving on snow-covered or slippery roads
>Sporty driving style: slip in the drive wheels,
high lateral acceleration
>When driving with snow chains
*
Initializing system
The initialization is completed during driv-
ing, which can be interrupted at any time.
When driving continues, the initialization is also
automatically continued.
Do not initialize the system when driving with
snow chains
*.<
Control Center, for principle details, refer to
page16.1.Press the button
This opens the start menu.
2.Press the controller to open the menu.
3.Select "Vehicle settings" and press the
controller.
4.Select "FTM" and press the controller.
5.Start engine, but do not start driving.
6.Select "Set tire pressure" and press the
controller.
7.Select "Yes" and press the controller.
8.Release.
The message "Initializing" is displayed.
The initialization is completed during driv-
ing. Then "Status: Active" appears on the
Control Display again.
Page 101 of 217
Practical interior accessories
100
Practical interior accessories
Integrated universal remote
control*
The concept
The integrated universal remote control
replaces up to three different hand-held trans-
mitters for various items of radio-controlled
equipment such as door openers and house
alarm systems. The integrated universal remote
control registers and stores signals from the
original hand-held transmitters.
The signal of an original hand-held transmitter
can be programmed into one of the three mem-
ory buttons1. Then the respective device can
be actuated using the memory button1 pro-
grammed for its use when the ignition key is in
position 2. The LED2 flashes to confirm trans-
mission of the signal.
If you sell your vehicle one day, delete the saved
programs beforehand for your own security,
refer to page101.
To prevent possible damage or injury,
before programming or using the inte-
grated universal remote control, always inspect
the immediate area to make certain that no peo-
ple, animals or objects are within the travel
range of the device. Also comply with the safety
precautions of the original hand-held transmit-
ter.<
Checking compatibility
If you see this symbol on the packaging
or in the manual supplied with the orig-
inal hand-held transmitter, it is safe to
assume that it is compatible with the integrated
universal remote control.
If you have additional questions, please consult
your BMW center or call 1-800-355-3515.
You can also visit these websites:
www.bmwusa.com or
www.homelink.com.
HomeLink is a registered trademark owned by
Johnson Controls, Inc.
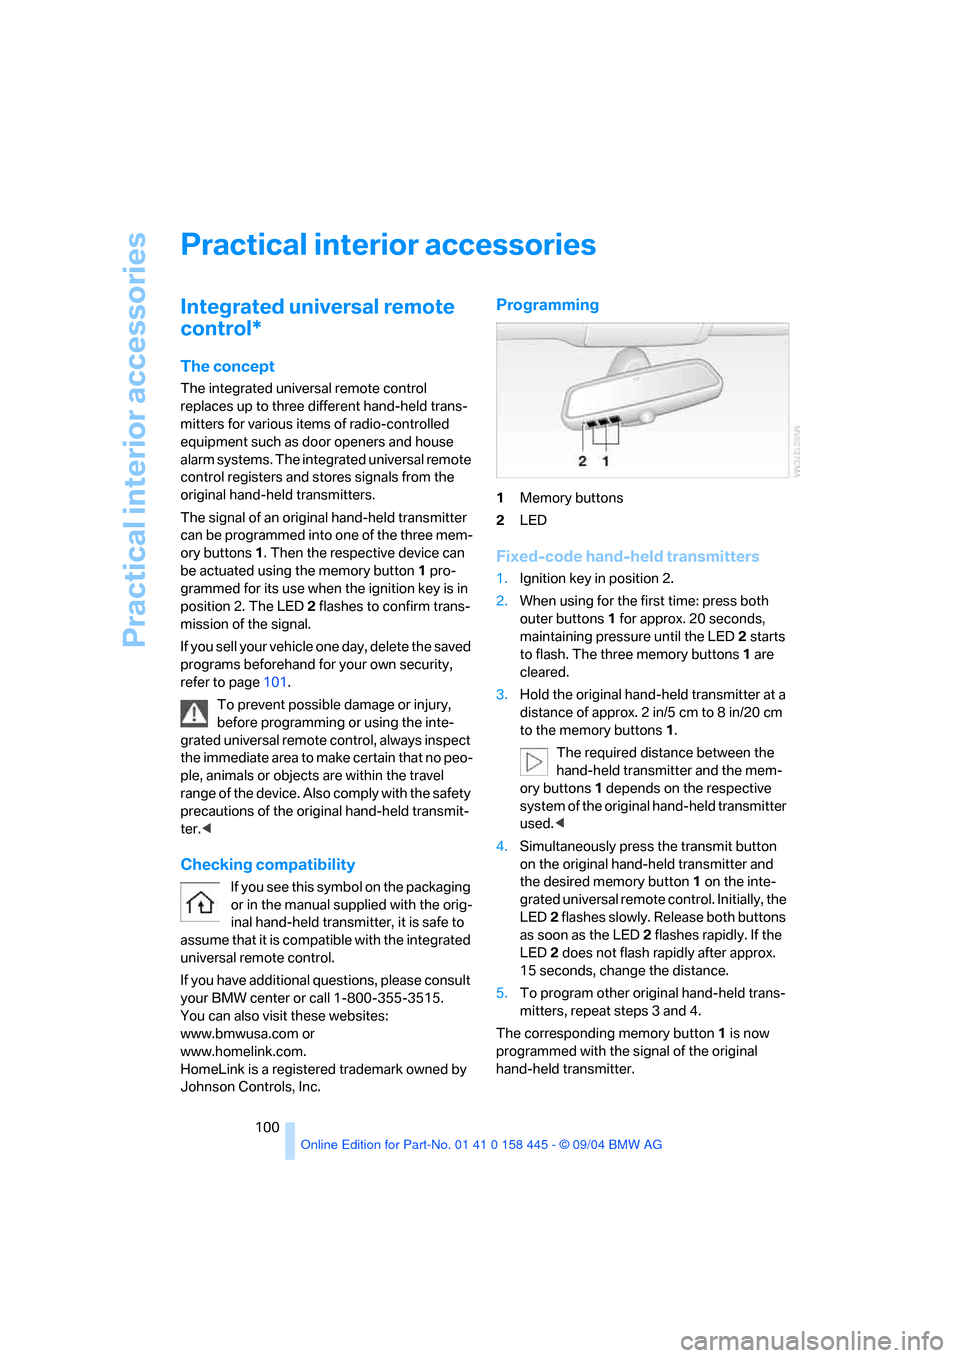
Programming
1Memory buttons
2LED
Fixed-code hand-held transmitters
1.Ignition key in position 2.
2.When using for the first time: press both
outer buttons 1 for approx. 20 seconds,
maintaining pressure until the LED 2 starts
to flash. The three memory buttons1 are
cleared.
3.Hold the original hand-held transmitter at a
distance of approx. 2 in/5 cm to 8 in/20 cm
to the memory buttons1.
The required distance between the
hand-held transmitter and the mem-
ory buttons1 depends on the respective
system of the original hand-held transmitter
used.<
4.Simultaneously press the transmit button
on the original hand-held transmitter and
the desired memory button1 on the inte-
grated universal remote control. Initially, the
LED2 flashes slowly. Release both buttons
as soon as the LED 2 flashes rapidly. If the
LED2 does not flash rapidly after approx.
15 seconds, change the distance.
5.To program other original hand-held trans-
mitters, repeat steps 3 and 4.
The corresponding memory button1 is now
programmed with the signal of the original
hand-held transmitter.
Page 123 of 217
Destination entry
122
Storing home address
You can store your current position or the cur-
rent destination as a home address in the
address book. This entry is in the second posi-
tion in the address book.
Control Center, for principle details, refer to
page16.
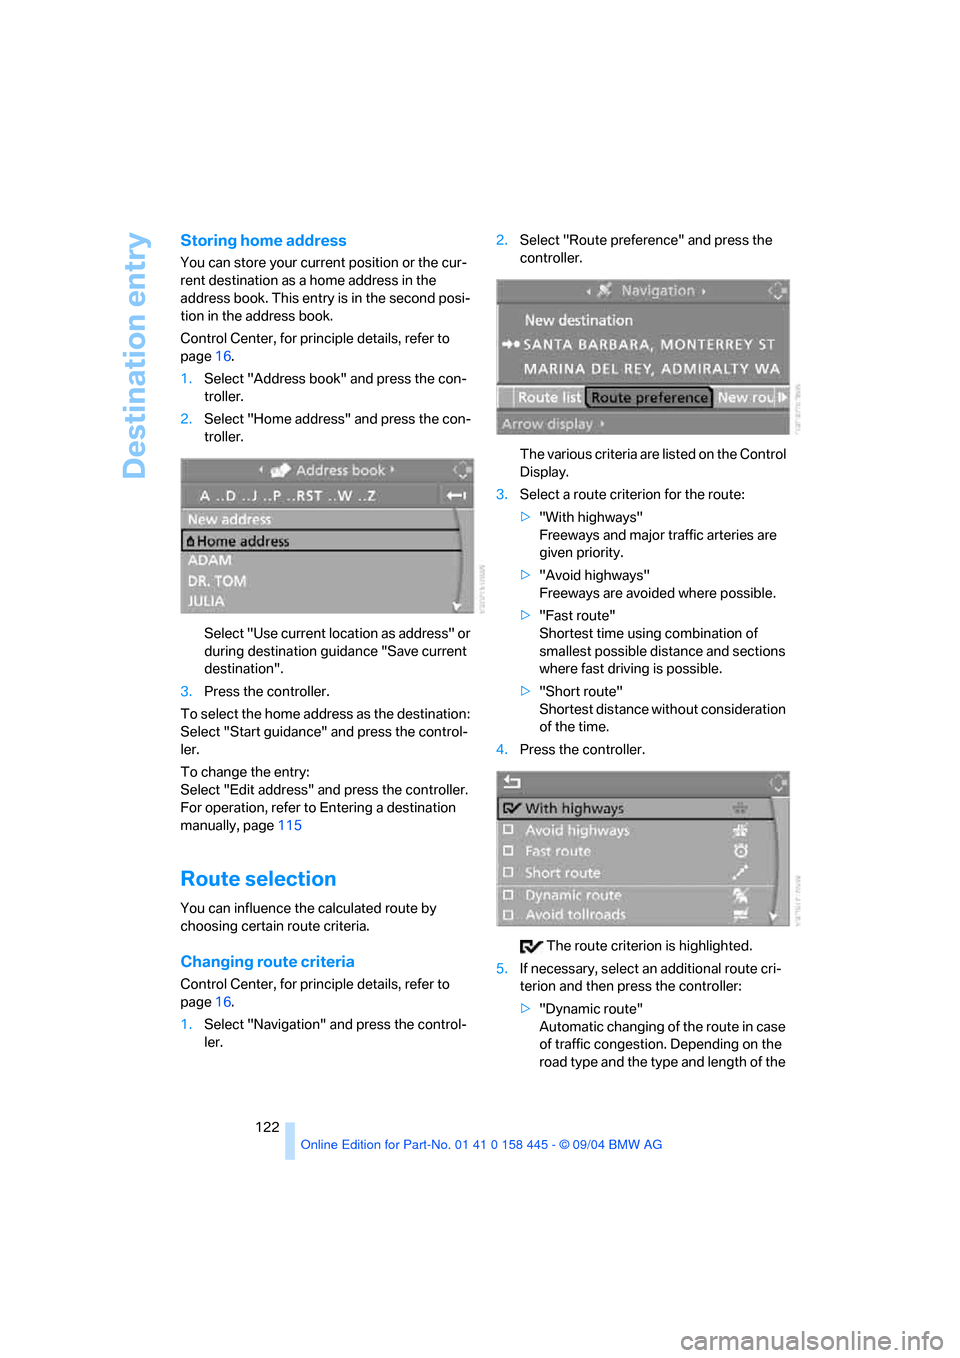
1.Select "Address book" and press the con-
troller.
2.Select "Home address" and press the con-
troller.
Select "Use current location as address" or
during destination guidance "Save current
destination".
3.Press the controller.
To select the home address as the destination:
Select "Start guidance" and press the control-
ler.
To change the entry:
Select "Edit address" and press the controller.
For operation, refer to Entering a destination
manually, page115
Route selection
You can influence the calculated route by
choosing certain route criteria.
Changing route criteria
Control Center, for principle details, refer to
page16.
1.Select "Navigation" and press the control-
ler.2.Select "Route preference" and press the
controller.
The various criteria are listed on the Control
Display.
3.Select a route criterion for the route:
>"With highways"
Freeways and major traffic arteries are
given priority.
>"Avoid highways"
Freeways are avoided where possible.
>"Fast route"
Shortest time using combination of
smallest possible distance and sections
where fast driving is possible.
>"Short route"
Shortest distance without consideration
of the time.
4.Press the controller.
The route criterion is highlighted.
5.If necessary, select an additional route cri-
terion and then press the controller:
>"Dynamic route"
Automatic changing of the route in case
of traffic congestion. Depending on the
road type and the type and length of the
Page 125 of 217
Destination guidance
124
Destination guidance
Starting destination
guidance
Control Center, for principle details, refer to
page16.
1.Select "Navigation" and press the control-
ler.
2.Select the destination from the destination
list and press the controller or enter a new
destination, refer to page115.
3.Select "Start guidance" and press the con-
troller.
The destination guidance is started.
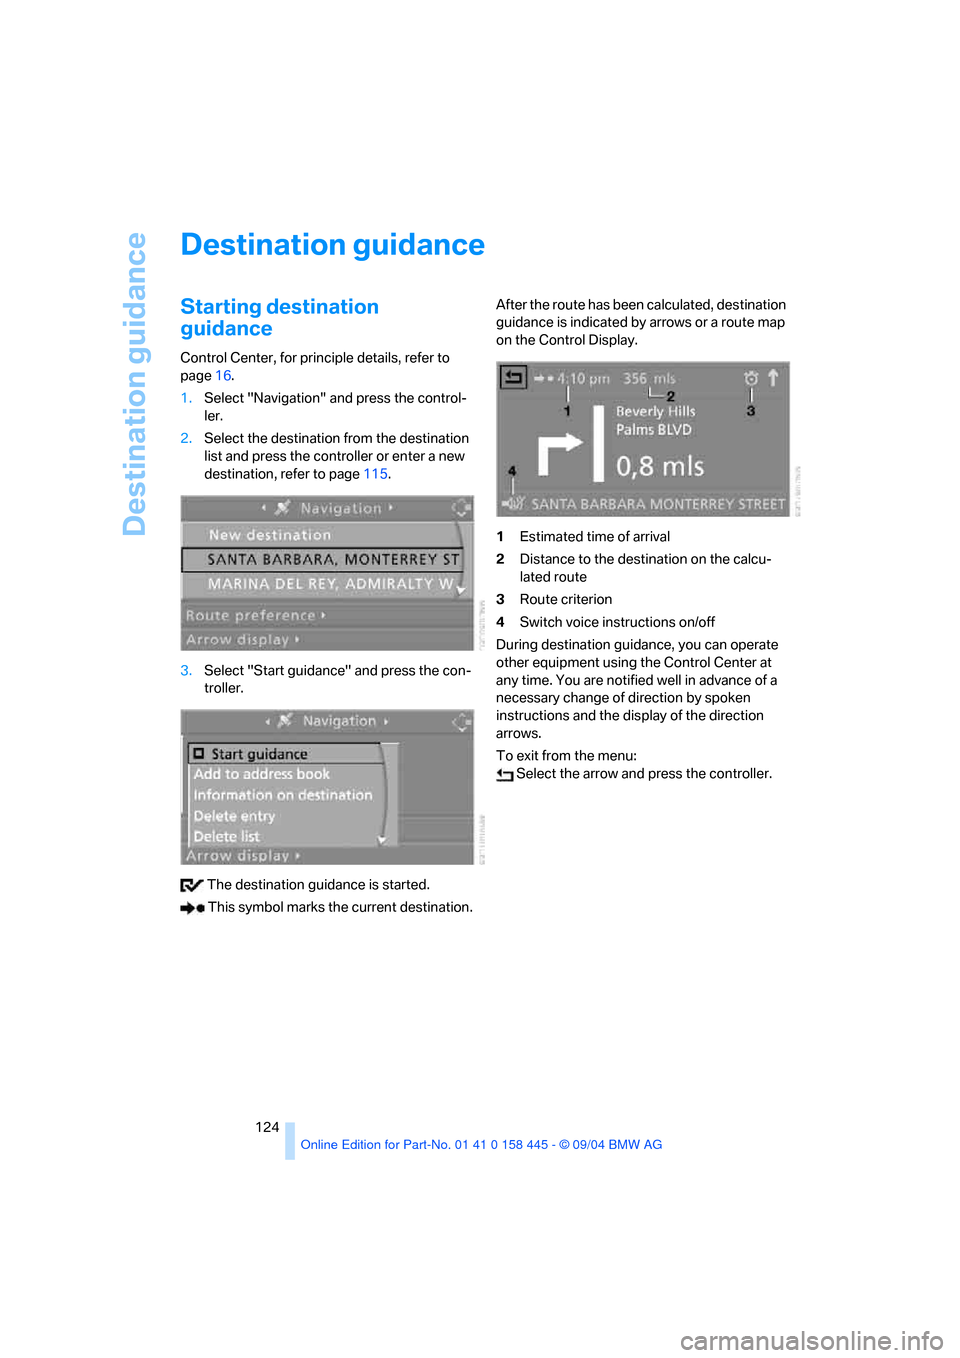
This symbol marks the current destination.After the route has been calculated, destination
guidance is indicated by arrows or a route map
on the Control Display.
1Estimated time of arrival
2Distance to the destination on the calcu-
lated route
3Route criterion
4Switch voice instructions on/off
During destination guidance, you can operate
other equipment using the Control Center at
any time. You are notified well in advance of a
necessary change of direction by spoken
instructions and the display of the direction
arrows.
To exit from the menu:
Select the arrow and press the controller.
Page 202 of 217

Reference 201
At a glance
Controls
Driving tips
Communications
Navigation
Entertainment
Mobility
C
California law
– Event Data Recorders179
California Proposition 65
Warning6
"Call"153
Call
– accepting152
– display accepted153
– ending152
– in absence153
– starting152
Calling
– from phone book153
– from the Top 8 list153
– redialing153
"Call sender"156
Can holder, refer to Cup
holders103
Capacities195
Capacity of the luggage
compartment192
Car battery, refer to Vehicle
battery183
Car care, refer to the Caring
for your vehicle brochure
Car-care products, refer to the
Caring for your vehicle
brochure
"Car data"74
Care, refer to the Caring for
your vehicle brochure
Cargo loading
– securing cargo111
– stowing cargo111
– vehicle110
Caring for artificial leather,
refer to the Caring for your
vehicle brochure
Caring for leather, refer to the
Caring for your vehicle
brochure
Caring for light-alloy wheels,
refer to the Caring for your
vehicle brochure
Caring for plastic, refer to the
Caring for your vehicle
brochureCaring for the carpet, refer to
the Caring for your vehicle
brochure
Caring for the vehicle finish,
refer to the Caring for your
vehicle brochure
Car keys, refer to Key set28
Car phone151
– installation location, refer to
Center armrest102
– refer to Portable phone150
– refer to separate Owner's
Manual
Car radio, refer to Radio136
Car wash110
– also refer to the Caring for
your vehicle brochure
– refer to Before driving into a
car wash110
Catalytic converter, refer to
Hot exhaust system108
"Categories"141
CBC Cornering Brake
Control81
CBS Condition Based
Service178
"CD"133,143
CD changer143
– controls132
– fast forward/reverse145
– installation location145
– playing a track145
– random play sequence145
– repeating a track144
– selecting a CD144
– selecting a track144
– switching on/off132
– tone control133
– volume133
CD player143
– controls132
– fast forward/reverse145
– playing a track145
– random play sequence145
– repeating a track144
– selecting a track144
– switching on/off132
– tone control133
– volume133Center armrest
– adjusting the height102
– front102
Center console14
"Central locking"29
Central locking system29
– from inside vehicle31
Changes, technical, refer to
For your own safety6
Changing a wheel183
Changing gear
– automatic transmission with
Steptronic58
Changing language on
Control Display78
Changing measurement units
on Control Display77
Changing wheels183
CHECK button73
Check Control71
"Check Control
messages"73
Check Gas Cap166
Checking the air pressure,
refer to Tire inflation
pressure168
Child's seats, refer to Child-
restraint systems52
Child-restraint fixing system
LATCH53
Child restraints52
Child-restraint systems52
Chrome parts, care, refer to
the Caring for your vehicle
brochure
Cigarette lighter103
Cleaning, refer to the Caring
for your vehicle brochure
Cleaning the windshield, refer
to Wiper system61
"Climate"96
Clock69
– 12h/24h mode78
– setting time and date78
Closing
– from inside31
– from outside29
Clothes hooks, Coupe102
Cockpit10
Page 203 of 217
Everything from A to Z
202 Cold start, refer to Starting
engine54
"Communication"152
"Communication
settings"159
Compact disc
– refer to CD changer143
– refer to CD player143
Computer74
– clock, 12h/24h clock
mode78
– displays on Control
Display74
– hour signal78
"Concert hall"135
Condition Based Service
CBS178
"Confirmation"30
Confirmation signals for
locking and unlocking30
Connecting a vacuum cleaner,
refer to Socket103
Consumption display, refer to
Average fuel
consumption74
"Continue guidance to
destination?"125
Control Center16
– adjusting brightness77
– assistance window20
– automatic climate control96
– changing settings19,77
– changing the menu page19
– changing time and date78
– confirming selection or
entry19
– controller16
– display, menus16
– language selection78
– menu item selection19
– menu navigation17
– operating elements16
– selecting units of
measurement and display
format77
– start menu17
– status information20
– symbols17
Control Display16Controller, refer to Control
Center16
Controls, refer to Cockpit10
Convenience operation
– convertible top30,31
– glass sunroof30,31
– windows30,31
Convenience start, refer to
Starting engine54,55
Convertible
– convertible program for
automatic climate control97
– opening and closing
windows36
– rollover protection
system87
– top39
– wind deflector42
Convertible top
– care, refer to the Caring for
your vehicle brochure
– convenience operation31
– emergency closing41
– manual closing in the event
of an electrical
malfunction41
– opening and closing40
Coolant176
– level176
Cooling, maximum95
Cornering Brake Control
CBC81
Country of destination for
navigation116
Courtesy lighting93
Cruise control61
– active cruise control62
Cruising range74
Cup holders103
Curb weight, refer to
Weights192
"Current position"125
Current position
– displaying125
– entering120
– storing120
"Customer Relations"162
Cylinders, refer to Engine
data192
D
Dashboard, refer to
Cockpit10
Dashboard lighting, refer to
Instrument lighting93
Data192
– capacities195
– dimensions193
– engine192
– weights192
"Date"79
Date69
– setting78
"Date format"79
Daytime driving lamps91
DBC Dynamic Brake
Control81
– malfunction83
– warning lamp83
"Deactivated"47
Deactivating front passenger
airbag, Coupe52
Decommissioning the vehicle,
refer to the Caring for your
vehicle brochure
Deep water, refer to Driving
through water109
Defrosting windows95
Defrosting windows and
removing condensation95
Defrosting windshield, refer to
Defrosting windows95
Defrost position, refer to
Defrosting windows95
"Delete address book" for
navigation121
"Delete all numbers" on the
portable phone155
"Delete data" for
navigation121
"Delete" for portable
phone154
Destination address
– deleting121
– entering115
Page 206 of 217
Reference 205
At a glance
Controls
Driving tips
Communications
Navigation
Entertainment
Mobility
G
Garage-door opener, refer to
Integrated universal remote
control100
Gasoline
– refer to Fuel
specifications167
– refer to Required fuel167
Gasoline display, refer to Fuel
gage70
Gear changes
– SMG Sequential manual
transmission57
Gear display
– automatic transmission with
Steptronic58
– SMG Sequential manual
transmission57
Gearshift lever
– automatic transmission with
Steptronic58
– manual transmission56
– SMG Sequential manual
transmission56
General driving notes108
Glass sunroof, electric with
raise function37
– convenience operation31
– moving manually38
– remote control30
Glove compartment101
– rechargeable flashlight101
GPS navigation, refer to
Navigation system114
Grills, refer to Ventilation94
Gross vehicle weight, refer to
Weights192
H
Handbrake55
– indicator lamp13,55
Hands-free system14,151
Hazard warning flashers15
Head airbags86
Headlamp control,
automatic91Headlamp flasher60
Headlamps
– care, refer to the Caring for
your vehicle brochure
– cleaning, refer to Wiper
system61
– replacing bulbs180
Head Light, refer to Adaptive
Head Light92
Head-Up Display88
Heated mirrors50
Heated rear window94
Heated seats49
Heated steering wheel51
Heater95
Heating
– exterior mirrors50
– interior94
– rear window94
– residual heat mode96
– seats49
– steering wheel51
Heating with engine switched
off, refer to Residual heat
mode96
Heavy cargo, refer to Securing
load111
Height, refer to
Dimensions193
Height adjustment
– seats45
– steering wheel50
High beams92
– headlamp flasher92
– indicator lamp13
– replacing bulbs180
Hills109
Holder for cups103
"Home address"122
Hood174
Horn10
Hotel function32
Hot exhaust system108
"Hour memo"78
"House number" for desti-
nation entry117Hydraulic Brake Assistant,
refer to DBC Dynamic Brake
Control81
Hydroplaning109
– also refer to Minimum tread
depth171
I
Ice warning69
iDrive, refer to Control
Center16
Ignition key28
Ignition key positions, refer to
Ignition lock54
Ignition lock54
Increasing luggage
compartment capacity,
Convertible34
Independent ventilation
– activating an activation
time98
– setting activation time98
– switching on and off
directly98
Indicator/warning lamps
– ABS Antilock Brake
System83
– active steering85
– airbags87
– brake system13,83
– DSC Dynamic Stability
Control13,83
– DTC Dynamic Traction
Control13,82
– fastening safety belts49
– Flat Tire Monitor85
– fog lamps13,92
– handbrake55
Indicator and warning lamps,
overview13
Individually assignable
buttons on steering wheel,
refer to Programmable
buttons on steering
wheel51
Individual settings, refer to
Key Memory28