2005 BMW 645I CONVERTIBLE reset
[x] Cancel search: resetPage 13 of 217
Cockpit
12
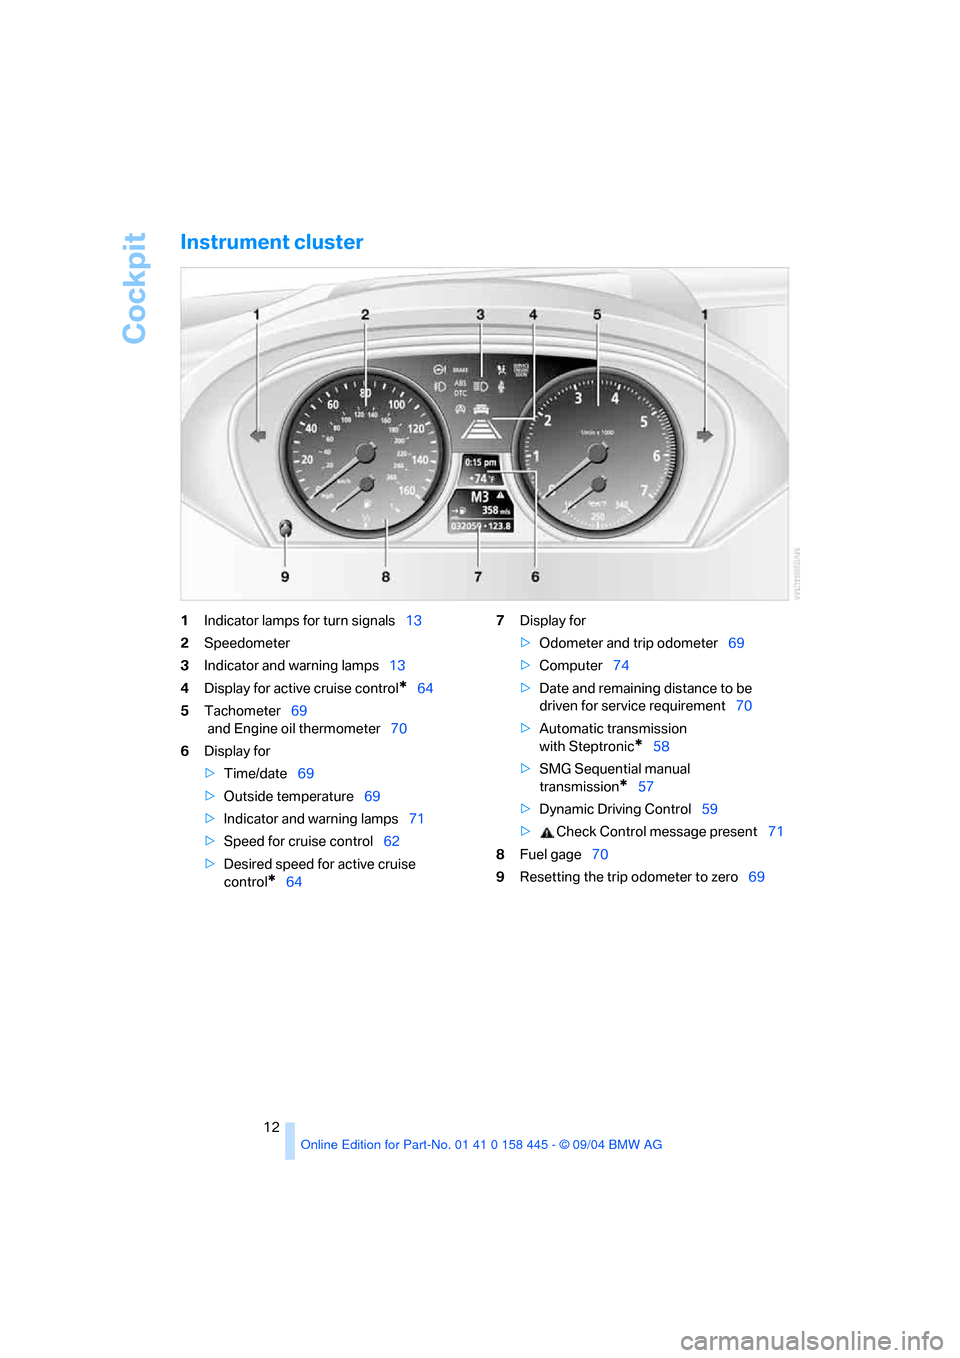
Instrument cluster
1Indicator lamps for turn signals13
2Speedometer
3Indicator and warning lamps13
4Display for active cruise control
*64
5Tachometer69
and Engine oil thermometer70
6Display for
>Time/date69
>Outside temperature69
>Indicator and warning lamps71
>Speed for cruise control62
>Desired speed for active cruise
control
*647Display for
>Odometer and trip odometer69
>Computer74
>Date and remaining distance to be
driven for service requirement70
>Automatic transmission
with Steptronic
*58
>SMG Sequential manual
transmission
*57
>Dynamic Driving Control59
> Check Control message present71
8Fuel gage70
9Resetting the trip odometer to zero69
Page 70 of 217
Controls
69Reference
At a glance
Driving tips
Communications
Navigation
Entertainment
Mobility
Everything under control
Odometer, outside
temperature display, clock
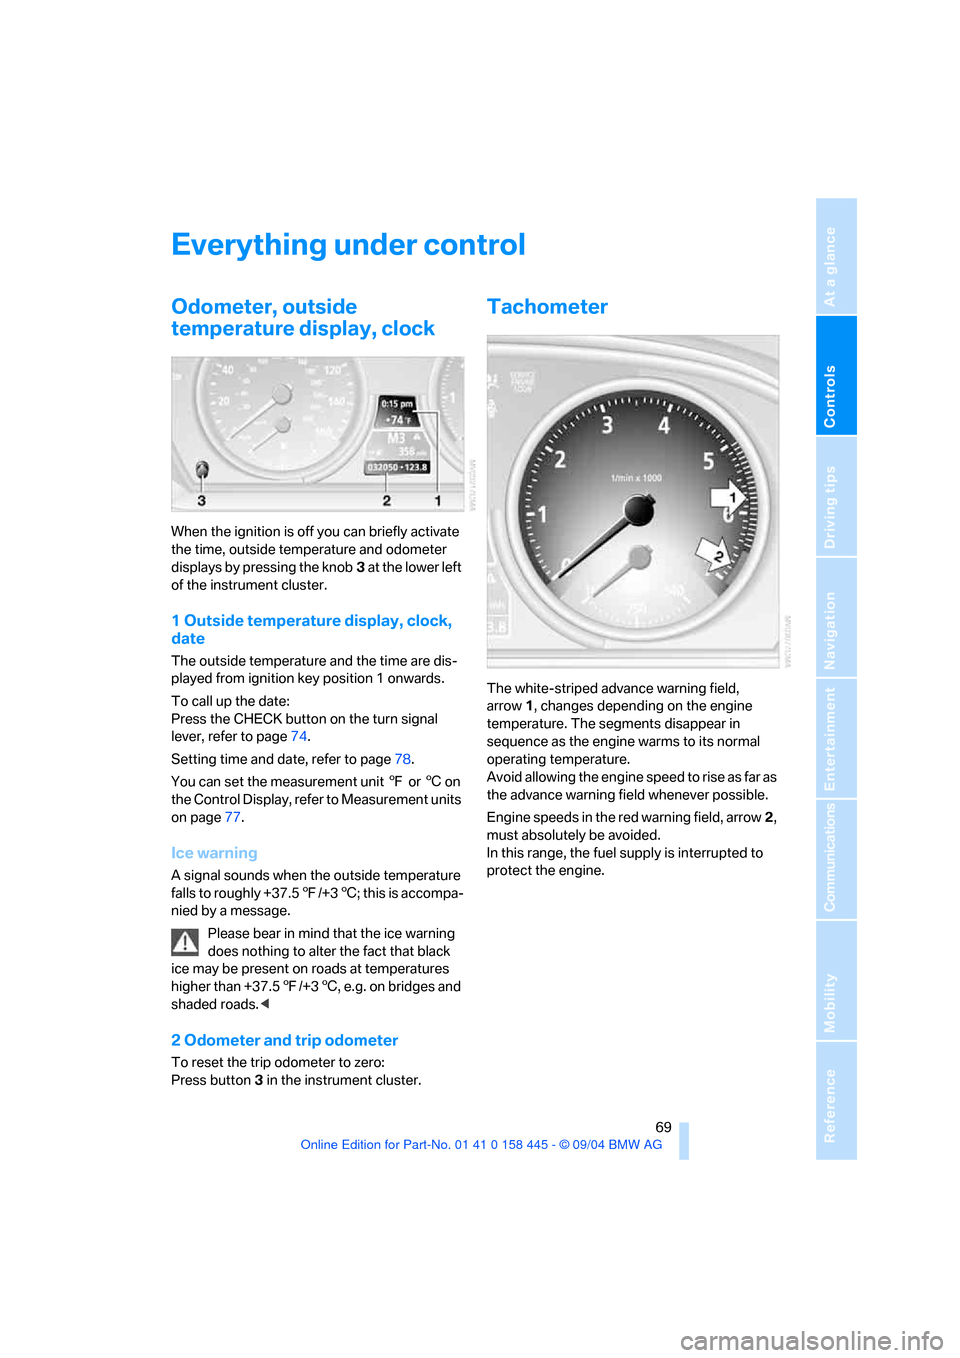
When the ignition is off you can briefly activate
the time, outside temperature and odometer
displays by pressing the knob3 at the lower left
of the instrument cluster.
1 Outside temperature display, clock,
date
The outside temperature and the time are dis-
played from ignition key position 1 onwards.
To call up the date:
Press the CHECK button on the turn signal
lever, refer to page74.
Setting time and date, refer to page78.
You can set the measurement unit 7 or 6 on
the Control Display, refer to Measurement units
on page77.
Ice warning
A signal sounds when the outside temperature
falls to roughly +37.57/+36; this is accompa-
nied by a message.
Please bear in mind that the ice warning
does nothing to alter the fact that black
ice may be present on roads at temperatures
higher than +37.57/+36, e.g. on bridges and
shaded roads.<
2 Odometer and trip odometer
To reset the trip odometer to zero:
Press button3 in the instrument cluster.
Tachometer
The white-striped advance warning field,
arrow1, changes depending on the engine
temperature. The segments disappear in
sequence as the engine warms to its normal
operating temperature.
Avoid allowing the engine speed to rise as far as
the advance warning field whenever possible.
Engine speeds in the red warning field, arrow2,
must absolutely be avoided.
In this range, the fuel supply is interrupted to
protect the engine.
Page 75 of 217
Everything under control
74
Computer
Requesting information
As of ignition key position 1, you can use the BC
button in the turn signal lever to call up com-
puter information in the instrument cluster.
A new function appears each time you press the
BC button.
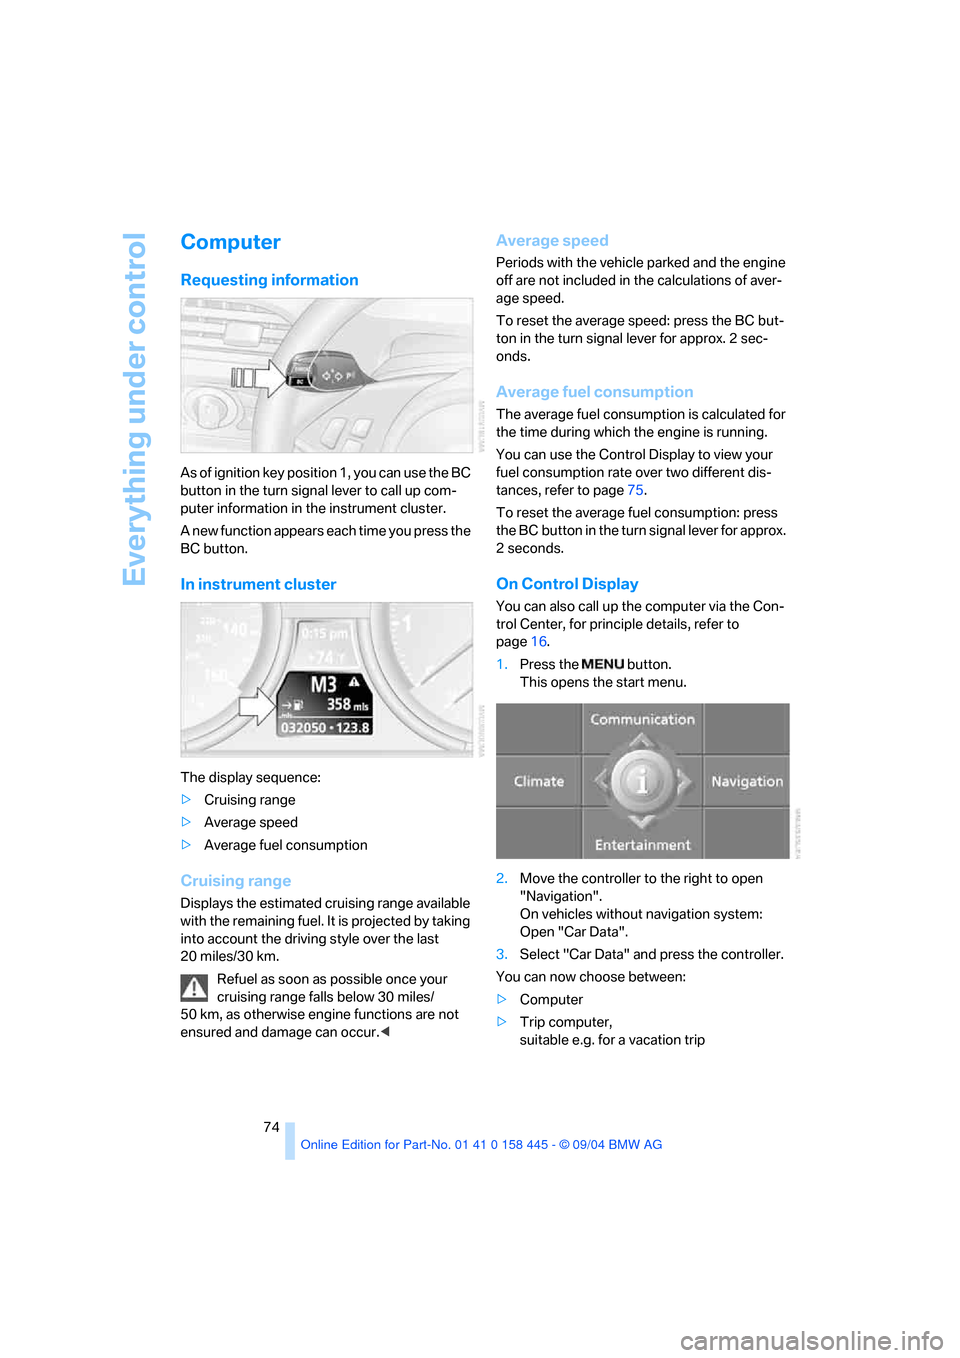
In instrument cluster
The display sequence:
>Cruising range
>Average speed
>Average fuel consumption
Cruising range
Displays the estimated cruising range available
with the remaining fuel. It is projected by taking
into account the driving style over the last
20 miles/30 km.
Refuel as soon as possible once your
cruising range falls below 30 miles/
50 km, as otherwise engine functions are not
ensured and damage can occur.<
Average speed
Periods with the vehicle parked and the engine
off are not included in the calculations of aver-
age speed.
To reset the average speed: press the BC but-
ton in the turn signal lever for approx. 2 sec-
onds.
Average fuel consumption
The average fuel consumption is calculated for
the time during which the engine is running.
You can use the Control Display to view your
fuel consumption rate over two different dis-
tances, refer to page75.
To reset the average fuel consumption: press
the BC button in the turn signal lever for approx.
2seconds.
On Control Display
You can also call up the computer via the Con-
trol Center, for principle details, refer to
page16.
1.Press the button.
This opens the start menu.
2.Move the controller to the right to open
"Navigation".
On vehicles without navigation system:
Open "Car Data".
3.Select "Car Data" and press the controller.
You can now choose between:
>Computer
>Trip computer,
suitable e.g. for a vacation trip
Page 76 of 217
Controls
75Reference
At a glance
Driving tips
Communications
Navigation
Entertainment
Mobility
Computer
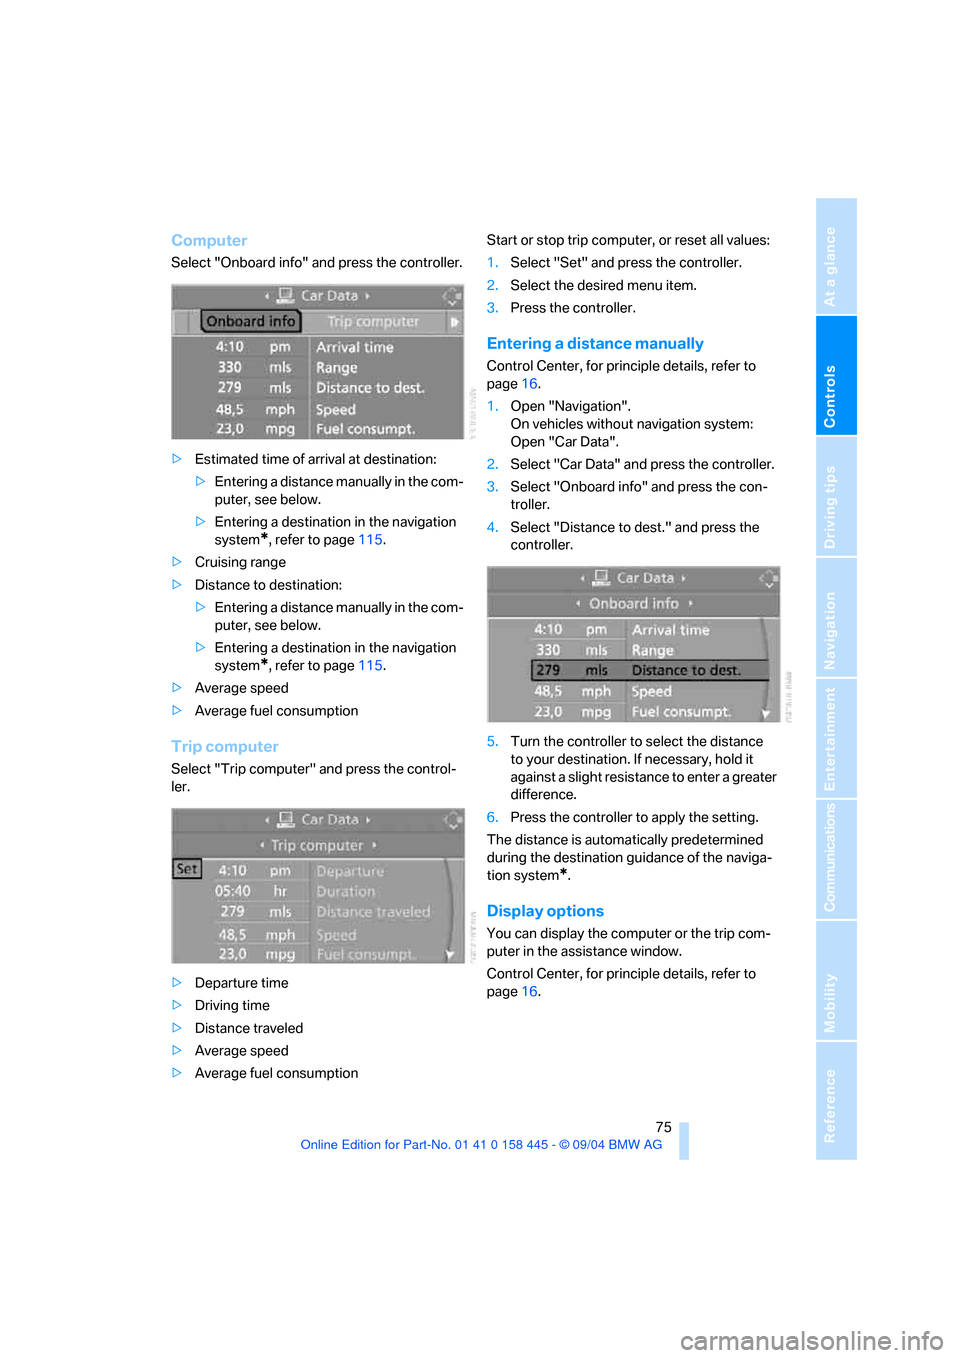
Select "Onboard info" and press the controller.
>Estimated time of arrival at destination:
>Entering a distance manually in the com-
puter, see below.
>Entering a destination in the navigation
system
*, refer to page115.
>Cruising range
>Distance to destination:
>Entering a distance manually in the com-
puter, see below.
>Entering a destination in the navigation
system
*, refer to page115.
>Average speed
>Average fuel consumption
Trip computer
Select "Trip computer" and press the control-
ler.
>Departure time
>Driving time
>Distance traveled
>Average speed
>Average fuel consumptionStart or stop trip computer, or reset all values:
1.Select "Set" and press the controller.
2.Select the desired menu item.
3.Press the controller.
Entering a distance manually
Control Center, for principle details, refer to
page16.
1.Open "Navigation".
On vehicles without navigation system:
Open "Car Data".
2.Select "Car Data" and press the controller.
3.Select "Onboard info" and press the con-
troller.
4.Select "Distance to dest." and press the
controller.
5.Turn the controller to select the distance
to your destination. If necessary, hold it
against a slight resistance to enter a greater
difference.
6.Press the controller to apply the setting.
The distance is automatically predetermined
during the destination guidance of the naviga-
tion system
*.
Display options
You can display the computer or the trip com-
puter in the assistance window.
Control Center, for principle details, refer to
page16.
Page 78 of 217
Controls
77Reference
At a glance
Driving tips
Communications
Navigation
Entertainment
Mobility
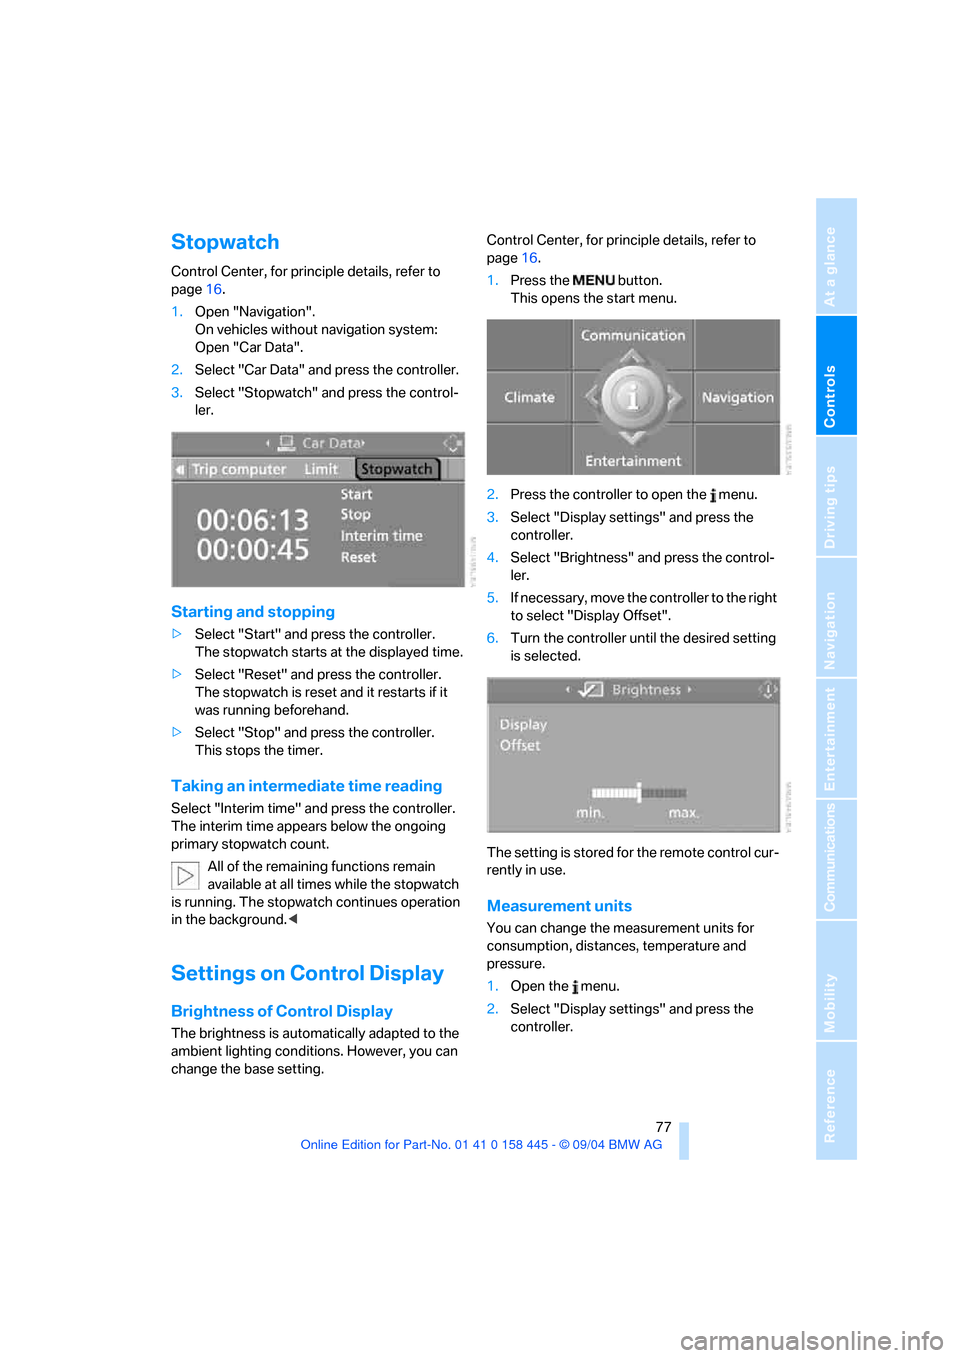
Stopwatch
Control Center, for principle details, refer to
page16.
1.Open "Navigation".
On vehicles without navigation system:
Open "Car Data".
2.Select "Car Data" and press the controller.
3.Select "Stopwatch" and press the control-
ler.
Starting and stopping
>Select "Start" and press the controller.
The stopwatch starts at the displayed time.
>Select "Reset" and press the controller.
The stopwatch is reset and it restarts if it
was running beforehand.
>Select "Stop" and press the controller.
This stops the timer.
Taking an intermediate time reading
Select "Interim time" and press the controller.
The interim time appears below the ongoing
primary stopwatch count.
All of the remaining functions remain
available at all times while the stopwatch
is running. The stopwatch continues operation
in the background.<
Settings on Control Display
Brightness of Control Display
The brightness is automatically adapted to the
ambient lighting conditions. However, you can
change the base setting.Control Center, for principle details, refer to
page16.
1.Press the button.
This opens the start menu.
2.Press the controller to open the menu.
3.Select "Display settings" and press the
controller.
4.Select "Brightness" and press the control-
ler.
5.If necessary, move the controller to the right
to select "Display Offset".
6.Turn the controller until the desired setting
is selected.
The setting is stored for the remote control cur-
rently in use.
Measurement units
You can change the measurement units for
consumption, distances, temperature and
pressure.
1.Open the menu.
2.Select "Display settings" and press the
controller.
Page 97 of 217
A congenial climate
96 it off while also increasing the air volume as
required.
The recirculated-air mode should not be used
over a longer period of time, as the air quality
inside the vehicle deteriorates continuously.<
Residual heat mode
Press the button when the motor is
switched off and warm.
The heat stored in the engine is
used to heat the passenger com-
partment, e.g. when stopped at a school to pick
up a child.
You can adjust the automatic climate control
settings as of ignition key position 1.
Provided that the engine has warmed to its nor-
mal operating temperature and the battery is
charged, you can use this function for up to
15 minutes after switching off the ignition. The
LED in the button lights up to confirm compli-
ance with both of these conditions.
Switching off automatic climate control
The air volume, the heater and the
cooling function are all switched
off.
You can restart the automatic cli-
mate control by pressing any of its buttons
except the REST button.
Settings using Control Center
Ignition key:
>In vehicles with separate drives for audio
CDs and navigation DVDs, ignition key in
position 2.
>In vehicles with one drive for audio CDs,
ignition key in position 1.
Control Center, for principle details, refer to
page16.1.Press the button.
This opens the start menu.
2.Move the controller to the left to open "Cli-
mate".
You can set the following:
>Manual air distribution, separate for driver's
side and passenger side
>Adapting temperature in upper body region
>Intensity of the AUTO program
The settings are stored for the remote control
currently in use.
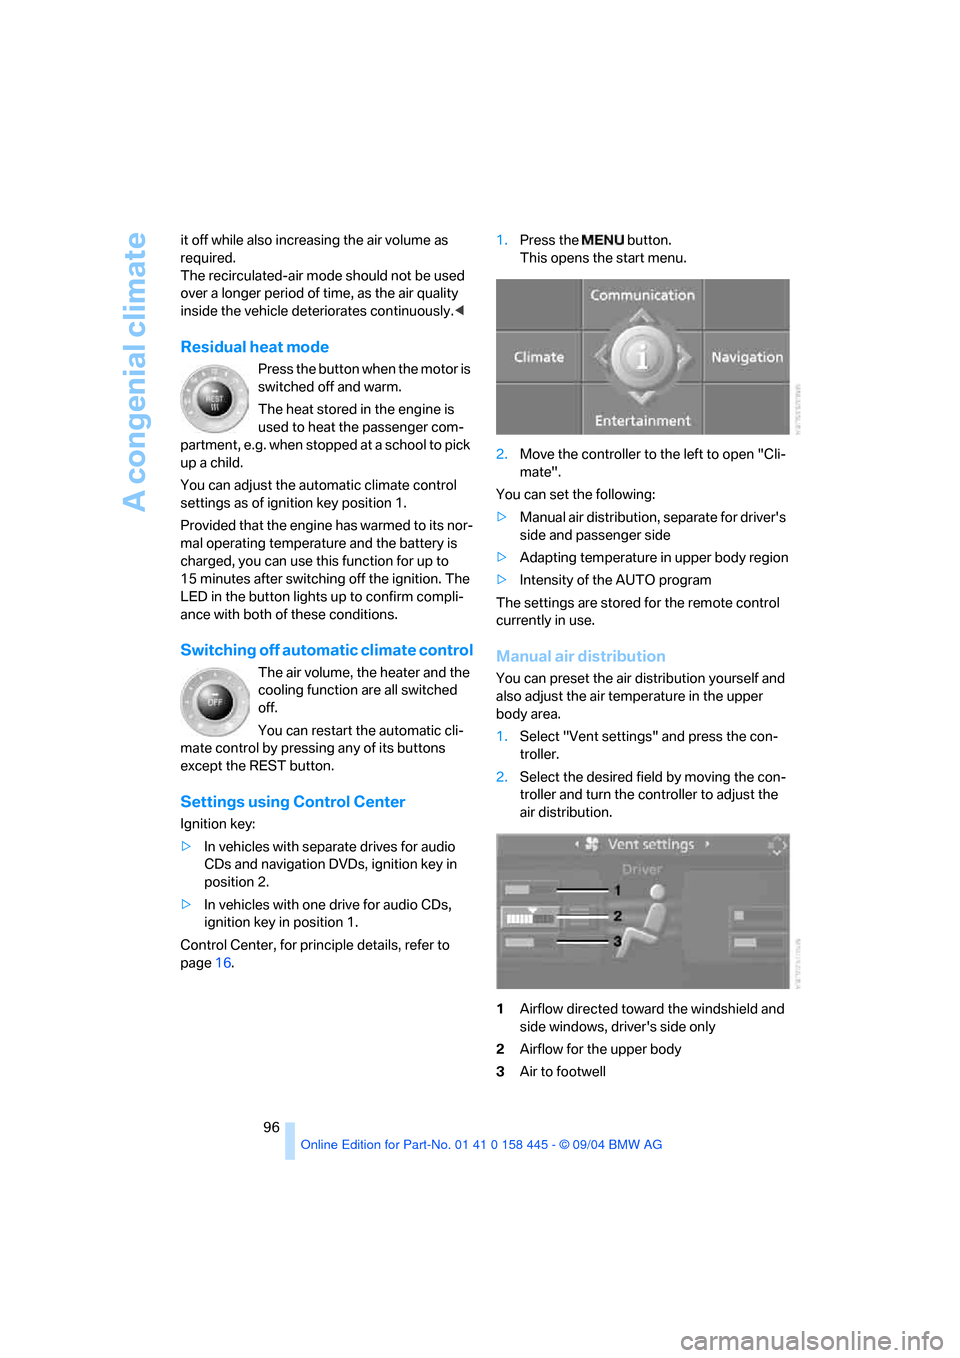
Manual air distribution
You can preset the air distribution yourself and
also adjust the air temperature in the upper
body area.
1.Select "Vent settings" and press the con-
troller.
2.Select the desired field by moving the con-
troller and turn the controller to adjust the
air distribution.
1Airflow directed toward the windshield and
side windows, driver's side only
2Airflow for the upper body
3Air to footwell
Page 136 of 217
Navigation
Entertainment
Driving tips
135Reference
At a glance
Controls
Communications
Mobility
2.Select "Concert hall" or "Theater".
3.Press the controller.
LOGIC7 spatial sound is switched on.
To switch off spatial sound:
Select "Off" and press the controller.
LOGIC7 and the LOGIC7 logo are registered
trade marks of Lexicon, Inc., a company of the
Harman International Group.
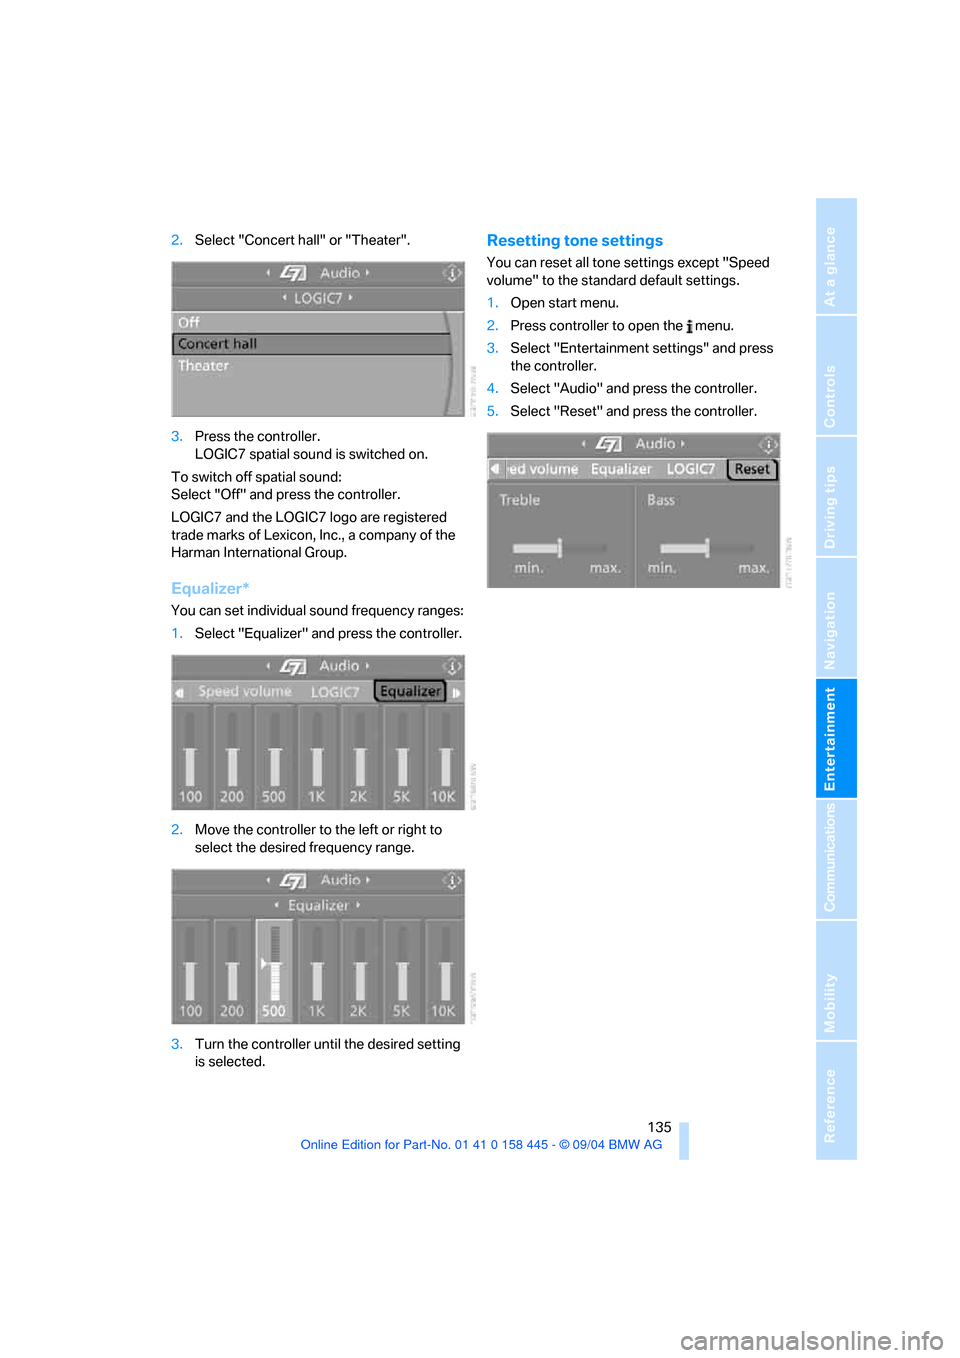
Equalizer*
You can set individual sound frequency ranges:
1.Select "Equalizer" and press the controller.
2.Move the controller to the left or right to
select the desired frequency range.
3.Turn the controller until the desired setting
is selected.
Resetting tone settings
You can reset all tone settings except "Speed
volume" to the standard default settings.
1.Open start menu.
2.Press controller to open the menu.
3.Select "Entertainment settings" and press
the controller.
4.Select "Audio" and press the controller.
5.Select "Reset" and press the controller.
Page 137 of 217
Radio
136
Radio
Your radio provides reception of the FM and AM
wavebands.
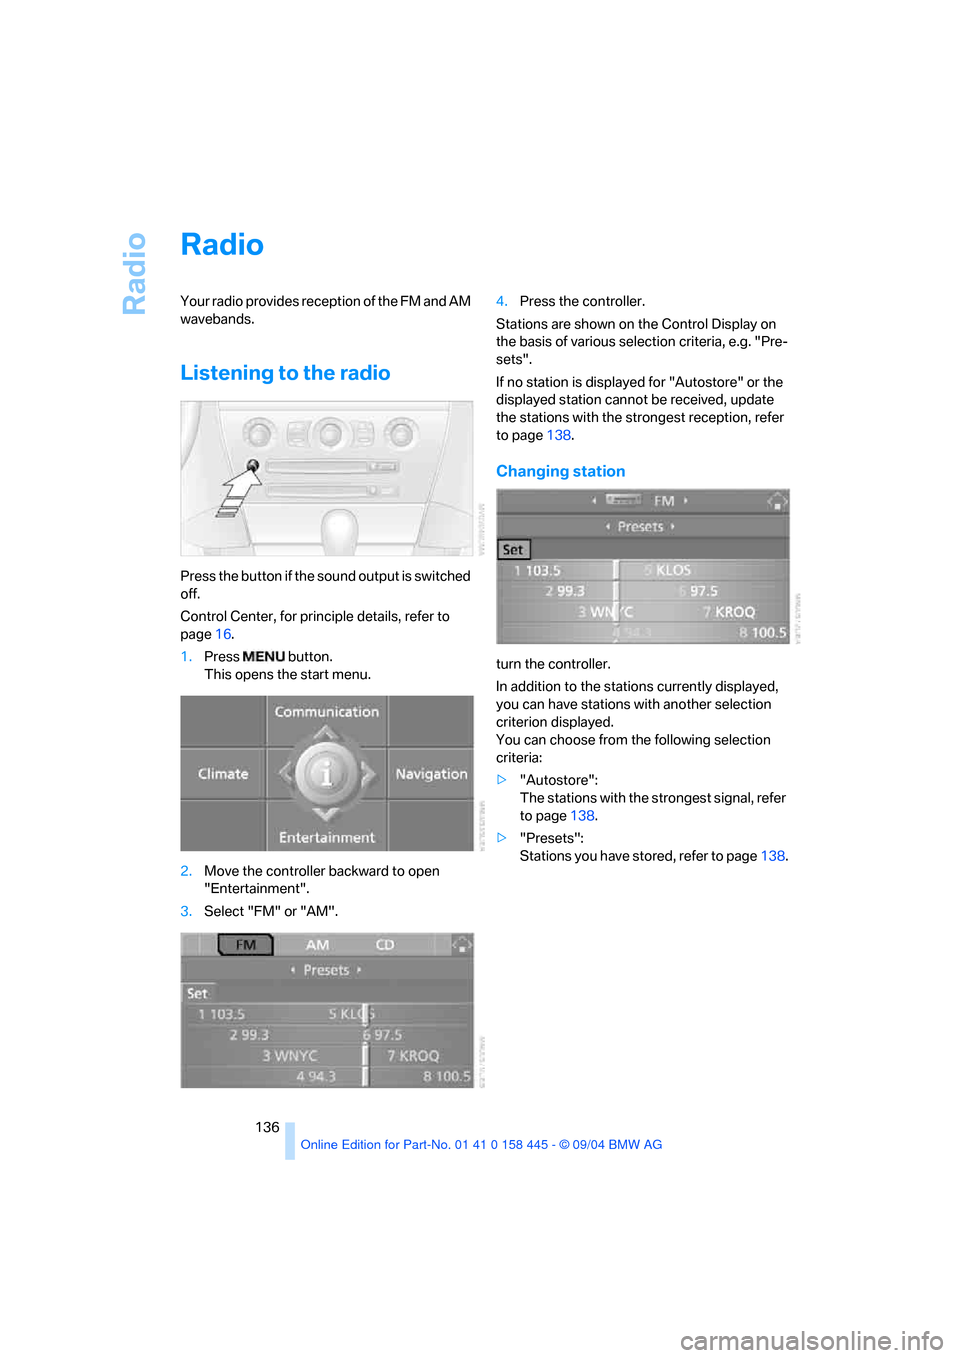
Listening to the radio
Press the button if the sound output is switched
off.
Control Center, for principle details, refer to
page16.
1.Press button.
This opens the start menu.
2.Move the controller backward to open
"Entertainment".
3.Select "FM" or "AM".4.Press the controller.
Stations are shown on the Control Display on
the basis of various selection criteria, e.g. "Pre-
sets".
If no station is displayed for "Autostore" or the
displayed station cannot be received, update
the stations with the strongest reception, refer
to page138.
Changing station
turn the controller.
In addition to the stations currently displayed,
you can have stations with another selection
criterion displayed.
You can choose from the following selection
criteria:
>"Autostore":
The stations with the strongest signal, refer
to page138.
>"Presets":
Stations you have stored, refer to page138.