2005 BMW 645I CONVERTIBLE lock
[x] Cancel search: lockPage 167 of 217
Refueling
166
Refueling
Always switch off the engine before refu-
eling. If you do not, fuel cannot be dis-
pensed into the tank and a message on the
Control Display will appear.<
Always observe all applicable precautions
and regulations when handling fuels.
Never carry spare fuel containers in your vehi-
cle. Whether empty or full, these containers can
leak, cause an explosion, and lead to fire in the
event of a collision.<
Fuel filler door
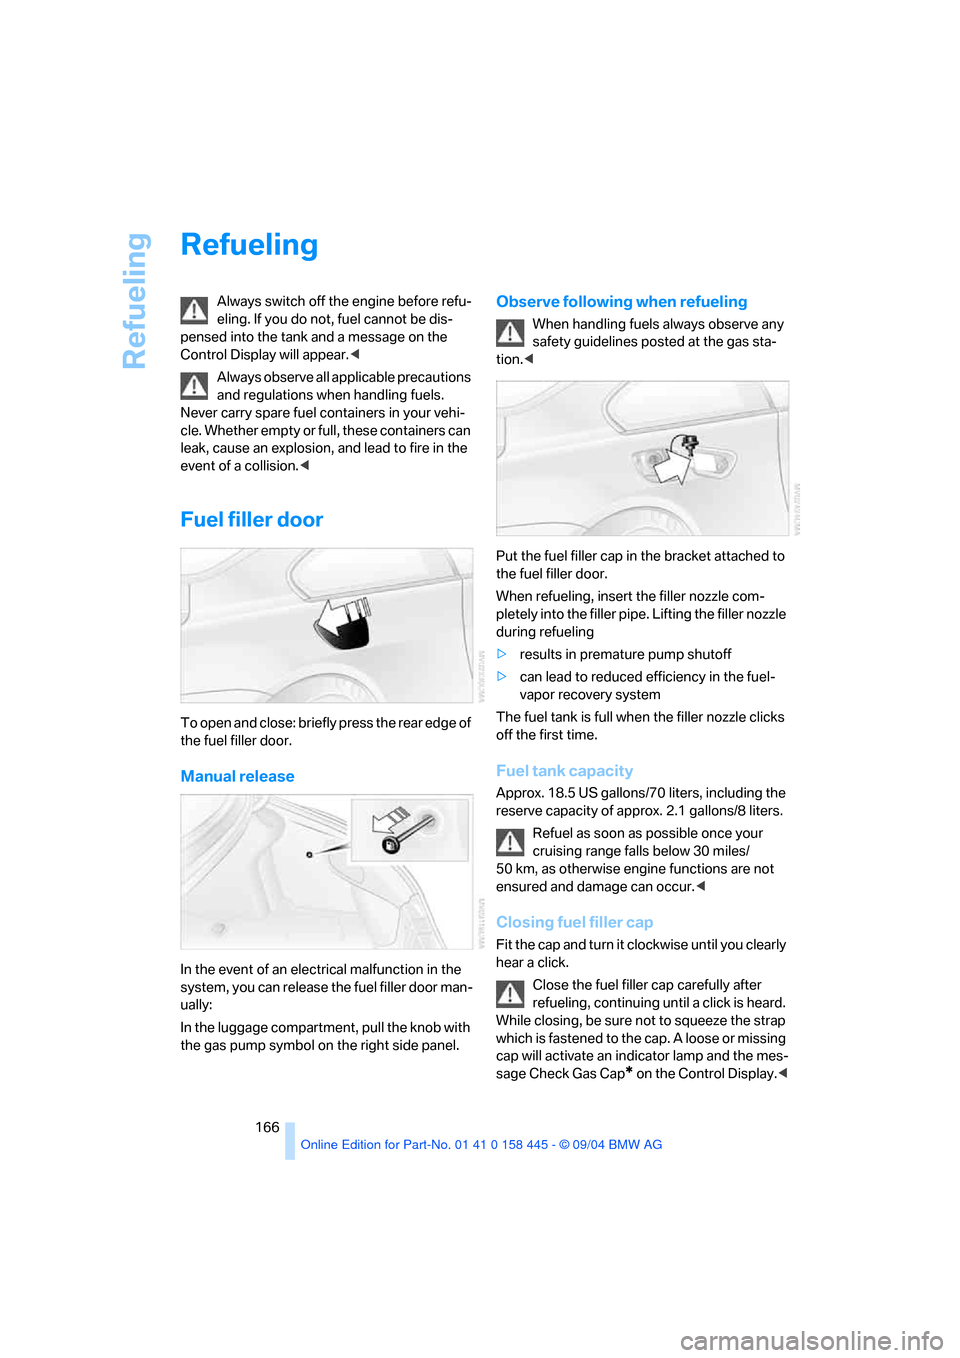
To open and close: briefly press the rear edge of
the fuel filler door.
Manual release
In the event of an electrical malfunction in the
system, you can release the fuel filler door man-
ually:
In the luggage compartment, pull the knob with
the gas pump symbol on the right side panel.
Observe following when refueling
When handling fuels always observe any
safety guidelines posted at the gas sta-
tion.<
Put the fuel filler cap in the bracket attached to
the fuel filler door.
When refueling, insert the filler nozzle com-
pletely into the filler pipe. Lifting the filler nozzle
during refueling
>results in premature pump shutoff
>can lead to reduced efficiency in the fuel-
vapor recovery system
The fuel tank is full when the filler nozzle clicks
off the first time.
Fuel tank capacity
Approx. 18.5 US gallons/70 liters, including the
reserve capacity of approx. 2.1 gallons/8 liters.
Refuel as soon as possible once your
cruising range falls below 30 miles/
50 km, as otherwise engine functions are not
ensured and damage can occur.<
Closing fuel filler cap
Fit the cap and turn it clockwise until you clearly
hear a click.
Close the fuel filler cap carefully after
refueling, continuing until a click is heard.
While closing, be sure not to squeeze the strap
which is fastened to the cap. A loose or missing
cap will activate an indicator lamp and the mes-
sage Check Gas Cap
* on the Control Display.<
Page 178 of 217
Mobility
177Reference
At a glance
Controls
Driving tips
Communications
Navigation
Entertainment
2.Turn the cap of the expansion tank counter-
clockwise to allow any accumulated pres-
sure to escape, then continue turning to
open.
3.The coolant level is correct when it lies
between the Min and Max mark, also refer to
the drawing next the filler neck.
4.If the coolant is low, slowly add coolant up to
the specified level – do not overfill.
5.Turn the cap until it clicks.
6.Have the reason for the coolant loss elimi-
nated as soon as possible.
Brake system
Malfunction
Brake fluid
The warning lamp lights up in red
in spite of the handbrake being
released; a message appears on the
Control Display.
Stop the vehicle immediately.
The brake fluid in the reservoir has fallen to
below the minimum level. At the same time, a
significantly longer brake pedal path may be
noticeable. Have the system checked immedi-
ately by a BMW center.
Warning lamp for Canadian models.
When you continue driving, an increased
brake pedal path can be necessary, and
significantly longer braking distances might be
required. Please adapt your driving style
accordingly.<
Brake pads
The warning lamp lights up in red
in spite of the handbrake being
released; a message appears on the
Control Display. The brake pads have reached
their minimum pad thickness. Have the brake
pads replaced as soon as possible.Warning lamp for Canadian models.
For your own safety: use only brake pads
that BMW has approved for your particu-
lar vehicle model. As BMW cannot assess the
suitability of other brake pads for use on your
vehicle, BMW is unable to assume continued
responsibility for the vehicle's operating safety
if non-approved pads are installed.<
Page 181 of 217
Replacing components
180
Replacing components
Onboard tool kit
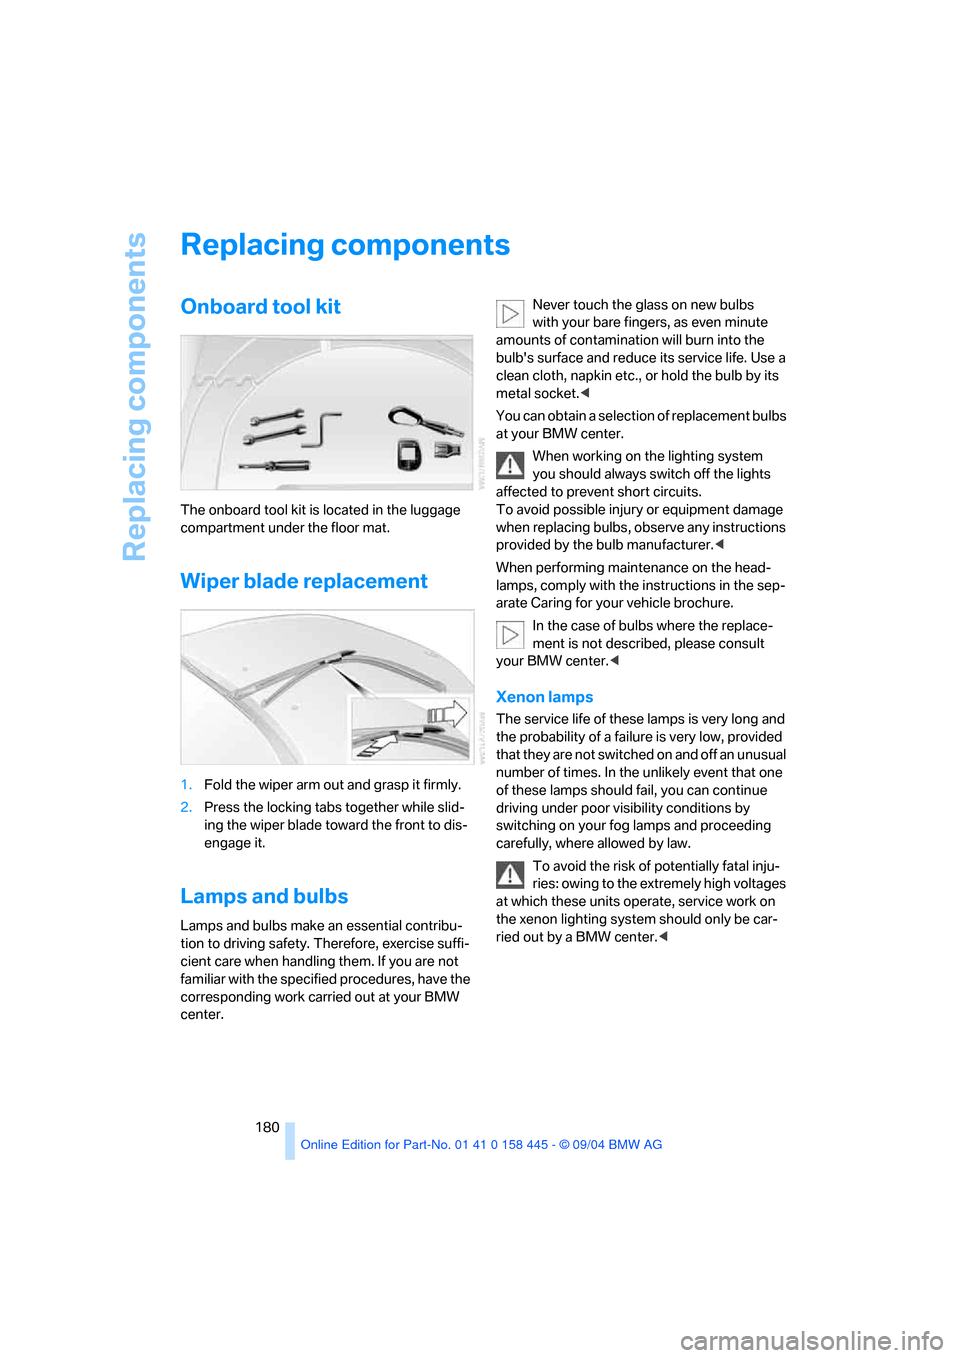
The onboard tool kit is located in the luggage
compartment under the floor mat.
Wiper blade replacement
1.Fold the wiper arm out and grasp it firmly.
2.Press the locking tabs together while slid-
ing the wiper blade toward the front to dis-
engage it.
Lamps and bulbs
Lamps and bulbs make an essential contribu-
tion to driving safety. Therefore, exercise suffi-
cient care when handling them. If you are not
familiar with the specified procedures, have the
corresponding work carried out at your BMW
center.Never touch the glass on new bulbs
with your bare fingers, as even minute
amounts of contamination will burn into the
bulb's surface and reduce its service life. Use a
clean cloth, napkin etc., or hold the bulb by its
metal socket.<
You can obtain a selection of replacement bulbs
at your BMW center.
When working on the lighting system
you should always switch off the lights
affected to prevent short circuits.
To avoid possible injury or equipment damage
when replacing bulbs, observe any instructions
provided by the bulb manufacturer.<
When performing maintenance on the head-
lamps, comply with the instructions in the sep-
arate Caring for your vehicle brochure.
In the case of bulbs where the replace-
ment is not described, please consult
your BMW center.<
Xenon lamps
The service life of these lamps is very long and
the probability of a failure is very low, provided
that they are not switched on and off an unusual
number of times. In the unlikely event that one
of these lamps should fail, you can continue
driving under poor visibility conditions by
switching on your fog lamps and proceeding
carefully, where allowed by law.
To avoid the risk of potentially fatal inju-
ries: owing to the extremely high voltages
at which these units operate, service work on
the xenon lighting system should only be car-
ried out by a BMW center.<
Page 187 of 217
Giving and receiving assistance
186
Warning triangle*
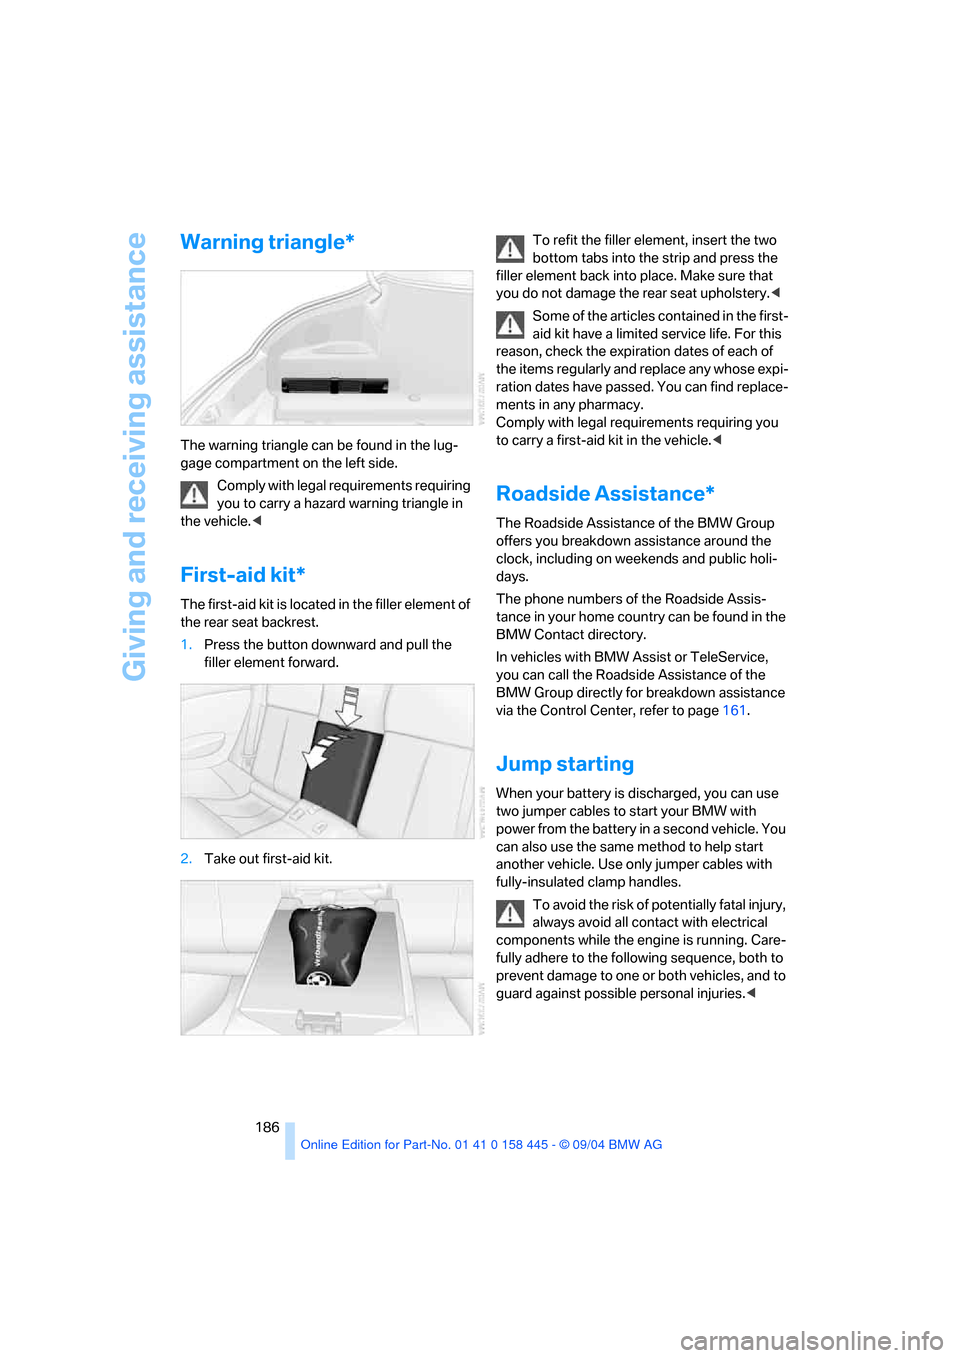
The warning triangle can be found in the lug-
gage compartment on the left side.
Comply with legal requirements requiring
you to carry a hazard warning triangle in
the vehicle.<
First-aid kit*
The first-aid kit is located in the filler element of
the rear seat backrest.
1.Press the button downward and pull the
filler element forward.
2.Take out first-aid kit.To refit the filler element, insert the two
bottom tabs into the strip and press the
filler element back into place. Make sure that
you do not damage the rear seat upholstery.<
Some of the articles contained in the first-
aid kit have a limited service life. For this
reason, check the expiration dates of each of
the items regularly and replace any whose expi-
ration dates have passed. You can find replace-
ments in any pharmacy.
Comply with legal requirements requiring you
to carry a first-aid kit in the vehicle.<
Roadside Assistance*
The Roadside Assistance of the BMW Group
offers you breakdown assistance around the
clock, including on weekends and public holi-
days.
The phone numbers of the Roadside Assis-
tance in your home country can be found in the
BMW Contact directory.
In vehicles with BMW Assist or TeleService,
you can call the Roadside Assistance of the
BMW Group directly for breakdown assistance
via the Control Center, refer to page161.
Jump starting
When your battery is discharged, you can use
two jumper cables to start your BMW with
power from the battery in a second vehicle. You
can also use the same method to help start
another vehicle. Use only jumper cables with
fully-insulated clamp handles.
To avoid the risk of potentially fatal injury,
always avoid all contact with electrical
components while the engine is running. Care-
fully adhere to the following sequence, both to
prevent damage to one or both vehicles, and to
guard against possible personal injuries.<
Page 189 of 217
Giving and receiving assistance
188
Towing and tow-starting
Always observe all applicable towing laws
and regulations.<
Never allow passengers to ride in a towed
vehicle for any reason.<
Use tow fitting
The threaded tow fitting is stored in the tool kit
mounted on the inside of the luggage compart-
ment under the floor mat, refer to page180, and
should always remain in the vehicle. It can be
screwed in at the front or rear of the BMW.
To avoid damage to the tow fitting and the
vehicle, observe the following: only use
the tow fitting that comes with the vehicle and
screw it in as far as possible. Use the tow fitting
for towing only on roads. Avoid lateral strains on
the tow fitting, e.g. do not the lift vehicle by the
tow fitting.<
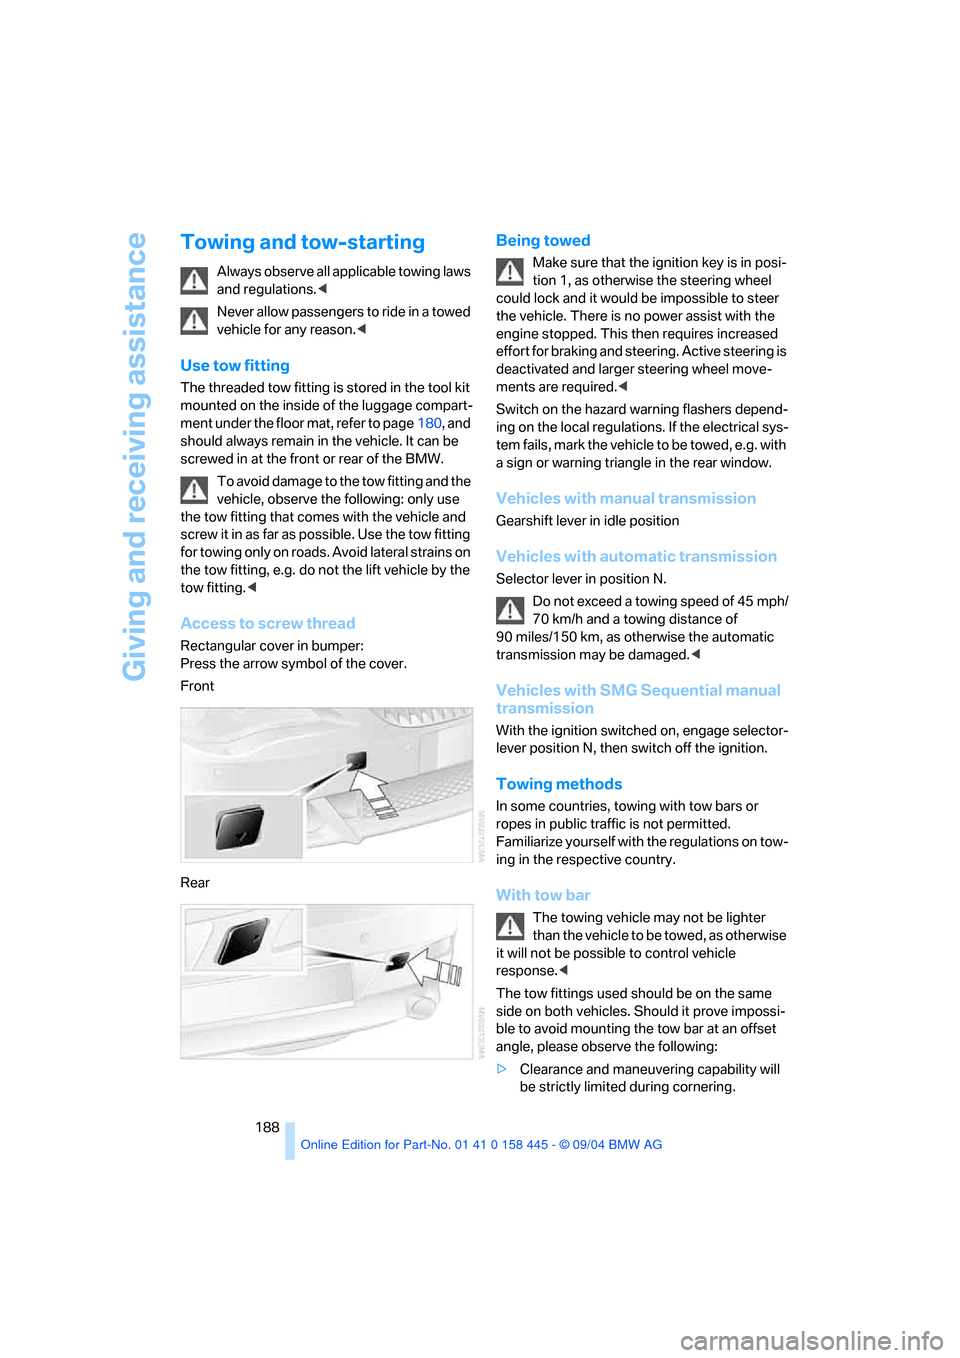
Access to screw thread
Rectangular cover in bumper:
Press the arrow symbol of the cover.
Front
Rear
Being towed
Make sure that the ignition key is in posi-
tion 1, as otherwise the steering wheel
could lock and it would be impossible to steer
the vehicle. There is no power assist with the
engine stopped. This then requires increased
effort for braking and steering. Active steering is
deactivated and larger steering wheel move-
ments are required.<
Switch on the hazard warning flashers depend-
ing on the local regulations. If the electrical sys-
tem fails, mark the vehicle to be towed, e.g. with
a sign or warning triangle in the rear window.
Vehicles with manual transmission
Gearshift lever in idle position
Vehicles with automatic transmission
Selector lever in position N.
Do not exceed a towing speed of 45 mph/
70 km/h and a towing distance of
90 miles/150 km, as otherwise the automatic
transmission may be damaged.<
Vehicles with SMG Sequential manual
transmission
With the ignition switched on, engage selector-
lever position N, then switch off the ignition.
Towing methods
In some countries, towing with tow bars or
ropes in public traffic is not permitted.
Familiarize yourself with the regulations on tow-
ing in the respective country.
With tow bar
The towing vehicle may not be lighter
than the vehicle to be towed, as otherwise
it will not be possible to control vehicle
response.<
The tow fittings used should be on the same
side on both vehicles. Should it prove impossi-
ble to avoid mounting the tow bar at an offset
angle, please observe the following:
>Clearance and maneuvering capability will
be strictly limited during cornering.
Page 199 of 217
Short commands of the voice command system
198
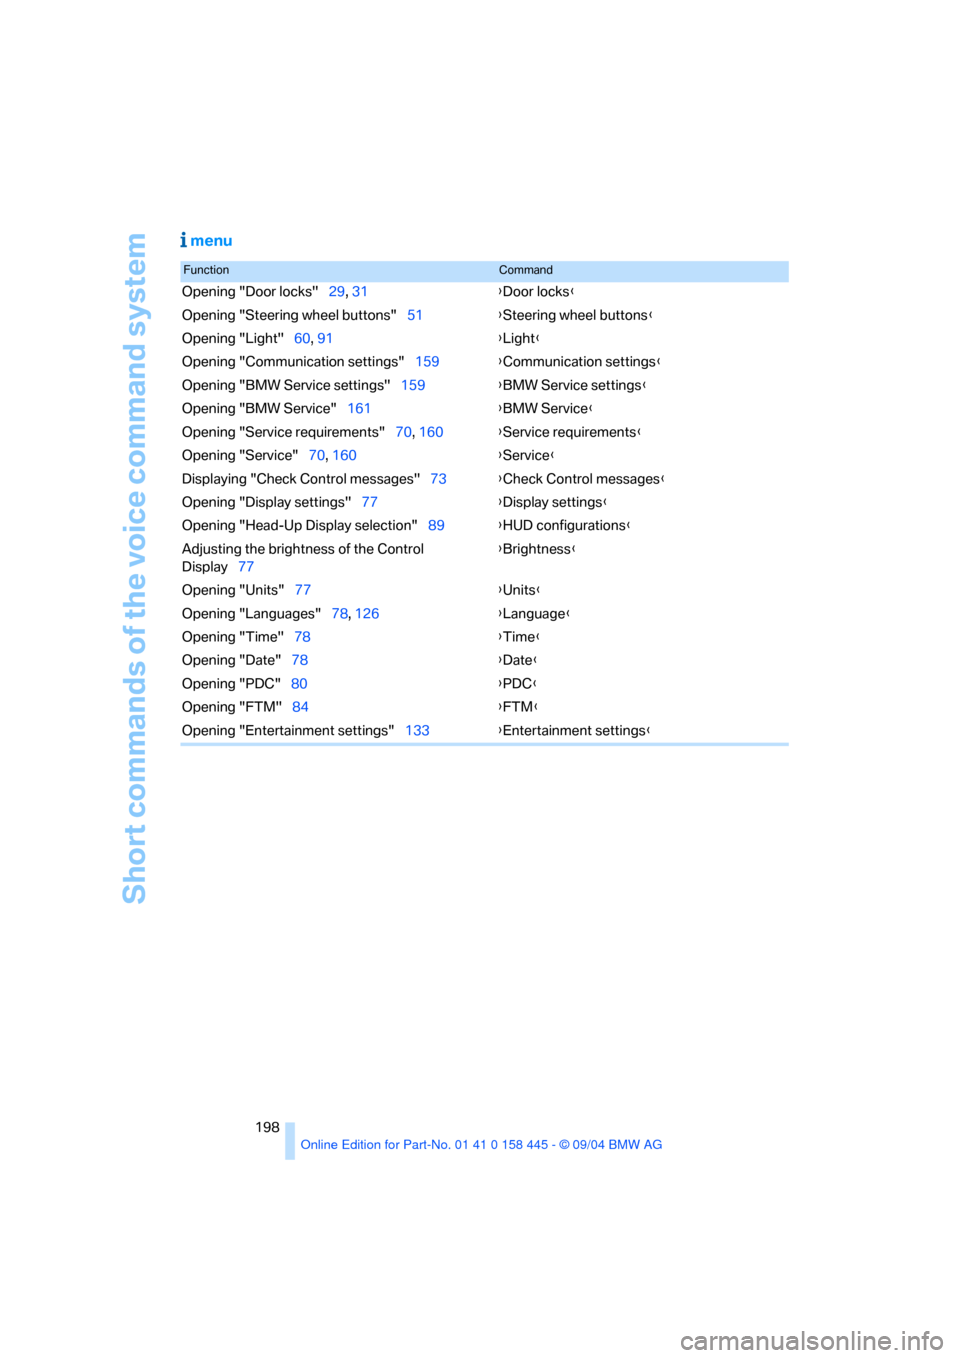
menu
FunctionCommand
Opening "Door locks"29, 31{Door locks}
Opening "Steering wheel buttons"51{Steering wheel buttons}
Opening "Light"60, 91{Light}
Opening "Communication settings"159{Communication settings}
Opening "BMW Service settings"159{BMW Service settings}
Opening "BMW Service"161{BMW Service}
Opening "Service requirements"70, 160{Service requirements}
Opening "Service"70, 160{Service}
Displaying "Check Control messages"73{Check Control messages}
Opening "Display settings"77{Display settings}
Opening "Head-Up Display selection"89{HUD configurations}
Adjusting the brightness of the Control
Display77{Brightness}
Opening "Units"77{Units}
Opening "Languages"78, 126{Language}
Opening "Time"78{Time}
Opening "Date"78{Date}
Opening "PDC"80{PDC}
Opening "FTM"84{FTM}
Opening "Entertainment settings"133{Entertainment settings}
Page 200 of 217

199Reference
At a glance
Controls
Driving tips
Communications
Navigation
Entertainment
Mobility
Everything from A to Z
Index
"..." Identifies Control Display
texts used to select
individual functions,
pointing out where these are
located.
A
ABS Antilock Brake
System81
– indicator lamp83
– malfunction83
ACC, refer to Active cruise
control62
Acceleration assistant with
SMG59
Accessories, refer to Your
individual vehicle5
Activated-charcoal filter97
"Activation time" for
independent ventilation98
Active cruise control62
– indicator lamps64
– malfunction68
– selecting distance65
Active roll stabilization83
Active steering85
– initializing system86
– warning lamp85
Adapting temperature in
upper body region97
Adaptive brake lamps, refer to
Brake Force Display86
Adaptive Head Light92
"Add digits" for portable
phone153
"Address book" for
navigation120
Address for navigation
– deleting121
– entering115
– selecting120
– storing current position120"Add to destination list"117
Adhesive bandages, refer to
First-aid kit186
Adjusting the temperature
with automatic climate
control95
Adjusting the thigh support45
Adjusting tone during audio
operation, refer to Tone
control133
"After opening door"46
"After unlocking"46
Airbags86
– deactivating, Coupe52
– sitting safely44
– warning lamp87
Air distribution
– automatic95
– manual96
Airing, refer to Ventilation97
Air recirculation, refer to AUC
Automatic recirculated-air
control95
"Air recirculation on / off"51
Air vents, refer to
Ventilation94
Air volume95
AKI, refer to Fuel
specifications167
Alarm system34
– avoiding unintentional
alarms35
– interior motion sensor35
– switching off alarm34
– switching off tilt alarm
sensor and interior motion
sensor35
– tilt alarm sensor35
All around the center
console14
All around the steering
wheel10
"All channels"141"All doors"29
All-season tires, refer to
Winter tires172
"AM", reception
range133,136
Antenna for portable
phone150
Antifreeze
– coolant176
– washer fluid61
Antilock Brake System
ABS81
– indicator lamp83
Anti-theft alarm system, refer
to Alarm system34
Anti-theft system29
Anti-trapping mechanism
– glass sunroof38
– power windows37
Approved axle loads, refer to
Weights192
Approved gross vehicle
weight, refer to Weights192
Armrest, refer to Center
armrest102
Arrival time
– refer to Computer75
– refer to Starting destination
guidance124
"Arrow display" during
Navigation127
Ashtray103
Assist, refer to BMW
Assist159
Assistance systems, refer to
Driving stability control
systems81
Assistance window20
"Assist. window off"21
AUC Automatic recirculated-
air control95
"Audio"133
Page 201 of 217
Everything from A to Z
200 Audio132
– controls132
– switching on/off132
– tone control133
– volume133
Automatic
– air distribution95
– air volume95
– cruise control61,62
– headlamp control91
– service notification160
– steering wheel adjustment,
refer to Easy entry/exit50
– storing stations138
Automatic car washes110
– also refer to the Caring for
your vehicle brochure
Automatic climate control94
– automatic air distribution95
– convertible program97
– settings using Control
Center96
– switching off96
Automatic curb monitor47
"Automatic programs"97
Automatic recirculated-air
control AUC95
Automatic station search137
Automatic transmission with
Steptronic58
– convenience start55
– Dynamic Driving Control59
– interlock54
– kick-down58
– selector lever interlock58
– shiftlock58
– starting engine55
– towing188
– tow-starting189
"Automatic ventilation"98
AUTO program with
automatic climate control95
"Autostore" on the
radio136,138
Average fuel consumption74
– setting units77
Average speed74"Avoid ferries" for
navigation123
Avoid freeways for
navigation122
"Avoid highways" for
navigation122
Avoiding unintentional
alarms35
"Avoid tollroads" for
navigation123
Axle loads, refer to
Weights192
"A - Z"153
B
Backrests, refer to Seats44
Backup lamps, refer to
Reverse gear56
Balance, refer to Tone
control134
Balance adjustment in audio
mode, right/left134
Bandages, refer to First-aid
kit186
"Bass", refer to Tone
control134
Bass, refer to Tone
control133
Battery
– jump starting186
– refer to Vehicle battery183
Being towed188
Belts, refer to Safety belts48
Beverage holder, refer to Cup
holders103
Black ice, refer to Ice
warning69
Blower, refer to Air volume95
BMW Assist159
– enabling159
– services offered160
BMW maintenance
system178
"BMW Service"161
"BMW Service settings"159
Bottle holder, refer to Cup
holders103Brake Assistant, refer to DBC
Dynamic Brake Control81
Brake fluid177
– warning lamp177
Brake Force Display86
Brake hydraulic system177
Brake lamps
– Brake Force Display86
– replacing bulbs182
Brake pads177
– breaking-in108
Brake rotors110
Brakes109
– ABS Antilock Brake
System81
– brake fluid177
– Brake Force Display86
– brake pads108,177
– breaking-in108
– CBC Cornering Brake
Control81
– handbrake55
Brake system108
– brake fluid level177
– brake pads108,177
– brake rotors110
– breaking-in108
– warning lamp13,83,177
Brake wear warning
– brake pads177
Braking
– electronic brake-force
distribution81
– refer to Braking safely109
Breakdown assistance161
Breakdown services, refer to
Roadside Assistance186
Breaking-in108
– clutch108
– differential108
Break wear warning
– warning lamp177
"Brightness"77
Buttons on steering wheel11
Bypassing route sections128