2005 BMW 645I CONVERTIBLE phone
[x] Cancel search: phonePage 30 of 217
Controls
29Reference
At a glance
Driving tips
Communications
Navigation
Entertainment
Mobility
The following settings mentioned last are also
called up during unlocking:
>Driver's seat, exterior-mirror and steering-
wheel position, refer to page46
>The volume and tone settings for audio and
video sources, refer to page133
>The volume setting for the telephone, refer
to page151
>The display of the stored stations for the
radio, refer to page138
Central locking system
The concept
The central locking system is ready for opera-
tion whenever the driver's door is closed. This
simultaneously engages and releases the locks
on the following:
>Doors
>Compartment in the front center console
>Luggage compartment lid
>Fuel filler door
The central locking system can be operated
from the outside
>via the remote control
>via the door lock
and from inside via the button for the central
locking system.
If operated from the inside, the fuel filler door
and the compartment in the front center con-
sole are not locked, refer to page31.
The anti-theft system is automatically activated
whenever you activate the central locking sys-
tem from outside the vehicle. It prevents the
doors from being unlocked using the lock but-
tons or door handles. The alarm system is
armed/disarmed at the same time. The dome
light is also switched on and off with the remote
control.
You can find more detailed information on the
alarm system on page34.In the event of a serious accident, the central
locking system unlocks automatically. The haz-
ard warning flashers and interior lamps also
switch on.
Opening and closing: from
outside
Using the remote control
Protect the remote control against unau-
thorized use by handing over only the
spare key, for example when using hotel valet
parking.<
Because any persons or animals left unat-
tended in a parked vehicle could lock the
doors from the inside, you should always keep
the remote control with you; this precaution
ensures that you will remain able to unlock the
vehicle from the outside at all times.<
Unlocking
Use the button to unlock the vehicle
depending on the setting.
Control Center, for principle details, refer to
page16.
1.Open the menu.
2.Select "Vehicle settings" and press the
controller.
3.Select "Door locks" and press the control-
ler.
4.Select "Central locking" and press the con-
troller.
5.Select "Unlock button" and press the con-
troller.
6.Select a menu item:
>"All doors"
Press the button once to unlock the
entire vehicle.
>"Driver's door only"
Press the button once to unlock only
the driver's door and the fuel filler door.
Page 38 of 217
Controls
37Reference
At a glance
Driving tips
Communications
Navigation
Entertainment
Mobility
Rear window
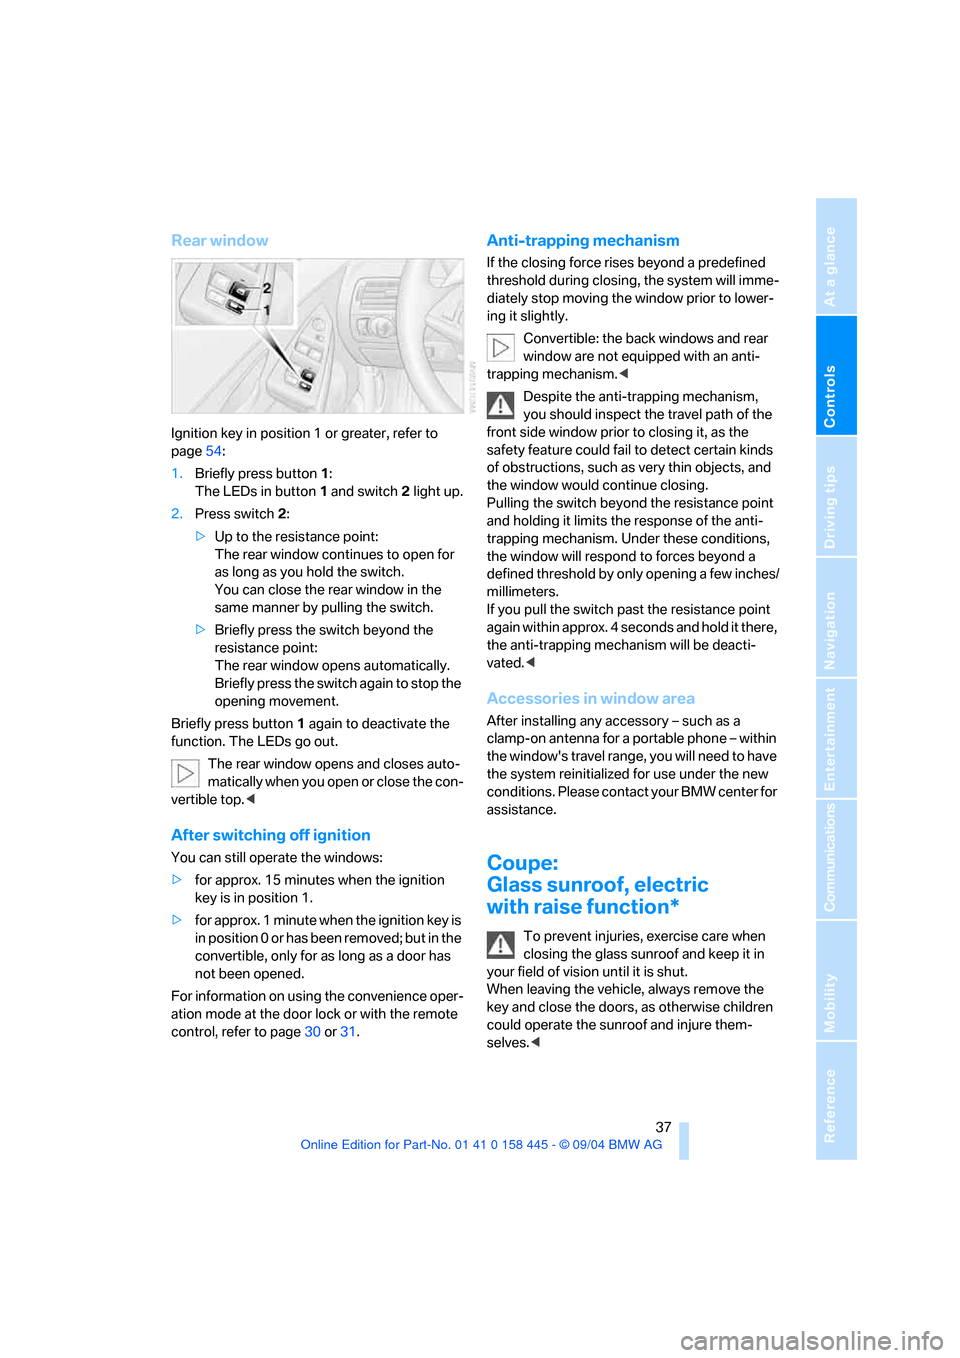
Ignition key in position 1 or greater, refer to
page54:
1.Briefly press button1:
The LEDs in button 1 and switch 2 light up.
2.Press switch 2:
>Up to the resistance point:
The rear window continues to open for
as long as you hold the switch.
You can close the rear window in the
same manner by pulling the switch.
>Briefly press the switch beyond the
resistance point:
The rear window opens automatically.
Briefly press the switch again to stop the
opening movement.
Briefly press button 1 again to deactivate the
function. The LEDs go out.
The rear window opens and closes auto-
matically when you open or close the con-
vertible top.<
After switching off ignition
You can still operate the windows:
>for approx. 15 minutes when the ignition
key is in position 1.
>for approx. 1 minute when the ignition key is
in position 0 or has been removed; but in the
convertible, only for as long as a door has
not been opened.
For information on using the convenience oper-
ation mode at the door lock or with the remote
control, refer to page30 or31.
Anti-trapping mechanism
If the closing force rises beyond a predefined
threshold during closing, the system will imme-
diately stop moving the window prior to lower-
ing it slightly.
Convertible: the back windows and rear
window are not equipped with an anti-
trapping mechanism.<
Despite the anti-trapping mechanism,
you should inspect the travel path of the
front side window prior to closing it, as the
safety feature could fail to detect certain kinds
of obstructions, such as very thin objects, and
the window would continue closing.
Pulling the switch beyond the resistance point
and holding it limits the response of the anti-
trapping mechanism. Under these conditions,
the window will respond to forces beyond a
defined threshold by only opening a few inches/
millimeters.
If you pull the switch past the resistance point
again within approx. 4 seconds and hold it there,
the anti-trapping mechanism will be deacti-
vated.<
Accessories in window area
After installing any accessory – such as a
clamp-on antenna for a portable phone – within
the window's travel range, you will need to have
the system reinitialized for use under the new
conditions. Please contact your BMW center for
assistance.
Coupe:
Glass sunroof, electric
with raise function*
To prevent injuries, exercise care when
closing the glass sunroof and keep it in
your field of vision until it is shut.
When leaving the vehicle, always remove the
key and close the doors, as otherwise children
could operate the sunroof and injure them-
selves.<
Page 52 of 217
Controls
51Reference
At a glance
Driving tips
Communications
Navigation
Entertainment
Mobility
Steering wheel heater*
In ignition key position 2, press the button.
The indicator lamp in the button lights up when
the steering wheel heater is switched on.
Programmable buttons on steering
wheel
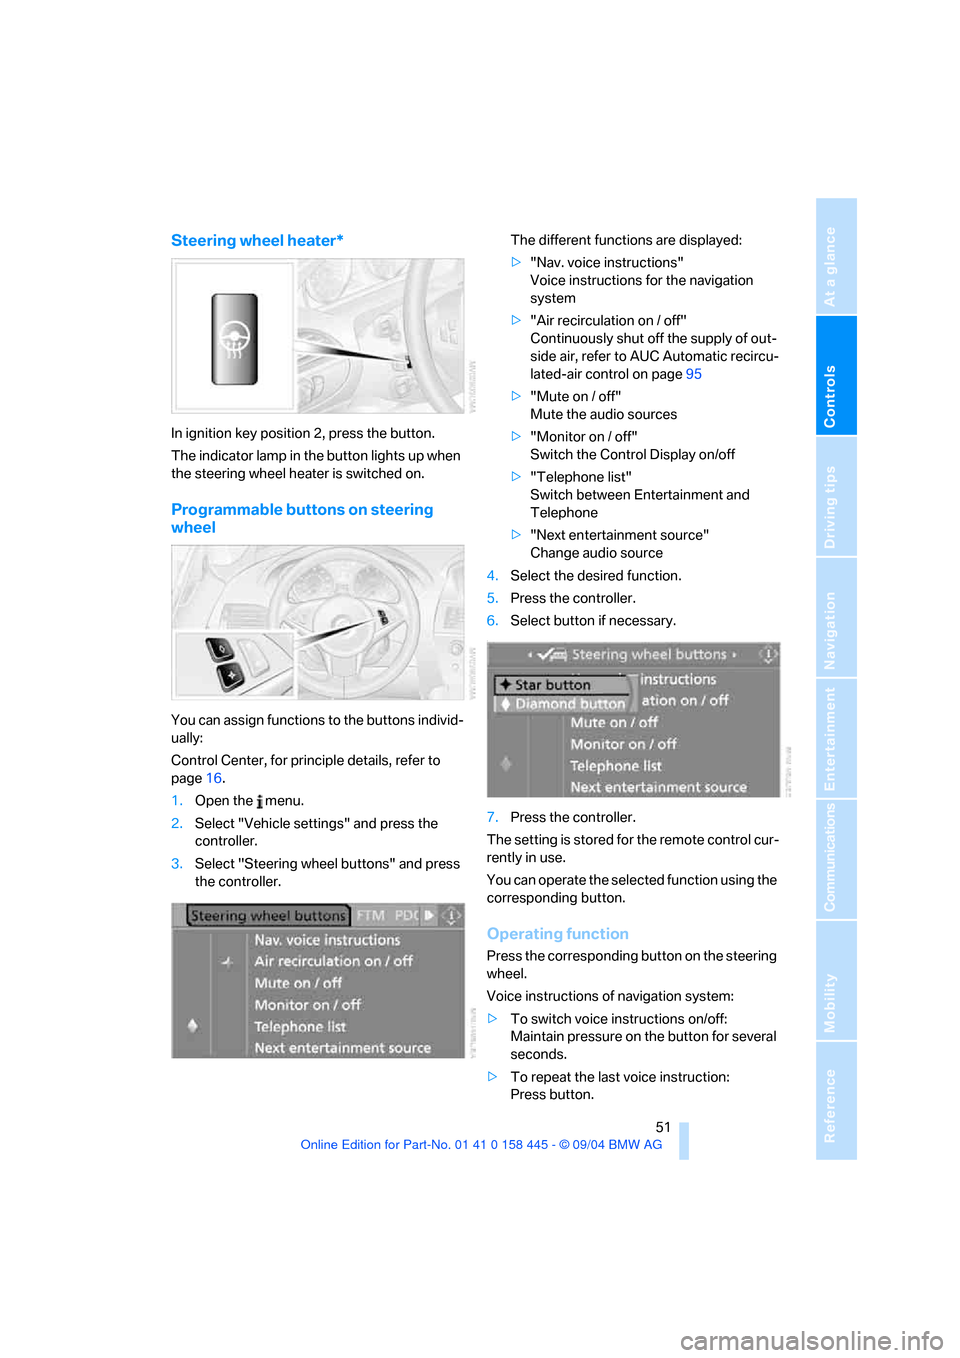
You can assign functions to the buttons individ-
ually:
Control Center, for principle details, refer to
page16.
1.Open the menu.
2.Select "Vehicle settings" and press the
controller.
3.Select "Steering wheel buttons" and press
the controller.The different functions are displayed:
>"Nav. voice instructions"
Voice instructions for the navigation
system
>"Air recirculation on / off"
Continuously shut off the supply of out-
side air, refer to AUC Automatic recircu-
lated-air control on page95
>"Mute on / off"
Mute the audio sources
>"Monitor on / off"
Switch the Control Display on/off
>"Telephone list"
Switch between Entertainment and
Telephone
>"Next entertainment source"
Change audio source
4.Select the desired function.
5.Press the controller.
6.Select button if necessary.
.
7.Press the controller.
The setting is stored for the remote control cur-
rently in use.
You can operate the selected function using the
corresponding button.
Operating function
Press the corresponding button on the steering
wheel.
Voice instructions of navigation system:
>To switch voice instructions on/off:
Maintain pressure on the button for several
seconds.
>To repeat the last voice instruction:
Press button.
Page 103 of 217
Practical interior accessories
102
Center armrest
A storage compartment is located in the arm-
rest between the front seats. This compartment
is integrated into the central locking system and
can also be locked separately using the hotel
function, refer to page32.
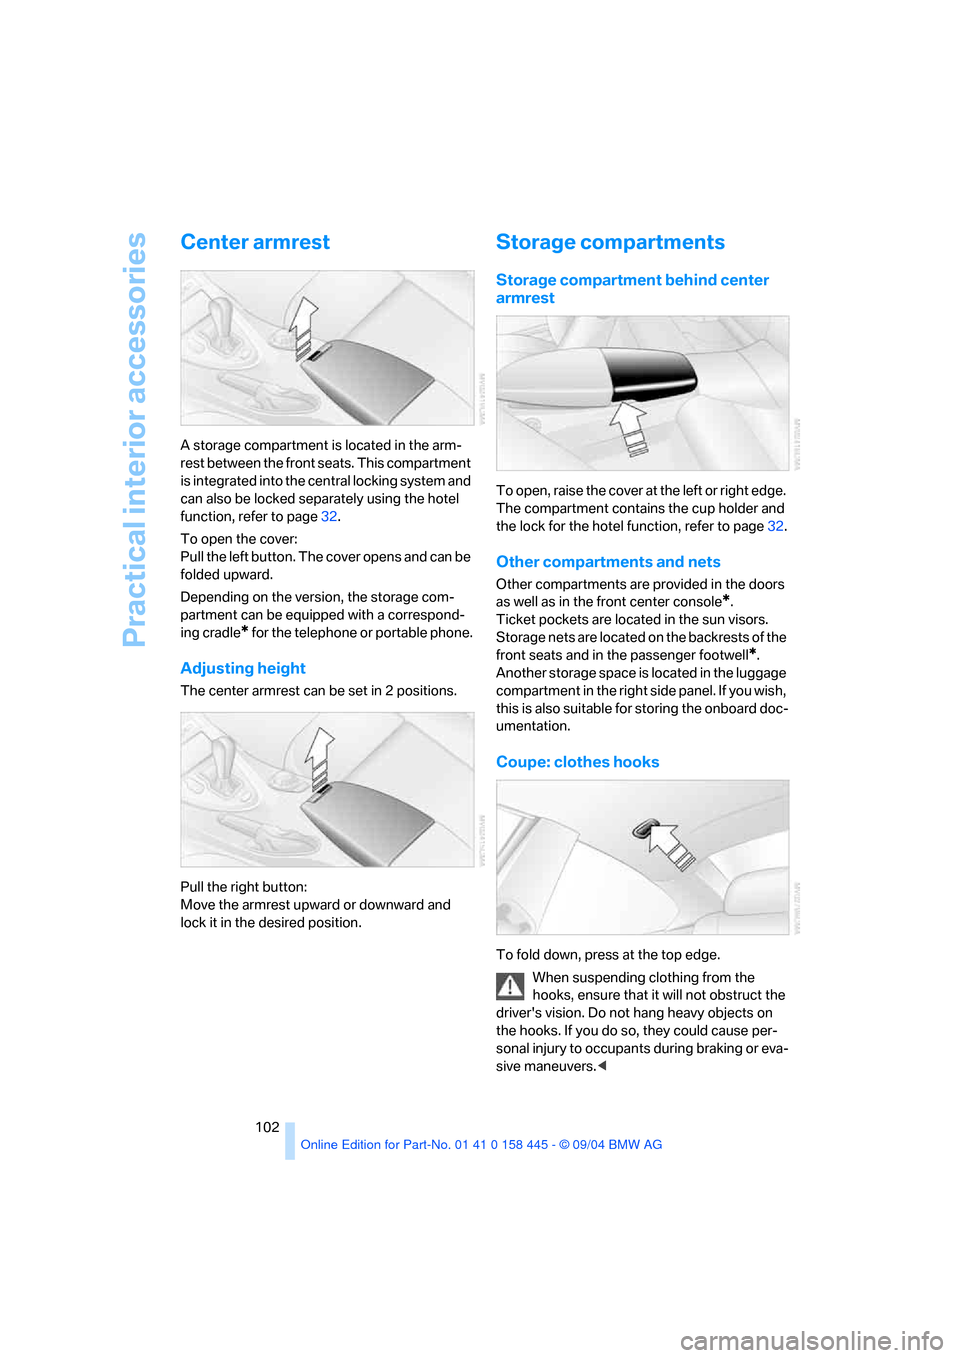
To open the cover:
Pull the left button. The cover opens and can be
folded upward.
Depending on the version, the storage com-
partment can be equipped with a correspond-
ing cradle
* for the telephone or portable phone.
Adjusting height
The center armrest can be set in 2 positions.
Pull the right button:
Move the armrest upward or downward and
lock it in the desired position.
Storage compartments
Storage compartment behind center
armrest
To open, raise the cover at the left or right edge.
The compartment contains the cup holder and
the lock for the hotel function, refer to page32.
Other compartments and nets
Other compartments are provided in the doors
as well as in the front center console
*.
Ticket pockets are located in the sun visors.
Storage nets are located on the backrests of the
front seats and in the passenger footwell
*.
Another storage space is located in the luggage
compartment in the right side panel. If you wish,
this is also suitable for storing the onboard doc-
umentation.
Coupe: clothes hooks
To fold down, press at the top edge.
When suspending clothing from the
hooks, ensure that it will not obstruct the
driver's vision. Do not hang heavy objects on
the hooks. If you do so, they could cause per-
sonal injury to occupants during braking or eva-
sive maneuvers.<
Page 110 of 217
Driving tips
109Reference
At a glance
Controls
Communications
Navigation
Entertainment
Mobility
Mobile communication devices in
vehicle
BMW advises against using mobile com-
munication devices, e.g. portable phones,
inside the vehicle without a direct connection to
an external antenna. Otherwise, the vehicle
electronics and mobile communication device
can influence one another. In addition, there is
no assurance that the radiation emitted during
transmission will be conveyed out of the vehicle
interior.<
Hydroplaning
When driving on wet or slushy roads,
reduce road speed. If you do not, a wedge
of water can form between tires and road sur-
face. This phenomenon is referred to as hydro-
planing, and is characterized by a partial or
complete loss of contact between the tires and
the road surface, ultimately undermining your
ability to steer and brake the vehicle.<
The risk of hydroplaning increases as the tread
depth of the tires decreases, also refer to Mini-
mum tire tread on page171.
Driving through water
Do not drive through water on the road if it
is deeper than 1 ft/30 cm, and then only at
walking speed at the most. Otherwise, the vehi-
cle's engine, the electrical systems and the
transmission may be damaged.<
Using handbrake on inclines.
On inclines, do not hold the vehicle with
the clutch; use the handbrake. Otherwise
greater clutch wear will result.<
SMG Sequential manual transmission
Start off quickly on slopes. Do not hold
the vehicle on a hill by applying the throt-
tle, but engage the handbrake instead. Other-
wise overheating can occur in the transmission
region.<
Braking safely
Your BMW is equipped with ABS as standard. In
situations that require it, it is best to brake with
full force. Since the vehicle maintains steering
responsiveness, you can still avoid possible
obstacles with a minimum of steering effort.
Pulsation at the brake pedal combines with
sounds from the hydraulic circuits to indicate to
the driver that ABS is in its active mode.
Do not drive with your foot resting on the
brake pedal. Even light but consistent
pedal pressure can lead to high temperatures,
brake wear and possibly even brake failure.<
Driving in wet conditions
When driving on wet roads or in heavy rain,
briefly brake with light pedal pressure at inter-
vals of a few miles. Monitor traffic conditions to
ensure that this maneuver does not endanger
other road users. The heat generated in this
process helps dry the pads and rotors to ensure
that full braking efficiency will then be available
when you need it.
Hills
To prevent overheating and thus reduced
efficiency of the brake system, downshift
to a gear in which only minimal brake applica-
tions are needed when descending long or
steep downhill stretches. Even light but consis-
tent pedal pressure can lead to high tempera-
tures, brake wear and possibly even brake fail-
ure.<
You can further enhance the engine's braking
effect by selecting a lower gear in the automatic
transmission's manual mode, downshifting as
far as first gear on extremely steep stretches,
refer to page58. This strategy helps you avoid
placing excessive loads on the brake system.
Never drive with the clutch pressed
or allow the vehicle to coast with the
transmission in Neutral – or with the engine
switched off – there is no engine braking when
the transmission is in Neutral, and no power
assist for brakes and steering when the engine
is not running.
Page 120 of 217
Navigation
Driving tips
119Reference
At a glance
Controls
Communications
Entertainment
Mobility
4.Selecting location:
>"On destination"
>"On location"
>"On a new destination"
5.Press the controller.
6.Select the desired type of destination, such
as "Hotels and restaurants".
7.Press the controller.
Destinations are shown on the Control Dis-
play which are sorted by distance or alpha-
betically.
8.Select a destination and press the control-
ler.
9.Select a menu item:
>To apply the address in the destination
list and start the destination guidance:
Select "Select as destination" and press
the controller.
>To set up a telephone connection:
Select "Call" and press the controller.
To exit from the menu:
Select the arrow and press the controller.
Destination list
The destination list shows the last 20 entered
destinations as well as the current destination
of the destination guidance. This symbol
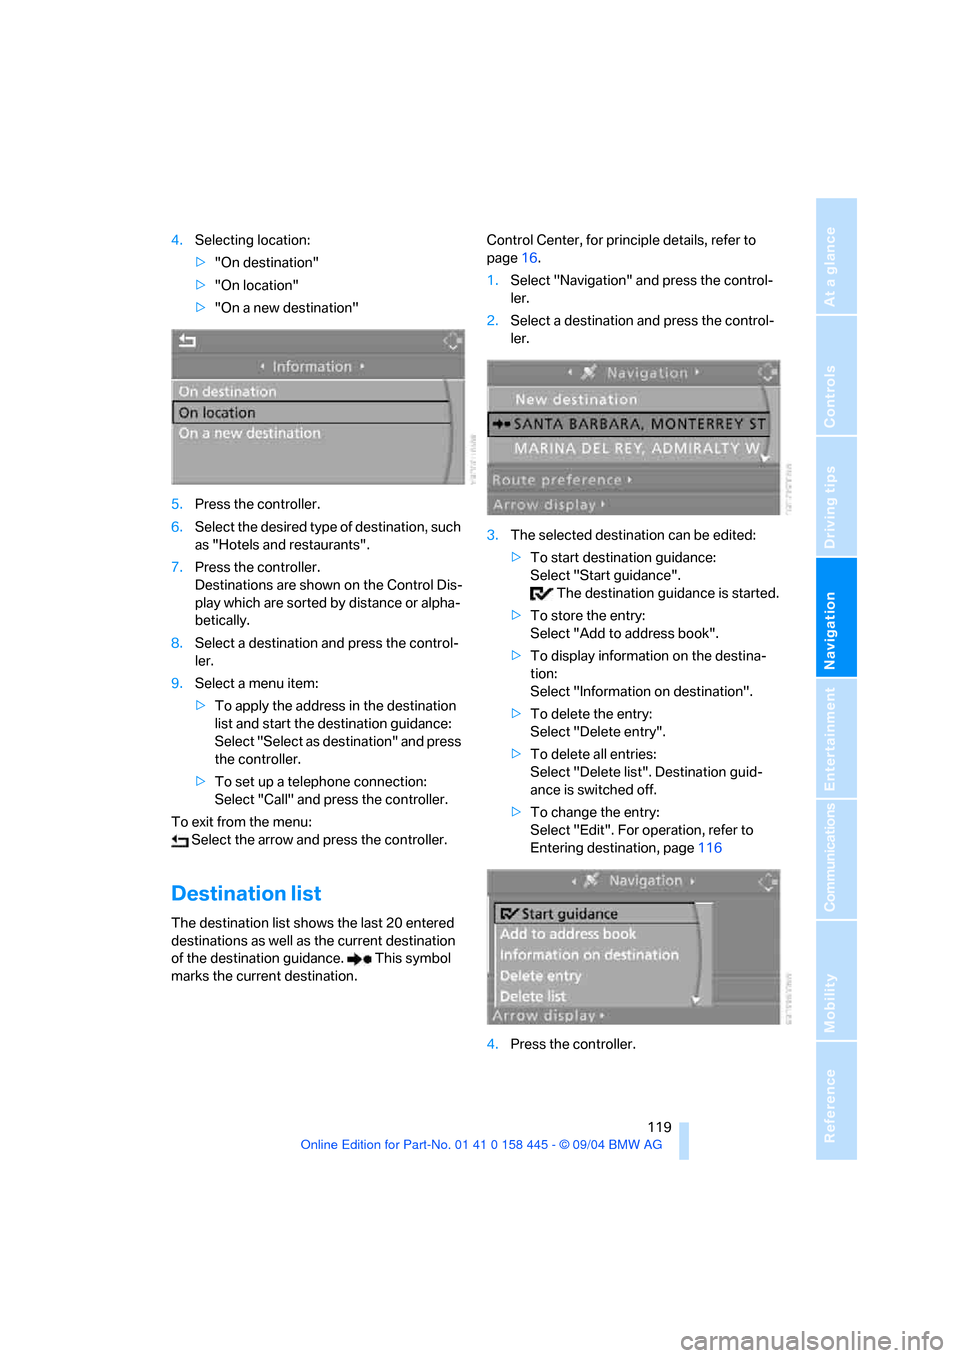
marks the current destination.Control Center, for principle details, refer to
page16.
1.Select "Navigation" and press the control-
ler.
2.Select a destination and press the control-
ler.
3.The selected destination can be edited:
>To start destination guidance:
Select "Start guidance".
The destination guidance is started.
>To store the entry:
Select "Add to address book".
>To display information on the destina-
tion:
Select "Information on destination".
>To delete the entry:
Select "Delete entry".
>To delete all entries:
Select "Delete list". Destination guid-
ance is switched off.
>To change the entry:
Select "Edit". For operation, refer to
Entering destination, page116
4.Press the controller.
Page 141 of 217
Radio
140
Satellite radio*
You can receive up to 100 different channels
with high sound quality.
The channels are offered to you in predefined
packages. To receive the channels of your
choice, you must have this package enabled.
You may experience signal drops and
muting events related to this new tech-
nology.<
Enabling or disabling channels
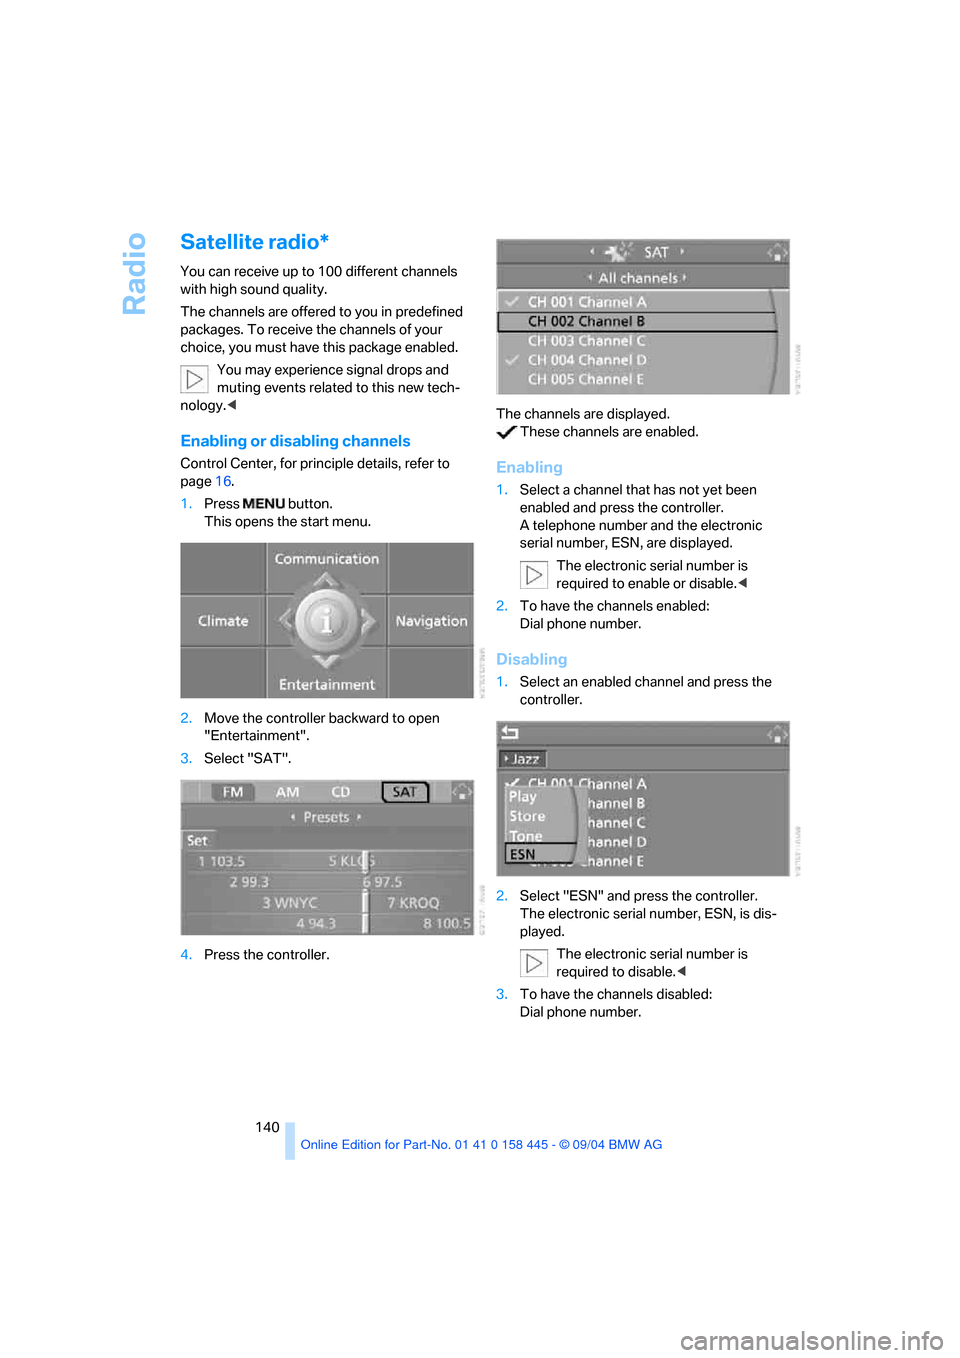
Control Center, for principle details, refer to
page16.
1.Press button.
This opens the start menu.
2.Move the controller backward to open
"Entertainment".
3.Select "SAT".
4.Press the controller.The channels are displayed.
These channels are enabled.Enabling
1.Select a channel that has not yet been
enabled and press the controller.
A telephone number and the electronic
serial number, ESN, are displayed.
The electronic serial number is
required to enable or disable.<
2.To have the channels enabled:
Dial phone number.
Disabling
1.Select an enabled channel and press the
controller.
2.Select "ESN" and press the controller.
The electronic serial number, ESN, is dis-
played.
The electronic serial number is
required to disable.<
3.To have the channels disabled:
Dial phone number.
Page 150 of 217
Communications
This chapter summarizes how to operate
your BMW portable phone via the
Control Center or voice control and how
to use BMW Assist or TeleService.
Communications