2005 BMW 645CI COUPE&CONVERTIBLE turn signal
[x] Cancel search: turn signalPage 75 of 217
Everything under control
74
Computer
Requesting information
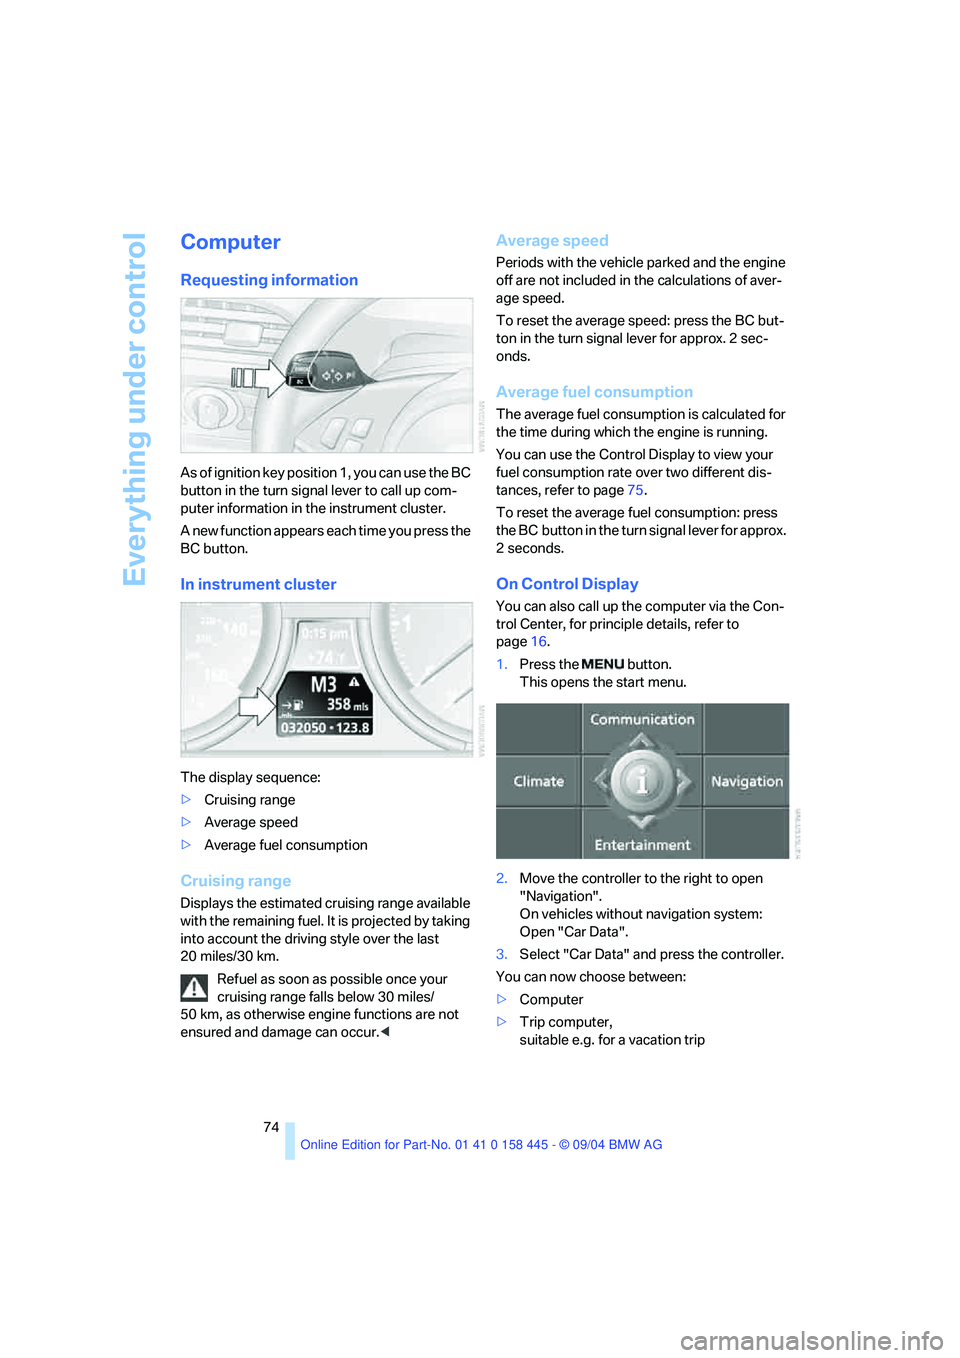
As of ignition key position 1, you can use the BC
button in the turn signal lever to call up com-
puter information in the instrument cluster.
A new function appears each time you press the
BC button.
In instrument cluster
The display sequence:
>Cruising range
>Average speed
>Average fuel consumption
Cruising range
Displays the estimated cruising range available
with the remaining fuel. It is projected by taking
into account the driving style over the last
20 miles/30 km.
Refuel as soon as possible once your
cruising range falls below 30 miles/
50 km, as otherwise engine functions are not
ensured and damage can occur.<
Average speed
Periods with the vehicle parked and the engine
off are not included in the calculations of aver-
age speed.
To reset the average speed: press the BC but-
ton in the turn signal lever for approx. 2 sec-
onds.
Average fuel consumption
The average fuel consumption is calculated for
the time during which the engine is running.
You can use the Control Display to view your
fuel consumption rate over two different dis-
tances, refer to page75.
To reset the average fuel consumption: press
the BC button in the turn signal lever for approx.
2seconds.
On Control Display
You can also call up the computer via the Con-
trol Center, for principle details, refer to
page16.
1.Press the button.
This opens the start menu.
2.Move the controller to the right to open
"Navigation".
On vehicles without navigation system:
Open "Car Data".
3.Select "Car Data" and press the controller.
You can now choose between:
>Computer
>Trip computer,
suitable e.g. for a vacation trip
Page 79 of 217

Everything under control
78 3.Select "Units" and press the controller.
4.Select the menu item to be set.
5.Press the controller.
6.Select the desired measurement unit and
press the controller.
The settings are stored for the remote control
currently in use.
Language on Control Display
Control Center, for principle details, refer to
page16.
1.Open the menu.
2.Select "Display settings" and press the
controller.
3.Select "Languages" and press the control-
ler.
4.Select "Text language" and press the con-
troller. You can select a different language
for the text displays.
5.Select the desired language and press the
controller.
The setting is stored for the remote control cur-
rently in use.
Setting time
Control Center, for principle details, refer to
page16.
1.Open the menu.
2.Select "Display settings" and press the
controller.
3.Select "Time" and press the controller.
4.Select "Set time" and press the controller.
The hours are selected.
5.Turn the controller to set the hours.
6.Press the controller to apply the setting.
The next adjustment is highlighted.
7.Make the remaining adjustments. After the
last adjustment, the time is stored.
12h/24h mode
1.Select "Time format" and press the control-
ler.
2.Select the desired mode and press the con-
troller.
The setting is stored for the remote control cur-
rently in use.
Switching on hour signal*
You will hear three tones just before each full
hour.
Select "Hour memo" and press the controller.
The hour signal is activated.
Setting date
Control Center, for principle details, refer to
page16.
1.Open the menu.
2.Select "Display settings" and press the
controller.
Page 92 of 217
Controls
91Reference
At a glance
Driving tips
Communications
Navigation
Entertainment
Mobility
Lamps
Parking lamps/low beams
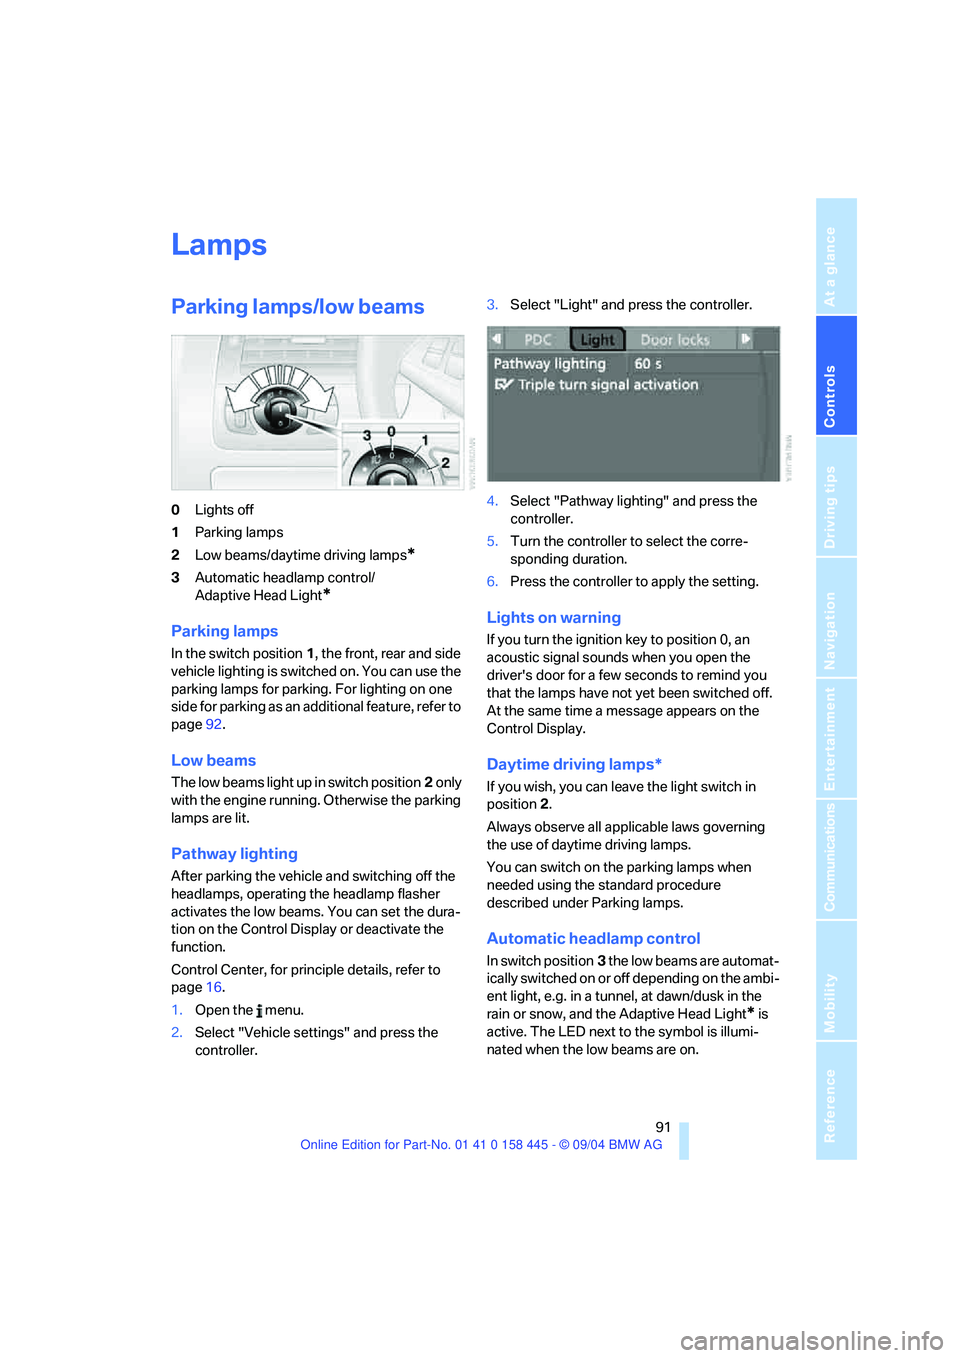
0Lights off
1Parking lamps
2Low beams/daytime driving lamps
*
3Automatic headlamp control/
Adaptive Head Light
*
Parking lamps
In the switch position1, the front, rear and side
vehicle lighting is switched on. You can use the
parking lamps for parking. For lighting on one
side for parking as an additional feature, refer to
page92.
Low beams
The low beams light up in switch position2 only
with the engine running. Otherwise the parking
lamps are lit.
Pathway lighting
After parking the vehicle and switching off the
headlamps, operating the headlamp flasher
activates the low beams. You can set the dura-
tion on the Control Display or deactivate the
function.
Control Center, for principle details, refer to
page16.
1.Open the menu.
2.Select "Vehicle settings" and press the
controller.3.Select "Light" and press the controller.
4.Select "Pathway lighting" and press the
controller.
5.Turn the controller to select the corre-
sponding duration.
6.Press the controller to apply the setting.
Lights on warning
If you turn the ignition key to position 0, an
acoustic signal sounds when you open the
driver's door for a few seconds to remind you
that the lamps have not yet been switched off.
At the same time a message appears on the
Control Display.
Daytime driving lamps*
If you wish, you can leave the light switch in
position2.
Always observe all applicable laws governing
the use of daytime driving lamps.
You can switch on the parking lamps when
needed using the standard procedure
described under Parking lamps.
Automatic headlamp control
In switch position3 the low beams are automat-
ically switched on or off depending on the ambi-
ent light, e.g. in a tunnel, at dawn/dusk in the
rain or snow, and the Adaptive Head Light
* is
active. The LED next to the symbol is illumi-
nated when the low beams are on.
Page 130 of 217
Navigation
Driving tips
129Reference
At a glance
Controls
Communications
Entertainment
Mobility
What to do if …
What to do if …
>a navigation DVD is inserted, but the
request to insert the DVD is displayed on
the Control Display?
The navigation DVD may not be the right
DVD for the navigation system. The DVD is
labeled accordingly.
>you request the current position of your
vehicle, but do not receive a precise dis-
play?
The system is unable to receive enough
GPS signals at your current position owing
to obstructions, your current position is not
yet available on your navigation DVD, or the
system is in the process of calculating your
current position. As a rule, reception is
guaranteed under a clear sky.
>the destination guidance does not accept a
destination?
The data of the destination is not stored on
the navigation DVD that is loaded. Select a
destination that is as close as possible to
the original.
>the destination guidance does not accept
an address without the street name?
On the navigation DVD, no downtown area
can be determined for the city or town
entered. Enter any street, or a destination
such as the railway station etc., then start
the destination guidance.>you want to enter a destination for the des-
tination guidance, but it is not possible to
select the letters for your desired entry?
The data of the destination is not stored on
the navigation DVD that is loaded. In this
case, the system will not offer you any let-
ters to choose from. Select a destination
that is as close as possible to the original.
>the system stops furnishing directions on
which way to turn as you approach intersec-
tions?
You are driving in an area that has not yet
been completely recorded on the naviga-
tion DVD. Instead of an arrow indicating a
turn, you will see an arrow which indicates
the general direction of your planned route.
Or you have left the recommended route
and the system requires a few seconds to
calculate a new recommended route.
>the navigation system does not react to
entries?
If the battery was disconnected, it then
takes up to 10 minutes before the system is
once again operational.
Page 137 of 217
Radio
136
Radio
Your radio provides reception of the FM and AM
wavebands.
Listening to the radio
Press the button if the sound output is switched
off.
Control Center, for principle details, refer to
page16.
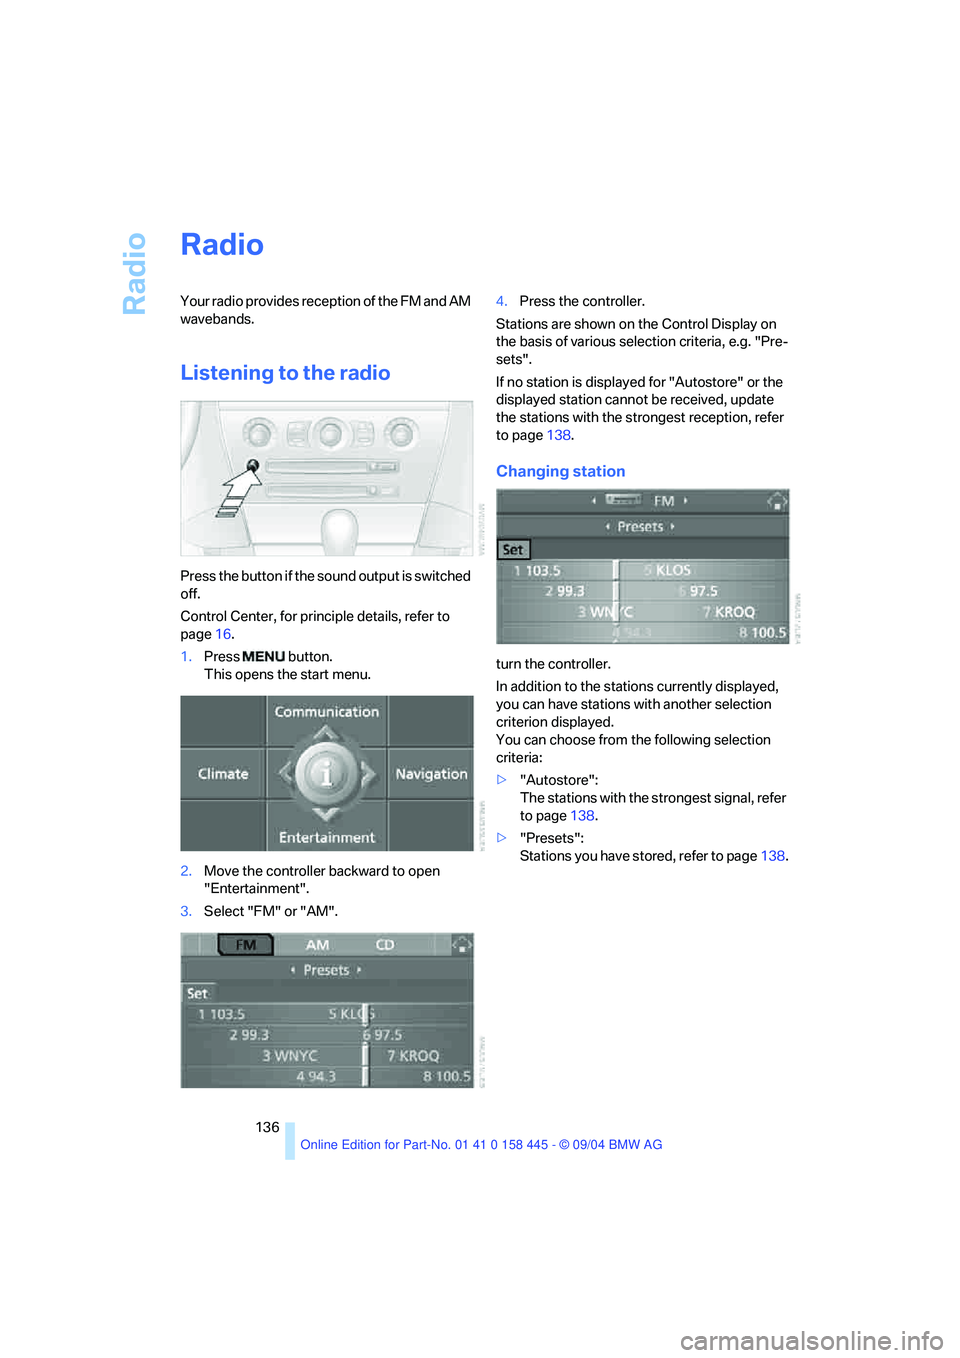
1.Press button.
This opens the start menu.
2.Move the controller backward to open
"Entertainment".
3.Select "FM" or "AM".4.Press the controller.
Stations are shown on the Control Display on
the basis of various selection criteria, e.g. "Pre-
sets".
If no station is displayed for "Autostore" or the
displayed station cannot be received, update
the stations with the strongest reception, refer
to page138.
Changing station
turn the controller.
In addition to the stations currently displayed,
you can have stations with another selection
criterion displayed.
You can choose from the following selection
criteria:
>"Autostore":
The stations with the strongest signal, refer
to page138.
>"Presets":
Stations you have stored, refer to page138.
Page 143 of 217
Radio
142
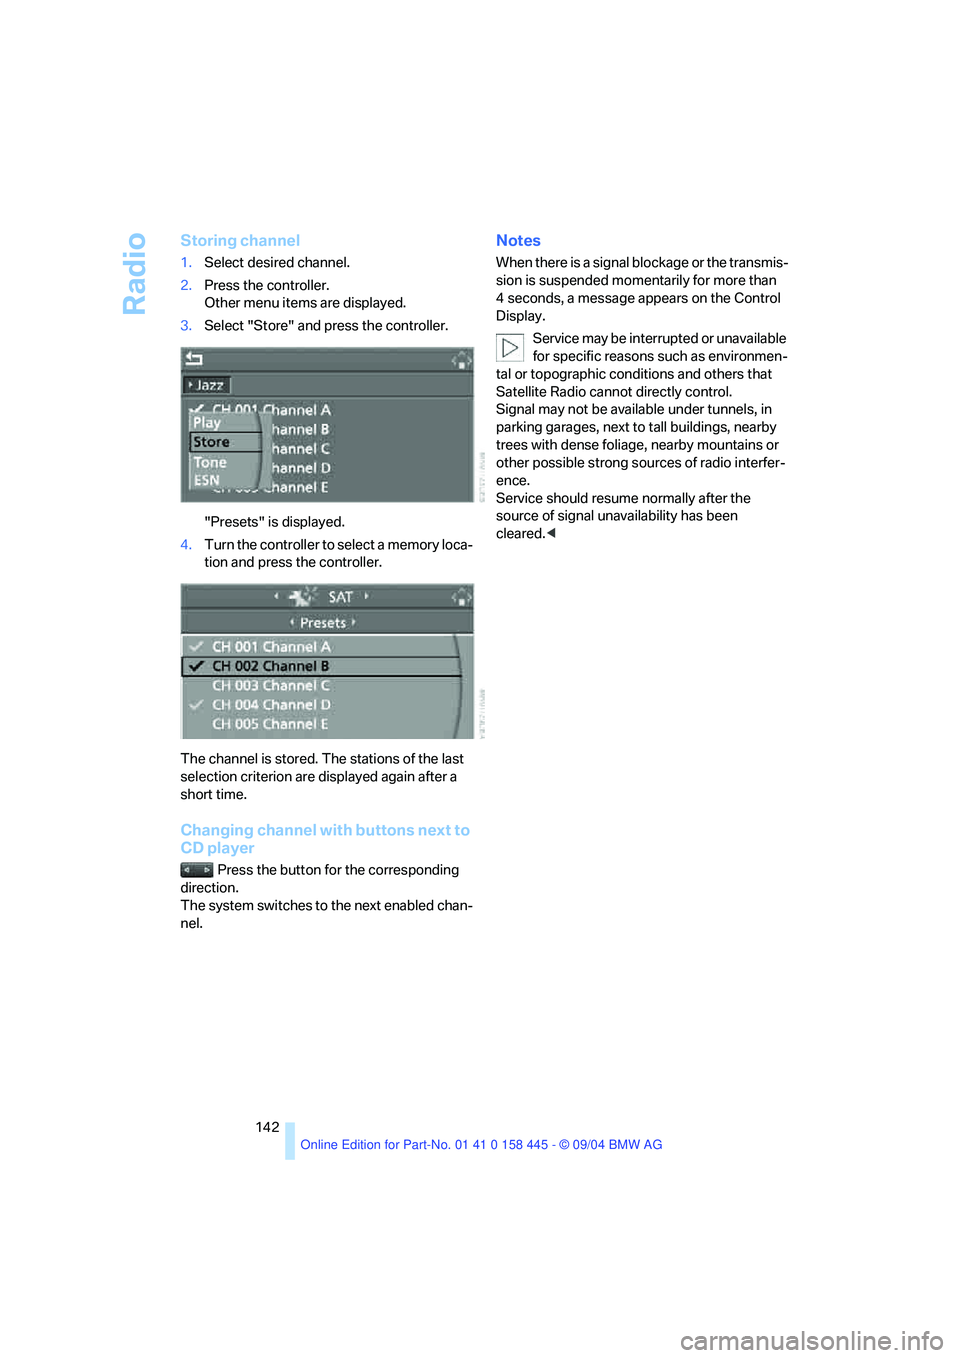
Storing channel
1.Select desired channel.
2.Press the controller.
Other menu items are displayed.
3.Select "Store" and press the controller.
"Presets" is displayed.
4.Turn the controller to select a memory loca-
tion and press the controller.
The channel is stored. The stations of the last
selection criterion are displayed again after a
short time.
Changing channel with buttons next to
CD player
Press the button for the corresponding
direction.
The system switches to the next enabled chan-
nel.
Notes
When there is a signal blockage or the transmis-
sion is suspended momentarily for more than
4 seconds, a message appears on the Control
Display.
Service may be interrupted or unavailable
for specific reasons such as environmen-
tal or topographic conditions and others that
Satellite Radio cannot directly control.
Signal may not be available under tunnels, in
parking garages, next to tall buildings, nearby
trees with dense foliage, nearby mountains or
other possible strong sources of radio interfer-
ence.
Service should resume normally after the
source of signal unavailability has been
cleared.<
Page 182 of 217
Mobility
181Reference
At a glance
Controls
Driving tips
Communications
Navigation
Entertainment
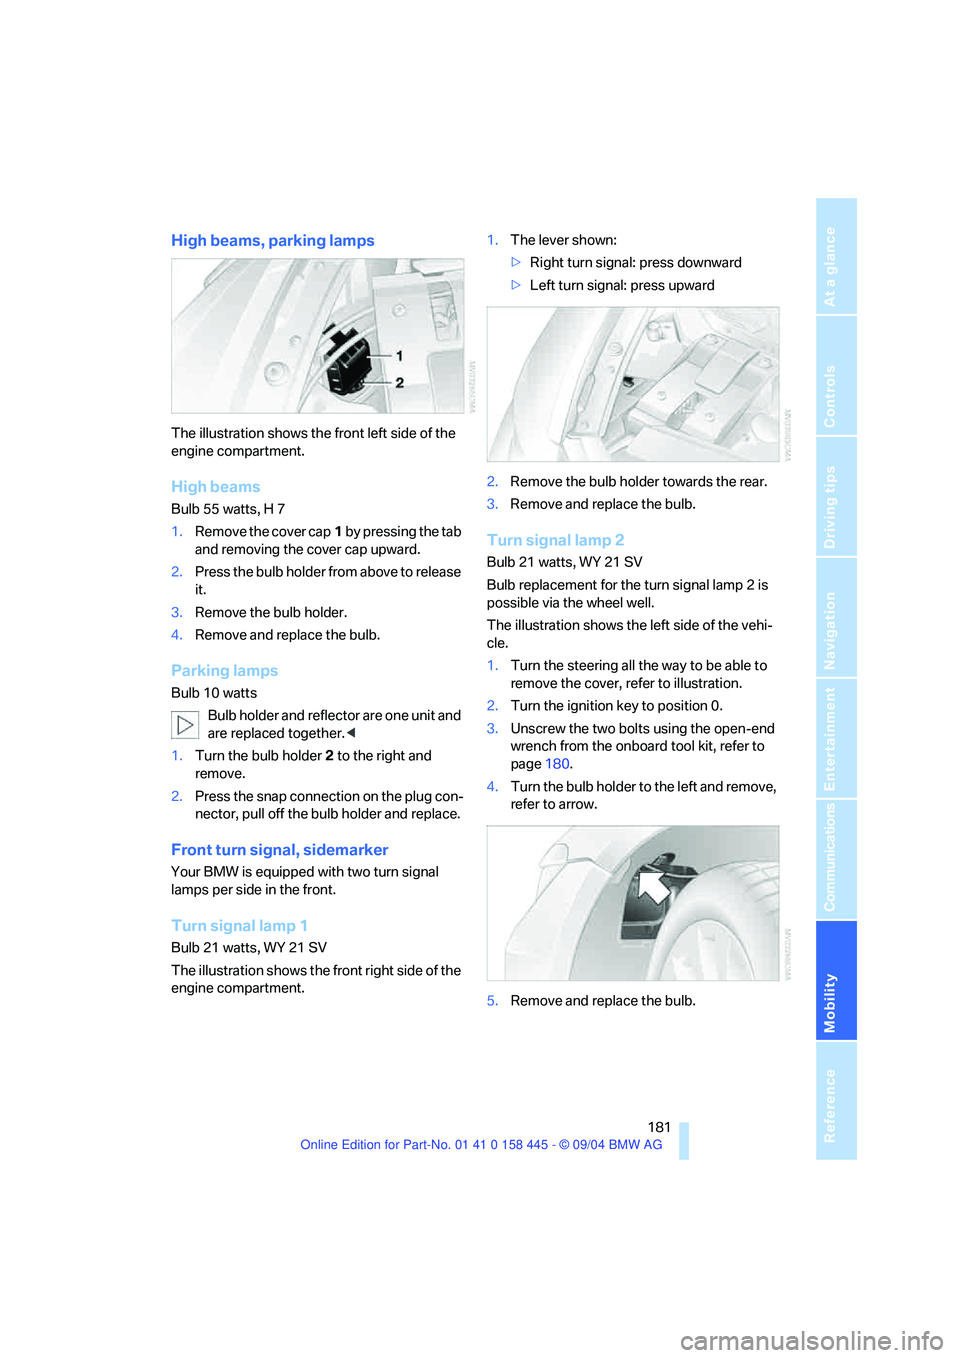
High beams, parking lamps
The illustration shows the front left side of the
engine compartment.
High beams
Bulb 55 watts, H 7
1.Remove the cover cap1 by pressing the tab
and removing the cover cap upward.
2.Press the bulb holder from above to release
it.
3.Remove the bulb holder.
4.Remove and replace the bulb.
Parking lamps
Bulb 10 watts
Bulb holder and reflector are one unit and
are replaced together.<
1.Turn the bulb holder2 to the right and
remove.
2.Press the snap connection on the plug con-
nector, pull off the bulb holder and replace.
Front turn signal, sidemarker
Your BMW is equipped with two turn signal
lamps per side in the front.
Turn signal lamp 1
Bulb 21 watts, WY 21 SV
The illustration shows the front right side of the
engine compartment.1.The lever shown:
>Right turn signal: press downward
>Left turn signal: press upward
2.Remove the bulb holder towards the rear.
3.Remove and replace the bulb.
Turn signal lamp 2
Bulb 21 watts, WY 21 SV
Bulb replacement for the turn signal lamp 2 is
possible via the wheel well.
The illustration shows the left side of the vehi-
cle.
1.Turn the steering all the way to be able to
remove the cover, refer to illustration.
2.Turn the ignition key to position 0.
3.Unscrew the two bolts using the open-end
wrench from the onboard tool kit, refer to
page180.
4.Turn the bulb holder to the left and remove,
refer to arrow.
5.Remove and replace the bulb.
Page 183 of 217
Replacing components
182
Sidemarker
Bulb 5 watts, WY5W ST
The bulb can be replaced via a cover at the front
of the wheel well, refer to the description for
turn signal lamp 2.
1.The bulb holder of the sidemarker lamp is
located toward the outside of the vehicle
next to the bulb holder of turn signal lamp 2.
2.Turn the bulb holder to the left and remove.
3.Remove and replace the bulb.
Side turn signals
Bulb 5 watts, WY 5 W
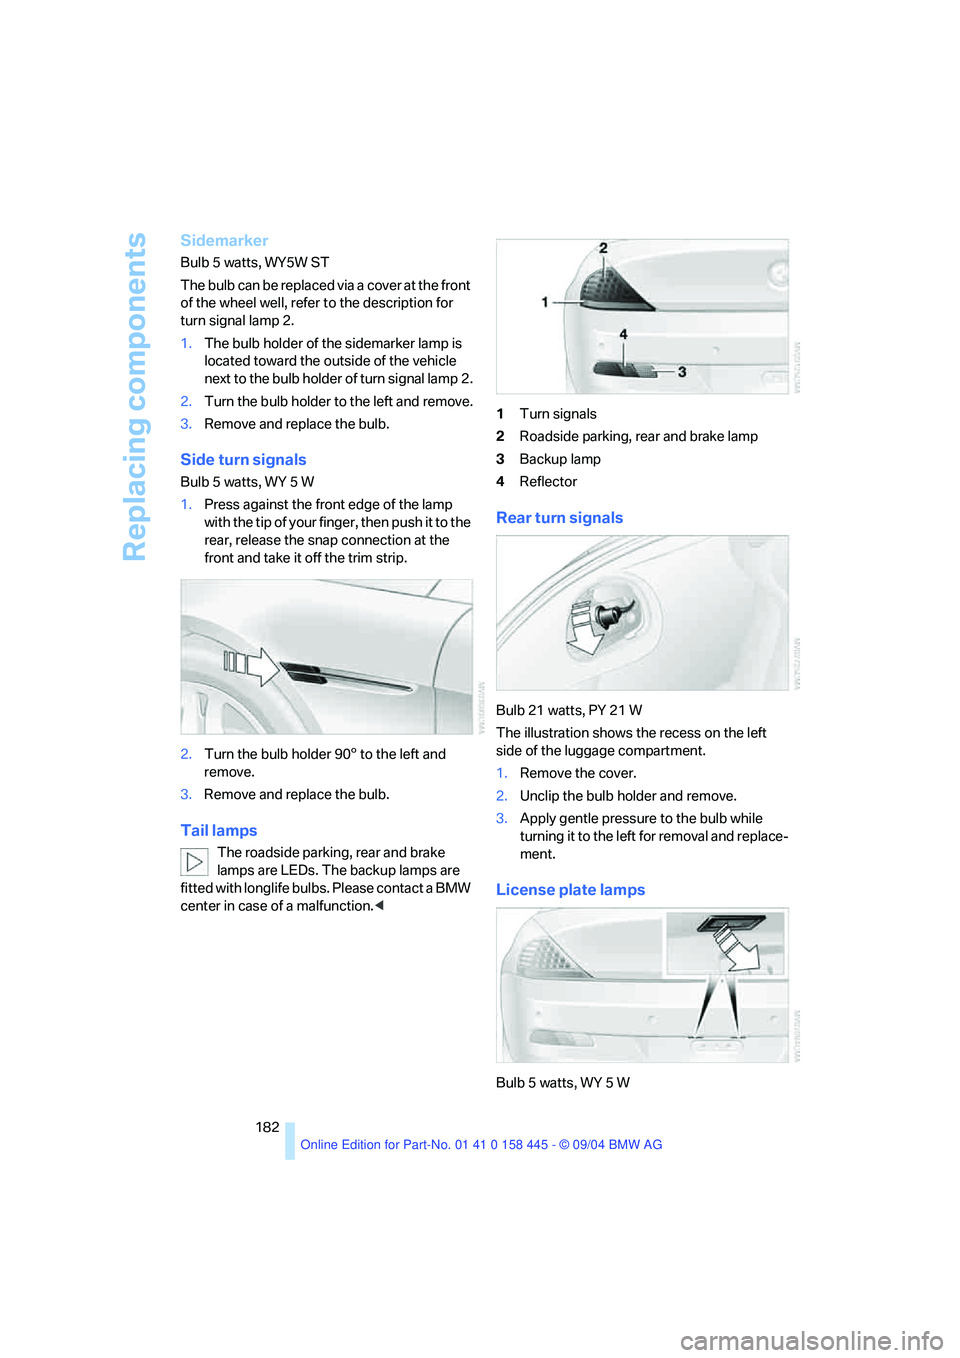
1.Press against the front edge of the lamp
with the tip of your finger, then push it to the
rear, release the snap connection at the
front and take it off the trim strip.
2.Turn the bulb holder 905 to the left and
remove.
3.Remove and replace the bulb.
Tail lamps
The roadside parking, rear and brake
lamps are LEDs. The backup lamps are
fitted with longlife bulbs. Please contact a BMW
center in case of a malfunction.<1Turn signals
2Roadside parking, rear and brake lamp
3Backup lamp
4Reflector
Rear turn signals
Bulb 21 watts, PY 21 W
The illustration shows the recess on the left
side of the luggage compartment.
1.Remove the cover.
2.Unclip the bulb holder and remove.
3.Apply gentle pressure to the bulb while
turning it to the left for removal and replace-
ment.
License plate lamps
Bulb 5 watts, WY 5 W