2005 BMW 645CI CONVERTIBLE lock
[x] Cancel search: lockPage 58 of 217
Controls
57Reference
At a glance
Driving tips
Communications
Navigation
Entertainment
Mobility
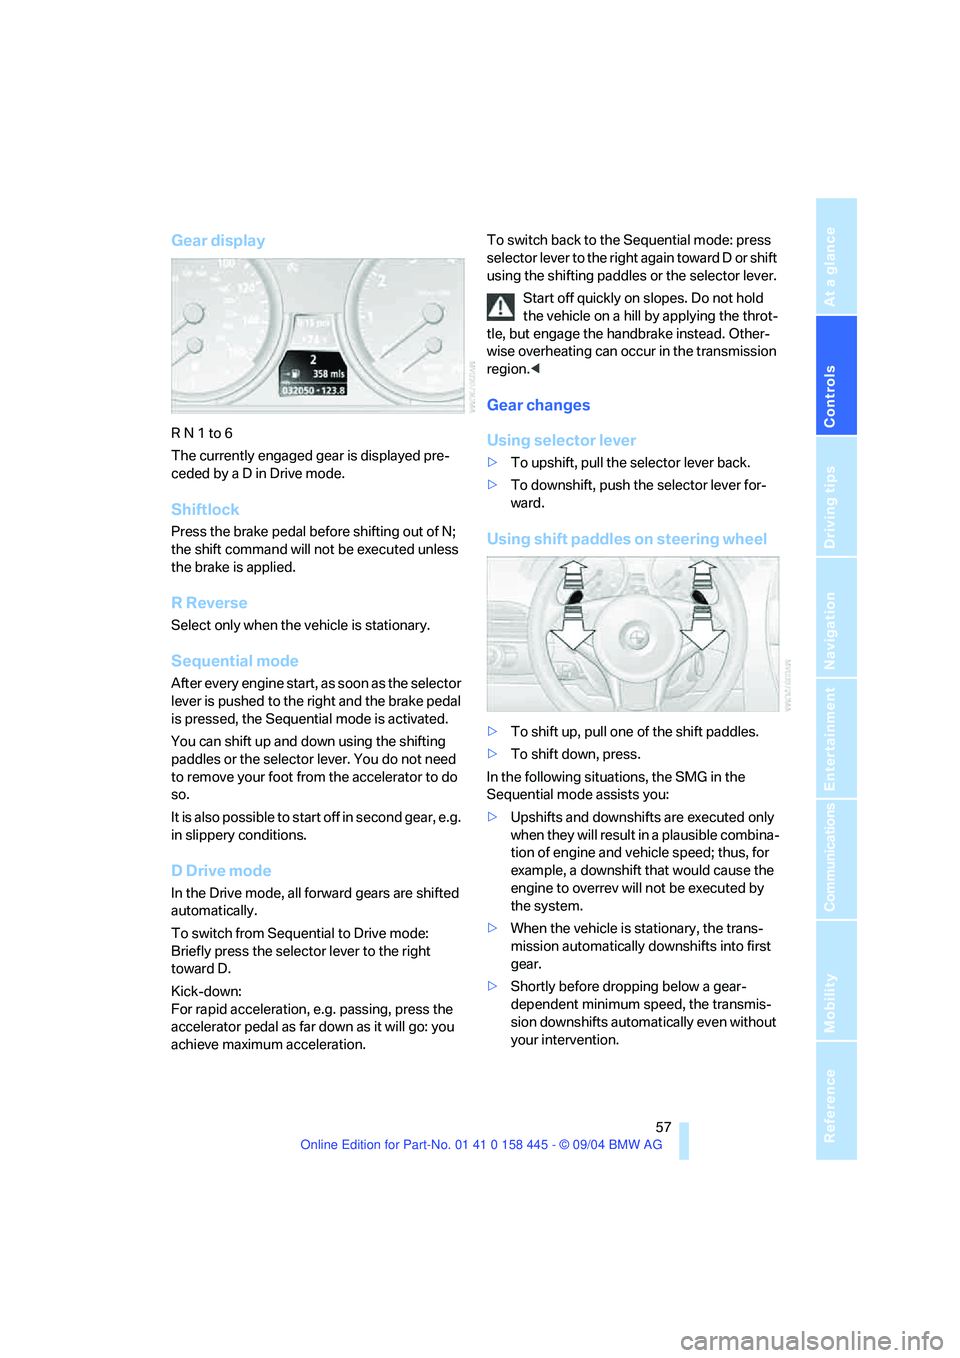
Gear display
R N 1 to 6
The currently engaged gear is displayed pre-
ceded by a D in Drive mode.
Shiftlock
Press the brake pedal before shifting out of N;
the shift command will not be executed unless
the brake is applied.
R Reverse
Select only when the vehicle is stationary.
Sequential mode
After every engine start, as soon as the selector
lever is pushed to the right and the brake pedal
is pressed, the Sequential mode is activated.
You can shift up and down using the shifting
paddles or the selector lever. You do not need
to remove your foot from the accelerator to do
so.
It is also possible to start off in second gear, e.g.
in slippery conditions.
D Drive mode
In the Drive mode, all forward gears are shifted
automatically.
To switch from Sequential to Drive mode:
Briefly press the selector lever to the right
toward D.
Kick-down:
For rapid acceleration, e.g. passing, press the
accelerator pedal as far down as it will go: you
achieve maximum acceleration.To switch back to the Sequential mode: press
selector lever to the right again toward D or shift
using the shifting paddles or the selector lever.
Start off quickly on slopes. Do not hold
the vehicle on a hill by applying the throt-
tle, but engage the handbrake instead. Other-
wise overheating can occur in the transmission
region.<
Gear changes
Using selector lever
>To upshift, pull the selector lever back.
>To downshift, push the selector lever for-
ward.
Using shift paddles on steering wheel
>To shift up, pull one of the shift paddles.
>To shift down, press.
In the following situations, the SMG in the
Sequential mode assists you:
>Upshifts and downshifts are executed only
when they will res ult in a plausible combina-
tion of engine and vehicle speed; thus, for
example, a downshift that would cause the
engine to overrev will not be executed by
the system.
>When the vehicle is stationary, the trans-
mission automatically downshifts into first
gear.
>Shortly before dropping below a gear-
dependent minimum speed, the transmis-
sion downshifts automatically even without
your intervention.
Page 59 of 217
Driving
58
Automatic transmission with
Steptronic*
In addition to the fully automatic mode, you can
also shift manually with Steptronic, refer to
page58.
Selector-lever positions
P R N D M/S + –
Displays in instrument cluster
P R N D DS M1 to M6
The selector lever position is indicated, and in
the manual mode, the gear currently engaged.
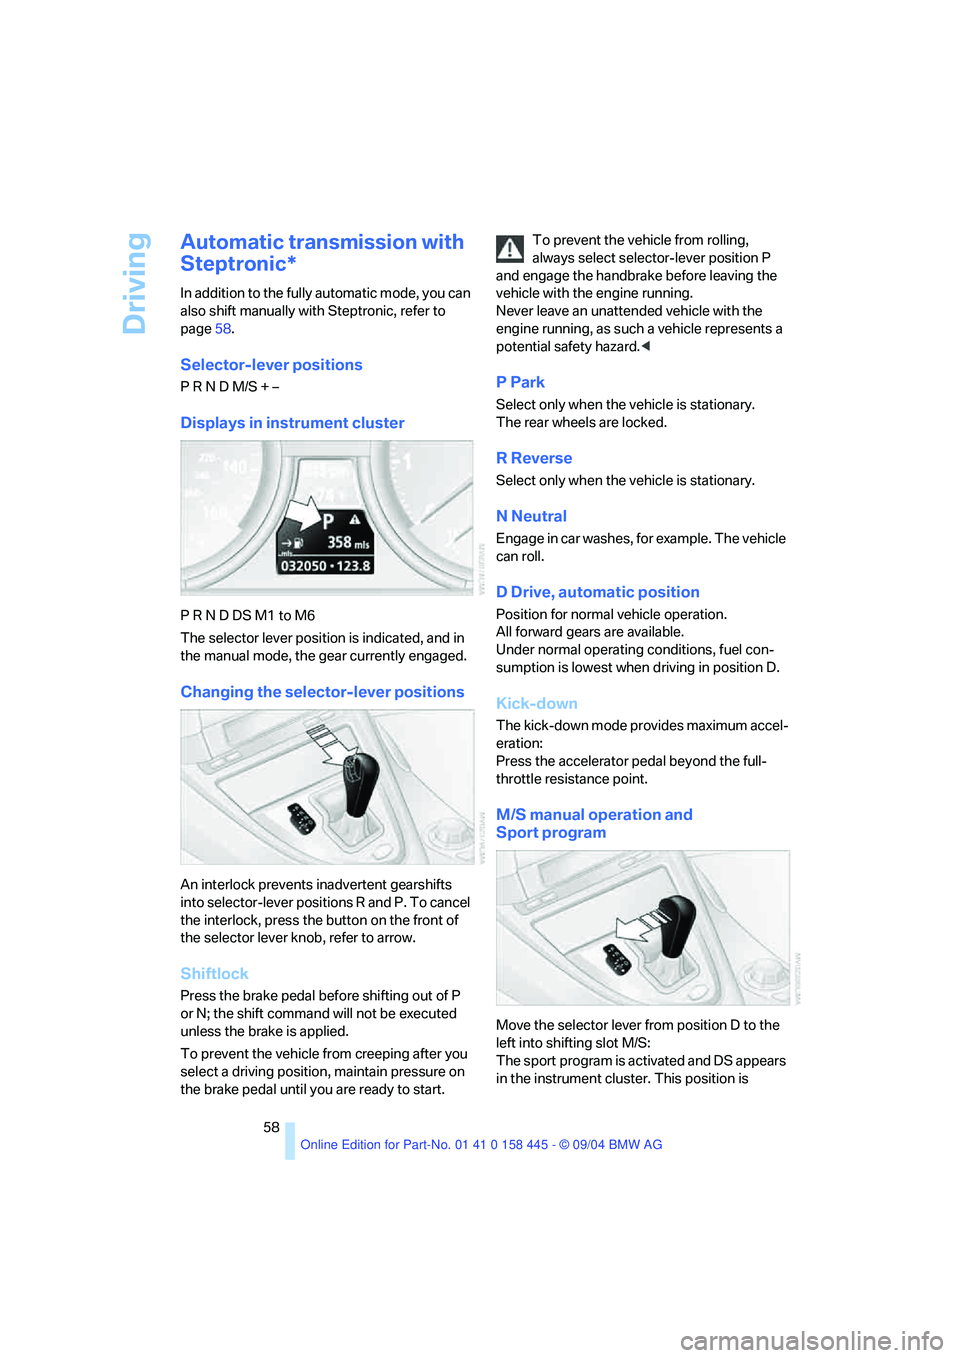
Changing the selector-lever positions
An interlock prevents inadvertent gearshifts
into selector-lever positions R and P. To cancel
the interlock, press the button on the front of
the selector lever knob, refer to arrow.
Shiftlock
Press the brake pedal before shifting out of P
or N; the shift command will not be executed
unless the brake is applied.
To prevent the vehicle from creeping after you
select a driving position, maintain pressure on
the brake pedal until you are ready to start.To prevent the vehicle from rolling,
always select selector-lever position P
and engage the handbrake before leaving the
vehicle with the engine running.
Never leave an unattended vehicle with the
engine running, as such a vehicle represents a
potential safety hazard.<
P Park
Select only when the vehicle is stationary.
The rear wheels are locked.
R Reverse
Select only when the vehicle is stationary.
N Neutral
Engage in car washes, for example. The vehicle
can roll.
D Drive, automatic position
Position for normal vehicle operation.
All forward gears are available.
Under normal operating conditions, fuel con-
sumption is lowest when driving in position D.
Kick-down
The kick-down mode provides maximum accel-
eration:
Press the accelerator pedal beyond the full-
throttle resistance point.
M/S manual operation and
Sport program
Move the selector lever from position D to the
left into shifting slot M/S:
The sport program is activated and DS appears
in the instrument cluster. This position is
Page 70 of 217
Controls
69Reference
At a glance
Driving tips
Communications
Navigation
Entertainment
Mobility
Everything under control
Odometer, outside
temperature display, clock
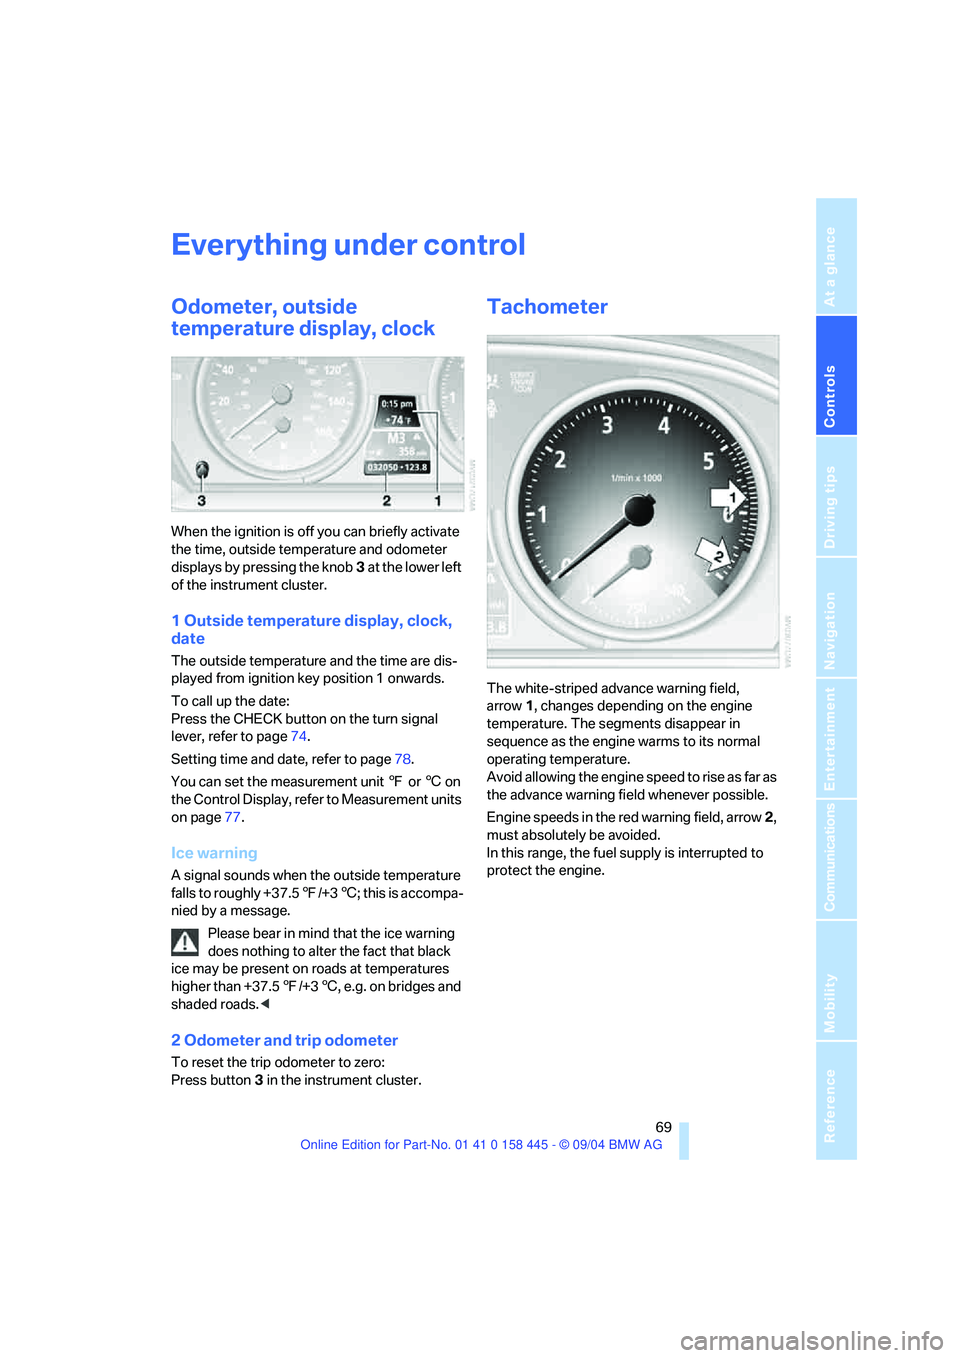
When the ignition is off you can briefly activate
the time, outside temperature and odometer
displays by pressing the knob3 at the lower left
of the instrument cluster.
1 Outside temperature display, clock,
date
The outside temperature and the time are dis-
played from ignition key position 1 onwards.
To call up the date:
Press the CHECK button on the turn signal
lever, refer to page74.
Setting time and date, refer to page78.
You can set the measurement unit 7 or 6 on
the Control Display, refer to Measurement units
on page77.
Ice warning
A signal sounds when the outside temperature
falls to roughly +37.57/+36; this is accompa-
nied by a message.
Please bear in mind that the ice warning
does nothing to alter the fact that black
ice may be present on roads at temperatures
higher than +37.57/+36, e.g. on bridges and
shaded roads.<
2 Odometer and trip odometer
To reset the trip odometer to zero:
Press button3 in the instrument cluster.
Tachometer
The white-striped advance warning field,
arrow1, changes depending on the engine
temperature. The segments disappear in
sequence as the engine warms to its normal
operating temperature.
Avoid allowing the engine speed to rise as far as
the advance warning field whenever possible.
Engine speeds in the red warning field, arrow2,
must absolutely be avoided.
In this range, the fuel supply is interrupted to
protect the engine.
Page 82 of 217
Controls
81Reference
At a glance
Driving tips
Communications
Navigation
Entertainment
Mobility
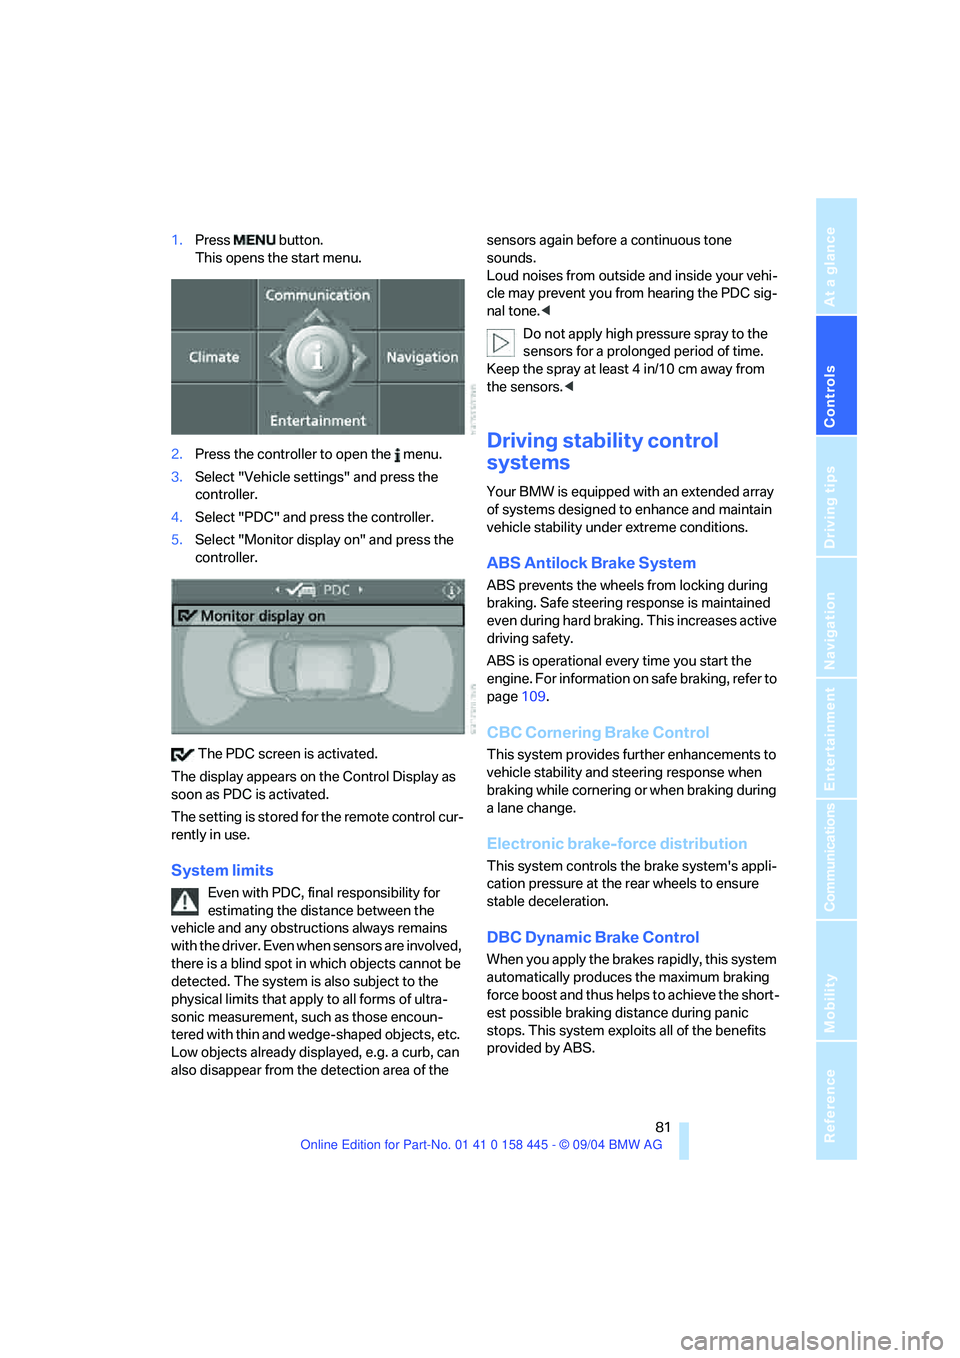
1.Press button.
This opens the start menu.
2.Press the controller to open the menu.
3.Select "Vehicle settings" and press the
controller.
4.Select "PDC" and press the controller.
5.Select "Monitor display on" and press the
controller.
The PDC screen is activated.
The display appears on the Control Display as
soon as PDC is activated.
The setting is stored for the remote control cur-
rently in use.
System limits
Even with PDC, final responsibility for
estimating the distance between the
vehicle and any obstructions always remains
with the driver. Even when sensors are involved,
there is a blind spot in which objects cannot be
detected. The system is also subject to the
physical limits that apply to all forms of ultra-
sonic measurement, such as those encoun-
tered with thin and wedge-shaped objects, etc.
Low objects already displayed, e.g. a curb, can
also disappear from the detection area of the sensors again before a continuous tone
sounds.
Loud noises from outside and inside your vehi-
cle may prevent you from hearing the PDC sig-
nal tone.<
Do not apply high pressure spray to the
sensors for a prolonged period of time.
Keep the spray at least 4 in/10 cm away from
the sensors.<
Driving stability control
systems
Your BMW is equipped with an extended array
of systems designed to enhance and maintain
vehicle stability under extreme conditions.
ABS Antilock Brake System
ABS prevents the wheels from locking during
braking. Safe steering response is maintained
even during hard braking. This increases active
driving safety.
ABS is operational every time you start the
engine. For information on safe braking, refer to
page109.
CBC Cornering Brake Control
This system provides further enhancements to
vehicle stability and steering response when
braking while cornering or when braking during
a lane change.
Electronic brake-force distribution
This system controls the brake system's appli-
cation pressure at the rear wheels to ensure
stable deceleration.
DBC Dynamic Brake Control
When you apply the brakes rapidly, this system
automatically produces the maximum braking
force boost and thus helps to achieve the short-
est possible braking distance during panic
stops. This system exploits all of the benefits
provided by ABS.
Page 96 of 217
Controls
95Reference
At a glance
Driving tips
Communications
Navigation
Entertainment
Mobility
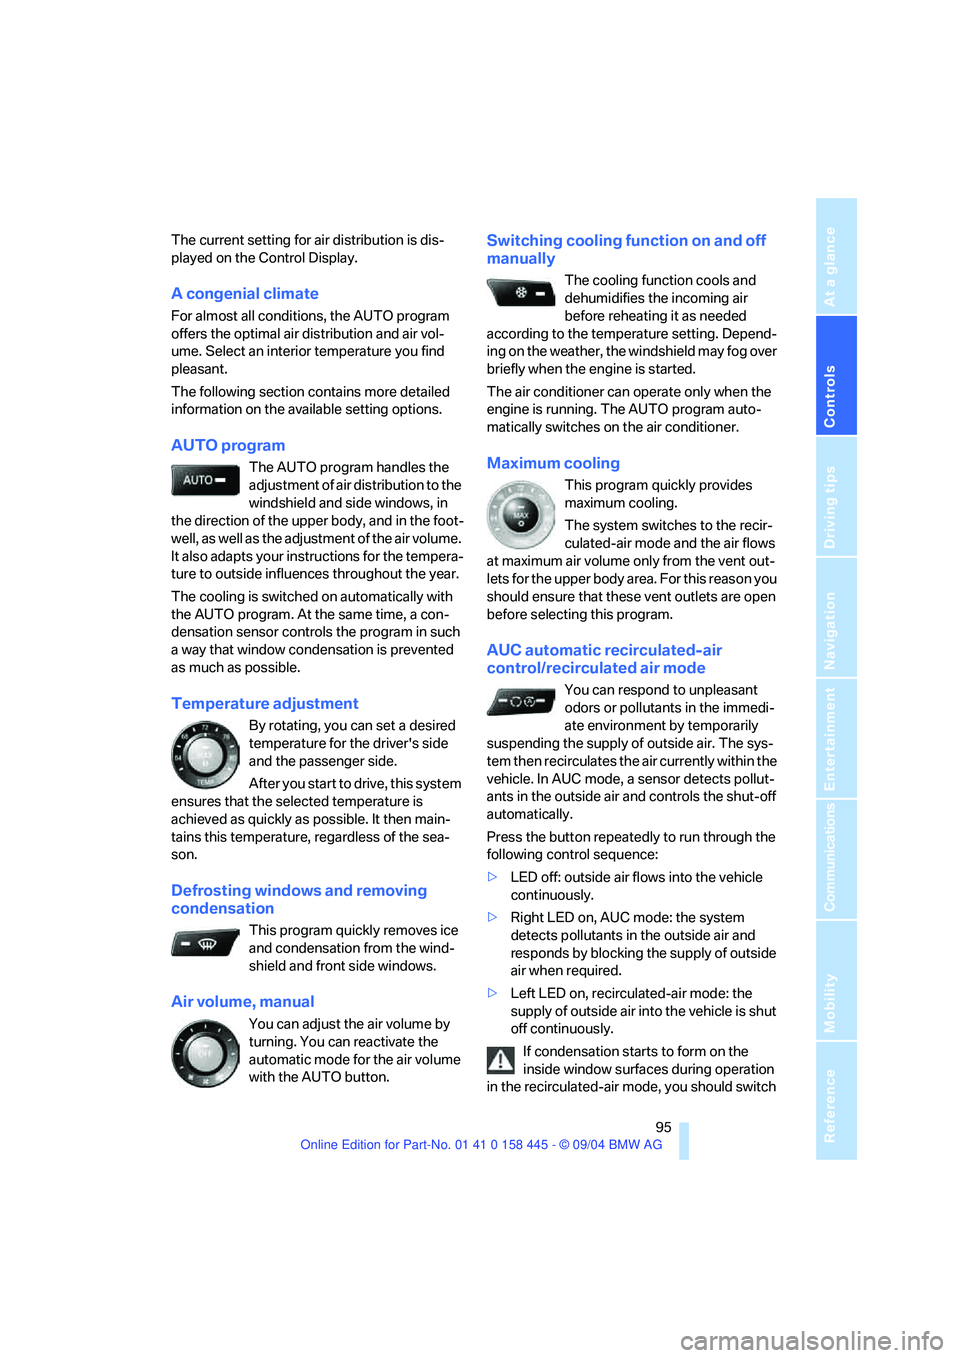
The current setting for air distribution is dis-
played on the Control Display.
A congenial climate
For almost all conditions, the AUTO program
offers the optimal air distribution and air vol-
ume. Select an interior temperature you find
pleasant.
The following section contains more detailed
information on the available setting options.
AUTO program
The AUTO program handles the
adjustment of air distribution to the
windshield and side windows, in
the direction of the upper body, and in the foot-
well, as well as the adjustment of the air volume.
It also adapts your instructions for the tempera-
ture to outside influences throughout the year.
The cooling is switched on automatically with
the AUTO program. At the same time, a con-
densation sensor controls the program in such
a way that window condensation is prevented
as much as possible.
Temperature adjustment
By rotating, you can set a desired
temperature for the driver's side
and the passenger side.
After you start to drive, this system
ensures that the selected temperature is
achieved as quickly as possible. It then main-
tains this temperature, regardless of the sea-
son.
Defrosting windows and removing
condensation
This program quickly removes ice
and condensation from the wind-
shield and front side windows.
Air volume, manual
You can adjust the air volume by
turning. You can reactivate the
automatic mode for the air volume
with the AUTO button.
Switching cooling function on and off
manually
The cooling function cools and
dehumidifies the incoming air
before reheating it as needed
according to the temperature setting. Depend-
ing on the weather, the windshield may fog over
briefly when the engine is started.
The air conditioner can operate only when the
engine is running. The AUTO program auto-
matically switches on the air conditioner.
Maximum cooling
This program quickly provides
maximum cooling.
The system switches to the recir-
culated-air mode and the air flows
at maximum air volume only from the vent out-
lets for the upper body area. For this reason you
should ensure that these vent outlets are open
before selecting this program.
AUC automatic recirculated-air
control/recirculated air mode
You can respond to unpleasant
odors or pollutants in the immedi-
ate environment by temporarily
suspending the supply of outside air. The sys-
tem then recirculates the air currently within the
vehicle. In AUC mode, a sensor detects pollut-
ants in the outside air and controls the shut-off
automatically.
Press the button repeatedly to run through the
following control sequence:
>LED off: outside air flows into the vehicle
continuously.
>Right LED on, AUC mode: the system
detects pollutants in the outside air and
responds by blocking the supply of outside
air when required.
>Left LED on, recirculated-air mode: the
supply of outside air into the vehicle is shut
off continuously.
If condensation starts to form on the
inside window surfaces during operation
in the recirculated-air mode, you should switch
Page 103 of 217
Practical interior accessories
102
Center armrest
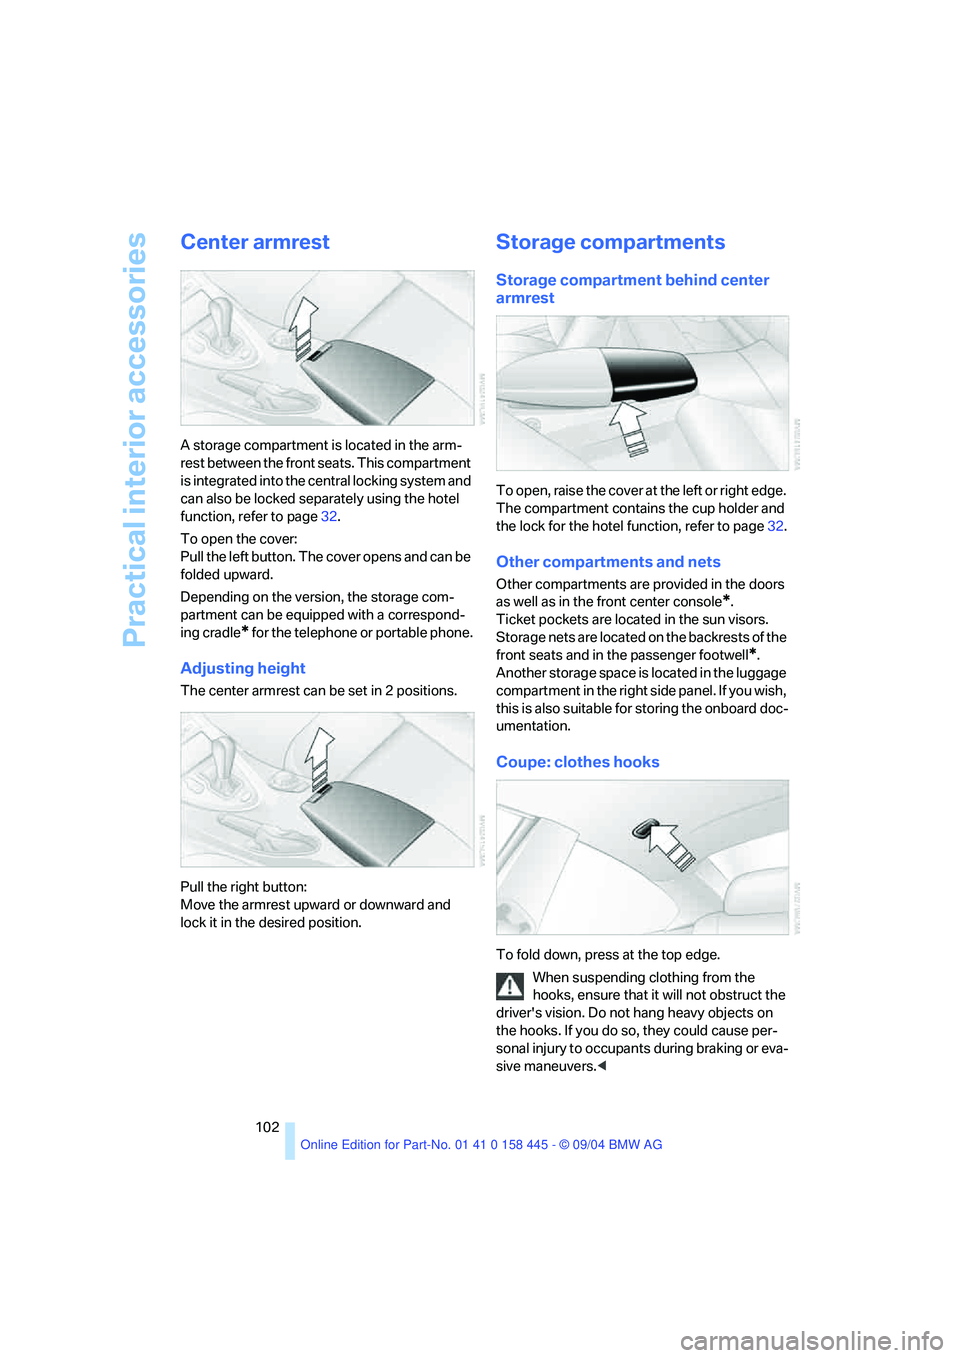
A storage compartment is located in the arm-
rest between the front seats. This compartment
is integrated into the central locking system and
can also be locked separately using the hotel
function, refer to page32.
To open the cover:
Pull the left button. The cover opens and can be
folded upward.
Depending on the version, the storage com-
partment can be equipped with a correspond-
ing cradle
* for the telephone or portable phone.
Adjusting height
The center armrest can be set in 2 positions.
Pull the right button:
Move the armrest upward or downward and
lock it in the desired position.
Storage compartments
Storage compartment behind center
armrest
To open, raise the cover at the left or right edge.
The compartment contains the cup holder and
the lock for the hotel function, refer to page32.
Other compartments and nets
Other compartments are provided in the doors
as well as in the front center console
*.
Ticket pockets are located in the sun visors.
Storage nets are located on the backrests of the
front seats and in the passenger footwell
*.
Another storage space is located in the luggage
compartment in the right side panel. If you wish,
this is also suitable for storing the onboard doc-
umentation.
Coupe: clothes hooks
To fold down, press at the top edge.
When suspending clothing from the
hooks, ensure that it will not obstruct the
driver's vision. Do not hang heavy objects on
the hooks. If you do so, they could cause per-
sonal injury to occupants during braking or eva-
sive maneuvers.<
Page 143 of 217
Radio
142
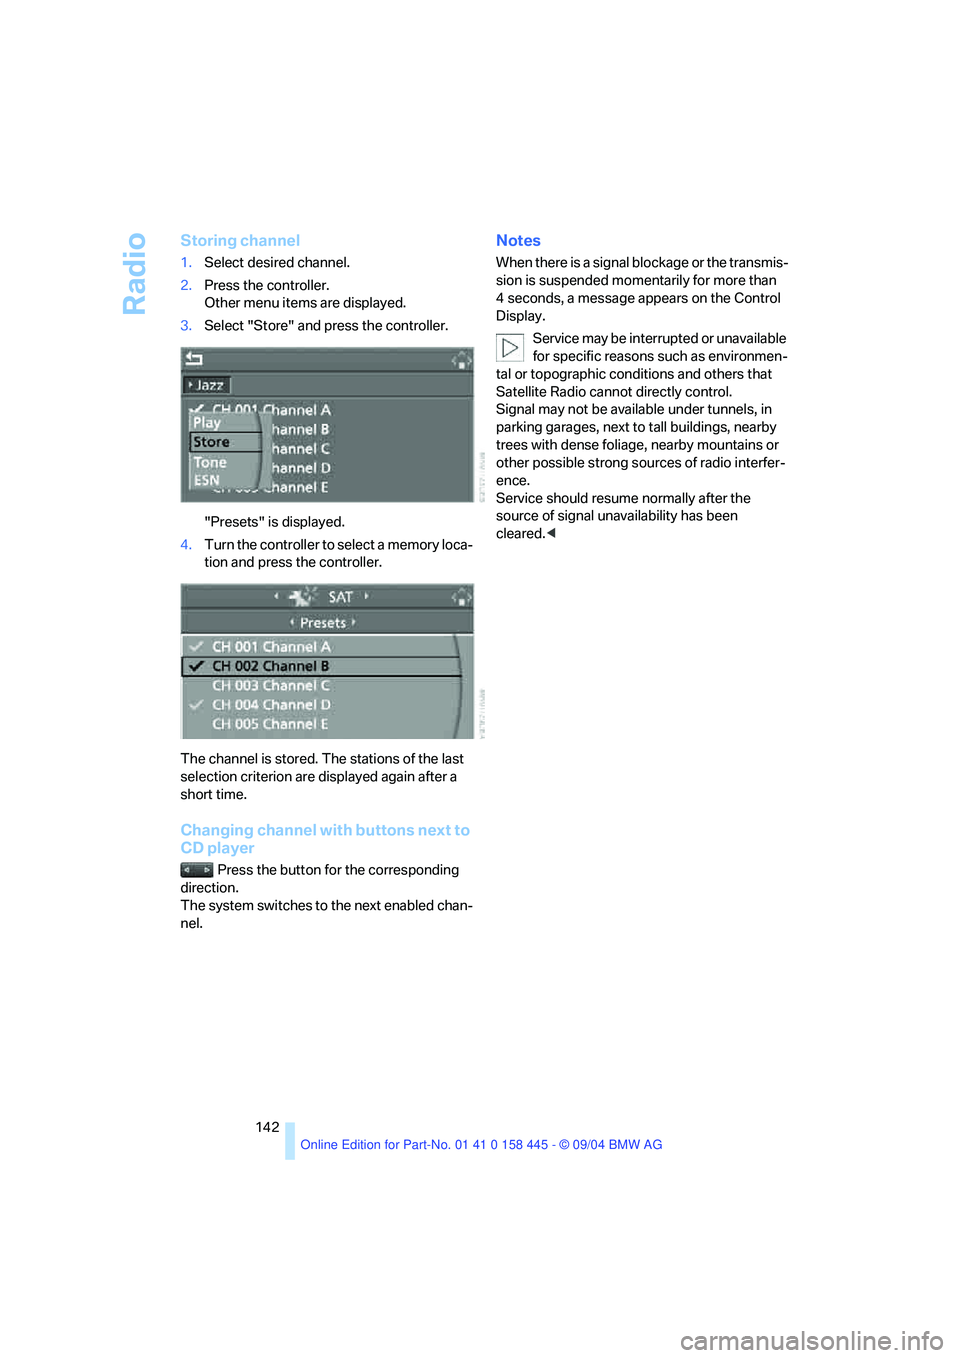
Storing channel
1.Select desired channel.
2.Press the controller.
Other menu items are displayed.
3.Select "Store" and press the controller.
"Presets" is displayed.
4.Turn the controller to select a memory loca-
tion and press the controller.
The channel is stored. The stations of the last
selection criterion are displayed again after a
short time.
Changing channel with buttons next to
CD player
Press the button for the corresponding
direction.
The system switches to the next enabled chan-
nel.
Notes
When there is a signal blockage or the transmis-
sion is suspended momentarily for more than
4 seconds, a message appears on the Control
Display.
Service may be interrupted or unavailable
for specific reasons such as environmen-
tal or topographic conditions and others that
Satellite Radio cannot directly control.
Signal may not be available under tunnels, in
parking garages, next to tall buildings, nearby
trees with dense foliage, nearby mountains or
other possible strong sources of radio interfer-
ence.
Service should resume normally after the
source of signal unavailability has been
cleared.<
Page 163 of 217
TeleService, BMW Assist
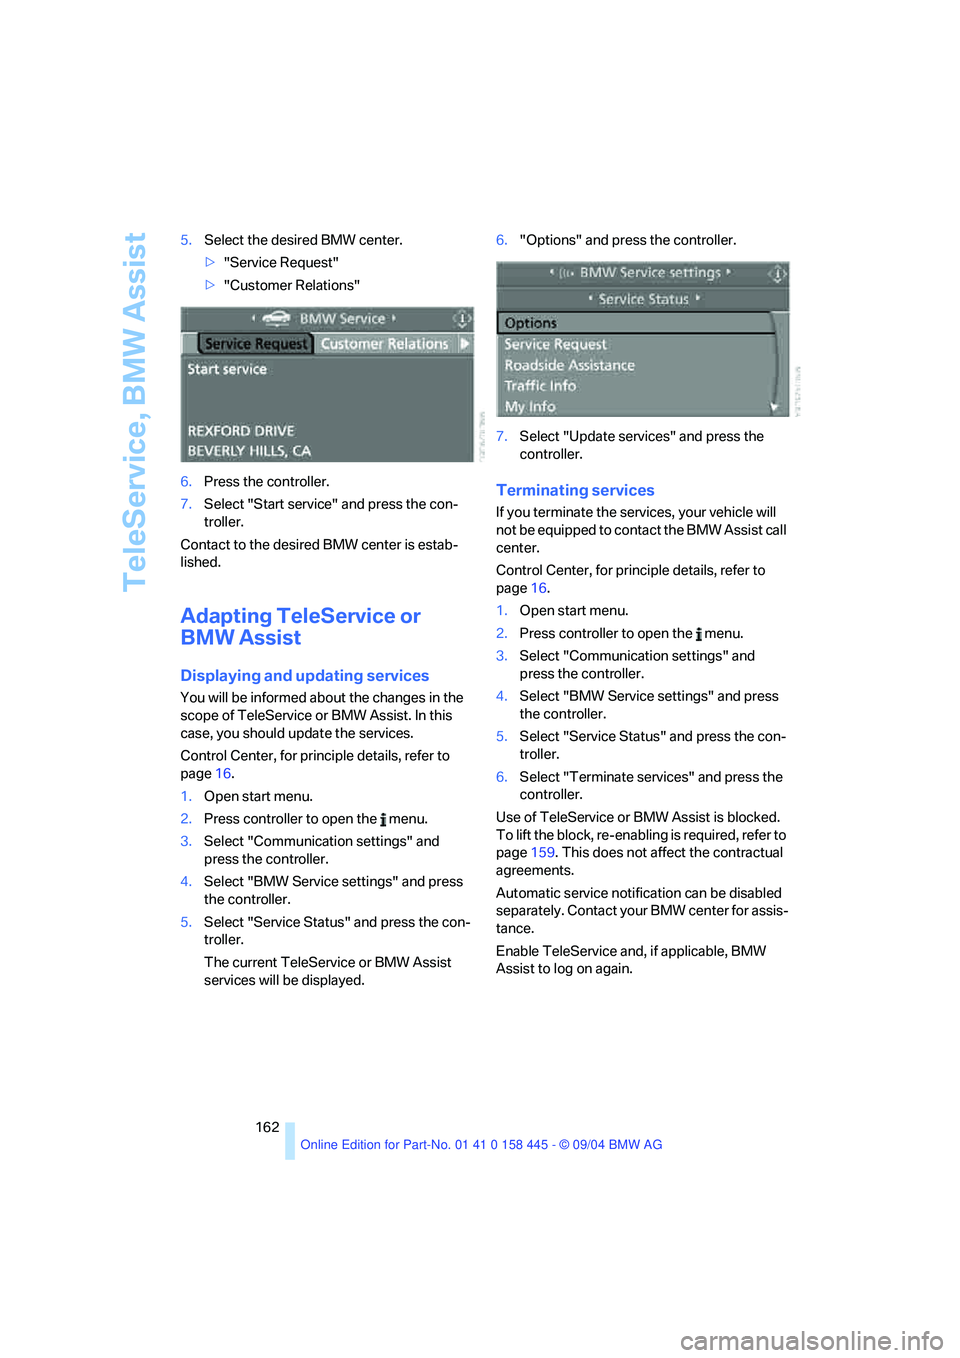
162 5.Select the desired BMW center.
>"Service Request"
>"Customer Relations"
6.Press the controller.
7.Select "Start service" and press the con-
troller.
Contact to the desired BMW center is estab-
lished.
Adapting TeleService or
BMW Assist
Displaying and updating services
You will be informed about the changes in the
scope of TeleService or BMW Assist. In this
case, you should update the services.
Control Center, for principle details, refer to
page16.
1.Open start menu.
2.Press controller to open the menu.
3.Select "Communication settings" and
press the controller.
4.Select "BMW Service settings" and press
the controller.
5.Select "Service Status" and press the con-
troller.
The current TeleService or BMW Assist
services will be displayed.6."Options" and press the controller.
7.Select "Update services" and press the
controller.
Terminating services
If you terminate the services, your vehicle will
not be equipped to contact the BMW Assist call
center.
Control Center, for principle details, refer to
page16.
1.Open start menu.
2.Press controller to open the menu.
3.Select "Communication settings" and
press the controller.
4.Select "BMW Service settings" and press
the controller.
5.Select "Service Status" and press the con-
troller.
6.Select "Terminate services" and press the
controller.
Use of TeleService or BMW Assist is blocked.
To lift the block, re-enabling is required, refer to
page159. This does not affect the contractual
agreements.
Automatic service notification can be disabled
separately. Contact your BMW center for assis-
tance.
Enable TeleService and, if applicable, BMW
Assist to log on again.