2005 BMW 645CI CONVERTIBLE engine
[x] Cancel search: enginePage 93 of 217
Lamps
92 The low beams remain on independent of
the ambient lighting conditions when you
switch on the fog lamps.
With the daytime driving lamps activated, the
low beams are always switched on in this switch
position with the ignition key in position 2.<
The automatic headlamp control cannot
serve as a substitute for your personal
judgment in determining when the lamps
should be switched on in response to ambient
lighting conditions. For example, the system
cannot detect fog. To avoid safety risks, you
should always switch on the lamps manually
under these conditions.<
Adaptive Head Light*
The concept
Adaptive Head Light is a variable headlamp
control system that enables better illumination
of the road surface. Depending on the steering
angle and other assumptions, the light from the
headlamp follows the course of the road.
Activating Adaptive Head Light
In switch position3 the Adaptive Head Light is
active and the automatic headlamp control is
switched on.
To avoid blinding oncoming traffic, the Adaptive
Head Light
>is not active when driving in reverse
>i s o n l y a c t i v e t o w a r d p a s s e n g e r ' s s i d e w h e n
stationary
Malfunction
The LED beside the symbol for automatic head-
lamp control flashes. The Adaptive Head Light
is malfunctioning or has failed. Have the system
checked as soon as possible.
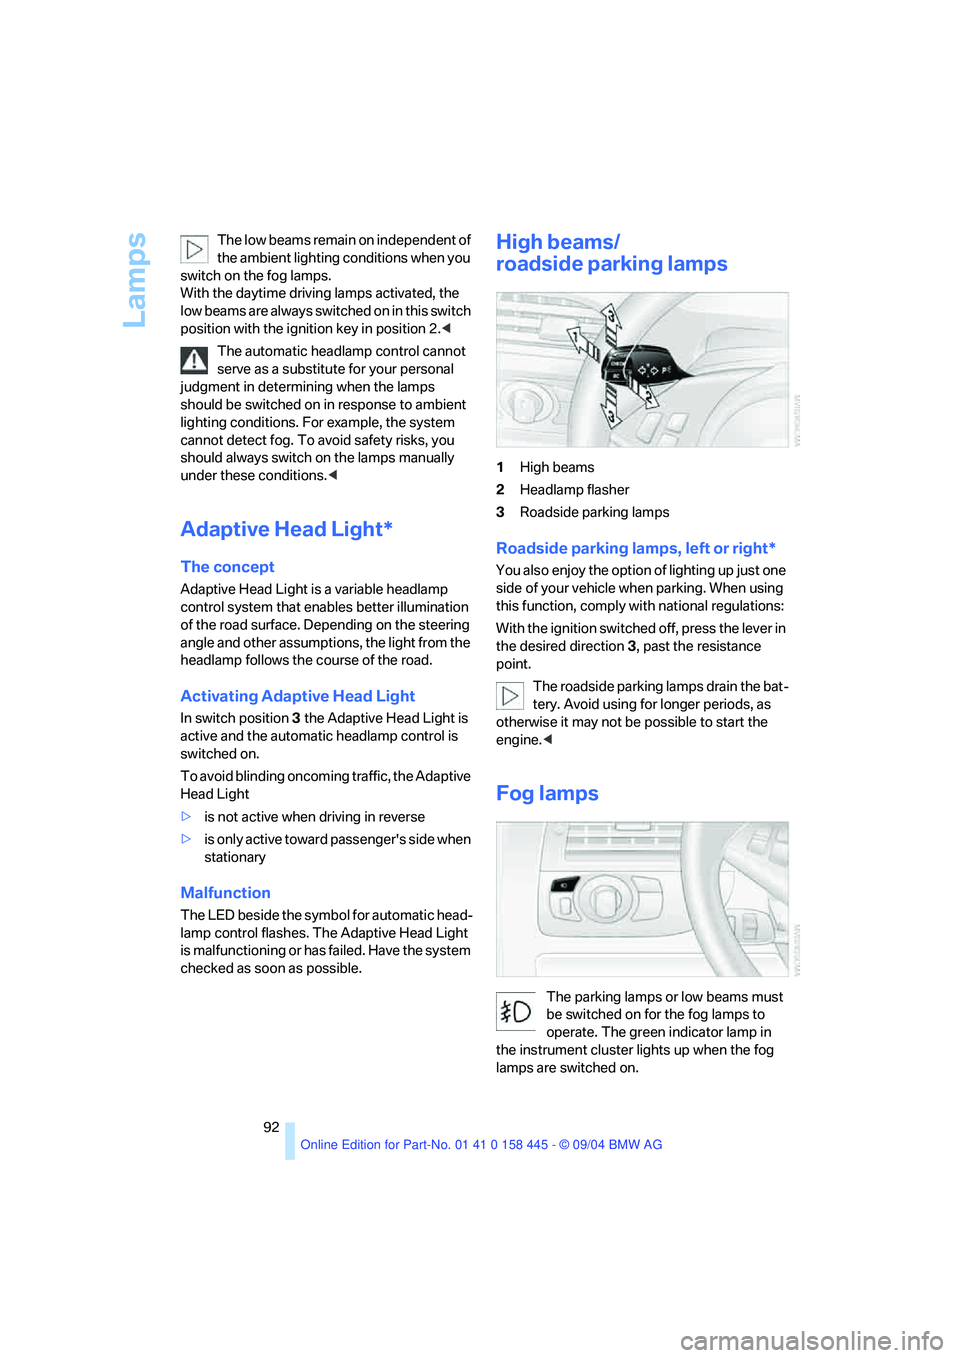
High beams/
roadside parking lamps
1High beams
2Headlamp flasher
3Roadside parking lamps
Roadside parking lamps, left or right*
You also enjoy the option of lighting up just one
side of your vehicle when parking. When using
this function, comply with national regulations:
With the ignition switched off, press the lever in
the desired direction3, past the resistance
point.
The roadside parking lamps drain the bat-
tery. Avoid using for longer periods, as
otherwise it may not be possible to start the
engine.<
Fog lamps
The parking lamps or low beams must
be switched on for the fog lamps to
operate. The green indicator lamp in
the instrument cluster lights up when the fog
lamps are switched on.
Page 96 of 217
Controls
95Reference
At a glance
Driving tips
Communications
Navigation
Entertainment
Mobility
The current setting for air distribution is dis-
played on the Control Display.
A congenial climate
For almost all conditions, the AUTO program
offers the optimal air distribution and air vol-
ume. Select an interior temperature you find
pleasant.
The following section contains more detailed
information on the available setting options.
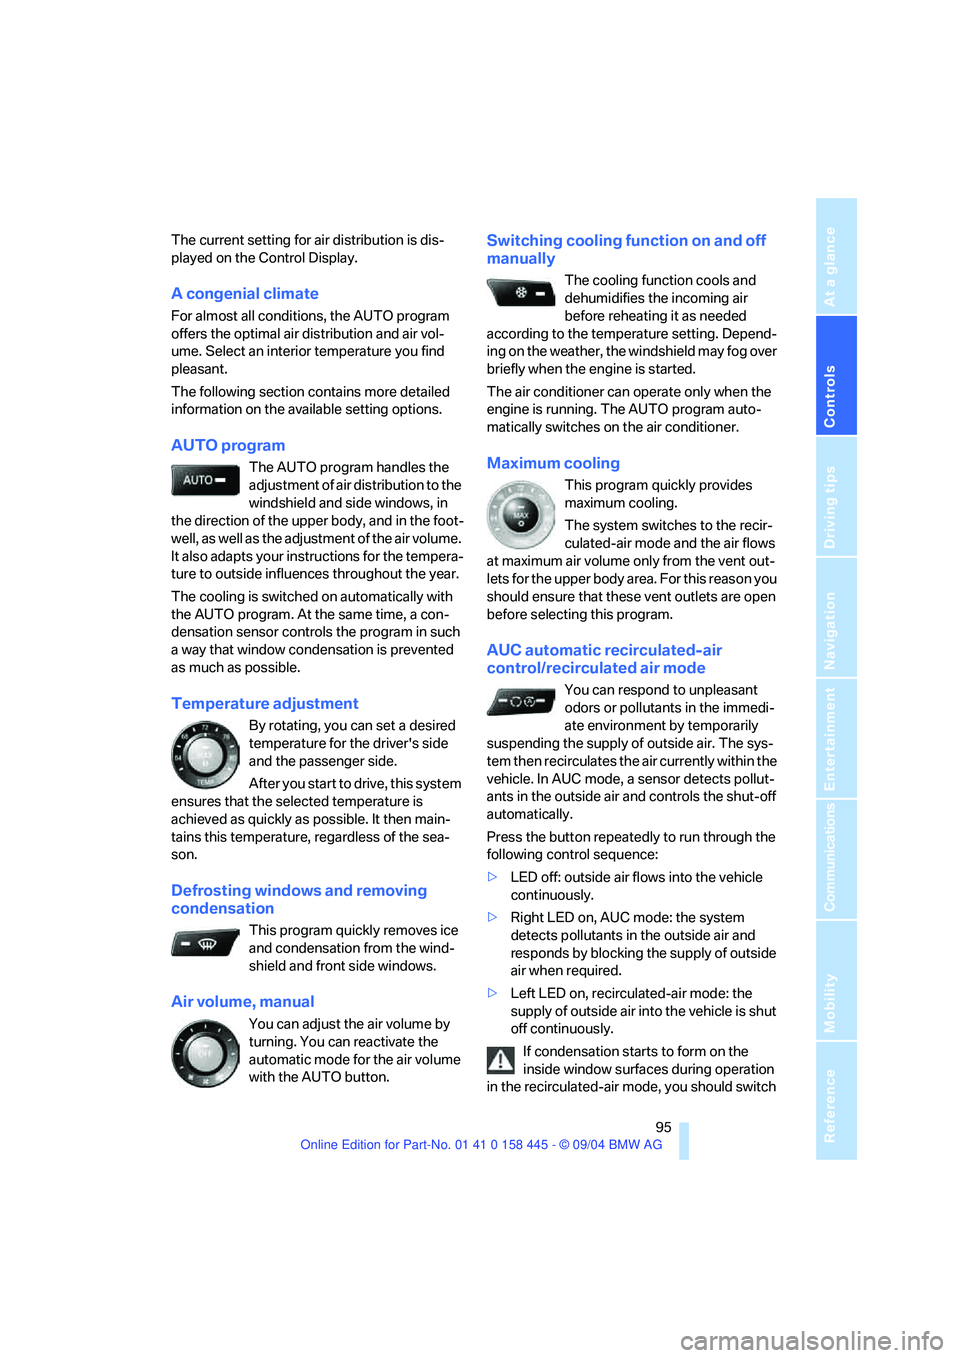
AUTO program
The AUTO program handles the
adjustment of air distribution to the
windshield and side windows, in
the direction of the upper body, and in the foot-
well, as well as the adjustment of the air volume.
It also adapts your instructions for the tempera-
ture to outside influences throughout the year.
The cooling is switched on automatically with
the AUTO program. At the same time, a con-
densation sensor controls the program in such
a way that window condensation is prevented
as much as possible.
Temperature adjustment
By rotating, you can set a desired
temperature for the driver's side
and the passenger side.
After you start to drive, this system
ensures that the selected temperature is
achieved as quickly as possible. It then main-
tains this temperature, regardless of the sea-
son.
Defrosting windows and removing
condensation
This program quickly removes ice
and condensation from the wind-
shield and front side windows.
Air volume, manual
You can adjust the air volume by
turning. You can reactivate the
automatic mode for the air volume
with the AUTO button.
Switching cooling function on and off
manually
The cooling function cools and
dehumidifies the incoming air
before reheating it as needed
according to the temperature setting. Depend-
ing on the weather, the windshield may fog over
briefly when the engine is started.
The air conditioner can operate only when the
engine is running. The AUTO program auto-
matically switches on the air conditioner.
Maximum cooling
This program quickly provides
maximum cooling.
The system switches to the recir-
culated-air mode and the air flows
at maximum air volume only from the vent out-
lets for the upper body area. For this reason you
should ensure that these vent outlets are open
before selecting this program.
AUC automatic recirculated-air
control/recirculated air mode
You can respond to unpleasant
odors or pollutants in the immedi-
ate environment by temporarily
suspending the supply of outside air. The sys-
tem then recirculates the air currently within the
vehicle. In AUC mode, a sensor detects pollut-
ants in the outside air and controls the shut-off
automatically.
Press the button repeatedly to run through the
following control sequence:
>LED off: outside air flows into the vehicle
continuously.
>Right LED on, AUC mode: the system
detects pollutants in the outside air and
responds by blocking the supply of outside
air when required.
>Left LED on, recirculated-air mode: the
supply of outside air into the vehicle is shut
off continuously.
If condensation starts to form on the
inside window surfaces during operation
in the recirculated-air mode, you should switch
Page 97 of 217
A congenial climate
96 it off while also increasing the air volume as
required.
The recirculated-air mode should not be used
over a longer period of time, as the air quality
inside the vehicle deteriorates continuously.<
Residual heat mode
Press the button when the motor is
switched off and warm.
The heat stored in the engine is
used to heat the passenger com-
partment, e.g. when stopped at a school to pick
up a child.
You can adjust the automatic climate control
settings as of ignition key position 1.
Provided that the engine has warmed to its nor-
mal operating temperature and the battery is
charged, you can use this function for up to
15 minutes after switching off the ignition. The
LED in the button lights up to confirm compli-
ance with both of these conditions.
Switching off automatic climate control
The air volume, the heater and the
cooling function are all switched
off.
You can restart the automatic cli-
mate control by pressing any of its buttons
except the REST button.
Settings using Control Center
Ignition key:
>In vehicles with separate drives for audio
CDs and navigation DVDs, ignition key in
position 2.
>In vehicles with one drive for audio CDs,
ignition key in position 1.
Control Center, for principle details, refer to
page16.1.Press the button.
This opens the start menu.
2.Move the controller to the left to open "Cli-
mate".
You can set the following:
>Manual air distribution, separate for driver's
side and passenger side
>Adapting temperature in upper body region
>Intensity of the AUTO program
The settings are stored for the remote control
currently in use.
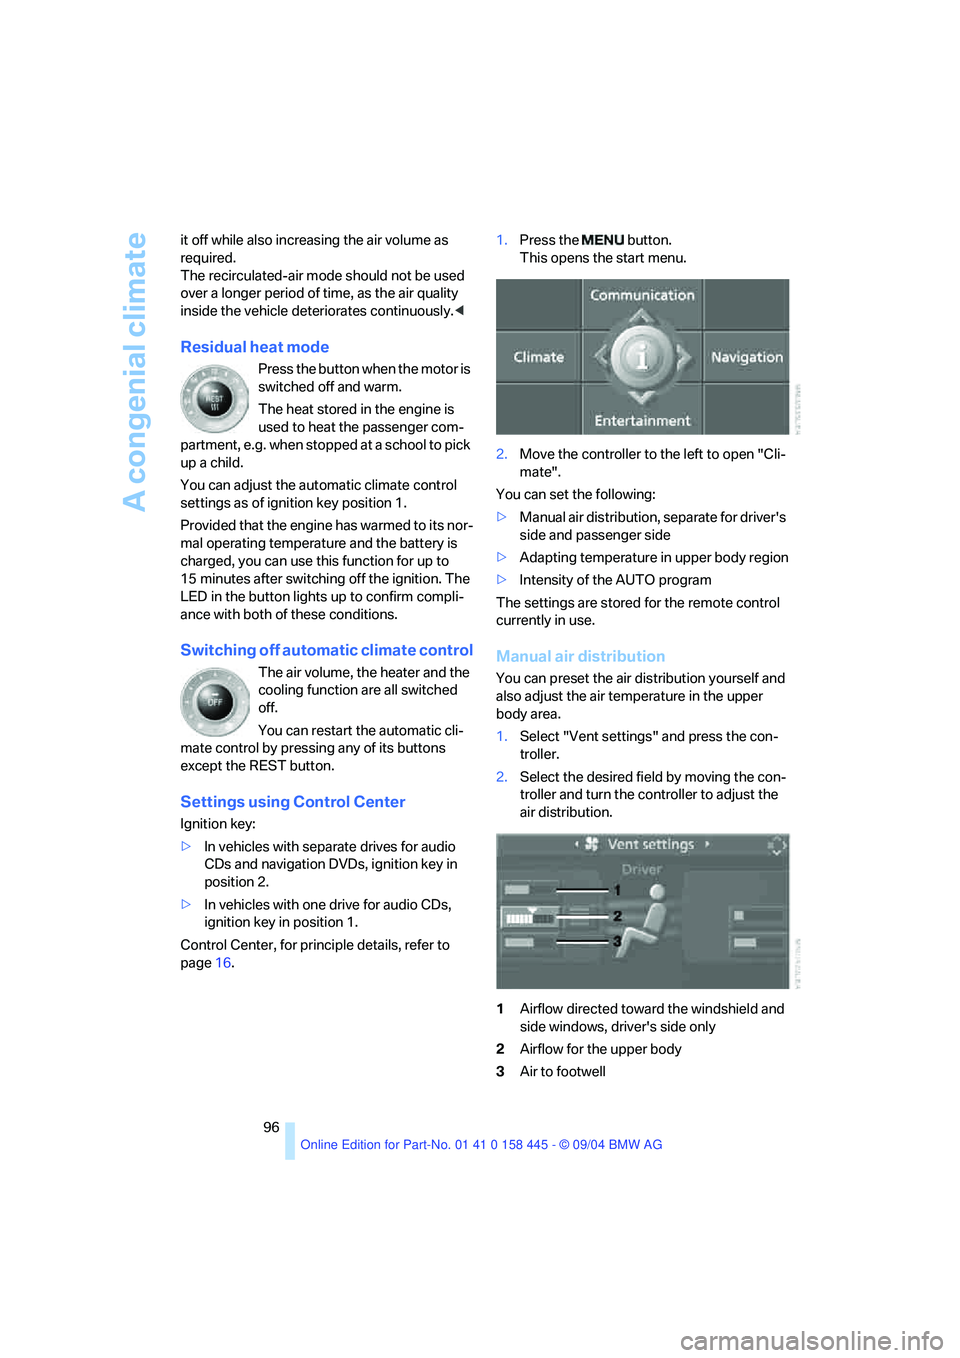
Manual air distribution
You can preset the air distribution yourself and
also adjust the air temperature in the upper
body area.
1.Select "Vent settings" and press the con-
troller.
2.Select the desired field by moving the con-
troller and turn the controller to adjust the
air distribution.
1Airflow directed toward the windshield and
side windows, driver's side only
2Airflow for the upper body
3Air to footwell
Page 109 of 217
Things to remember when driving
108
Things to remember when driving
Breaking-in
Moving parts need time to adjust to one
another. To ensure that your vehicle continues
to provide optimized economy of operation
throughout an extended service life, we request
that you devote careful attention to the follow-
ing section.
Engine and differential
Up to 1,200 miles/2,000 km:
You should attempt to vary both vehicle and
engine speeds. Until the break-in period has
been completed, you should also refrain from
exceeding an engine speed of 4,500 rpm or a
driving speed of 100 mph/160 km/h.
Always obey all official speed limits.
Avoid full-throttle operation and use of the
transmission's kick-down mode during these
initial miles.
Once you have driven 1,200 miles/2,000 km,
the engine and vehicle speeds can be gradually
increased.
SMG Sequential manual transmission
Do not use the acceleration assistant during the
break-in period, refer to page59.
Tires
Due to technical factors associated with their
manufacture, tires do not achieve their full trac-
tion potential until after an initial break-in
period. Therefore, drive reservedly during the
first 200 miles/300 km.
Brake system
Brakes require an initial break-in period of
approx. 300 miles/500 km to achieve optimized
contact and wear patterns between brake pads
and rotors.
Clutch
The function of the clutch is only at its opti-
mized level after a distance driven of approx.
300 miles/500 km. During this break-in period,
engage the clutch gently.
After component replacement
You should also comply with these break-in
procedures should the components mentioned
above need to be replaced at a later point.
General driving notes
Close the luggage compartment lid
Operate the vehicle only when the lug-
gage compartment lid is completely
closed. Otherwise, exhaust fumes could pene-
trate to the interior of the vehicle.<
If special circumstances should make it abso-
lutely necessary to operate the vehicle with the
luggage compartment lid open:
1.Coupe: close both windows and the glass
sunroof.
Convertible: with closed top, close all win-
dows.
2.Adjust the automatic climate control to sup-
ply a high air volume, refer to page95.
Hot exhaust system
As in all vehicles equipped with a catalytic
converter, extremely high temperatures
are generated in this vehicle. Do not remove the
heat shields installed adjacent to various sec-
tions of the exhaust system, and never apply
undercoating to them. When driving, standing
at idle and while parking, take care to avoid pos-
sible contact between the hot exhaust system
and any highly flammable materials such as hay,
leaves, grass, etc. Such contact could lead to a
fire, and with it the risk of serious property dam-
age as well as personal injury.<
Page 110 of 217
Driving tips
109Reference
At a glance
Controls
Communications
Navigation
Entertainment
Mobility
Mobile communication devices in
vehicle
BMW advises against using mobile com-
munication devices, e.g. portable phones,
inside the vehicle without a direct connection to
an external antenna. Otherwise, the vehicle
electronics and mobile communication device
can influence one another. In addition, there is
no assurance that the radiation emitted during
transmission will be conveyed out of the vehicle
interior.<
Hydroplaning
When driving on wet or slushy roads,
reduce road speed. If you do not, a wedge
of water can form between tires and road sur-
face. This phenomenon is referred to as hydro-
planing, and is characterized by a partial or
complete loss of contact between the tires and
the road surface, ultimately undermining your
ability to steer and brake the vehicle.<
The risk of hydroplaning increases as the tread
depth of the tires decreases, also refer to Mini-
mum tire tread on page171.
Driving through water
Do not drive through water on the road if it
is deeper than 1 ft/30 cm, and then only at
walking speed at the most. Otherwise, the vehi-
cle's engine, the electrical systems and the
transmission may be damaged.<
Using handbrake on inclines.
On inclines, do not hold the vehicle with
the clutch; use the handbrake. Otherwise
greater clutch wear will result.<
SMG Sequential manual transmission
Start off quickly on slopes. Do not hold
the vehicle on a hill by applying the throt-
tle, but engage the handbrake instead. Other-
wise overheating can occur in the transmission
region.<
Braking safely
Your BMW is equipped with ABS as standard. In
situations that require it, it is best to brake with
full force. Since the vehicle maintains steering
responsiveness, you can still avoid possible
obstacles with a minimum of steering effort.
Pulsation at the brake pedal combines with
sounds from the hydraulic circuits to indicate to
the driver that ABS is in its active mode.
Do not drive with your foot resting on the
brake pedal. Even light but consistent
pedal pressure can lead to high temperatures,
brake wear and possibly even brake failure.<
Driving in wet conditions
When driving on wet roads or in heavy rain,
briefly brake with light pedal pressure at inter-
vals of a few miles. Monitor traffic conditions to
ensure that this maneuver does not endanger
other road users. The heat generated in this
process helps dry the pads and rotors to ensure
that full braking efficiency will then be available
when you need it.
Hills
To prevent overheating and thus reduced
efficiency of the brake system, downshift
to a gear in which only minimal brake applica-
tions are needed when descending long or
steep downhill stretches. Even light but consis-
tent pedal pressure can lead to high tempera-
tures, brake wear and possibly even brake fail-
ure.<
You can further enhance the engine's braking
effect by selecting a lower gear in the automatic
transmission's manual mode, downshifting as
far as first gear on extremely steep stretches,
refer to page58. This strategy helps you avoid
placing excessive loads on the brake system.
Never drive with the clutch pressed
or allow the vehicle to coast with the
transmission in Neutral – or with the engine
switched off – there is no engine braking when
the transmission is in Neutral, and no power
assist for brakes and steering when the engine
is not running.
Page 167 of 217
Refueling
166
Refueling
Always switch off the engine before refu-
eling. If you do not, fuel cannot be dis-
pensed into the tank and a message on the
Control Display will appear.<
Always observe all applicable precautions
and regulations when handling fuels.
Never carry spare fuel containers in your vehi-
cle. Whether empty or full, these containers can
leak, cause an explosion, and lead to fire in the
event of a collision.<
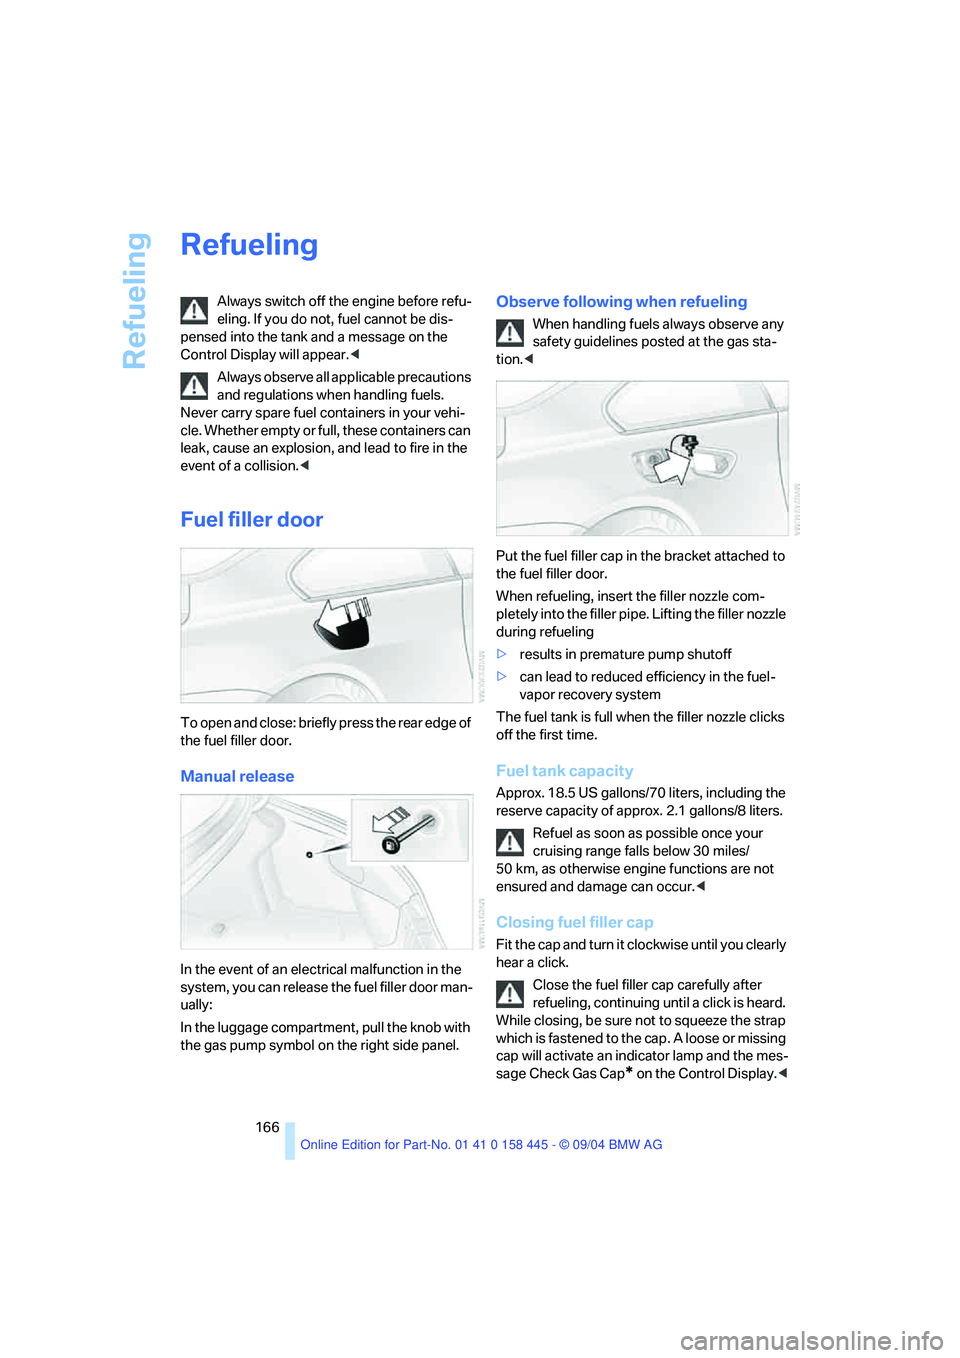
Fuel filler door
To open and close: briefly press the rear edge of
the fuel filler door.
Manual release
In the event of an electrical malfunction in the
system, you can release the fuel filler door man-
ually:
In the luggage compartment, pull the knob with
the gas pump symbol on the right side panel.
Observe following when refueling
When handling fuels always observe any
safety guidelines posted at the gas sta-
tion.<
Put the fuel filler cap in the bracket attached to
the fuel filler door.
When refueling, insert the filler nozzle com-
pletely into the filler pipe. Lifting the filler nozzle
during refueling
>results in premature pump shutoff
>can lead to reduced efficiency in the fuel-
vapor recovery system
The fuel tank is full when the filler nozzle clicks
off the first time.
Fuel tank capacity
Approx. 18.5 US gallons/70 liters, including the
reserve capacity of approx. 2.1 gallons/8 liters.
Refuel as soon as possible once your
cruising range falls below 30 miles/
50 km, as otherwise engine functions are not
ensured and damage can occur.<
Closing fuel filler cap
Fit the cap and turn it clockwise until you clearly
hear a click.
Close the fuel filler cap carefully after
refueling, continuing until a click is heard.
While closing, be sure not to squeeze the strap
which is fastened to the cap. A loose or missing
cap will activate an indicator lamp and the mes-
sage Check Gas Cap
* on the Control Display.<
Page 168 of 217
Mobility
167Reference
At a glance
Controls
Driving tips
Communications
Navigation
Entertainment
Fuel specifications
The engine uses unleaded gasoline only.
Required fuel
Premium unleaded gasoline
The minimum octane rating is 91.
If you use gasoline with this minimum octane
rating, the engine may produce knocking
sounds when starting at high outside tempera-
tures. This has no effect on the engine life.
Minimum Octane Rating corresponds to the
Anti Knock Index AKI and is determined accord-
ing to the so-called (R+M)/2 method.
Do not use leaded gasoline, as otherwise
the lambda probe and catalytic converter
will be permanently damaged.<
Use high-quality brands
Field experience has indicated significant dif-
ferences in fuel quality: volatility, composition,
additives, etc., among gasolines offered for sale
in the United States and Canada. Fuels contain-
ing up to and including 10 % ethanol or other
oxygenates with up to 2.8 % oxygen by weight,
that is, 15 % MTBE or 3 % methanol plus an
equivalent amount of co-solvent, will not void
the applicable warranties with respect to
defects in materials or workmanship.
The use of poor-quality fuels may result in
drivability, starting and stalling problems,
especially under certain environmental condi-
tions such as high ambient temperature and
high altitude.
Should you encounter drivability problems
which you suspect could be related to the fuel
you are using, we recommend that you respond
by switching to a recognized high-quality
brand.
Failure to comply with these recommendations
may also result in unscheduled maintenance.<
Page 176 of 217
Mobility
175Reference
At a glance
Controls
Driving tips
Communications
Navigation
Entertainment
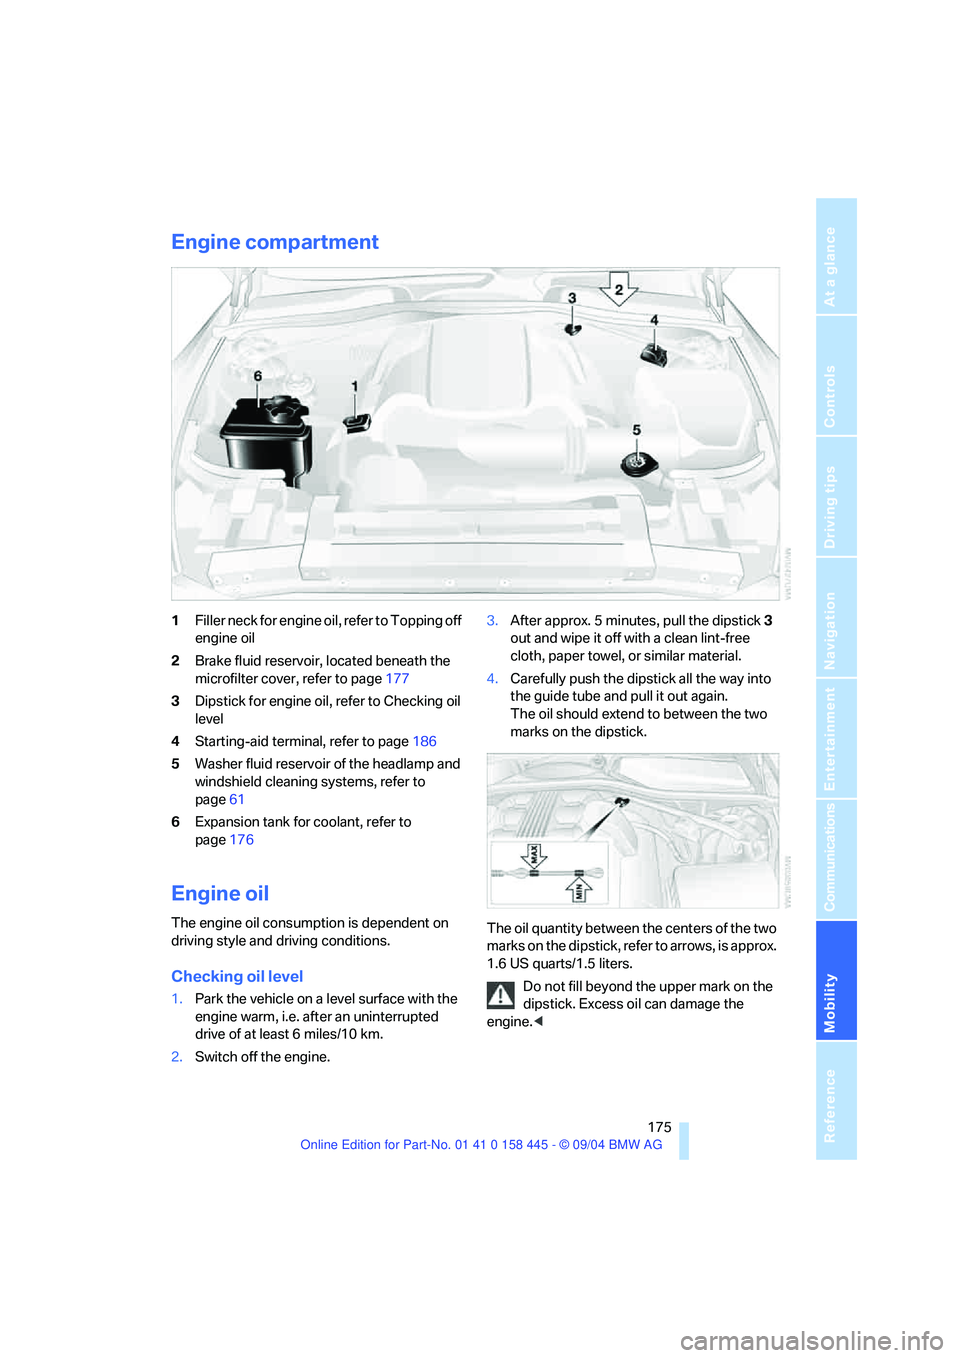
Engine compartment
1Filler neck for engine oil, refer to Topping off
engine oil
2Brake fluid reservoir, located beneath the
microfilter cover, refer to page177
3Dipstick for engine oil, refer to Checking oil
level
4Starting-aid terminal, refer to page186
5Washer fluid reservoir of the headlamp and
windshield cleaning systems, refer to
page61
6Expansion tank for coolant, refer to
page176
Engine oil
The engine oil consumption is dependent on
driving style and driving conditions.
Checking oil level
1.Park the vehicle on a level surface with the
engine warm, i.e. after an uninterrupted
drive of at least 6 miles/10 km.
2.Switch off the engine.3.After approx. 5 minutes, pull the dipstick3
out and wipe it off with a clean lint-free
cloth, paper towel, or similar material.
4.Carefully push the dipstick all the way into
the guide tube and pull it out again.
The oil should extend to between the two
marks on the dipstick.
The oil quantity between the centers of the two
marks on the dipstick, refer to arrows, is approx.
1.6 US quarts/1.5 liters.
Do not fill beyond the upper mark on the
dipstick. Excess oil can damage the
engine.<