2005 BMW 545I SEDAN warning light
[x] Cancel search: warning lightPage 14 of 221

At a glance
13Reference
Controls
Driving tips
Communication
Navigation
Entertainment
Mobility
Indicator and warning lamps
The concept
Indicator and warning lamps and their combina-
tions are displayed in the display region1 and in
the display2. To better differentiate between
malfunctions, different symbols can be shown
on the display2.
Some lights in the display region1 are tested
for proper function by briefly lighting up during
starting of the engine or when the ignition is
switched on.
Acknowledging active functions
The following indicator lamps in the display
region1 indicate that the associated functions
are activated:
What to do in case of a malfunction
All warning lamps and indicator lamps not yet
listed are also accompanied by text messages
on the Control Display. These may contain
more information as to the cause of a malfunc-
tion and instructions on what to do.
Sometimes, warning lamps are also accompa-
nied by supplemental text messages on the
Control Display that are shown immediately.
Text messages that do not appear immediately
are stored and can be displayed subsequently.
For further information on displaying these
messages later, refer to Check Control on
page 67. Turn signals56
Handbrake engaged52
Handbrake engaged for Canadian
models
Front fog lamps88
DTC Dynamic Traction Control78
High beams/headlamp flasher88
DSC Dynamic Stability Control78
Page 35 of 221

Opening and closing
34 The system indicates that it has been correctly
armed by switching on the hazard warning
flashers for a single cycle and by emitting an
acoustic signal.
You can also open the luggage compartment lid
with the system armed using the button on
the remote control, refer to page30. When the
luggage compartment lid is closed, it is locked
again and monitored.
Switching off alarm
>Unlock the vehicle using the remote control,
refer to page29
>or turn the ignition key to position 1, refer to
page51.
Indicator lamp displays
>The indicator lamp under the inside rear-
view mirror flashes continuously: the sys-
tem is armed.
>The indicator lamp flashes after locking: the
doors or luggage compartment lid are not
properly closed. Even if you do not close the
alerted area, the system begins to monitor
the remaining areas, and the indicator lamp
flashes continuously after approx. 10 sec-
onds. However, the interior motion sensor
is not activated.
>The indicator lamp goes out after unlocking:
your vehicle has not been disturbed while
you were away.
>The indicator lamp flashes after unlocking
until the key is inserted into the lock, but can
blink for up to approx. 5 minutes: your vehi-
cle has been disturbed while you were
away.
Tilt alarm sensor and interior motion
sensor
Tilt alarm sensor
The tilt of the vehicle is monitored. The alarm
system reacts, e.g. in case of an attempted
wheel theft or towing.
Interior motion sensor
In order for the interior motion sensor to func-
tion properly, the windows and glass sunroof
must be completely closed.
Avoiding unintentional alarms
The tilt alarm sensor and interior motion sensor
may be switched off at the same time. This pre-
vents unintentional alarms, e.g. in the following
situations:
>In stacking garages
>When transporting on car-carrying trains
>When animals are to remain in the vehicle
Switching off tilt alarm sensor and
interior motion sensor
Press the button on the remote control
once again directly after locking.
The indicator lamp lights up briefly and then
flashes continuously. The tilt alarm sensor and
the interior motion sensor are switched off until
the next time the vehicle is unlocked and subse-
quently locked again.
Windows
To prevent injuries, exercise care when
closing the windows and keep them in
your field of vision until they are shut.
When leaving the vehicle, always remove the
ignition key and close the doors to prevent chil-
dren from operating the windows and injuring
themselves etc.<
Page 61 of 221

Driving
60 Active cruise control is not and must not
be used as a collision avoidance/warning
system.<
Since this active cruise control system is
a new technology and operates differ-
ently from conventional cruise control systems
which you may be accustomed to, you are
strongly urged to read all of the pages relating
to this system before use. Pay special attention
to the information contained in the Things to
know about active cruise control section in this
manual beginning on page62.<
Vehicles with manual transmission
You can use the system in the 2nd to 6th gear
within a normal engine speed range and also
change gears. Continuous operation at very
high or very low engine speeds is not possible.
In this case the driver is asked to shift or the
system deactivates itself.
Vehicles with SMG
Continuous operation at very high engine
speeds is not possible in the Sequential mode.
In this case the driver is asked to shift or the
system deactivates itself.
In the Drive mode, the SMG acts similarly to the
automatic transmission in the D position.
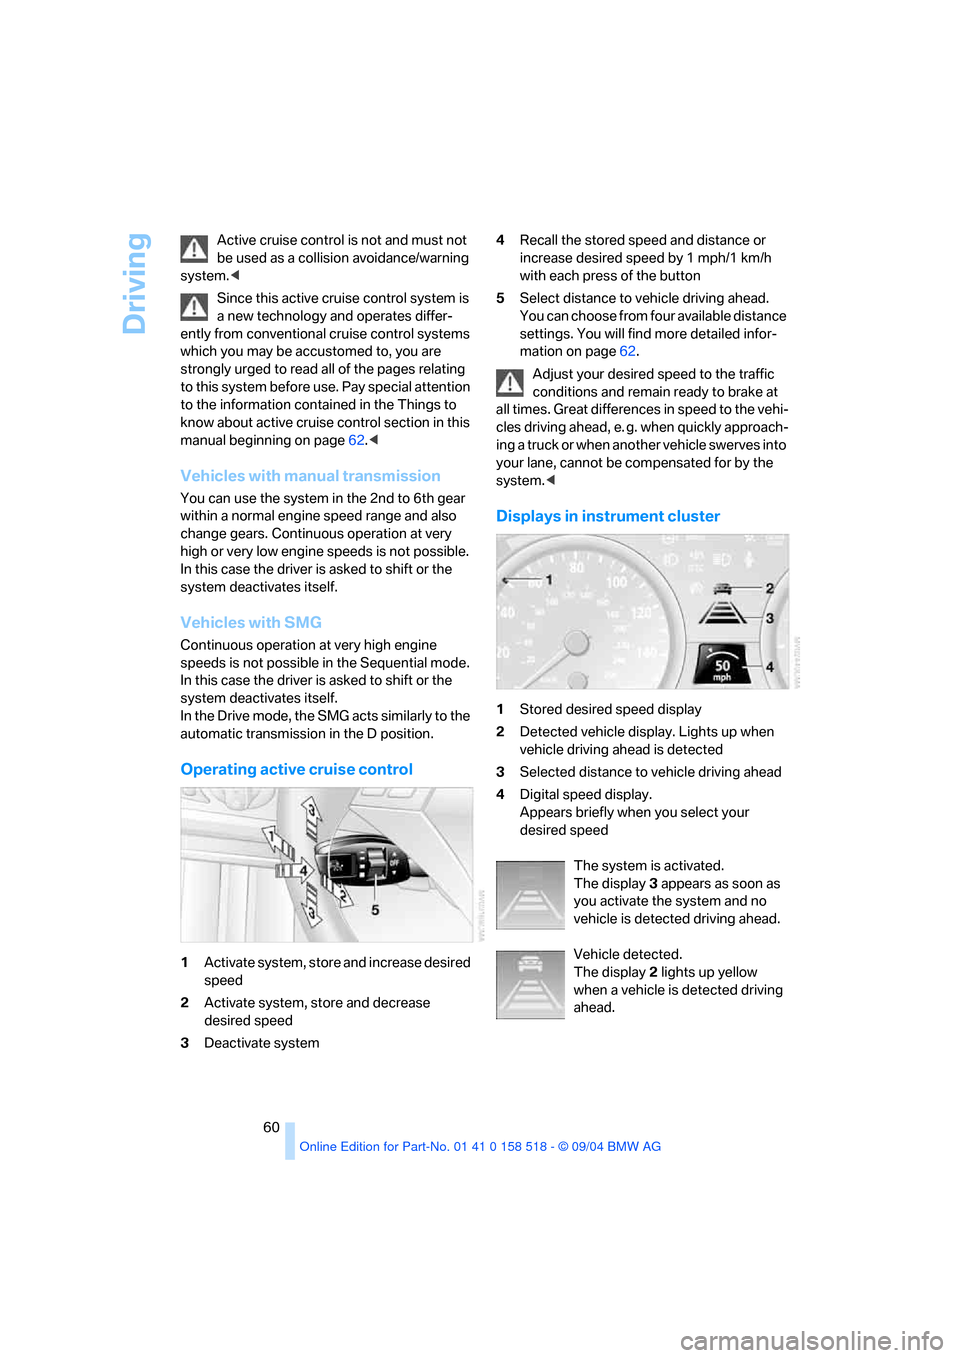
Operating active cruise control
1Activate system, store and increase desired
speed
2Activate system, store and decrease
desired speed
3Deactivate system4Recall the stored speed and distance or
increase desired speed by 1 mph/1 km/h
with each press of the button
5Select distance to vehicle driving ahead.
You can choose from four available distance
settings. You will find more detailed infor-
mation on page62.
Adjust your desired speed to the traffic
conditions and remain ready to brake at
all times. Great differences in speed to the vehi-
cles driving ahead, e. g. when quickly approach-
ing a truck or when another vehicle swerves into
your lane, cannot be compensated for by the
system.<
Displays in instrument cluster
1Stored desired speed display
2Detected vehicle display. Lights up when
vehicle driving ahead is detected
3Selected distance to vehicle driving ahead
4Digital speed display.
Appears briefly when you select your
desired speed
The system is activated.
The display 3 appears as soon as
you activate the system and no
vehicle is detected driving ahead.
Vehicle detected.
The display 2 lights up yellow
when a vehicle is detected driving
ahead.
Page 64 of 221

Controls
63Reference
At a glance
Driving tips
Communication
Navigation
Entertainment
Mobility
Always remember that the range and abil-
ity of the system does have physical limi-
tations. It will not apply the brakes or decelerate
your vehicle when there is a slow-moving vehi-
cle, stopped vehicle or stationary object ahead
of you, as for example, at a traffic light or a
parked vehicle. Also, the system does not react
to oncoming traffic, pedestrians or other types
of potential traffic such as a rider on horseback.
It is also possible that the system may not
detect smaller moving objects such as motor-
cycles or bicycles. Be especially alert when
encountering any of these situations as the sys-
tem will neither automatically brake, nor provide
a warning to you. Also, be aware that every
decrease in the distance setting allows your
vehicle to come closer to a vehicle in front of
you and requires a heightened amount of alert-
ness.<
If while your vehicle is actively following a vehi-
cle in front of you and the vehicle ahead speeds
up or the lane ahead becomes clear, then your
vehicle will accelerate to the speed you have
selected. Be aware that changing to a clear,
unobstructed lane will also result in your vehicle
accelerating.
Be certain to deactivate the system when
you pull into an exit lane for a highway off-
ramp.<
Also, vehicles traveling in a staggered manner
on a highway may cause a delay in the system's
reaction to a vehicle in front of you or may cause
the system to react to a vehicle actually in the
lane next to you. Always be ready to take action
or apply the brakes if necessary.
Active cruise control can only decelerate the
vehicle to approx. 20 mph/30 km/h. If the sys-
tem reduces vehicle speed below 20 mph/
30 km/h or if DSC/ABS is engaged while driving,
the system will automatically deactivate.
Remember, the system cannot stop your
vehicle. In addition, the system is deacti-
vated whenever the driver applies the vehicle
brakes, shifts the transmission to neutral/N, or
deactivates DSC. After any deactivation, the
system will no longer automatically activate the
vehicle brakes, which means the driver must intervene and resume manual braking. You
should then reactivate the system only when
you are fully aware of the prior speed and dis-
tance settings.<
Active cruise control may brake when you
reduce the stored desired speed; however, the
driver must constantly monitor traffic and inter-
vene if necessary.
When you switch off the engine or ignition,
active cruise control is fully switched off, too,
and any settings you have selected are can-
celed.
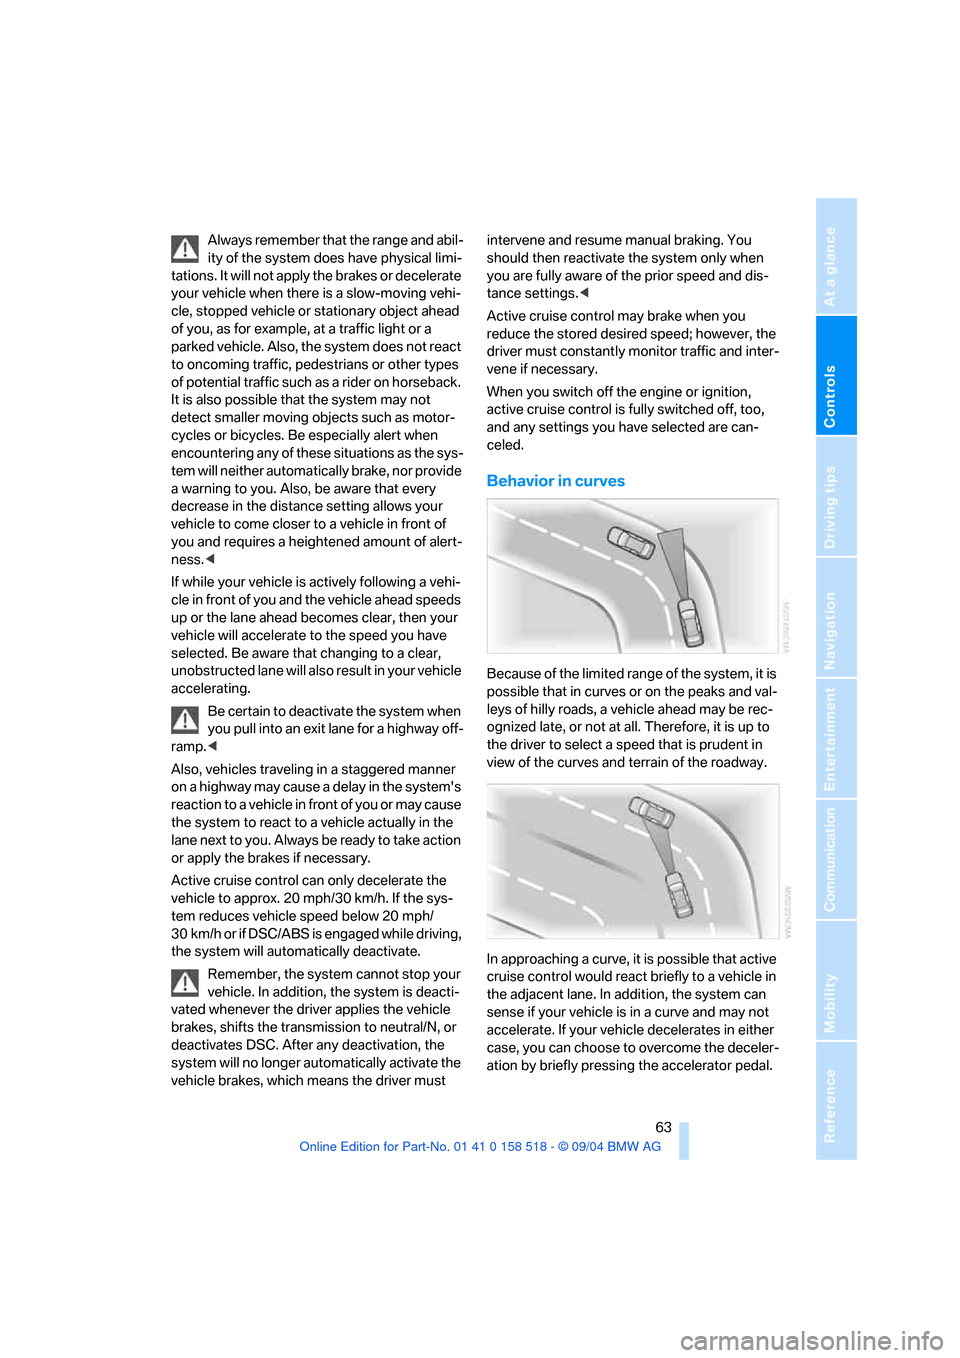
Behavior in curves
Because of the limited range of the system, it is
possible that in curves or on the peaks and val-
leys of hilly roads, a vehicle ahead may be rec-
ognized late, or not at all. Therefore, it is up to
the driver to select a speed that is prudent in
view of the curves and terrain of the roadway.
In approaching a curve, it is possible that active
cruise control would react briefly to a vehicle in
the adjacent lane. In addition, the system can
sense if your vehicle is in a curve and may not
accelerate. If your vehicle decelerates in either
case, you can choose to overcome the deceler-
ation by briefly pressing the accelerator pedal.
Page 73 of 221

Everything under control
72 3.Press the controller.
Speed limit
You can enter a speed and a Check Control
message indicates when you have reached this
speed. This enables you, for example, to
receive warnings if you exceed a speed limit in
an urban area.
You are only warned of reaching this speed a
second time if your vehicle speed falls below it
again by at least 3 mph/5 km/h.
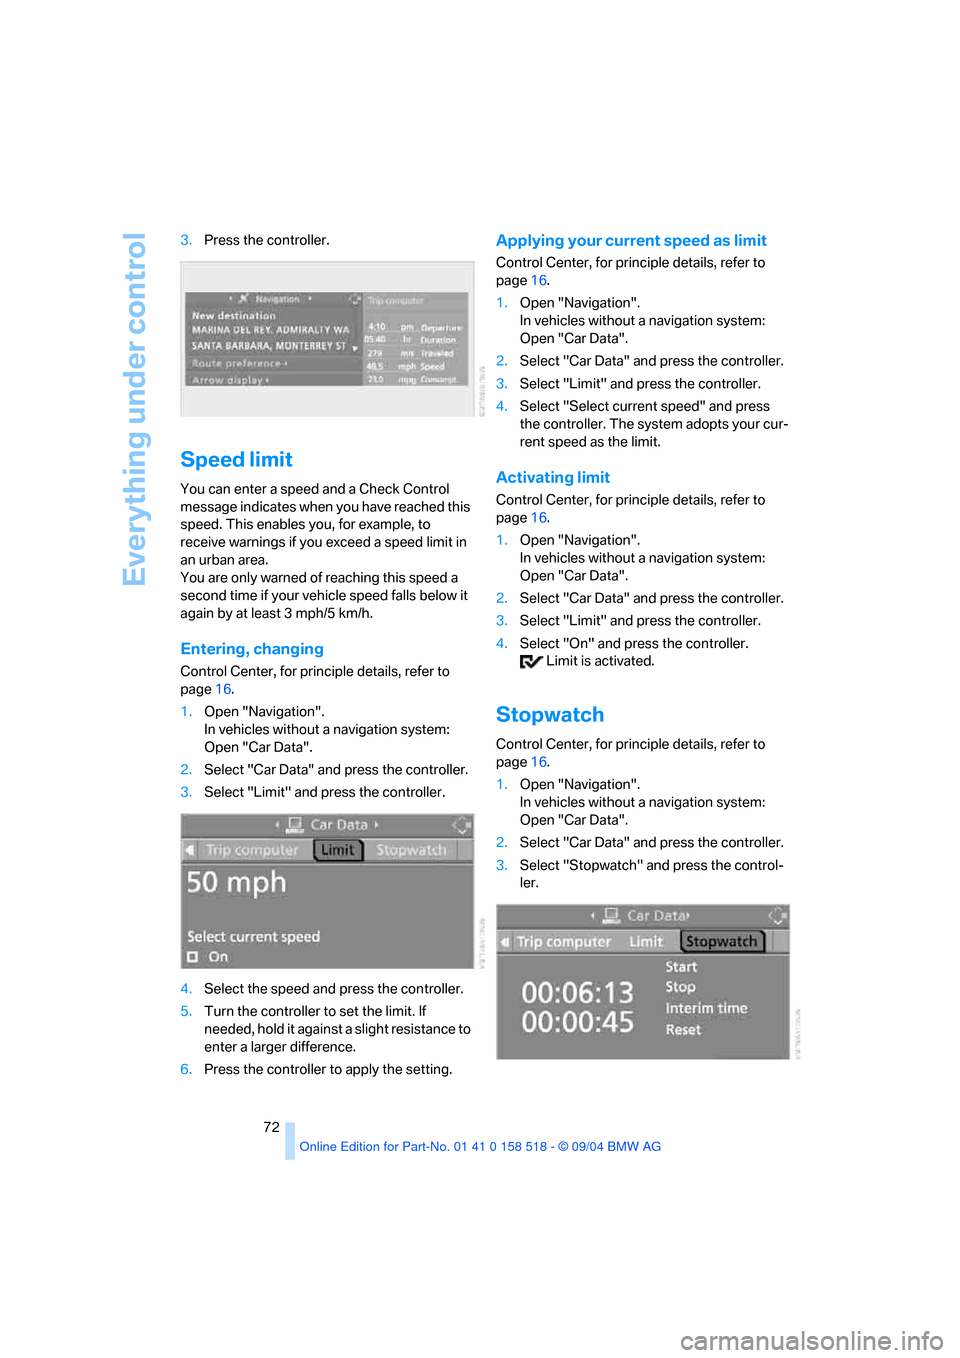
Entering, changing
Control Center, for principle details, refer to
page16.
1.Open "Navigation".
In vehicles without a navigation system:
Open "Car Data".
2.Select "Car Data" and press the controller.
3.Select "Limit" and press the controller.
4.Select the speed and press the controller.
5.Turn the controller to set the limit. If
needed, hold it against a slight resistance to
enter a larger difference.
6.Press the controller to apply the setting.
Applying your current speed as limit
Control Center, for principle details, refer to
page16.
1.Open "Navigation".
In vehicles without a navigation system:
Open "Car Data".
2.Select "Car Data" and press the controller.
3.Select "Limit" and press the controller.
4.Select "Select current speed" and press
the controller. The system adopts your cur-
rent speed as the limit.
Activating limit
Control Center, for principle details, refer to
page16.
1.Open "Navigation".
In vehicles without a navigation system:
Open "Car Data".
2.Select "Car Data" and press the controller.
3.Select "Limit" and press the controller.
4.Select "On" and press the controller.
Limit is activated.
Stopwatch
Control Center, for principle details, refer to
page16.
1.Open "Navigation".
In vehicles without a navigation system:
Open "Car Data".
2.Select "Car Data" and press the controller.
3.Select "Stopwatch" and press the control-
ler.
Page 77 of 221

Technology for comfort, convenience and safety
76
Technology for comfort, convenience and
safety
PDC Park Distance Control*
The concept
The PDC assists you when you are parking.
Acoustic signals and an optical display
* alert
you to the approach of an object from behind
your vehicle. To measure the distance, there
are four ultrasonic sensors in each bumper. The
sensors at the front and at the two rear corners
have a range of approx. 24 in/60 cm; the rear
middle sensors have approx. 5 ft/1.50 m.
PDC is a parking aid that can indicate
objects when they are approached
slowly, as is usually the case when parking.
Avoid approaching an object at high speed, as
otherwise the physical circumstances would
mean that the system warning was too late.<
Automatic mode
When the ignition key is in position 2, the sys-
tem automatically assumes operational status
after a few seconds each time you shift into
reverse or move the selector lever into the R
position.
Wait this short period before driving. The sys-
tem switches itself off when you shift out of
reverse.
Manual mode
Press button, the LED lights up.
Deactivating manual mode
Press the button again; the indicator lamp goes
out.
The system is automatically deactivated once
the vehicle travels approx. 165 ft/50 m or
exceeds a speed of roughly 20 mph/30 km/h;
the indicator lamp goes out. You can reactivate
the system manually as needed.
Signal tones
When nearing an object, the position is corre-
spondingly indicated by an interval tone. Thus,
an object detected to the left rear of the vehicle
will be indicated by a signal tone from the left
rear speaker, etc. As the distance between
vehicle and object decreases, the intervals
between the tones become shorter. If the dis-
tance to the nearest object falls to below
roughly 1 ft/30 cm, then a continuous tone
sounds.
The warning signal is canceled after approx.
3 seconds, if you are moving parallel to a wall.
Malfunction
The LED in the button flashes and a message
appears on the Control Display. PDC is mal-
functioning. Have the system checked.
To prevent this problem, keep the sensors
clean and free of ice or snow in order to ensure
that they will continue to operate effectively.
PDC with visual warning*
You can also have the system show distances
to objects on the Control Display. The Control
Display also indicates objects that are farther
away before a signal tone sounds.
Page 80 of 221

Controls
79Reference
At a glance
Driving tips
Communication
Navigation
Entertainment
Mobility
Malfunction in vehicle stability-control
systems
The brake system warning lamp lights
up in red, appearing together with the
indicator lamps for ABS and DSC. A
message appears on the Control Dis-
play. The driving stability control sys-
tems are deactivated. Conventional
braking efficiency remains available
without limitations. While you may con-
tinue, you should remember to proceed cau-
tiously and drive defensively while avoiding full
brake applications. Have the system checked
as soon as possible.
Display of the previously described
malfunction on Canadian models.
The indicator lamp for DSC lights up; a
message appears on the Control Dis-
play. DSC and DTC are deactivated.
The stability maintenance functions are no
longer available. The vehicle remains in running
order. Have the system checked as soon as
possible.
The warning lamp for the brake system
lights up in yellow; a message appears
on the Control Display. DBC has failed.
Have the system checked as soon as possible.
Display of the previously described
malfunction on Canadian models.
Active roll stabilization*
The concept
Active roll stabilization minimizes body roll and
optimizes vehicle stability during cornering and
evasive maneuvers.
Dynamic stabilizers at the front and rear axles
form the basis for active roll stabilization. Sus-
pension compliance adapts to suit driving con-
ditions, varying from performance-oriented during cornering to smooth and comfort-ori-
ented when the vehicle is proceeding in a
straight line. During vehicle operation, the sys-
tem continuously runs through closed-loop
control cycles lasting only fractions of a second.
The system assumes operational status each
time you start the engine.
Malfunction
The warning lamp lights up and a mes-
sage appears on the Control Display.
There is a malfunction in the system.
Have the system checked as soon as possible.
If there is a malfunction in the system,
please remember to adapt your speed
accordingly, especially in curves. The suspen-
s i o n w il l b e n o t i c ea b ly s o f t e r a n d t h e v e h i cl e w il l
display a greater tendency to tilt during corner-
ing and in crosswinds. If a message stating that
you should stop appears on the Control Display,
stop and switch off the engine as soon as pos-
sible. In this case the oil level in the reservoir
may have dropped below the minimum, possi-
bly owing to a leak in the hydraulic system. Do
not continue driving. Contact your BMW cen-
ter.<
Flat Tire Monitor
The concept
The Flat Tire Monitor keeps track of the infla-
tion pressures in the four mounted tires as you
drive. The system provides an alert whenever
the inflation pressure drops significantly in rela-
tion to the pressure in another tire.
In the event of a pressure loss, the rolling radius
and therefore the rotation speed of the wheels
change. This change is detected and is
reported as a flat tire.
Functional requirement
In order to assure the reliable reporting of a flat
tire, the system must be initialized for the cor-
rect tire inflation pressure.
Perform the initialization immediately
after correcting the inflation pressure,
Page 81 of 221

Technology for comfort, convenience and safety
80 after changing a tire or after changing a wheel or
all of the wheels.<
System limits
The Flat Tire Monitor cannot indicate
sudden severe tire damage caused by
outside factors and does not detect a natural,
even pressure drop in all four tires.<
In the following situations, the system could be
delayed or malfunction:
>System has not been initialized
>Driving on snowy or slippery road surface
>Sporty driving style: slip in the drive wheels,
high lateral acceleration
>Driving with snow chains
*
When you are driving with the compact wheel,
the Flat Tire Monitor is unable to function.
Initializing system
The initialization finishes during driving,
which can be interrupted at any time.
When driving resumes, the initialization is con-
tinued automatically. When driving with snow
chains or with the compact wheel, do not initial-
ize the system.<
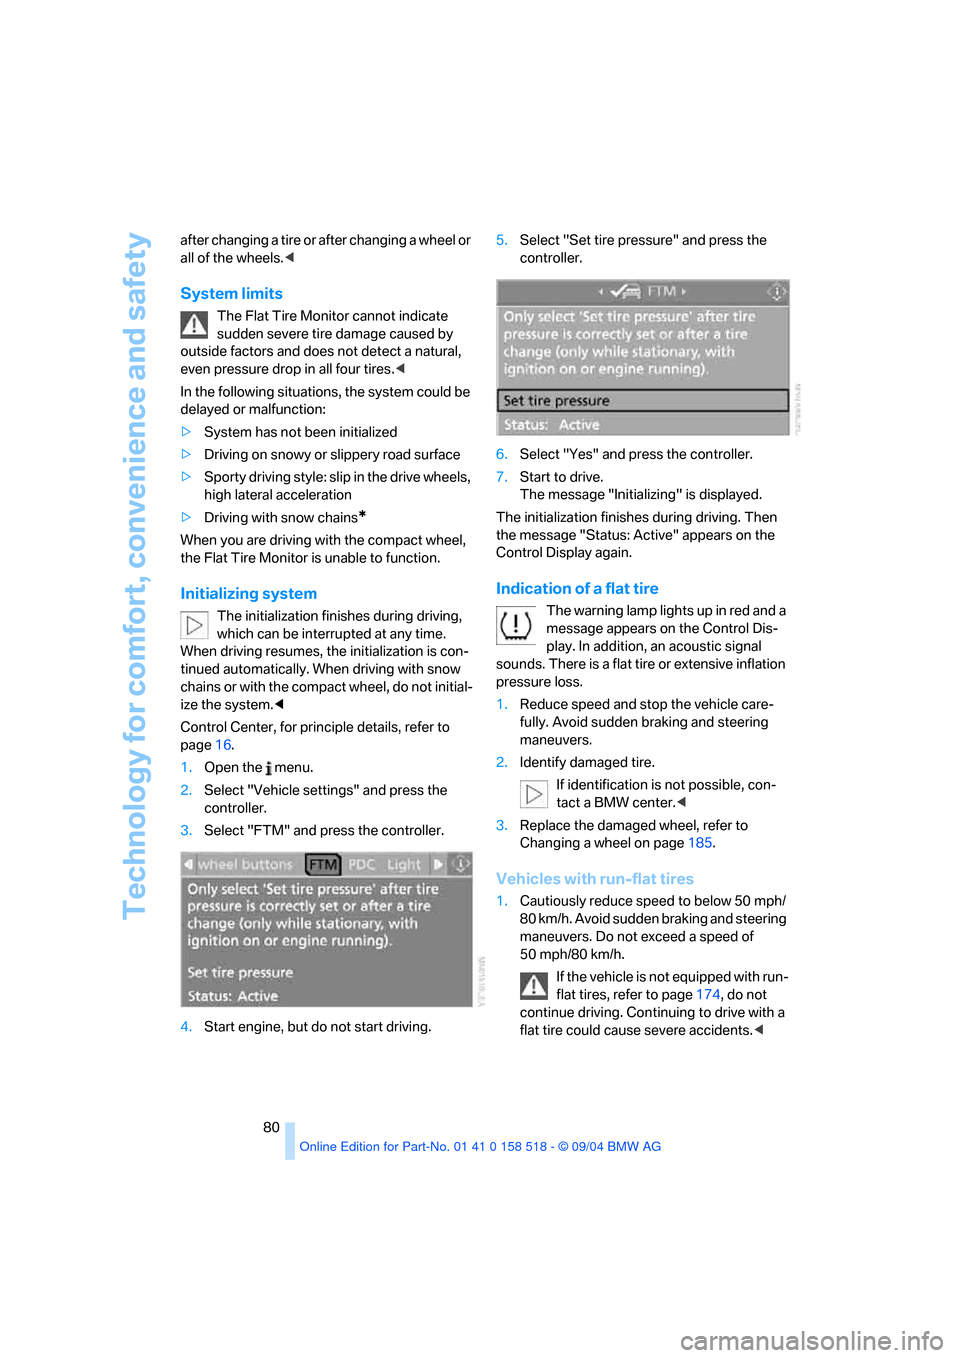
Control Center, for principle details, refer to
page16.
1.Open the menu.
2.Select "Vehicle settings" and press the
controller.
3.Select "FTM" and press the controller.
4.Start engine, but do not start driving.5.Select "Set tire pressure" and press the
controller.
6.Select "Yes" and press the controller.
7.Start to drive.
The message "Initializing" is displayed.
The initialization finishes during driving. Then
the message "Status: Active" appears on the
Control Display again.
Indication of a flat tire
The warning lamp lights up in red and a
message appears on the Control Dis-
play. In addition, an acoustic signal
sounds. There is a flat tire or extensive inflation
pressure loss.
1.Reduce speed and stop the vehicle care-
fully. Avoid sudden braking and steering
maneuvers.
2.Identify damaged tire.
If identification is not possible, con-
tact a BMW center.<
3.Replace the damaged wheel, refer to
Changing a wheel on page185.
Vehicles with run-flat tires
1.Cautiously reduce speed to below 50 mph/
80 km/h. Avoid sudden braking and steering
maneuvers. Do not exceed a speed of
50 mph/80 km/h.
If the vehicle is not equipped with run-
flat tires, refer to page174, do not
continue driving. Continuing to drive with a
flat tire could cause severe accidents.<