2005 BMW 545I SEDAN rear entertainment
[x] Cancel search: rear entertainmentPage 100 of 221
Controls
99Reference
At a glance
Driving tips
Communication
Navigation
Entertainment
Mobility
Storage compartments
Storage compartment on center
console between front seats
Open by pressing the cover back.
Other compartments
There are other compartments in the doors as
well as in the front and rear center console.
Storage nets are located on the backrests of the
front seats.
Clothes hooks
When suspending clothing from the
hooks ensure that it will not obstruct the
driver's vision. Do not hang heavy objects on
the hooks. If you do so, they could cause per-
sonal injury to occupants during braking or eva-
sive maneuvers.<
Cup holders
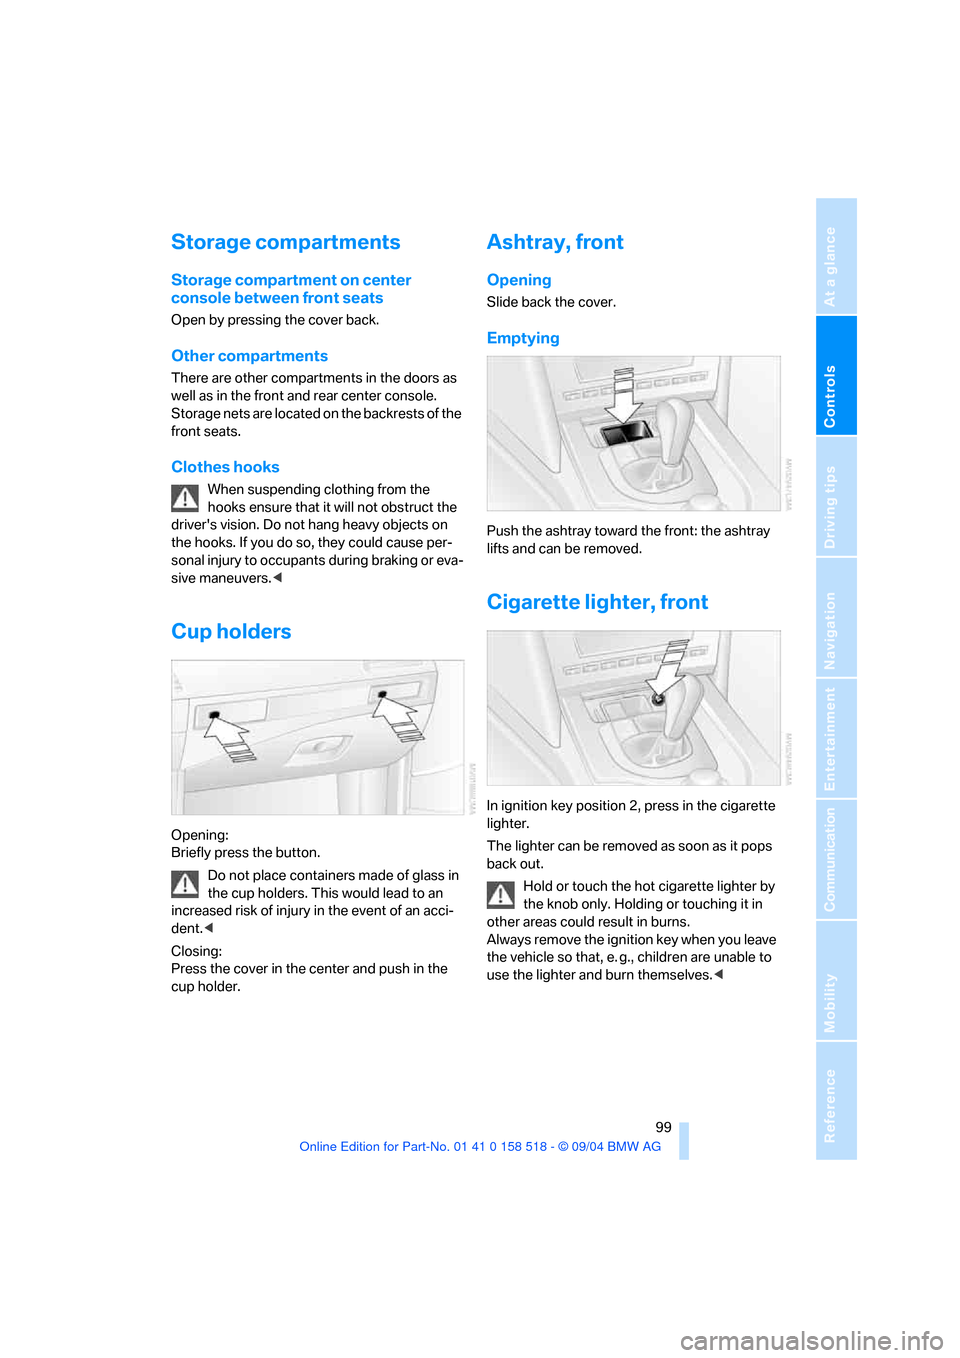
Opening:
Briefly press the button.
Do not place containers made of glass in
the cup holders. This would lead to an
increased risk of injury in the event of an acci-
dent.<
Closing:
Press the cover in the center and push in the
cup holder.
Ashtray, front
Opening
Slide back the cover.
Emptying
Push the ashtray toward the front: the ashtray
lifts and can be removed.
Cigarette lighter, front
In ignition key position 2, press in the cigarette
lighter.
The lighter can be removed as soon as it pops
back out.
Hold or touch the hot cigarette lighter by
the knob only. Holding or touching it in
other areas could result in burns.
Always remove the ignition key when you leave
the vehicle so that, e. g., children are unable to
use the lighter and burn themselves.<
Page 102 of 221
Controls
101Reference
At a glance
Driving tips
Communication
Navigation
Entertainment
Mobility
Folding down rear seat*
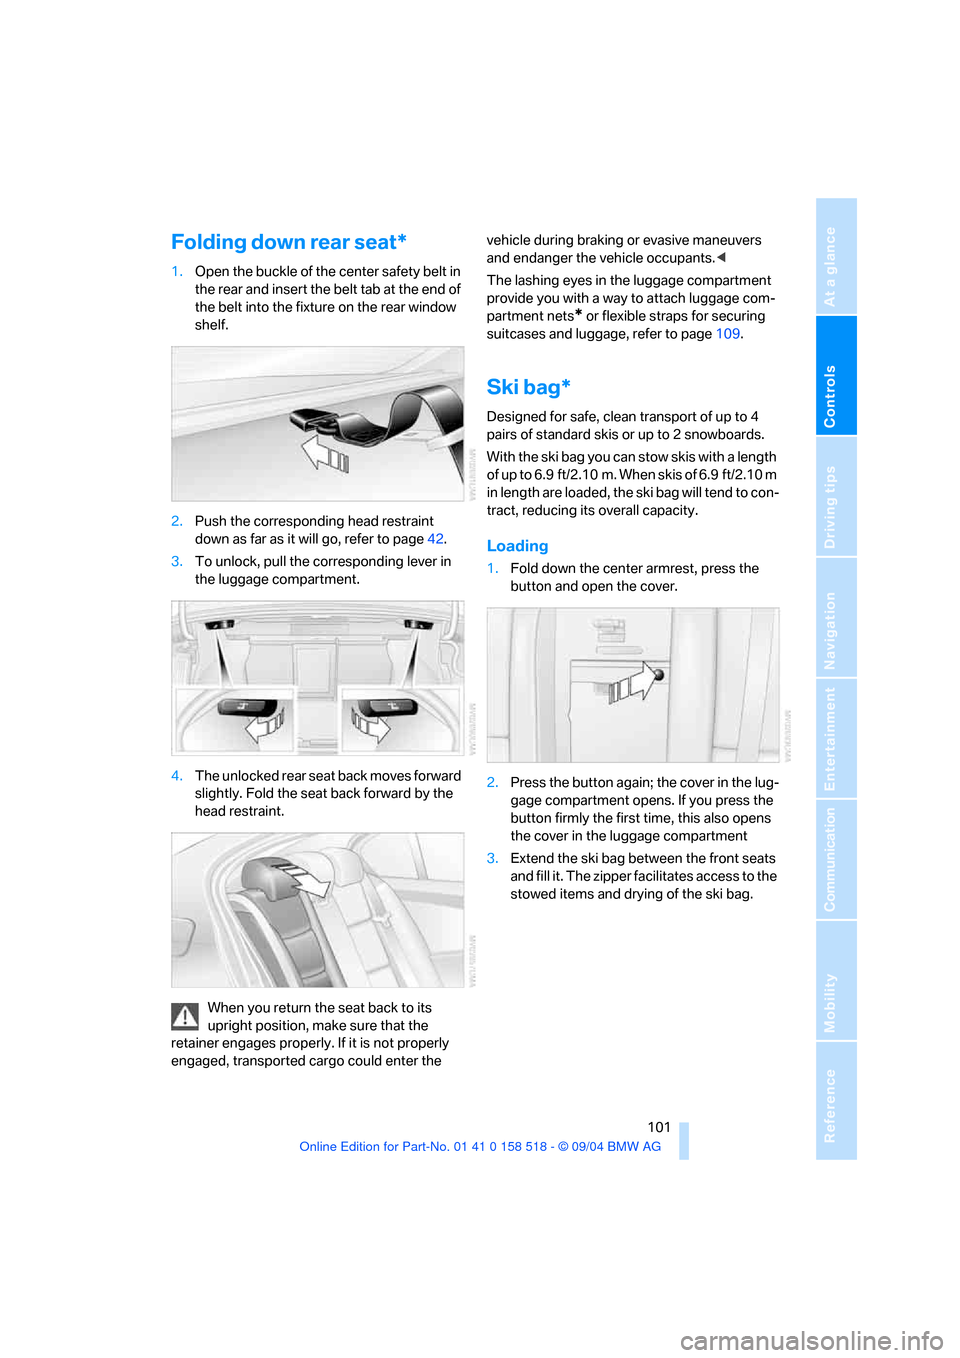
1.Open the buckle of the center safety belt in
the rear and insert the belt tab at the end of
the belt into the fixture on the rear window
shelf.
2.Push the corresponding head restraint
down as far as it will go, refer to page42.
3.To unlock, pull the corresponding lever in
the luggage compartment.
4.The unlocked rear seat back moves forward
slightly. Fold the seat back forward by the
head restraint.
When you return the seat back to its
upright position, make sure that the
retainer engages properly. If it is not properly
engaged, transported cargo could enter the vehicle during braking or evasive maneuvers
and endanger the vehicle occupants.<
The lashing eyes in the luggage compartment
provide you with a way to attach luggage com-
partment nets
* or flexible straps for securing
suitcases and luggage, refer to page109.
Ski bag*
Designed for safe, clean transport of up to 4
pairs of standard skis or up to 2 snowboards.
With the ski bag you can stow skis with a length
of up to 6.9 ft/2.10 m. When skis of 6.9 ft/2.10 m
in length are loaded, the ski bag will tend to con-
tract, reducing its overall capacity.
Loading
1.Fold down the center armrest, press the
button and open the cover.
2.Press the button again; the cover in the lug-
gage compartment opens. If you press the
button firmly the first time, this also opens
the cover in the luggage compartment
3.Extend the ski bag between the front seats
and fill it. The zipper facilitates access to the
stowed items and drying of the ski bag.
Page 108 of 221
Driving tips
107Reference
At a glance
Controls
Communication
Navigation
Entertainment
Mobility
Portable phone in the vehicle
BMW discourages the use of mobile
communications devices, e. g. portable
phones, inside the vehicle without a direct con-
nection to an outside antenna. Otherwise, the
vehicle electronics and mobile communication
device can influence one another. In addition,
there is no assurance that the radiation which
results from transmission will be dissipated
from the vehicle interior.<
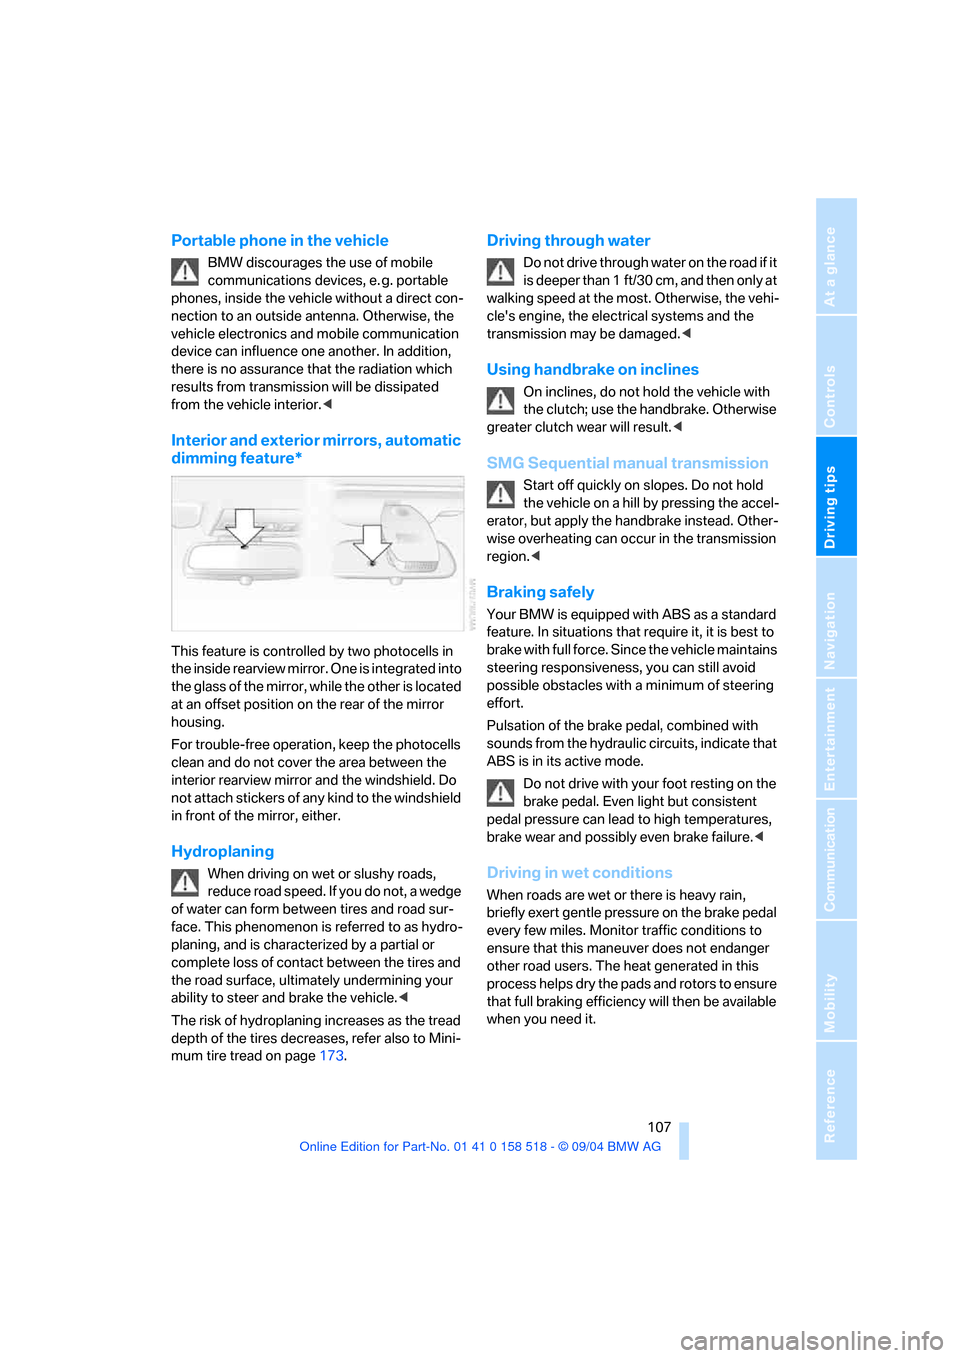
Interior and exterior mirrors, automatic
dimming feature*
This feature is controlled by two photocells in
the inside rearview mirror. One is integrated into
the glass of the mirror, while the other is located
at an offset position on the rear of the mirror
housing.
For trouble-free operation, keep the photocells
clean and do not cover the area between the
interior rearview mirror and the windshield. Do
not attach stickers of any kind to the windshield
in front of the mirror, either.
Hydroplaning
When driving on wet or slushy roads,
reduce road speed. If you do not, a wedge
of water can form between tires and road sur-
face. This phenomenon is referred to as hydro-
planing, and is characterized by a partial or
complete loss of contact between the tires and
the road surface, ultimately undermining your
ability to steer and brake the vehicle.<
The risk of hydroplaning increases as the tread
depth of the tires decreases, refer also to Mini-
mum tire tread on page173.
Driving through water
Do not drive through water on the road if it
is deeper than 1 ft/30 cm, and then only at
walking speed at the most. Otherwise, the vehi-
cle's engine, the electrical systems and the
transmission may be damaged.<
Using handbrake on inclines
On inclines, do not hold the vehicle with
the clutch; use the handbrake. Otherwise
greater clutch wear will result.<
SMG Sequential manual transmission
Start off quickly on slopes. Do not hold
the vehicle on a hill by pressing the accel-
erator, but apply the handbrake instead. Other-
wise overheating can occur in the transmission
region.<
Braking safely
Your BMW is equipped with ABS as a standard
feature. In situations that require it, it is best to
brake with full force. Since the vehicle maintains
steering responsiveness, you can still avoid
possible obstacles with a minimum of steering
effort.
Pulsation of the brake pedal, combined with
sounds from the hydraulic circuits, indicate that
ABS is in its active mode.
Do not drive with your foot resting on the
brake pedal. Even light but consistent
pedal pressure can lead to high temperatures,
brake wear and possibly even brake failure.<
Driving in wet conditions
When roads are wet or there is heavy rain,
briefly exert gentle pressure on the brake pedal
every few miles. Monitor traffic conditions to
ensure that this maneuver does not endanger
other road users. The heat generated in this
process helps dry the pads and rotors to ensure
that full braking efficiency will then be available
when you need it.
Page 110 of 221
Driving tips
109Reference
At a glance
Controls
Communication
Navigation
Entertainment
Mobility
5.Determine the combined weight of luggage
and cargo being loaded on the vehicle. That
weight may not safely exceed the available
cargo and luggage load capacity calculated
in step 4.
6.If your vehicle will be towing a trailer, part of
the load from your trailer will be transferred
to your vehicle. Consult the manual for
transporting a trailer to determine how this
may reduce the available cargo and luggage
load capacity of your vehicle.
Load
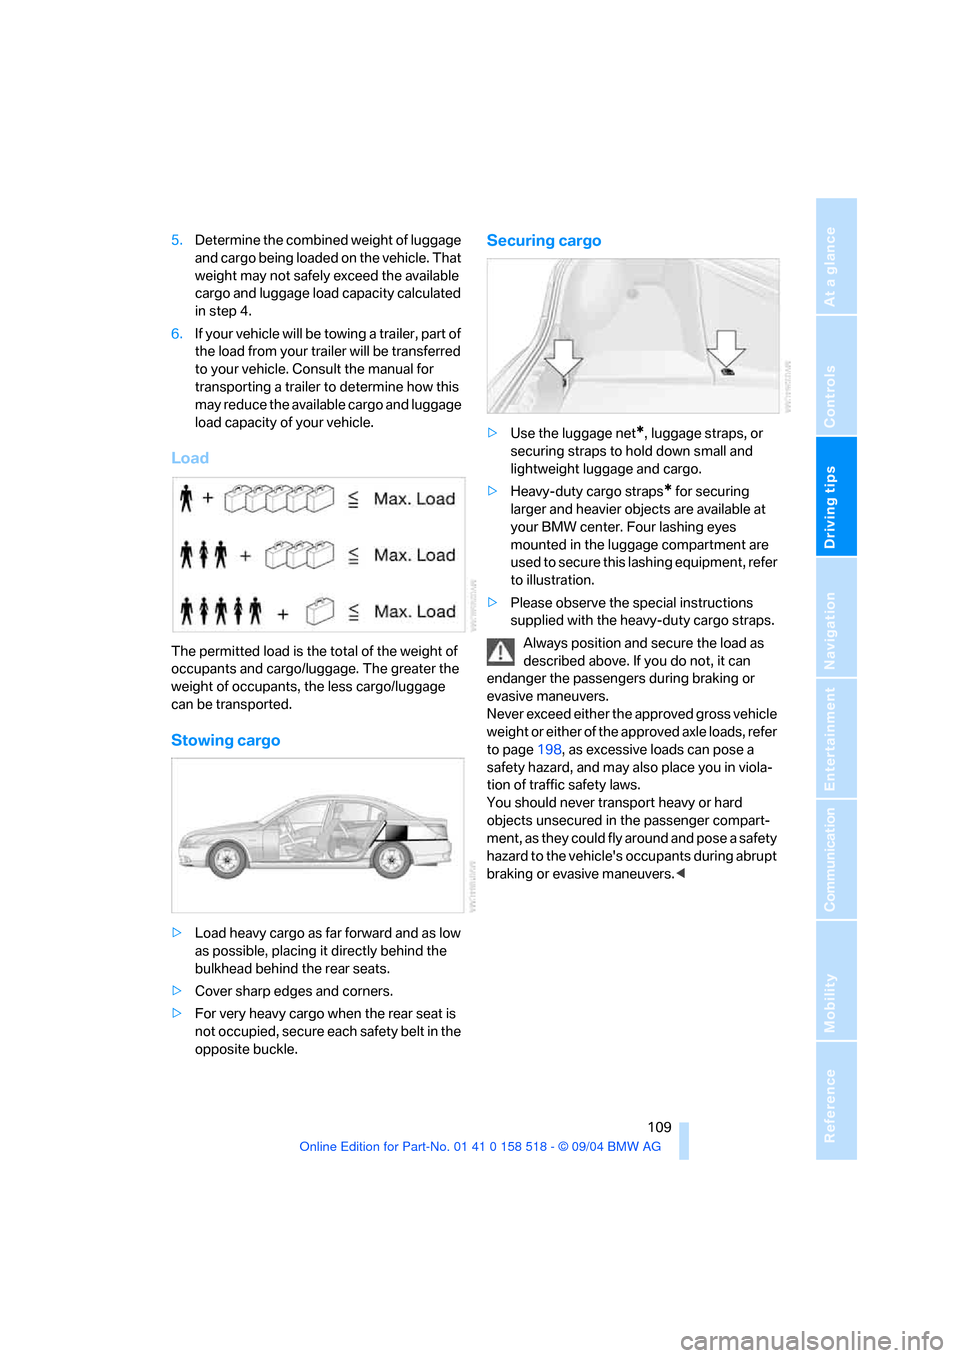
The permitted load is the total of the weight of
occupants and cargo/luggage. The greater the
weight of occupants, the less cargo/luggage
can be transported.
Stowing cargo
>Load heavy cargo as far forward and as low
as possible, placing it directly behind the
bulkhead behind the rear seats.
>Cover sharp edges and corners.
>For very heavy cargo when the rear seat is
not occupied, secure each safety belt in the
opposite buckle.
Securing cargo
>Use the luggage net*, luggage straps, or
securing straps to hold down small and
lightweight luggage and cargo.
>Heavy-duty cargo straps
* for securing
larger and heavier objects are available at
your BMW center. Four lashing eyes
mounted in the luggage compartment are
used to secure this lashing equipment, refer
to illustration.
>Please observe the special instructions
supplied with the heavy-duty cargo straps.
Always position and secure the load as
described above. If you do not, it can
endanger the passengers during braking or
evasive maneuvers.
Never exceed either the approved gross vehicle
weight or either of the approved axle loads, refer
to page198, as excessive loads can pose a
safety hazard, and may also place you in viola-
tion of traffic safety laws.
You should never transport heavy or hard
objects unsecured in the passenger compart-
ment, as they could fly around and pose a safety
hazard to the vehicle's occupants during abrupt
braking or evasive maneuvers.<
Page 135 of 221
On/off and tone
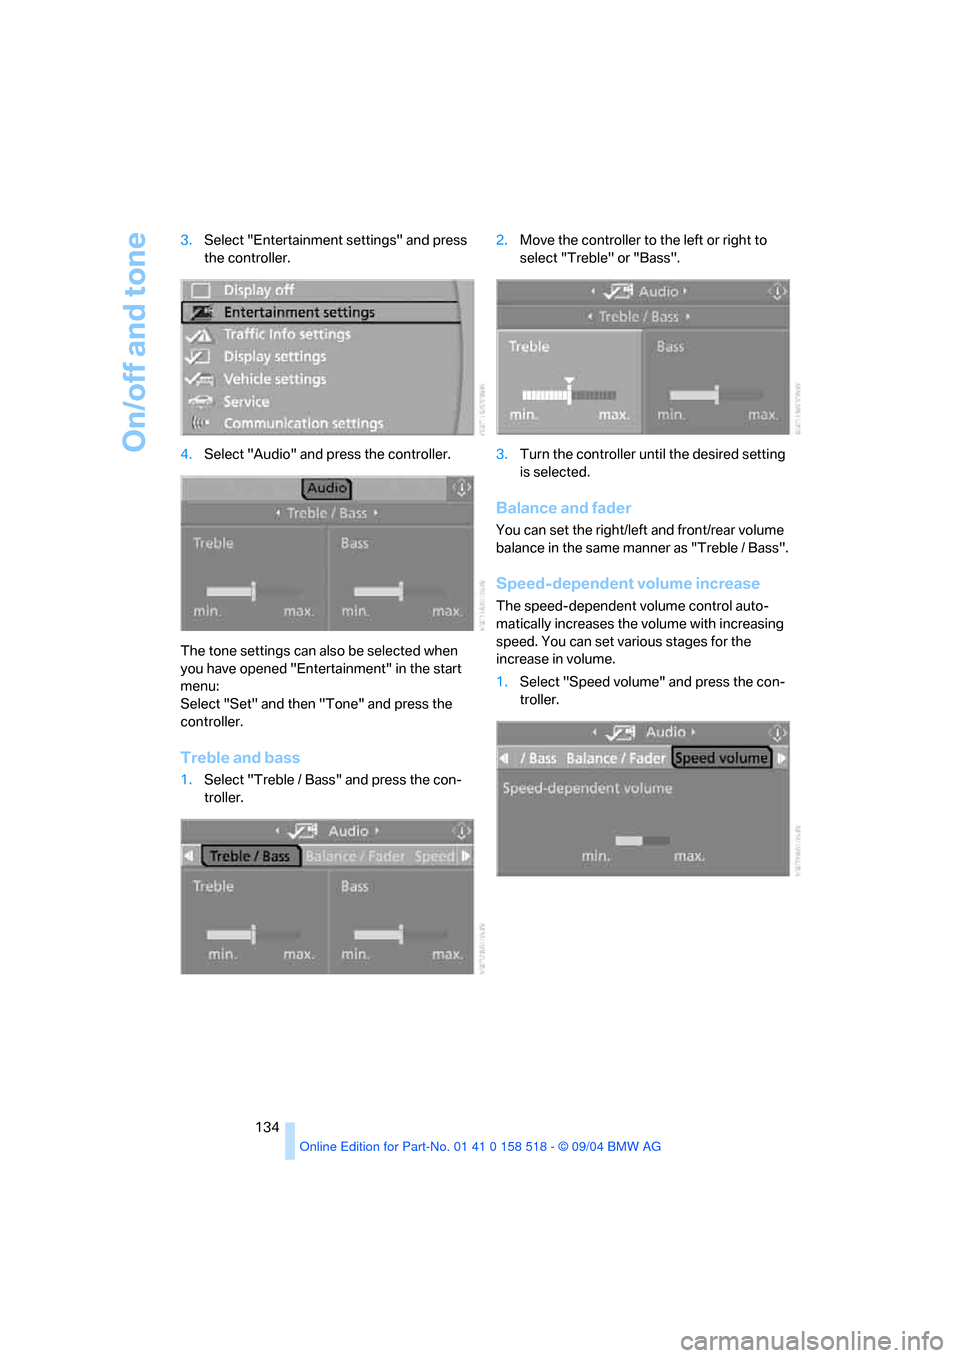
134 3.Select "Entertainment settings" and press
the controller.
4.Select "Audio" and press the controller.
The tone settings can also be selected when
you have opened "Entertainment" in the start
menu:
Select "Set" and then "Tone" and press the
controller.
Treble and bass
1.Select "Treble / Bass" and press the con-
troller.2.Move the controller to the left or right to
select "Treble" or "Bass".
3.Turn the controller until the desired setting
is selected.
Balance and fader
You can set the right/left and front/rear volume
balance in the same manner as "Treble / Bass".
Speed-dependent volume increase
The speed-dependent volume control auto-
matically increases the volume with increasing
speed. You can set various stages for the
increase in volume.
1.Select "Speed volume" and press the con-
troller.
Page 137 of 221
On/off and tone
136
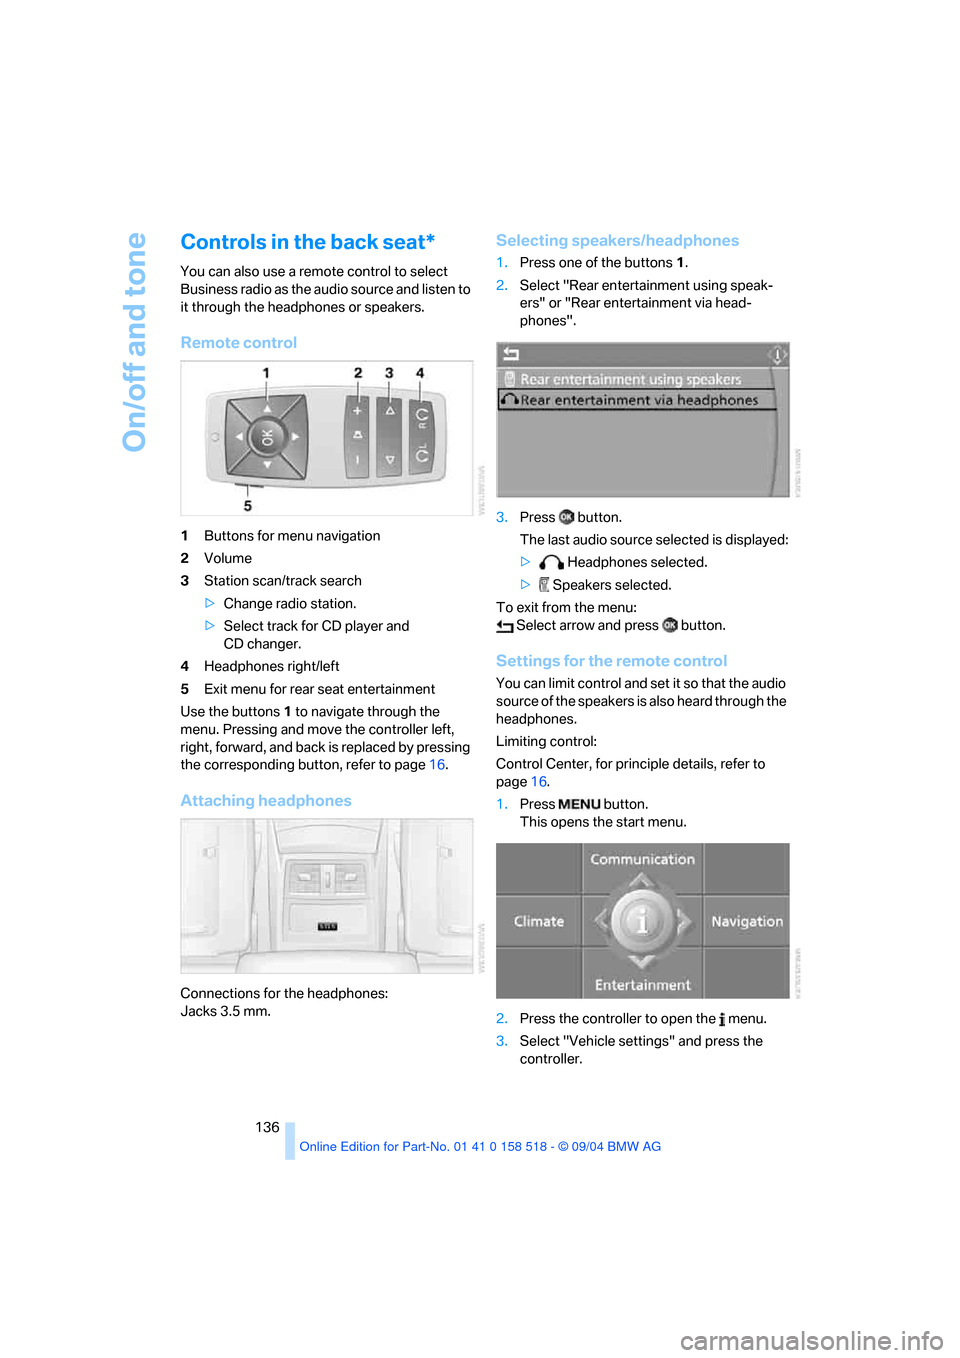
Controls in the back seat*
You can also use a remote control to select
Business radio as the audio source and listen to
it through the headphones or speakers.
Remote control
1Buttons for menu navigation
2Volume
3Station scan/track search
>Change radio station.
>Select track for CD player and
CD changer.
4Headphones right/left
5Exit menu for rear seat entertainment
Use the buttons1 to navigate through the
menu. Pressing and move the controller left,
right, forward, and back is replaced by pressing
the corresponding button, refer to page16.
Attaching headphones
Connections for the headphones:
Jacks 3.5 mm.
Selecting speakers/headphones
1.Press one of the buttons1.
2.Select "Rear entertainment using speak-
ers" or "Rear entertainment via head-
phones".
3.Press button.
The last audio source selected is displayed:
> Headphones selected.
> Speakers selected.
To exit from the menu:
Select arrow and press button.
Settings for the remote control
You can limit control and set it so that the audio
source of the speakers is also heard through the
headphones.
Limiting control:
Control Center, for principle details, refer to
page16.
1.Press button.
This opens the start menu.
2.Press the controller to open the menu.
3.Select "Vehicle settings" and press the
controller.
Page 138 of 221
Navigation
Entertainment
Driving tips
137Reference
At a glance
Controls
Communication
Mobility
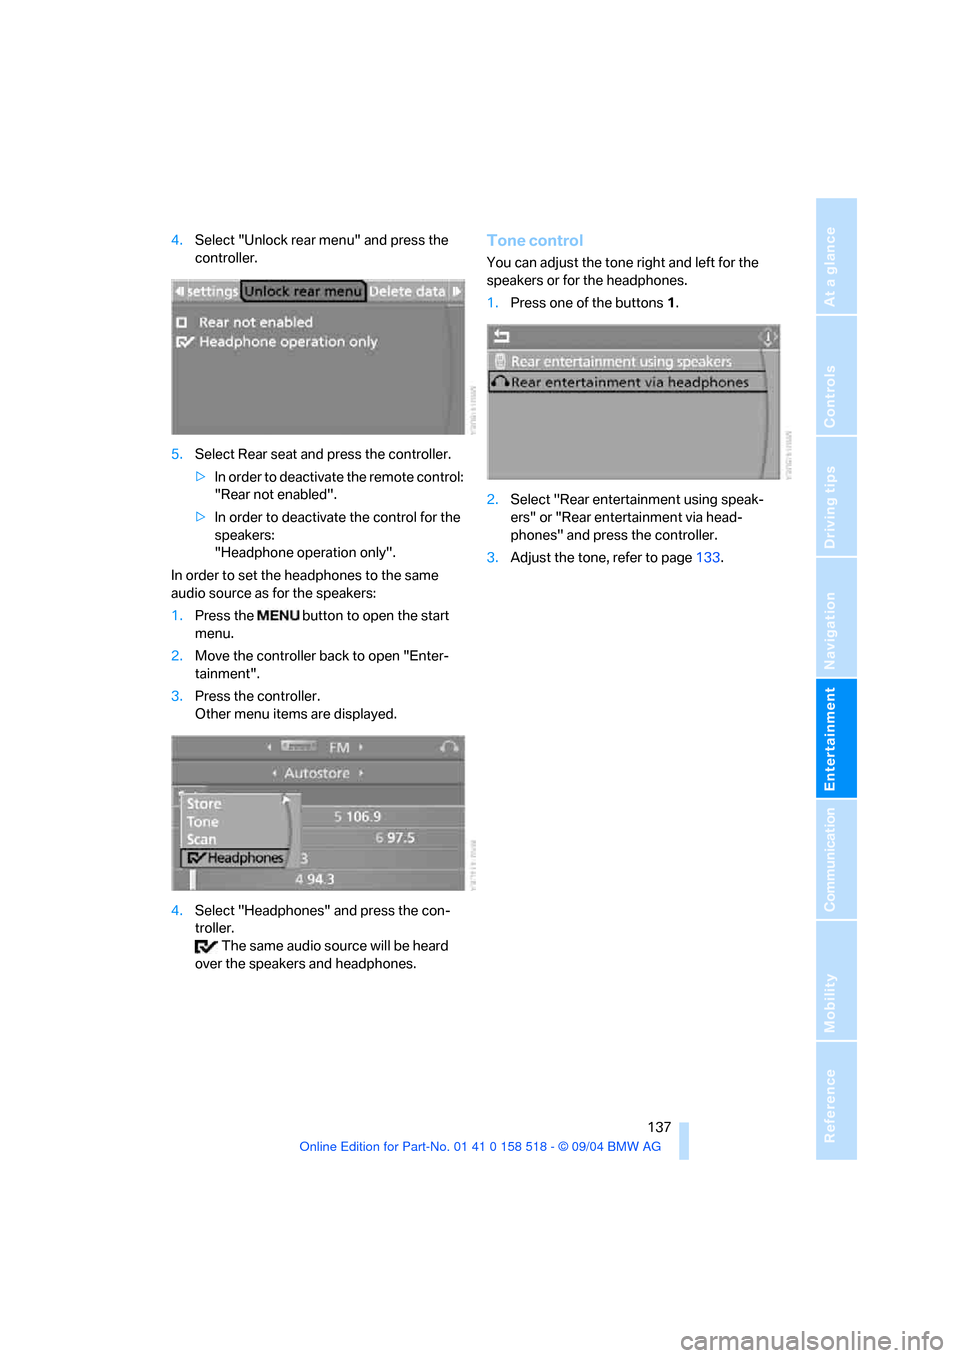
4.Select "Unlock rear menu" and press the
controller.
5.Select Rear seat and press the controller.
>In order to deactivate the remote control:
"Rear not enabled".
>In order to deactivate the control for the
speakers:
"Headphone operation only".
In order to set the headphones to the same
audio source as for the speakers:
1.Press the button to open the start
menu.
2.Move the controller back to open "Enter-
tainment".
3.Press the controller.
Other menu items are displayed.
4.Select "Headphones" and press the con-
troller.
The same audio source will be heard
over the speakers and headphones.Tone control
You can adjust the tone right and left for the
speakers or for the headphones.
1.Press one of the buttons1.
2.Select "Rear entertainment using speak-
ers" or "Rear entertainment via head-
phones" and press the controller.
3.Adjust the tone, refer to page133.
Page 172 of 221
Mobility
171Reference
At a glance
Controls
Driving tips
Communication
Navigation
Entertainment
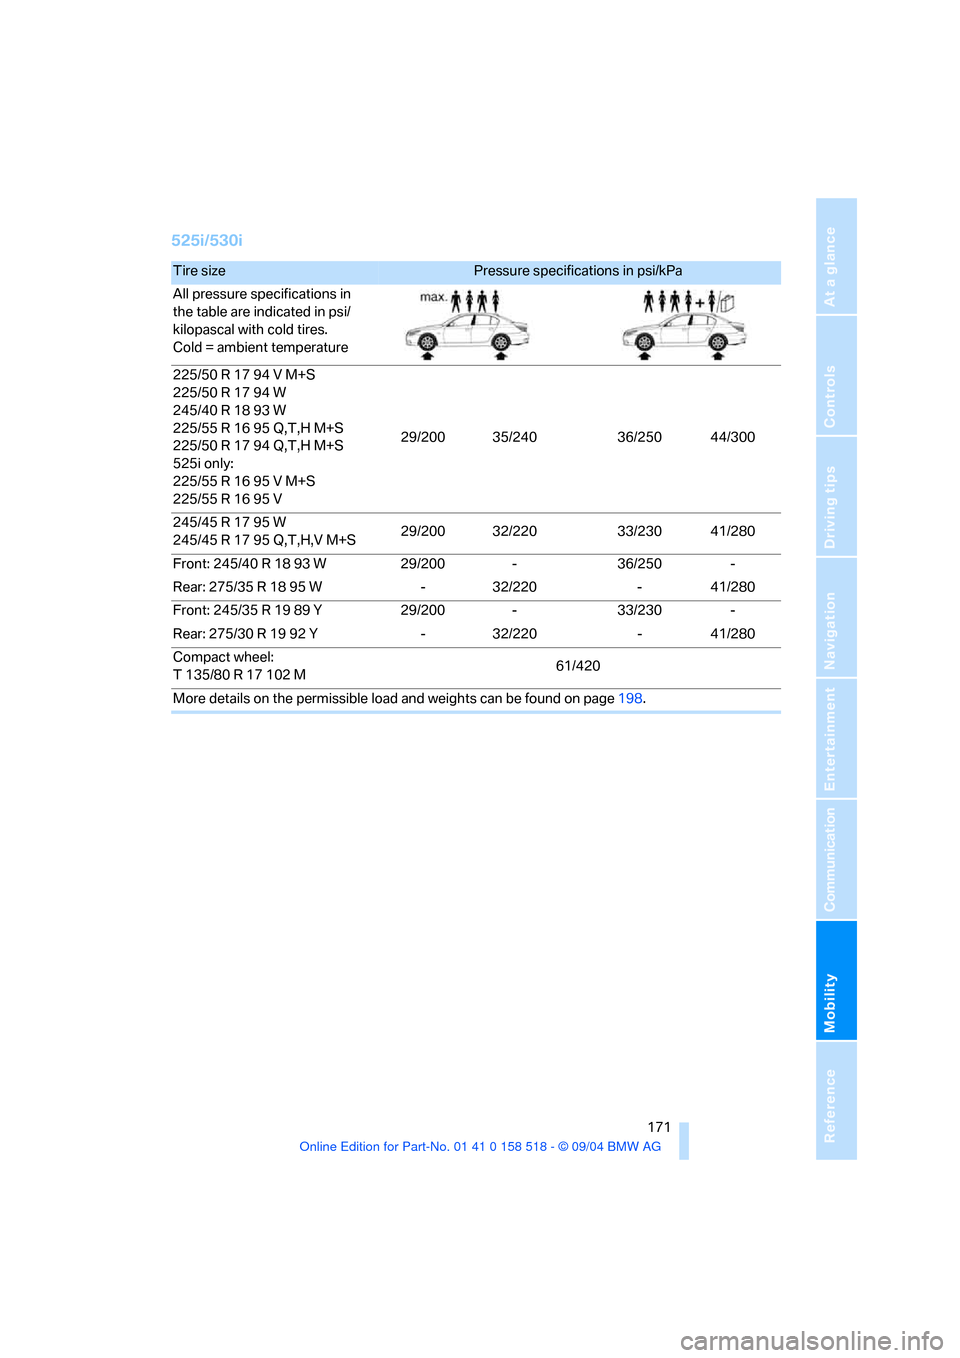
525i/530i
Tire size Pressure specifications in psi/kPa
All pressure specifications in
the table are indicated in psi/
kilopascal with cold tires.
Cold = ambient temperature
225/50 R 17 94 V M+S
225/50 R 17 94 W
245/40 R 18 93 W
225/55 R 16 95 Q,T,H M+S
225/50 R 17 94 Q,T,H M+S
525i only:
225/55 R 16 95 V M+S
225/55 R 16 95 V 29/200 35/240 36/250 44/300
245/45 R 17 95 W
245/45 R 17 95 Q,T,H,V M+S29/200 32/220 33/230 41/280
Front: 245/40 R 18 93 W 29/200 - 36/250 -
Rear: 275/35 R 18 95 W - 32/220 - 41/280
Front: 245/35 R 19 89 Y 29/200 - 33/230 -
Rear: 275/30 R 19 92 Y - 32/220 - 41/280
Compact wheel:
T 135/80 R 17 102 M61/420
More details on the permissible load and weights can be found on page198.