2005 BMW 545I SEDAN lights
[x] Cancel search: lightsPage 82 of 221

Controls
81Reference
At a glance
Driving tips
Communication
Navigation
Entertainment
Mobility
2.At the next opportunity, check the air pres-
sure in all four tires.
If the tire inflation pressure in all four
tires is correct, the Flat Tire Monitor
has not been initialized. The system must
then be initialized.<
3.In the event of complete tire pressure loss,
0 psi/0 kPa, or obvious tire damage, you can
estimate the possible distance for contin-
ued driving on the basis of the following
guide values:
>With a light load:
1 to 2 persons without luggage:
approx. 155 miles/250 km
>With a medium load:
2 persons, luggage compartment full, or
4 persons without luggage:
approx. 94 miles/150 km
>With a full load:
4 or more persons, luggage compart-
ment full:
approx. 30 miles/50 km
Drive reservedly and do not exceed a
speed of 50 mph/80 km/h. In the event of
pressure loss, vehicle handling changes. This
includes reduced tracking stability in braking,
extended braking distance and altered natural
steering characteristics.
If unusual vibrations occur while the vehicle is
being driven, this can indicate final failure of the
damaged tire. Reduce speed and stop as soon
as possible. Do not continue driving. Contact
your BMW center.<
Malfunction
The warning lamp lights up yellow and
a message appears on the Control Dis-
play. The Flat Tire Monitor has a mal-
function or has failed. Have the system checked
as soon as possible.
Active steering*
The concept
The active steering is a system that actively var-
ies the steering angle of the front wheels in rela-
tion to the steering wheel movements.
When you are driving in the low road speed
range, e. g. in a town or when parking, the steer-
ing angle increases, i.e. the steering becomes
very direct. In the higher speed range, on the
other hand, the steering angle is reduced more
and more. This improves the handling capability
of your BMW over the entire speed range.
In critical situations, the system can make tar-
geted corrections to the steering angle pro-
vided by the driver and thus stabilize the vehicle
before the driver intervenes. This stabilizing
intervention is simultaneously deactivated
when DSC is switched off, refer to page78.
Malfunction
The warning lamp lights up. The active
steering is no longer operational. At low
speeds, greater steering wheel move-
ments are required, whereas at higher speeds,
the vehicle reacts more sensitively to steering
wheel movements. Have the system checked.
If the warning lamp lights up during the first
engine starting following a power supply inter-
ruption, the system must be activated by being
initialized.
Initializing system
1.Start the engine.
2.With the vehicle stationary, turn the steer-
ing wheel from the straight-ahead position
t o t h e le f t a s f a r a s i t w i ll g o a n d t h e n b a c k t o
the straight-ahead position.
3.Switch off the engine.
When you start the engine again, all the func-
tions of the active steering are available once
again.
Page 83 of 221

Technology for comfort, convenience and safety
82
Brake Force Display
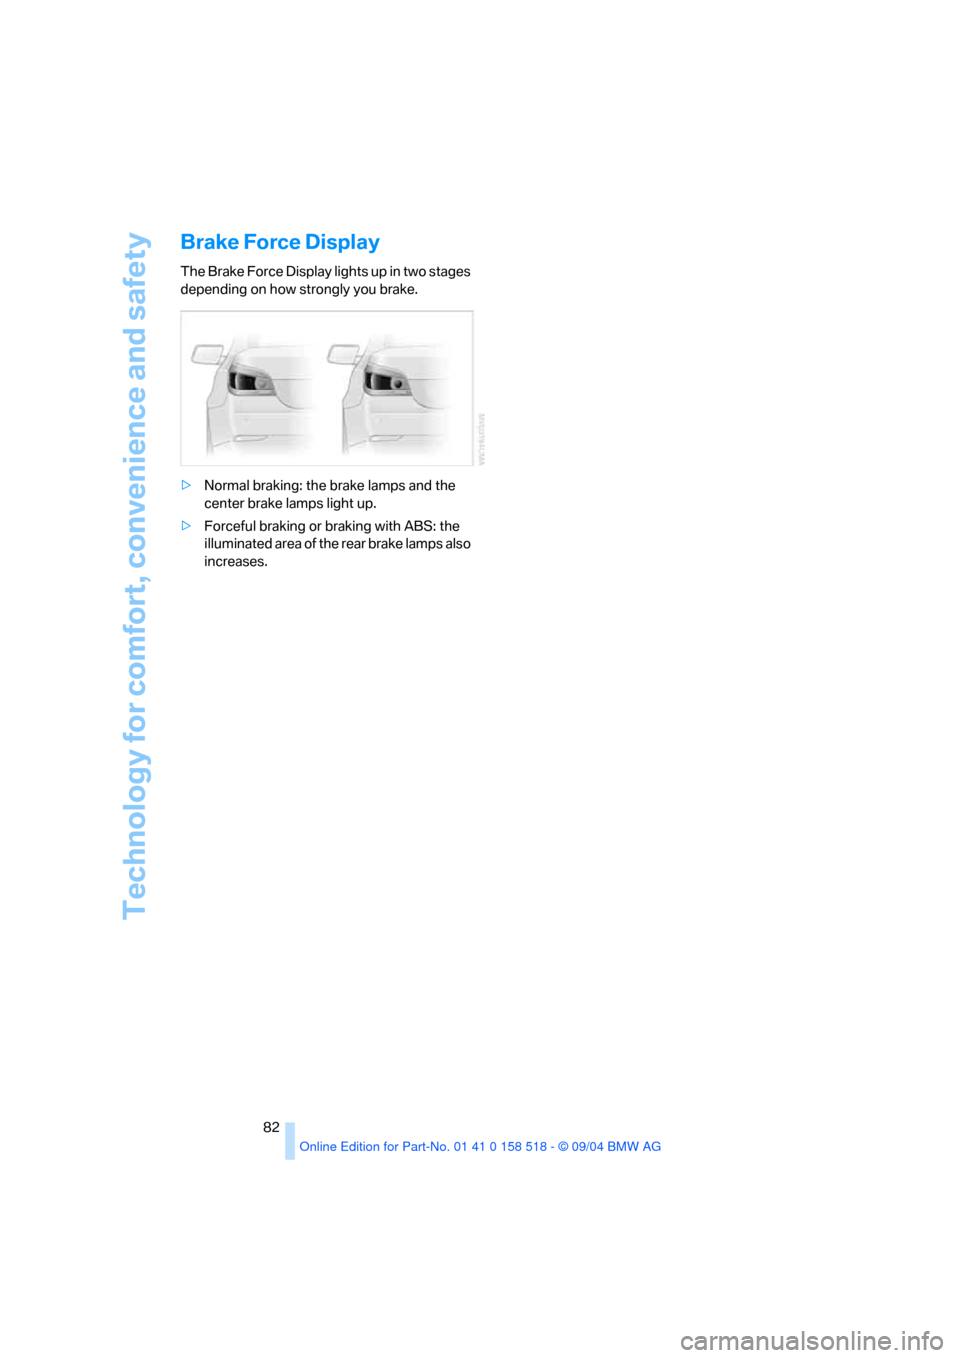
The Brake Force Display lights up in two stages
depending on how strongly you brake.
>Normal braking: the brake lamps and the
center brake lamps light up.
>Forceful braking or braking with ABS: the
illuminated area of the rear brake lamps also
increases.
Page 85 of 221

Technology for comfort, convenience and safety
84 >When an adult is traveling in the front seat,
the front and side airbags remain active on
the passenger side.
Although not desired, it can occur in the
case of heavier children that the front
passenger airbags remain active or in the case
of very light adults or young persons that the
front passenger airbags are deactivated. In
these cases, have the person ride in the rear
seat, refer to Passenger airbag status lamp
below. Do not load the passenger seat with any
items in addition to the person to be trans-
ported. Do not fit seat covers, seat cushion pad-
ding, ball mats or other items onto the front pas-
senger seat unless they are specifically
r e c o m m e n d e d b y B M W . D o n o t p l a c e a n y i t e m s
under the seat. Otherwise, the function of the
seat occupation detection could be impaired.<
Operational readiness of airbag system
As of ignition key position of 1, the warning
lamp lights up briefly, thus indicating the opera-
tional readiness of the entire airbag system and
the safety belt tensioners.
Airbag system malfunction
>The warning lamp does not light up as of
ignition key position 1.
>Warning lamp lights up continuously.
A malfunction could prevent the airbag
system from responding in the expected
manner to an impact occurring within its normal
response range.<
Passenger airbag status lamp
The indicator lamp located above the rear view
mirror indicates whether the front passenger
airbag system is active or not active/OFF.
The indicator lamp is used only for the
front passenger airbag system. The indi-
cator lamp illuminates to show that the front
passenger airbag system is OFF/not active.<
>The lamp illuminates briefly during startup,
but then goes out if the seat is empty, or an
adult or child of sufficient size is detected.
>The lamp remains illuminated when a child
in a rear facing child-restraint system is
detected and indicates that the passenger
airbag system is off.
If the lamp is illuminated when the seat is
occupied by a very light adult or teenager,
it is recommended that the person sit in the
rear.<
Find more information about passenger airbag
system and seat occupancy detection in the
section Automatic deactivation of front passen-
ger airbags above.
Head-Up Display*
The concept
With the Head-Up Display important informa-
tion is projected into the driver's field of view,
e.g. navigation instructions. This enables you to
take in this information without looking away
from the road.
Page 88 of 221

Controls
87Reference
At a glance
Driving tips
Communication
Navigation
Entertainment
Mobility
Lamps
Parking lamps/low beams
0Lights off
1Parking lamps
2Low beams/daytime driving lamps
*
3Automatic headlamp control*/
Adaptive Head Light
*
Parking lamps
In switch position1, the front, rear and side
vehicle lighting is switched on. You can use the
parking lamps for parking. For lighting on one
side for parking as an additional feature, refer to
page88.
Low beams
The low beams are activated in switch
position2 only when the engine is running, oth-
erwise only the parking lamps are switched on.
Pathway lighting
If the vehicle is parked and the headlamps are
switched off, operating the headlamp flasher
activates the low beams. You can set the dura-
tion on the Control Display or deactivate the
function.
Control Center, for principle details, refer to
page16.
1.Open the menu.
2.Select "Vehicle settings" and press the
controller.3.Select "Light" and press the controller.
4.Select "Pathway lighting" and press the
controller.
5.Turn the controller to select the corre-
sponding duration.
6.Press the controller to apply the setting.
Lights on warning
If you turn the ignition key to position 0, an
acoustic signal sounds when you open the
driver's door for a few seconds to remind you
that the light has not yet been switched off.
At the same time a message appears on the
Control Display.
Daytime driving lamps*
If so desired, you can leave the light switch in
the low beam position2.
Always observe all applicable laws governing
the use of daytime driving lamps.
You can switch on the parking lamps when
needed using the standard procedure
described under Parking lamps.
Automatic headlamp control*
In the switch position3, the system activates
and switches on and off the low beams in
response to changes in ambient light condi-
tions, for instance, in a tunnel, at dawn and
d u s k , a n d in r a i n o r s n o w . A d a p t iv e H e a d L ig h t
*
is active. The LED next to the symbol is illumi-
nated when the low beams are on.
Page 89 of 221

Lamps
88 The low beams remain switched on inde-
pendent of the ambient lighting condi-
tions when you switch on the fog lamps.
With the daytime driving lamps
* activated, the
low beams are always switched on when the
ignition key is in position 2.<
The automatic headlamp control cannot
serve as a substitute for your personal
judgment in determining when the lamps
should be switched on in response to ambient
lighting conditions. For example, the system
cannot detect fog. To avoid safety risks, you
should always switch on the lamps manually
under these conditions.<
Adaptive Head Light*
The concept
Adaptive Head Light is a variable headlamp
control system that enables better illumination
of the road surface. Depending on the steering
angle and other assumptions, the light from the
headlamp follows the course of the road.
Activating Adaptive Head Light
In the switch position3, the Adaptive Head
Light is active and the automatic headlamp con-
trol
* is switched on.
To avoid blinding oncoming traffic, the Adaptive
Head Light
>is not active when driving in reverse
>is only active toward passenger side when
stationary
Malfunction
The LED next to the symbol for automatic head-
lamp control flashes. Adaptive Head Light is
faulty or has failed. Have the system checked as
soon as possible.
High beams/roadside parking
lamps
1High beams
2Headlamp flasher
3Roadside parking lamps
Roadside parking lamps, left or right*
You also enjoy the option of lighting up just one
side of your vehicle when parking. When using
this function, comply with national regulations:
With the ignition off, press the lever in the
desired direction3, past the resistance point.
The roadside parking lamps drain the bat-
tery. Do not switch them on for long peri-
ods of time, otherwise it may no longer be pos-
sible to start the engine.<
Front fog lamps
The parking lamps or low beams must
be switched on for the fog lamps to
operate. The green indicator lamp in
the instrument cluster lights up whenever the
fog lamps are on.
The fog lamps are switched off whenever the
high beams are switched on.
Page 93 of 221

A congenial climate
92 The recirculated-air mode should not be used
over an extended period of time, as the air qual-
ity inside the vehicle deteriorates continu-
ously.<
Residual heat mode
Press this button when the engine
is switched off, but warm.
The heat stored in the engine is
used to heat the passenger com-
partment, e.g. while stopped at a school to pick
up a child.
You can adjust the automatic climate control
settings in ignition key position 1.
Provided that the engine has warmed to its nor-
mal operating temperature and the battery is
charged, you can use this function for up to
15 minutes after switching off the ignition. The
LED in the button lights up to confirm compli-
ance with both of these conditions.
Switching off automatic climate control
The air volume, the heater and the
cooling function are all switched
off.
You can restart the automatic cli-
mate control by pressing any of its buttons
except the REST button.
Settings using Control Center
Ignition key:
>On vehicles with separate drives for audio
CDs and navigation DVDs, ignition key in
position 2
>In vehicles with one drive for audio CDs,
ignition key in position 1Control Center, for principle details, refer to
page16.
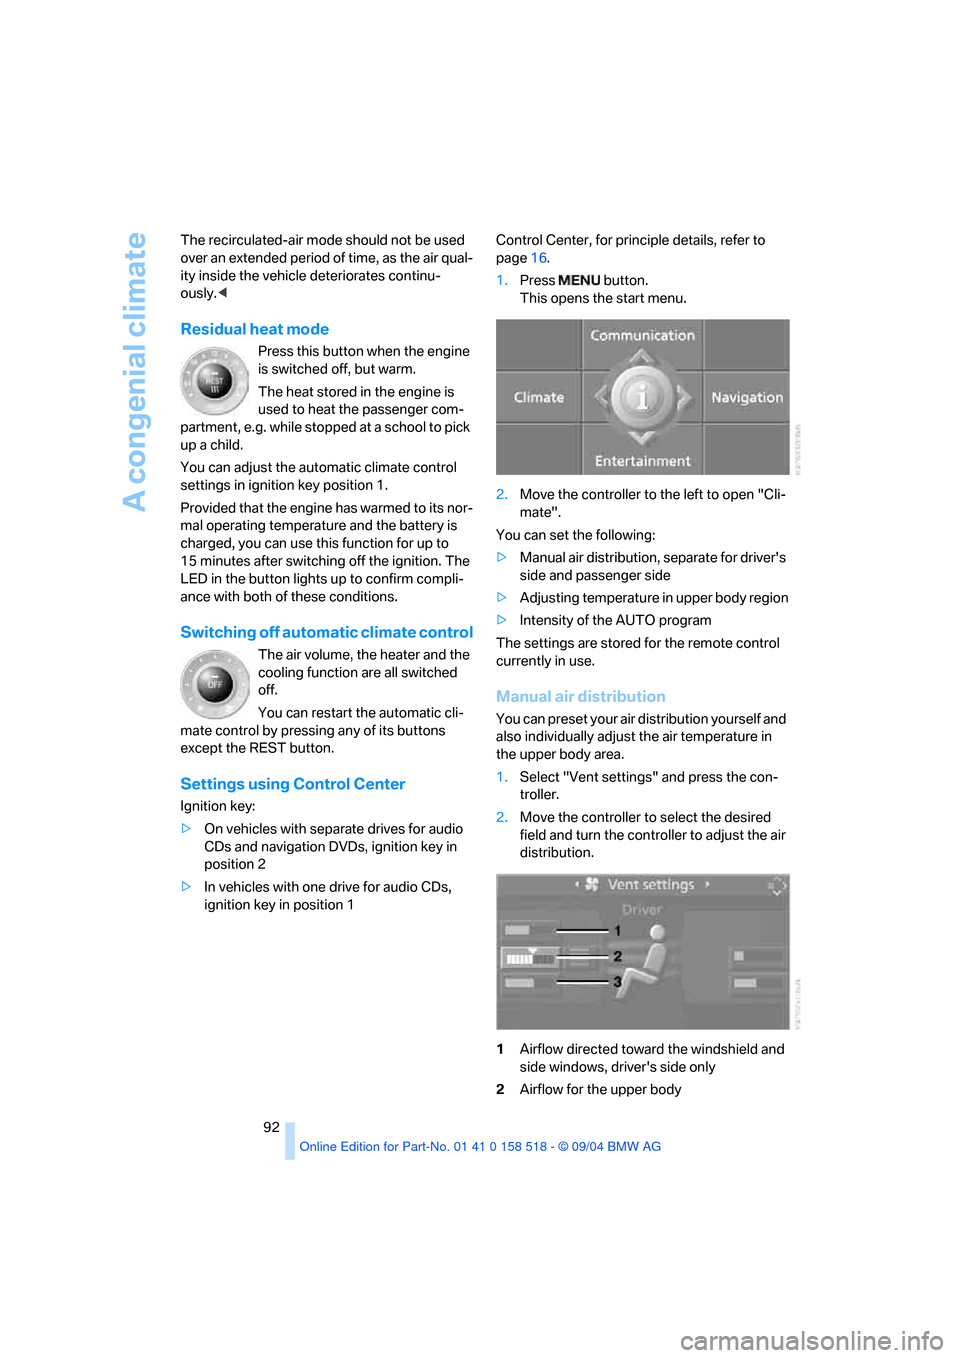
1.Press button.
This opens the start menu.
2.Move the controller to the left to open "Cli-
mate".
You can set the following:
>Manual air distribution, separate for driver's
side and passenger side
>Adjusting temperature in upper body region
>Intensity of the AUTO program
The settings are stored for the remote control
currently in use.
Manual air distribution
You can preset your air distribution yourself and
also individually adjust the air temperature in
the upper body area.
1.Select "Vent settings" and press the con-
troller.
2.Move the controller to select the desired
field and turn the controller to adjust the air
distribution.
1Airflow directed toward the windshield and
side windows, driver's side only
2Airflow for the upper body
Page 96 of 221

Controls
95Reference
At a glance
Driving tips
Communication
Navigation
Entertainment
Mobility
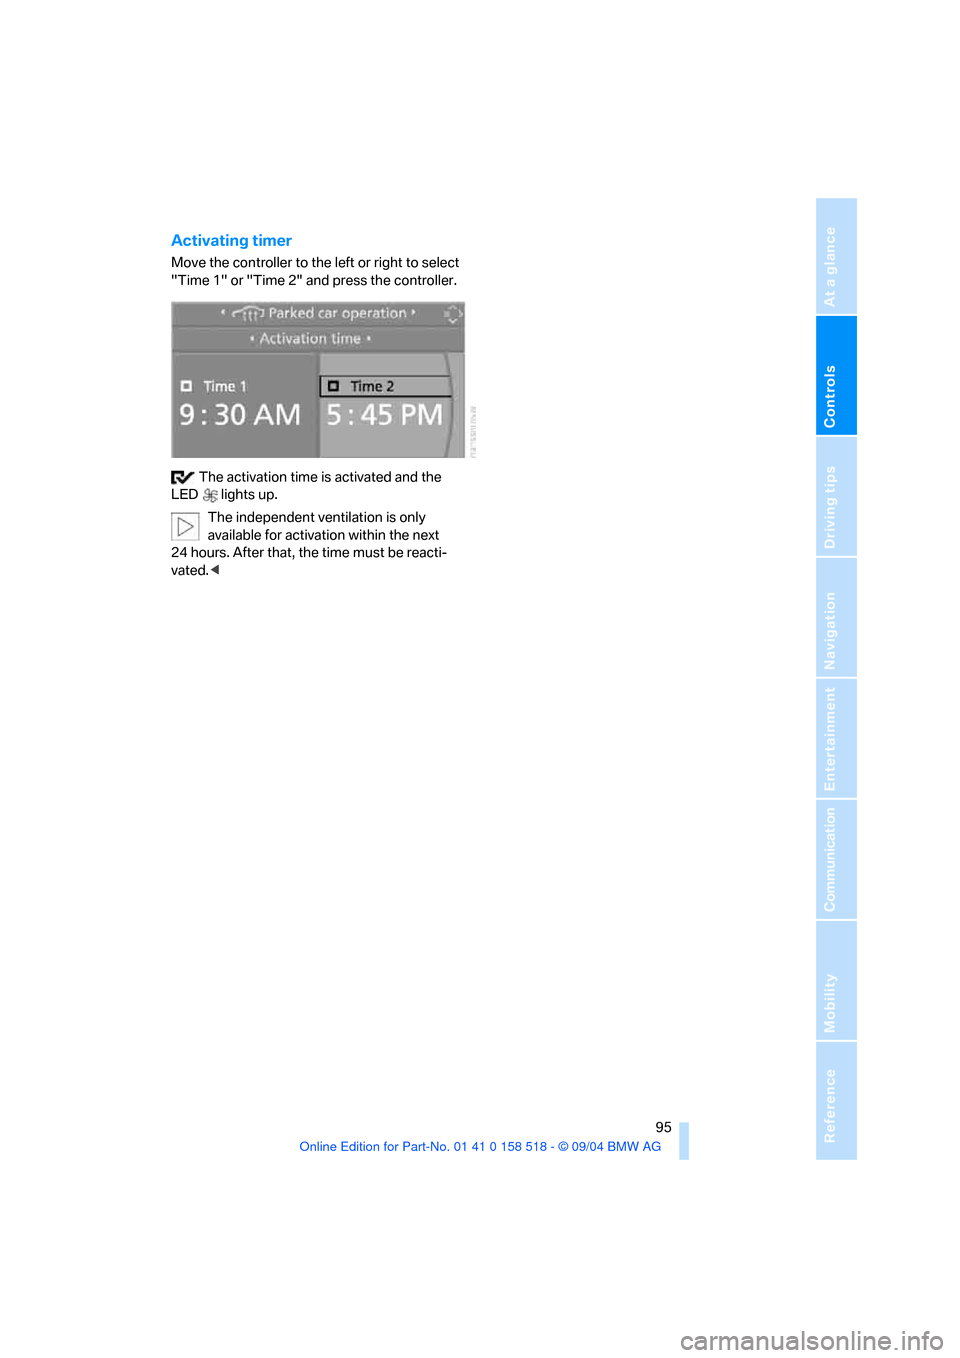
Activating timer
Move the controller to the left or right to select
"Time 1" or "Time 2" and press the controller.
The activation time is activated and the
LED lights up.
The independent ventilation is only
available for activation within the next
24 hours. After that, the time must be reacti-
vated.<
Page 101 of 221

Practical interior accessories
100
Sockets
With the ignition key in position 2, the cigarette
lighter socket can be used as a power outlet for
hand flashlights, car vacuum cleaners, etc., with
power ratings of up to approx. 200 W at 12 V.
Avoid damaging the socket due to inserting
plugs of different shapes or sizes. The same is
true for all power outlets in the vehicle.
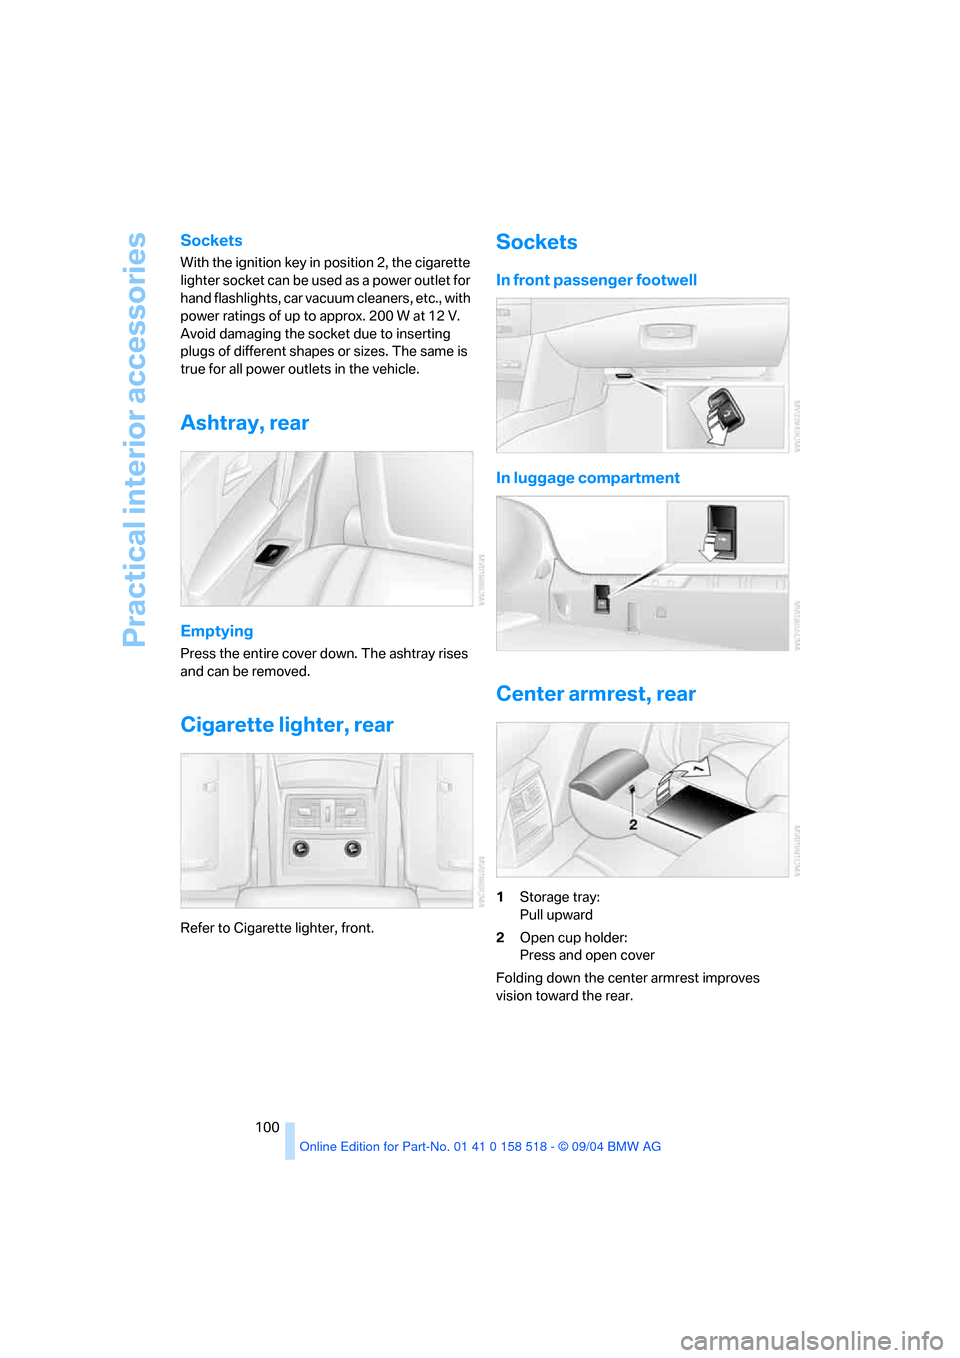
Ashtray, rear
Emptying
Press the entire cover down. The ashtray rises
and can be removed.
Cigarette lighter, rear
Refer to Cigarette lighter, front.
Sockets
In front passenger footwell
In luggage compartment
Center armrest, rear
1Storage tray:
Pull upward
2Open cup holder:
Press and open cover
Folding down the center armrest improves
vision toward the rear.