2005 BMW 530I SEDAN cooling
[x] Cancel search: coolingPage 16 of 221
At a glance
15Reference
Controls
Driving tips
Communication
Navigation
Entertainment
Mobility
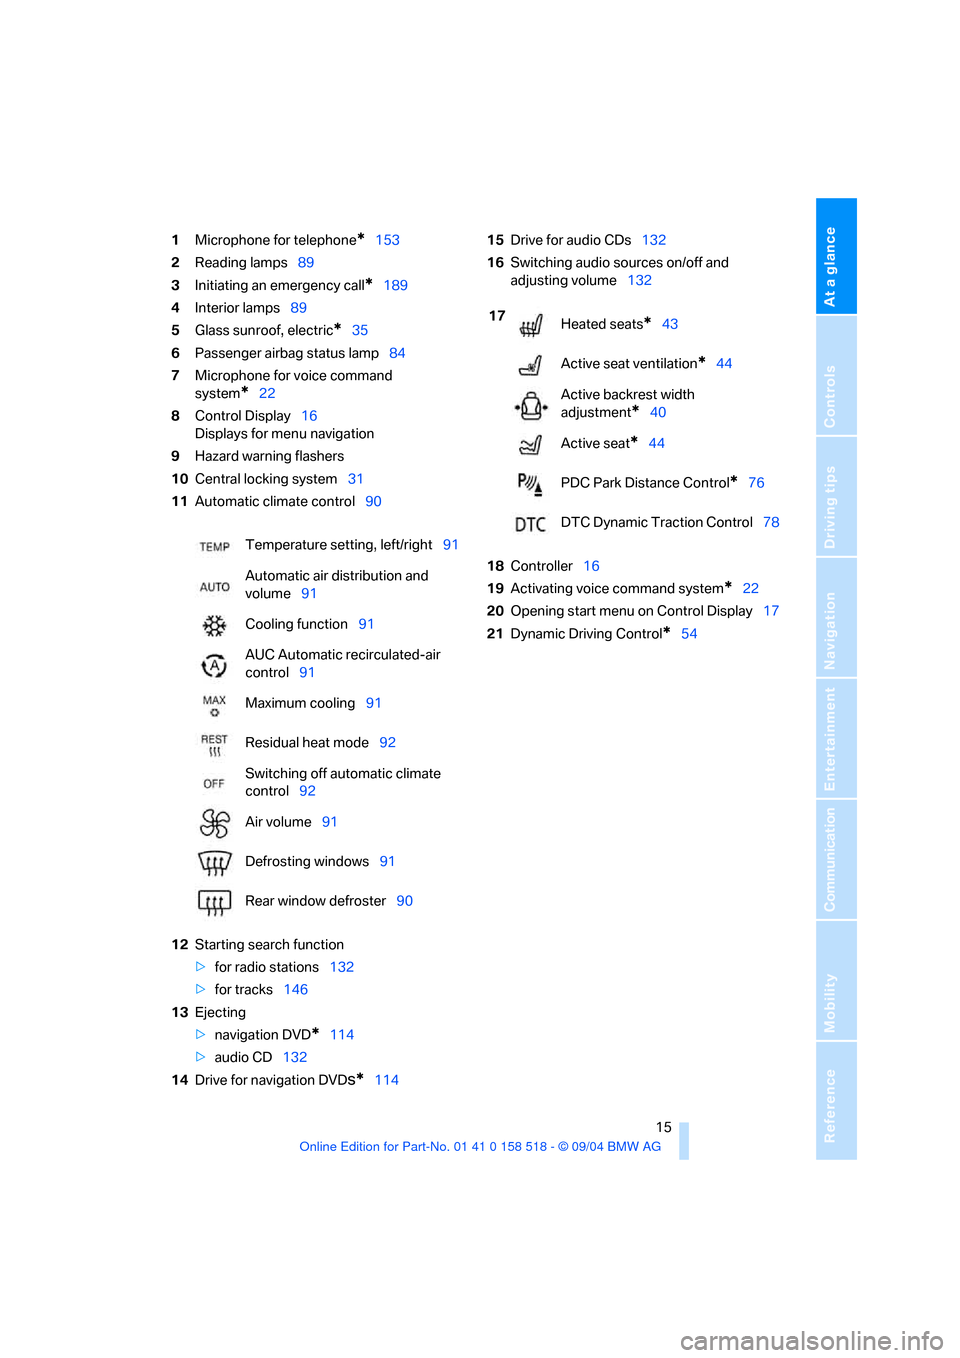
1Microphone for telephone*153
2Reading lamps89
3Initiating an emergency call
*189
4Interior lamps89
5Glass sunroof, electric
*35
6Passenger airbag status lamp84
7Microphone for voice command
system
*22
8Control Display16
Displays for menu navigation
9Hazard warning flashers
10Central locking system31
11Automatic climate control90
12Starting search function
>for radio stations132
>for tracks146
13Ejecting
>navigation DVD
*114
>audio CD132
14Drive for navigation DVD
s*11415Drive for audio CDs132
16Switching audio sources on/off and
adjusting volume132
18Controller16
19Activating voice command system
*22
20Opening start menu on Control Display17
21Dynamic Driving Control
*54 Temperature setting, left/right91
Automatic air distribution and
volume91
Cooling function91
AUC Automatic recirculated-air
control91
Maximum cooling91
Residual heat mode92
Switching off automatic climate
control92
Air volume91
Defrosting windows91
Rear window defroster90
17
Heated seats*43
Active seat ventilation
*44
Active backrest width
adjustment
*40
Active seat
*44
PDC Park Distance Control
*76
DTC Dynamic Traction Control78
Page 45 of 221
Adjustments
44
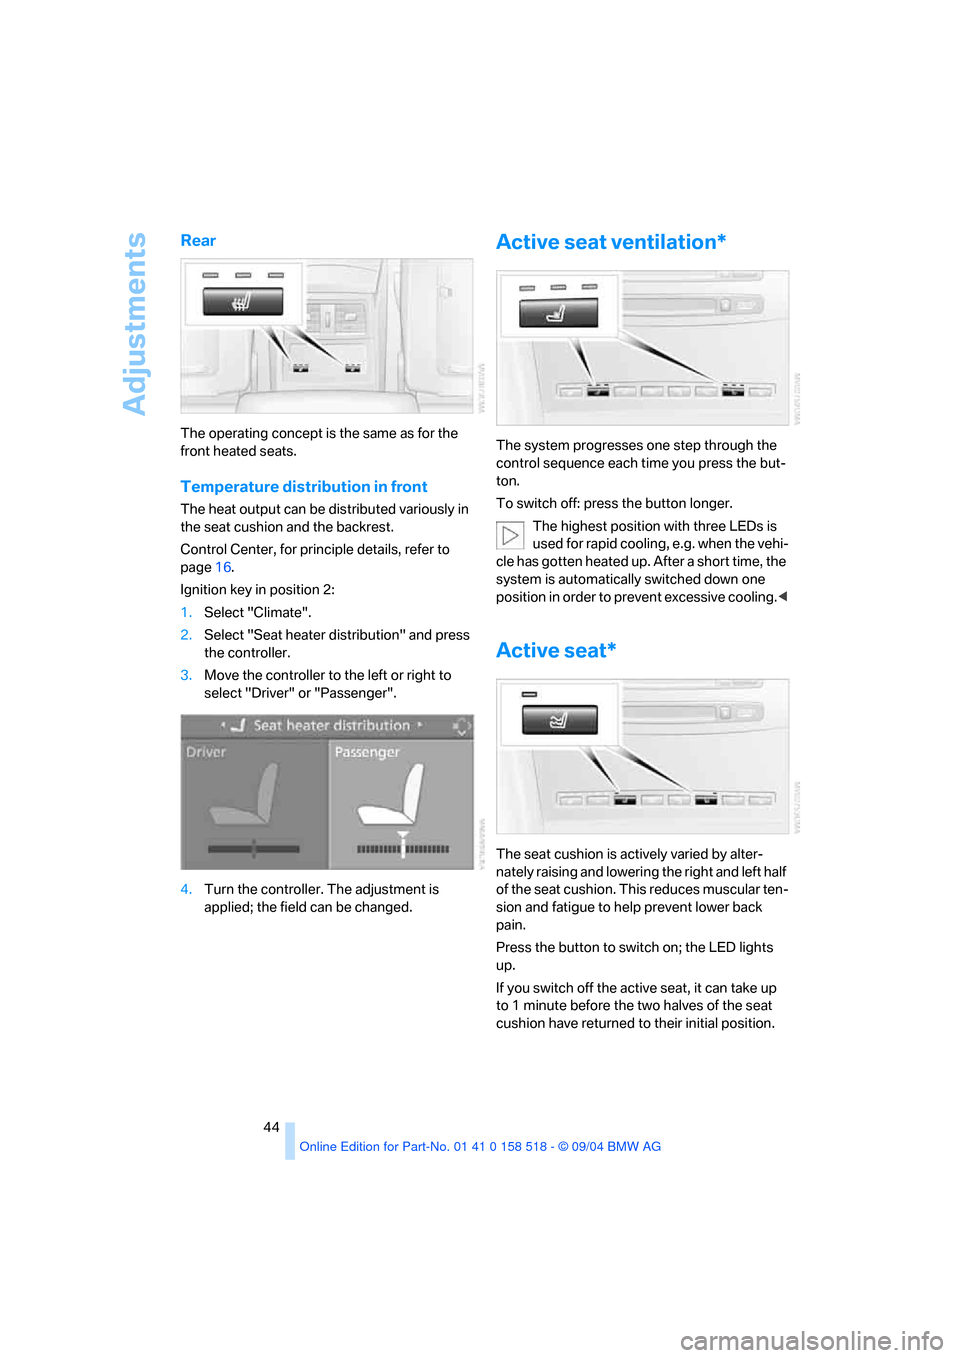
Rear
The operating concept is the same as for the
front heated seats.
Temperature distribution in front
The heat output can be distributed variously in
the seat cushion and the backrest.
Control Center, for principle details, refer to
page16.
Ignition key in position 2:
1.Select "Climate".
2.Select "Seat heater distribution" and press
the controller.
3.Move the controller to the left or right to
select "Driver" or "Passenger".
4.Turn the controller. The adjustment is
applied; the field can be changed.
Active seat ventilation*
The system progresses one step through the
control sequence each time you press the but-
ton.
To switch off: press the button longer.
The highest position with three LEDs is
used for rapid cooling, e.g. when the vehi-
cle has gotten heated up. After a short time, the
system is automatically switched down one
position in order to prevent excessive cooling.<
Active seat*
The seat cushion is actively varied by alter-
nately raising and lowering the right and left half
of the seat cushion. This reduces muscular ten-
sion and fatigue to help prevent lower back
pain.
Press the button to switch on; the LED lights
up.
If you switch off the active seat, it can take up
to 1 minute before the two halves of the seat
cushion have returned to their initial position.
Page 91 of 221

A congenial climate
90
A congenial climate
1Airflow directed toward the windshield and
side windows
2Air for the upper body region, refer to Front
ventilation on page93
3Air to footwell
4Temperature, left side of passenger com-
partment
5Maximum cooling
6Defrosting windows and removing conden-
sation
7Air volume, manual
8Switching off automatic climate control
9Switching cooling on and off manually10Temperature, right side of passenger com-
partment
11Residual heat mode
12AUTO program
13AUC Automatic recirculated-air control/
Recirculated-air mode
14LED for independent ventilation
15Rear window defroster
16Air grill for interior temperature sensor –
please keep clear and unobstructed
The current setting for air distribution is dis-
played on the Control Display.
Page 92 of 221
Controls
91Reference
At a glance
Driving tips
Communication
Navigation
Entertainment
Mobility
A congenial climate
For almost all conditions, the AUTO program
offers the optimal air distribution and air vol-
ume. Select an interior temperature you find
pleasant.
The following section contains more detailed
information on the available setting options.
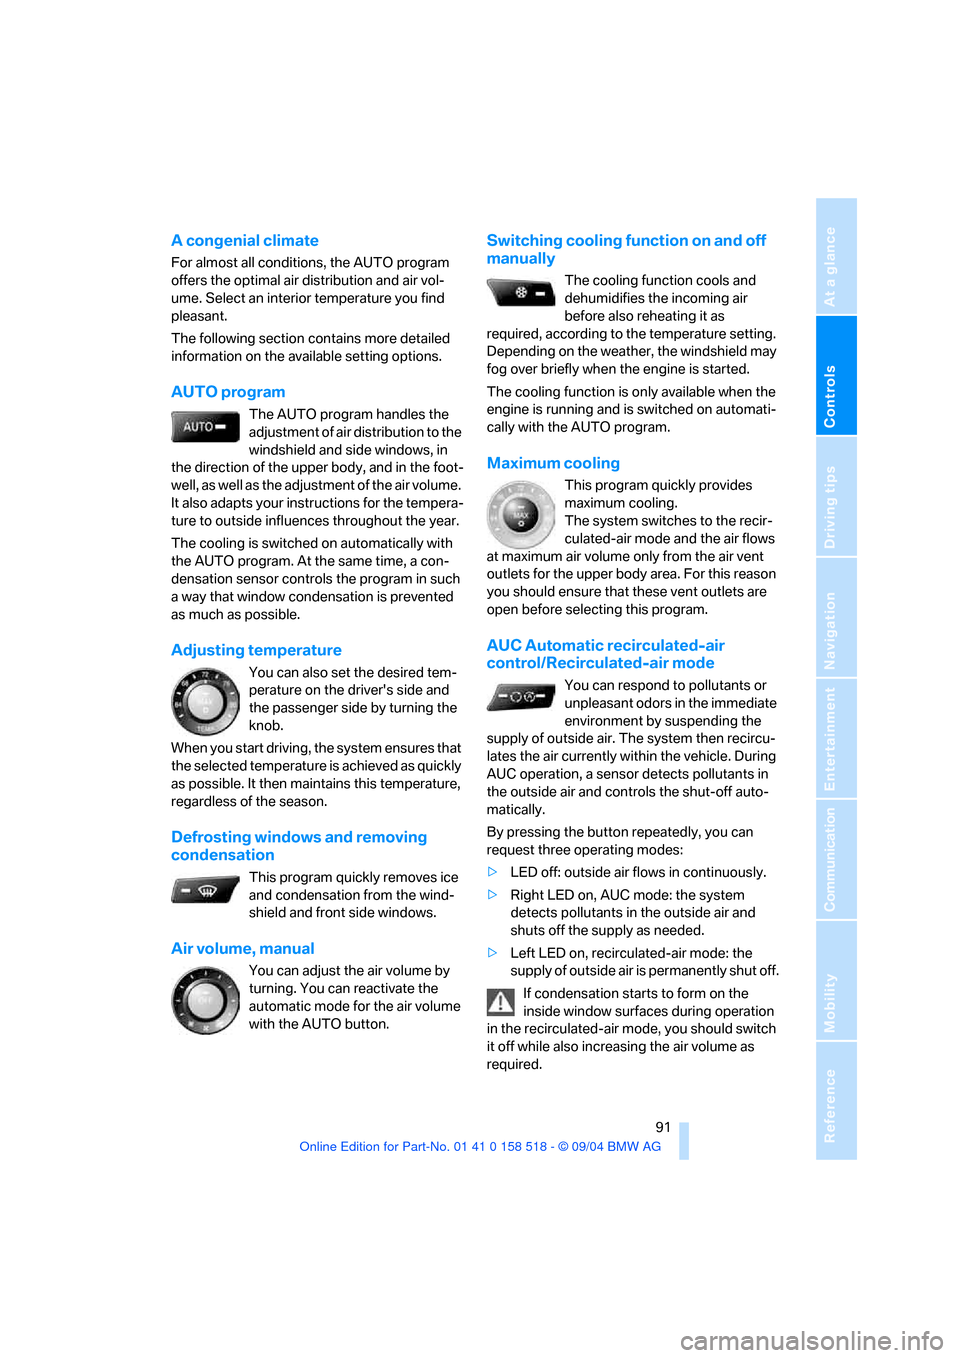
AUTO program
The AUTO program handles the
adjustment of air distribution to the
windshield and side windows, in
the direction of the upper body, and in the foot-
well, as well as the adjustment of the air volume.
It also adapts your instructions for the tempera-
ture to outside influences throughout the year.
The cooling is switched on automatically with
the AUTO program. At the same time, a con-
densation sensor controls the program in such
a way that window condensation is prevented
as much as possible.
Adjusting temperature
You can also set the desired tem-
perature on the driver's side and
the passenger side by turning the
knob.
When you start driving, the system ensures that
the selected temperature is achieved as quickly
as possible. It then maintains this temperature,
regardless of the season.
Defrosting windows and removing
condensation
This program quickly removes ice
and condensation from the wind-
shield and front side windows.
Air volume, manual
You can adjust the air volume by
turning. You can reactivate the
automatic mode for the air volume
with the AUTO button.
Switching cooling function on and off
manually
The cooling function cools and
dehumidifies the incoming air
before also reheating it as
required, according to the temperature setting.
Depending on the weather, the windshield may
fog over briefly when the engine is started.
The cooling function is only available when the
engine is running and is switched on automati-
cally with the AUTO program.
Maximum cooling
This program quickly provides
maximum cooling.
The system switches to the recir-
culated-air mode and the air flows
at maximum air volume only from the air vent
outlets for the upper body area. For this reason
you should ensure that these vent outlets are
open before selecting this program.
AUC Automatic recirculated-air
control/Recirculated-air mode
You can respond to pollutants or
unpleasant odors in the immediate
environment by suspending the
supply of outside air. The system then recircu-
lates the air currently within the vehicle. During
AUC operation, a sensor detects pollutants in
the outside air and controls the shut-off auto-
matically.
By pressing the button repeatedly, you can
request three operating modes:
>LED off: outside air flows in continuously.
>Right LED on, AUC mode: the system
detects pollutants in the outside air and
shuts off the supply as needed.
>Left LED on, recirculated-air mode: the
supply of outside air is permanently shut off.
If condensation starts to form on the
inside window surfaces during operation
in the recirculated-air mode, you should switch
it off while also increasing the air volume as
required.
Page 93 of 221
A congenial climate
92 The recirculated-air mode should not be used
over an extended period of time, as the air qual-
ity inside the vehicle deteriorates continu-
ously.<
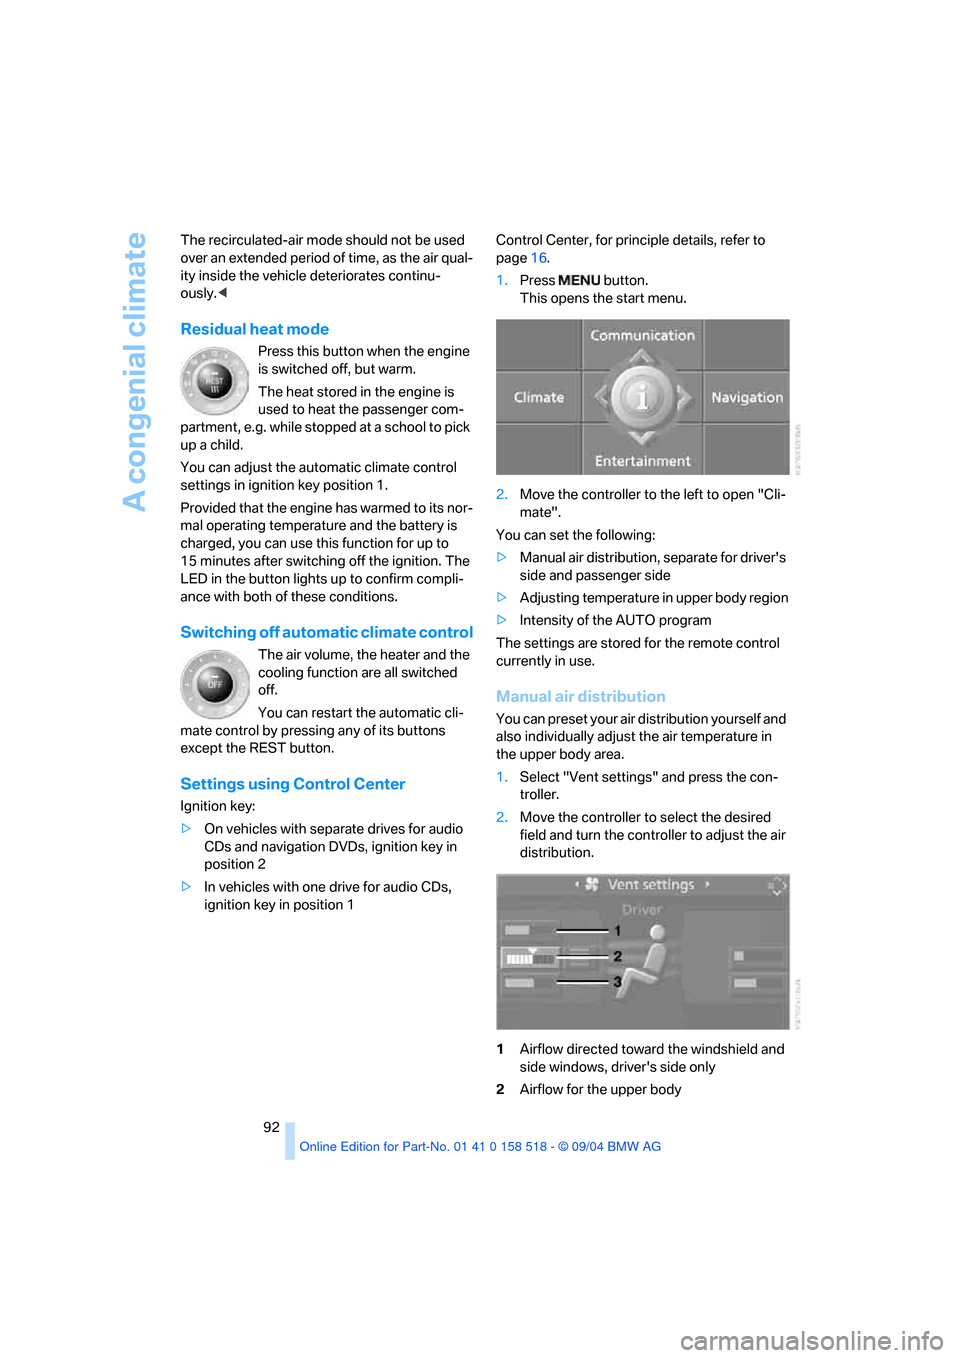
Residual heat mode
Press this button when the engine
is switched off, but warm.
The heat stored in the engine is
used to heat the passenger com-
partment, e.g. while stopped at a school to pick
up a child.
You can adjust the automatic climate control
settings in ignition key position 1.
Provided that the engine has warmed to its nor-
mal operating temperature and the battery is
charged, you can use this function for up to
15 minutes after switching off the ignition. The
LED in the button lights up to confirm compli-
ance with both of these conditions.
Switching off automatic climate control
The air volume, the heater and the
cooling function are all switched
off.
You can restart the automatic cli-
mate control by pressing any of its buttons
except the REST button.
Settings using Control Center
Ignition key:
>On vehicles with separate drives for audio
CDs and navigation DVDs, ignition key in
position 2
>In vehicles with one drive for audio CDs,
ignition key in position 1Control Center, for principle details, refer to
page16.
1.Press button.
This opens the start menu.
2.Move the controller to the left to open "Cli-
mate".
You can set the following:
>Manual air distribution, separate for driver's
side and passenger side
>Adjusting temperature in upper body region
>Intensity of the AUTO program
The settings are stored for the remote control
currently in use.
Manual air distribution
You can preset your air distribution yourself and
also individually adjust the air temperature in
the upper body area.
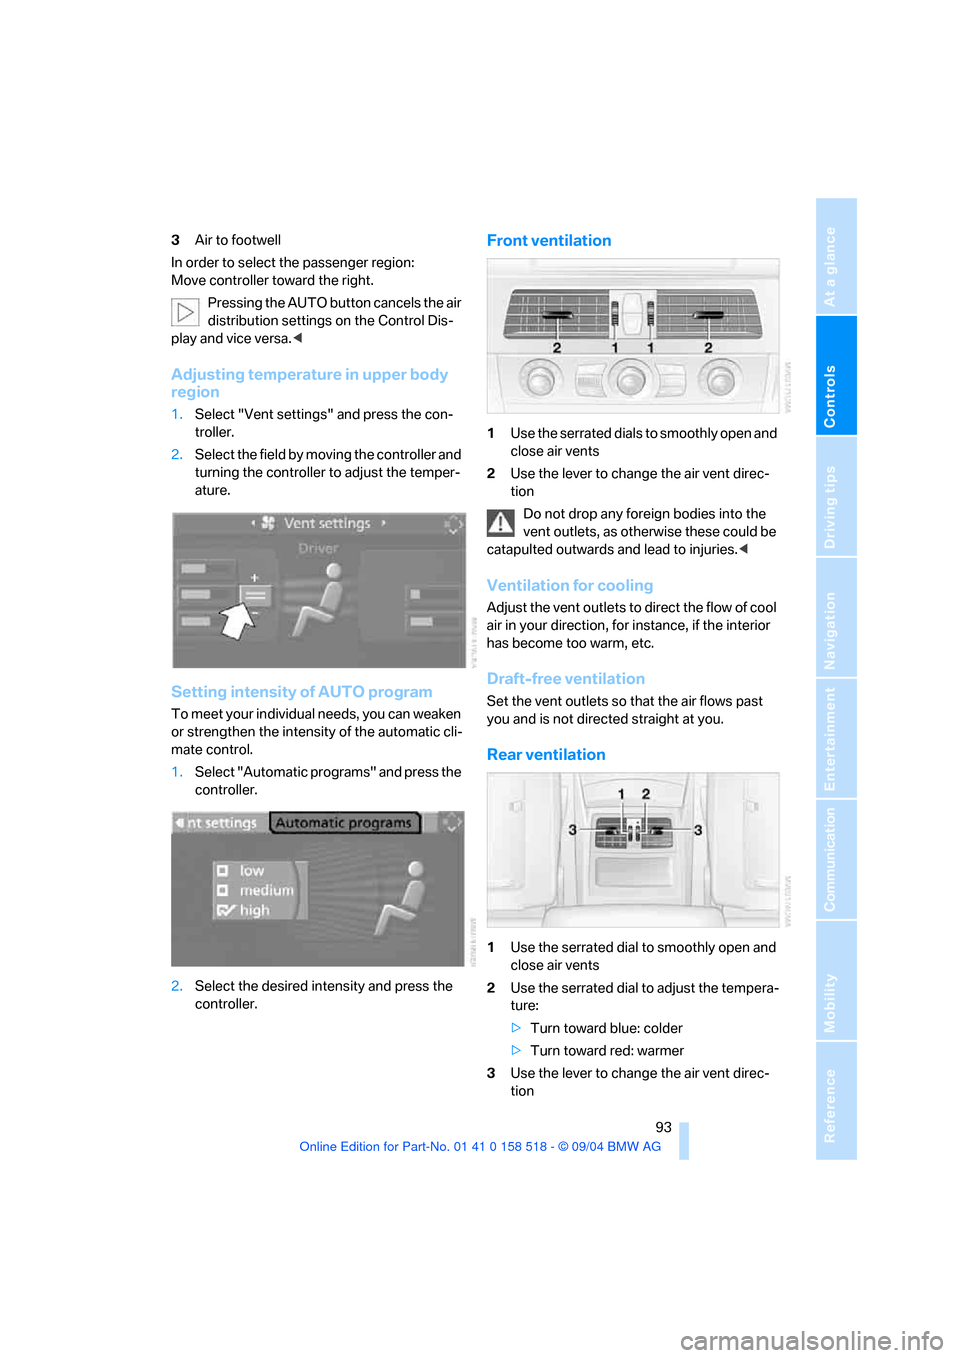
1.Select "Vent settings" and press the con-
troller.
2.Move the controller to select the desired
field and turn the controller to adjust the air
distribution.
1Airflow directed toward the windshield and
side windows, driver's side only
2Airflow for the upper body
Page 94 of 221
Controls
93Reference
At a glance
Driving tips
Communication
Navigation
Entertainment
Mobility
3Air to footwell
In order to select the passenger region:
Move controller toward the right.
Pressing the AUTO button cancels the air
distribution settings on the Control Dis-
play and vice versa.<
Adjusting temperature in upper body
region
1.Select "Vent settings" and press the con-
troller.
2.Select the field by moving the controller and
turning the controller to adjust the temper-
ature.
Setting intensity of AUTO program
To meet your individual needs, you can weaken
or strengthen the intensity of the automatic cli-
mate control.
1.Select "Automatic programs" and press the
controller.
2.Select the desired intensity and press the
controller.
Front ventilation
1Use the serrated dials to smoothly open and
close air vents
2Use the lever to change the air vent direc-
tion
Do not drop any foreign bodies into the
vent outlets, as otherwise these could be
catapulted outwards and lead to injuries.<
Ventilation for cooling
Adjust the vent outlets to direct the flow of cool
air in your direction, for instance, if the interior
has become too warm, etc.
Draft-free ventilation
Set the vent outlets so that the air flows past
you and is not directed straight at you.
Rear ventilation
1Use the serrated dial to smoothly open and
close air vents
2Use the serrated dial to adjust the tempera-
ture:
>Turn toward blue: colder
>Turn toward red: warmer
3Use the lever to change the air vent direc-
tion
Page 179 of 221

Under the hood
178 Do not exceed the upper marking on the
dipstick, otherwise an overfilling of oil can
damage the engine.<
Adding engine oil
Do not top off the oil until the oil level has
dropped to just above the lower marking on the
dipstick. In this area a message also appears on
the Control Display.
Refill the oil within the next 125 miles/
200 km, otherwise engine damage could
result.<
Continuous exposure to used oil has
caused cancer in laboratory testing.
For this reason, any skin areas that come into
contact with oil should be thoroughly washed
with soap and water.
Store oil, grease, etc., well out of the reach of
children; always observe all warning labels on
the containers.<
Oil change
Have oil changed only at your BMW center or
at a workshop that works according to BMW
repair procedures with correspondingly trained
personnel.
Specified engine oils
The quality of the engine oil selected has critical
significance for the operation and service life of
an engine. BMW continuously approves spe-
cific oils after confirming their suitability for use
in its vehicles with extensive testing.
Use only approved BMW High Performance
Synthetic Oil.
If you are unable to obtain BMW High Perfor-
mance Synthetic Oil, you can add small amounts of another synthetic oil between oil
changes. Use only oils with the API SH specifi-
cation or higher.
Ask your BMW center for details concern-
ing the specific BMW High Performance
Synthetic Oil or synthetic oils which have been
approved.<
You can also call BMW of North America at
1-800-831-1117 or visit this website:
www.bmwusa.com to obtain this information.
Viscosity ratings
Viscosity is the oil flow rating as defined in
SAE classes.
The selection of the correct SAE class depends
on the climatic conditions in the area where you
typically drive your BMW.
Approved oils are in SAE classes 5W-40
and 5W-30.<
These oils may be used for driving in all ambient
temperatures.
Coolant
Do not add coolant to the cooling system
when the engine is hot. Escaping coolant
can cause burns.<
Coolant consists of water and the addition of
antifreeze and anticorrosion agent. Not all com-
mercially available additives are suitable for
your BMW. Ask your BMW center for suitable
additives.
Only use suitable additives, as otherwise
engine damage may result. The additives
present a health hazard; observe the instruc-
tions on the containers.<
Comply with the appropriate environ-
mental protection regulations when dis-
posing of coolant additives.<
Checking coolant level
1.The engine must be at ambient tempera-
ture.
2.Turn the cap of the expansion tank counter-
clockwise to allow any accumulated pres-
Page 206 of 221

Reference 205
At a glance
Controls
Driving tips
Communica-
Navigation
Entertainment
Mobility
"Check Control
messages"69
Check Gas Cap168
Checking the air pressure,
refer to Tire inflation
pressure170
Child-restraint fixing system
LATCH49
Child restraints47
Child restraint systems47
Child-safety lock50
Child seats47
Chime, refer to Check
Control67
Chock185
Chrome parts, care, refer to
Caring for your vehicle
brochure
Cigarette lighter99
Cleaning, refer to Caring for
your vehicle brochure
Cleaning the windshield, refer
to Wiper system57
"Climate"44
Clock65
– 12h/24h mode74
– time setting74
Closing
– from inside31
– from outside29
Clothes hooks99
Cockpit10
Cold start, refer to Starting
engine51
"Comfort", active backrest
width adjustment40
Comfort area, refer to All
about the center console14
Comfort seat39
"Communication"154
"Communication
settings"161
Compact Disc
– refer to CD changer145
– refer to CD player145
Compact wheel
– changing wheels186
– inflation pressure171Computer69
– clock, 12h/24h mode74
– displays on Control
Display70
– hour signal74
"Concert hall"135
Condition Based Service
CBS180
"Confirmation"30
Confirmation signals for
locking and unlocking30
Consumption, refer to
Average consumption70
Consumption indicator
– Energy Control66
"Continue guidance to
destination?"125
Control Center16
– adjusting brightness73
– assistance window20
– automatic climate control92
– changing settings19,73
– changing the menu page19
– confirming selection or
entry19
– controller16
– displays, menus16
– language selection74
– lists19
– menu item selection19
– menu navigation17
– operating elements16
– selecting units of
measurement and display
format73
– setting time and date74
– start menu17
– status information20
– symbols17
Control Display, refer to
Control Center16
Controller, refer to Control
Center16
Controls, refer to Cockpit10
Convenience operation
– glass sunroof30
– windows30
Convenience start, refer to
Starting engine51Coolant178
– level178
Cooling, maximum91
Cornering Brake Control
CBC77
Country of destination for
navigation116
Courtesy lamps89
Cradle for telephone or
portable phone98
Cruise control58,59
– active cruise control59
Cruising range70
Cup holders99
Curb weight, refer to
Weights198
Current fuel consumption66
"Current position"125
Current position
– displaying125
– entering120
– storing120
"Customer Relations"164
Cylinders, refer to Engine
data196
D
Dashboard, refer to
Cockpit10
Data196
– capacities198
– dimensions197
– engine196
– technical data196
– weights198
"Date"74
Date65
– display format75
– retrieval65
– setting74
"Date format"75
Daytime driving lamps87
DBC Dynamic Brake
Control77
– warning lamp79
"Deactivated"41
Deactivating front passenger
airbags47,83