2005 BMW 530I SEDAN change time
[x] Cancel search: change timePage 72 of 221
Controls
71Reference
At a glance
Driving tips
Communication
Navigation
Entertainment
Mobility
>Distance to destination:
>Entering a distance manually in the com-
puter, see below.
>Entering a destination in the navigation
system
*, refer to page115.
>Average speed
>Average fuel consumption
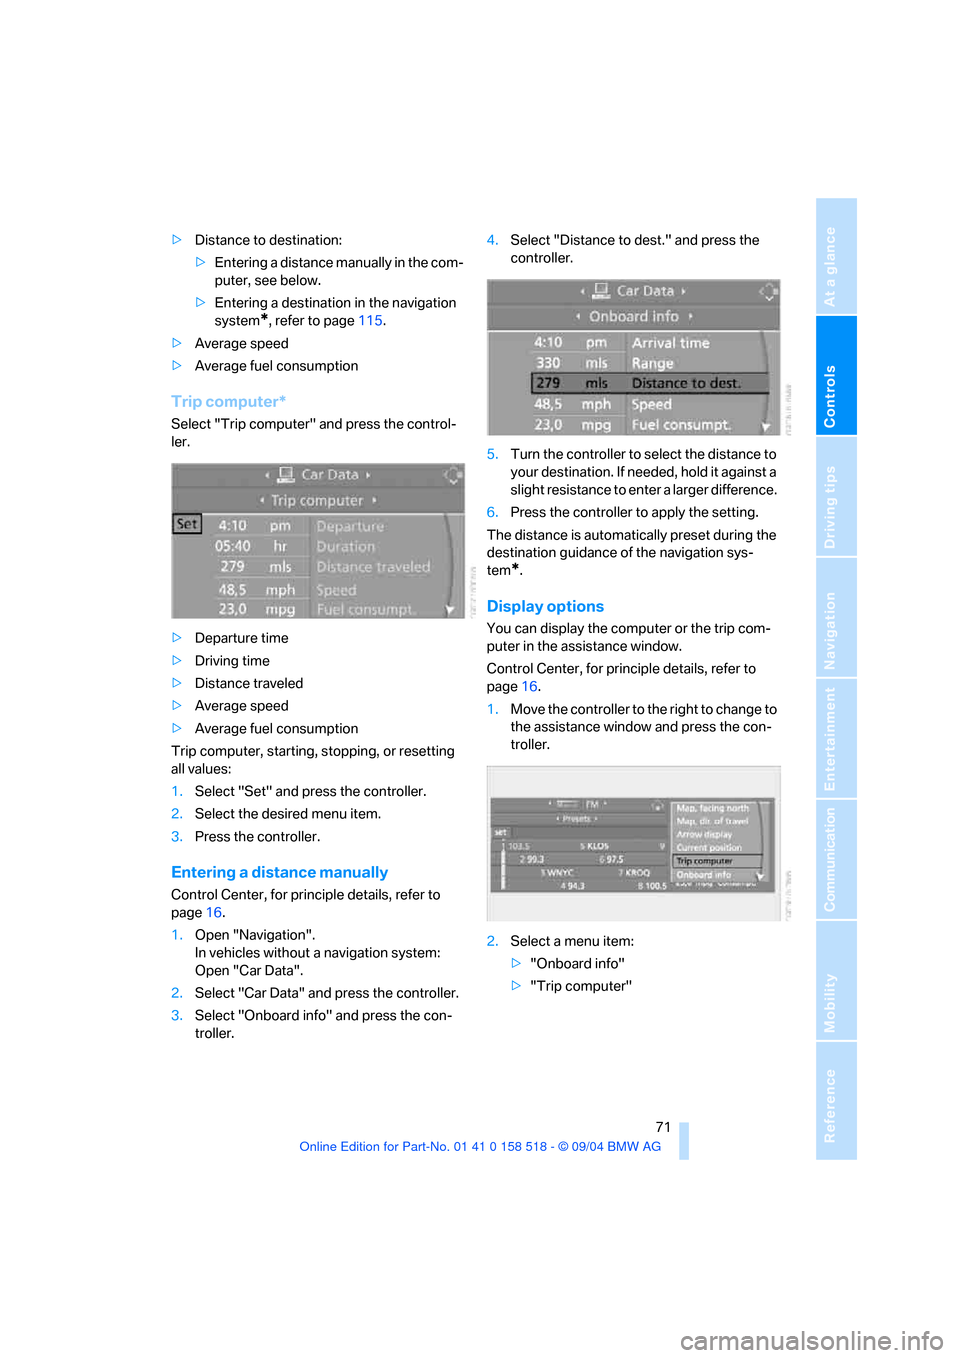
Trip computer*
Select "Trip computer" and press the control-
ler.
>Departure time
>Driving time
>Distance traveled
>Average speed
>Average fuel consumption
Trip computer, starting, stopping, or resetting
all values:
1.Select "Set" and press the controller.
2.Select the desired menu item.
3.Press the controller.
Entering a distance manually
Control Center, for principle details, refer to
page16.
1.Open "Navigation".
In vehicles without a navigation system:
Open "Car Data".
2.Select "Car Data" and press the controller.
3.Select "Onboard info" and press the con-
troller.4.Select "Distance to dest." and press the
controller.
5.Turn the controller to select the distance to
your destination. If needed, hold it against a
slight resistance to enter a larger difference.
6.Press the controller to apply the setting.
The distance is automatically preset during the
destination guidance of the navigation sys-
tem
*.
Display options
You can display the computer or the trip com-
puter in the assistance window.
Control Center, for principle details, refer to
page16.
1.Move the controller to the right to change to
the assistance window and press the con-
troller.
2.Select a menu item:
>"Onboard info"
>"Trip computer"
Page 74 of 221
Controls
73Reference
At a glance
Driving tips
Communication
Navigation
Entertainment
Mobility
Starting and stopping
>Select "Start" and press the controller.
The stopwatch starts at the displayed time.
>Select "Reset" and press the controller.
The stopwatch is reset and it restarts if it
was running beforehand.
>Select "Stop" and press the controller.
This stops the timer.
Taking an intermediate time reading
Select "Interim time" and press the controller.
The interim time appears below the ongoing
primary stopwatch count.
All of the remaining functions remain
available at all times while the stopwatch
is running. The stopwatch continues operation
in the background.<
Settings on Control Display
Brightness of Control Display
The brightness is automatically adapted to the
ambient lighting conditions. However, you can
change the base setting.
Control Center, for principle details, refer to
page16.
1.Press button.
This opens the start menu.
2.Press the controller to open the menu.
3.Select "Display settings" and press the
controller.
4.Select "Brightness" and press the control-
ler.5.If necessary, move the controller to the right
to select "Display Offset".
6.Turn the controller until the desired setting
is selected.
The setting is stored for the remote control cur-
rently in use.
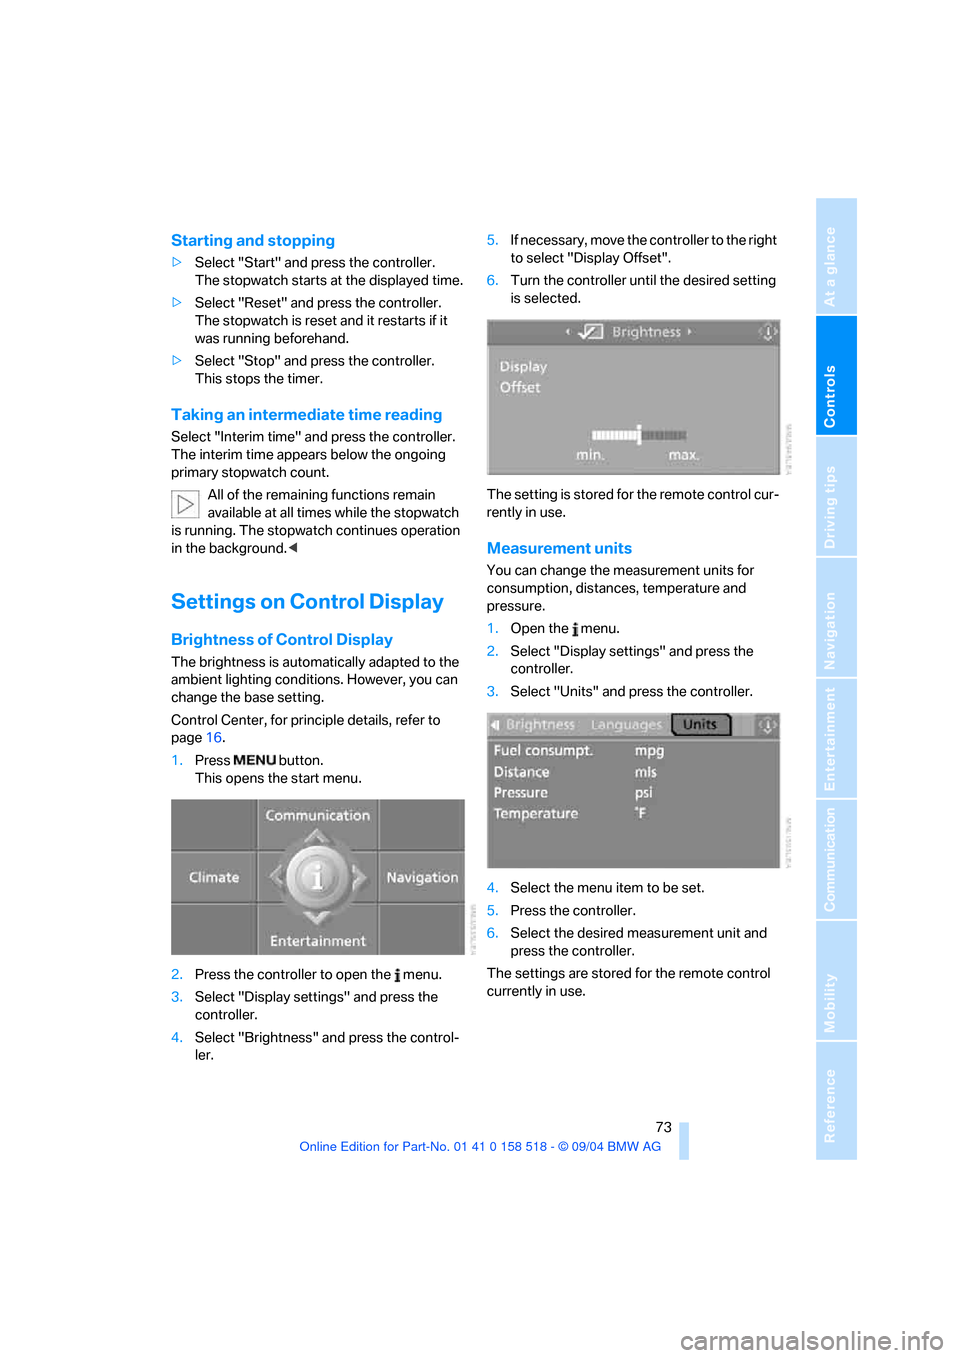
Measurement units
You can change the measurement units for
consumption, distances, temperature and
pressure.
1.Open the menu.
2.Select "Display settings" and press the
controller.
3.Select "Units" and press the controller.
4.Select the menu item to be set.
5.Press the controller.
6.Select the desired measurement unit and
press the controller.
The settings are stored for the remote control
currently in use.
Page 75 of 221
Everything under control
74
Language on Control Display
Control Center, for principle details, refer to
page16.
1.Open the menu.
2.Select "Display settings" and press the
controller.
3.Select "Languages" and press the control-
ler.
4.Select "Text language" and press the con-
troller. You can change the language of the
text displays.
5.Select and activate the desired language by
pressing the controller.
The setting is stored for the remote control cur-
rently in use.
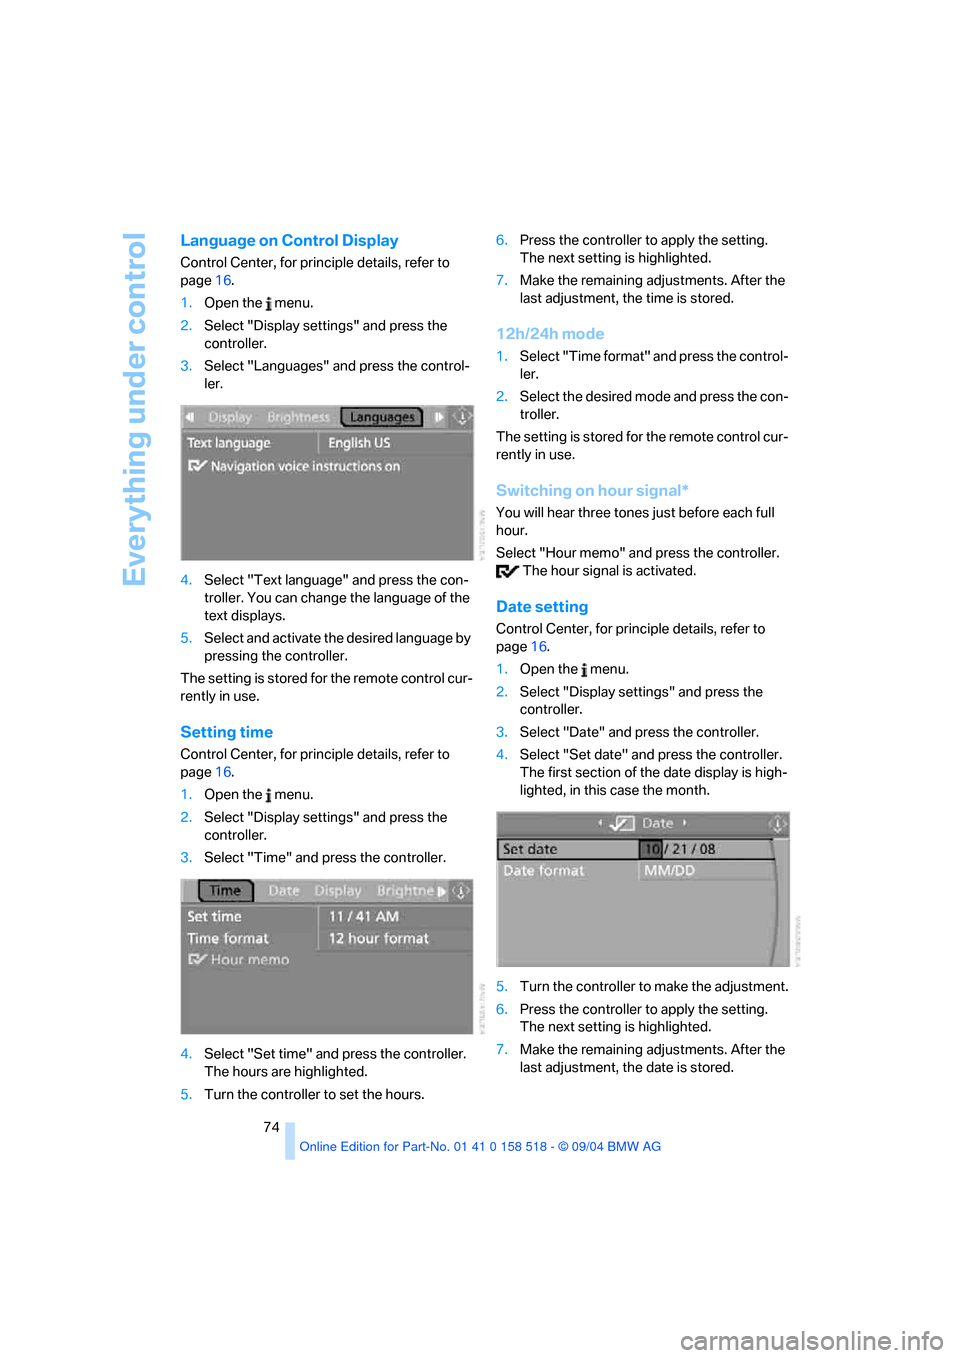
Setting time
Control Center, for principle details, refer to
page16.
1.Open the menu.
2.Select "Display settings" and press the
controller.
3.Select "Time" and press the controller.
4.Select "Set time" and press the controller.
The hours are highlighted.
5.Turn the controller to set the hours.6.Press the controller to apply the setting.
The next setting is highlighted.
7.Make the remaining adjustments. After the
last adjustment, the time is stored.
12h/24h mode
1.Select "Time format" and press the control-
ler.
2.Select the desired mode and press the con-
troller.
The setting is stored for the remote control cur-
rently in use.
Switching on hour signal*
You will hear three tones just before each full
hour.
Select "Hour memo" and press the controller.
The hour signal is activated.
Date setting
Control Center, for principle details, refer to
page16.
1.Open the menu.
2.Select "Display settings" and press the
controller.
3.Select "Date" and press the controller.
4.Select "Set date" and press the controller.
The first section of the date display is high-
lighted, in this case the month.
5.Turn the controller to make the adjustment.
6.Press the controller to apply the setting.
The next setting is highlighted.
7.Make the remaining adjustments. After the
last adjustment, the date is stored.
Page 78 of 221

Controls
77Reference
At a glance
Driving tips
Communication
Navigation
Entertainment
Mobility
Control Center, for principle details, refer to
page16.
1.Press button.
This opens the start menu.
2.Press the controller to open the menu.
3.Select "Vehicle settings" and press the
controller.
4.Select "PDC" and press the controller.
5.Select "Monitor display on" and press the
controller.
The PDC screen is activated.
The display appears on the Control Display as
soon as PDC is activated.
The setting for the remote control currently in
use is stored.
System limits
Even with PDC, final responsibility for
estimating the distance between the
vehicle and any obstructions always remains
with the driver. Even when sensors are pro-
vided, there is a blind spot in which objects can
no longer be detected.The system is also sub-
ject to the physical limits that apply to all forms
of ultrasonic measurement, such as those
encountered with thin and wedge-shaped
objects, etc. Low objects already displayed, e. g. a curb, can also disappear from the detec-
tion area of the sensors again before a continu-
ous tone sounds. Loud noises from outside and
inside your vehicle may prevent you from hear-
ing the PDC signal tone.<
Do not apply high pressure spray to the
sensors for a prolonged period of time.
Keep the spray at least 4 in/10 cm away from
the sensors.<
Driving stability control
systems
Your BMW is equipped with an extended array
of systems designed to enhance and maintain
vehicle stability under extreme conditions.
ABS Antilock Brake System
ABS prevents locking of the wheels during
braking. Safe steering response is maintained
even during full braking. Active safety is thus
increased.
The ABS is operational every time you start the
engine. Safe braking, refer to page107.
CBC Cornering Brake Control
When braking during curves or when braking
during a gear change, driving stability and
steering response are improved further.
Electronic brake-force distribution
The system controls the brake pressure in the
rear wheels to ensure stable braking behavior.
DBC Dynamic Brake Control
When you apply the brakes rapidly, this system
automatically produces the maximum braking
force boost and thus helps to achieve the short-
est possible braking distance during full brak-
ing. This system exploits all of the benefits pro-
vided by ABS.
Do not reduce the pressure on the brake pedal
for the duration of the brake application. When
the brake pedal is released, DBC is deactivated.
Page 80 of 221

Controls
79Reference
At a glance
Driving tips
Communication
Navigation
Entertainment
Mobility
Malfunction in vehicle stability-control
systems
The brake system warning lamp lights
up in red, appearing together with the
indicator lamps for ABS and DSC. A
message appears on the Control Dis-
play. The driving stability control sys-
tems are deactivated. Conventional
braking efficiency remains available
without limitations. While you may con-
tinue, you should remember to proceed cau-
tiously and drive defensively while avoiding full
brake applications. Have the system checked
as soon as possible.
Display of the previously described
malfunction on Canadian models.
The indicator lamp for DSC lights up; a
message appears on the Control Dis-
play. DSC and DTC are deactivated.
The stability maintenance functions are no
longer available. The vehicle remains in running
order. Have the system checked as soon as
possible.
The warning lamp for the brake system
lights up in yellow; a message appears
on the Control Display. DBC has failed.
Have the system checked as soon as possible.
Display of the previously described
malfunction on Canadian models.
Active roll stabilization*
The concept
Active roll stabilization minimizes body roll and
optimizes vehicle stability during cornering and
evasive maneuvers.
Dynamic stabilizers at the front and rear axles
form the basis for active roll stabilization. Sus-
pension compliance adapts to suit driving con-
ditions, varying from performance-oriented during cornering to smooth and comfort-ori-
ented when the vehicle is proceeding in a
straight line. During vehicle operation, the sys-
tem continuously runs through closed-loop
control cycles lasting only fractions of a second.
The system assumes operational status each
time you start the engine.
Malfunction
The warning lamp lights up and a mes-
sage appears on the Control Display.
There is a malfunction in the system.
Have the system checked as soon as possible.
If there is a malfunction in the system,
please remember to adapt your speed
accordingly, especially in curves. The suspen-
s i o n w il l b e n o t i c ea b ly s o f t e r a n d t h e v e h i cl e w il l
display a greater tendency to tilt during corner-
ing and in crosswinds. If a message stating that
you should stop appears on the Control Display,
stop and switch off the engine as soon as pos-
sible. In this case the oil level in the reservoir
may have dropped below the minimum, possi-
bly owing to a leak in the hydraulic system. Do
not continue driving. Contact your BMW cen-
ter.<
Flat Tire Monitor
The concept
The Flat Tire Monitor keeps track of the infla-
tion pressures in the four mounted tires as you
drive. The system provides an alert whenever
the inflation pressure drops significantly in rela-
tion to the pressure in another tire.
In the event of a pressure loss, the rolling radius
and therefore the rotation speed of the wheels
change. This change is detected and is
reported as a flat tire.
Functional requirement
In order to assure the reliable reporting of a flat
tire, the system must be initialized for the cor-
rect tire inflation pressure.
Perform the initialization immediately
after correcting the inflation pressure,
Page 88 of 221

Controls
87Reference
At a glance
Driving tips
Communication
Navigation
Entertainment
Mobility
Lamps
Parking lamps/low beams
0Lights off
1Parking lamps
2Low beams/daytime driving lamps
*
3Automatic headlamp control*/
Adaptive Head Light
*
Parking lamps
In switch position1, the front, rear and side
vehicle lighting is switched on. You can use the
parking lamps for parking. For lighting on one
side for parking as an additional feature, refer to
page88.
Low beams
The low beams are activated in switch
position2 only when the engine is running, oth-
erwise only the parking lamps are switched on.
Pathway lighting
If the vehicle is parked and the headlamps are
switched off, operating the headlamp flasher
activates the low beams. You can set the dura-
tion on the Control Display or deactivate the
function.
Control Center, for principle details, refer to
page16.
1.Open the menu.
2.Select "Vehicle settings" and press the
controller.3.Select "Light" and press the controller.
4.Select "Pathway lighting" and press the
controller.
5.Turn the controller to select the corre-
sponding duration.
6.Press the controller to apply the setting.
Lights on warning
If you turn the ignition key to position 0, an
acoustic signal sounds when you open the
driver's door for a few seconds to remind you
that the light has not yet been switched off.
At the same time a message appears on the
Control Display.
Daytime driving lamps*
If so desired, you can leave the light switch in
the low beam position2.
Always observe all applicable laws governing
the use of daytime driving lamps.
You can switch on the parking lamps when
needed using the standard procedure
described under Parking lamps.
Automatic headlamp control*
In the switch position3, the system activates
and switches on and off the low beams in
response to changes in ambient light condi-
tions, for instance, in a tunnel, at dawn and
d u s k , a n d in r a i n o r s n o w . A d a p t iv e H e a d L ig h t
*
is active. The LED next to the symbol is illumi-
nated when the low beams are on.
Page 123 of 221
Destination entry
122 4.Select "Delete data" and press the control-
ler.
5.Select "Delete address book" and press the
controller.
6.Select "Yes" and press the controller.
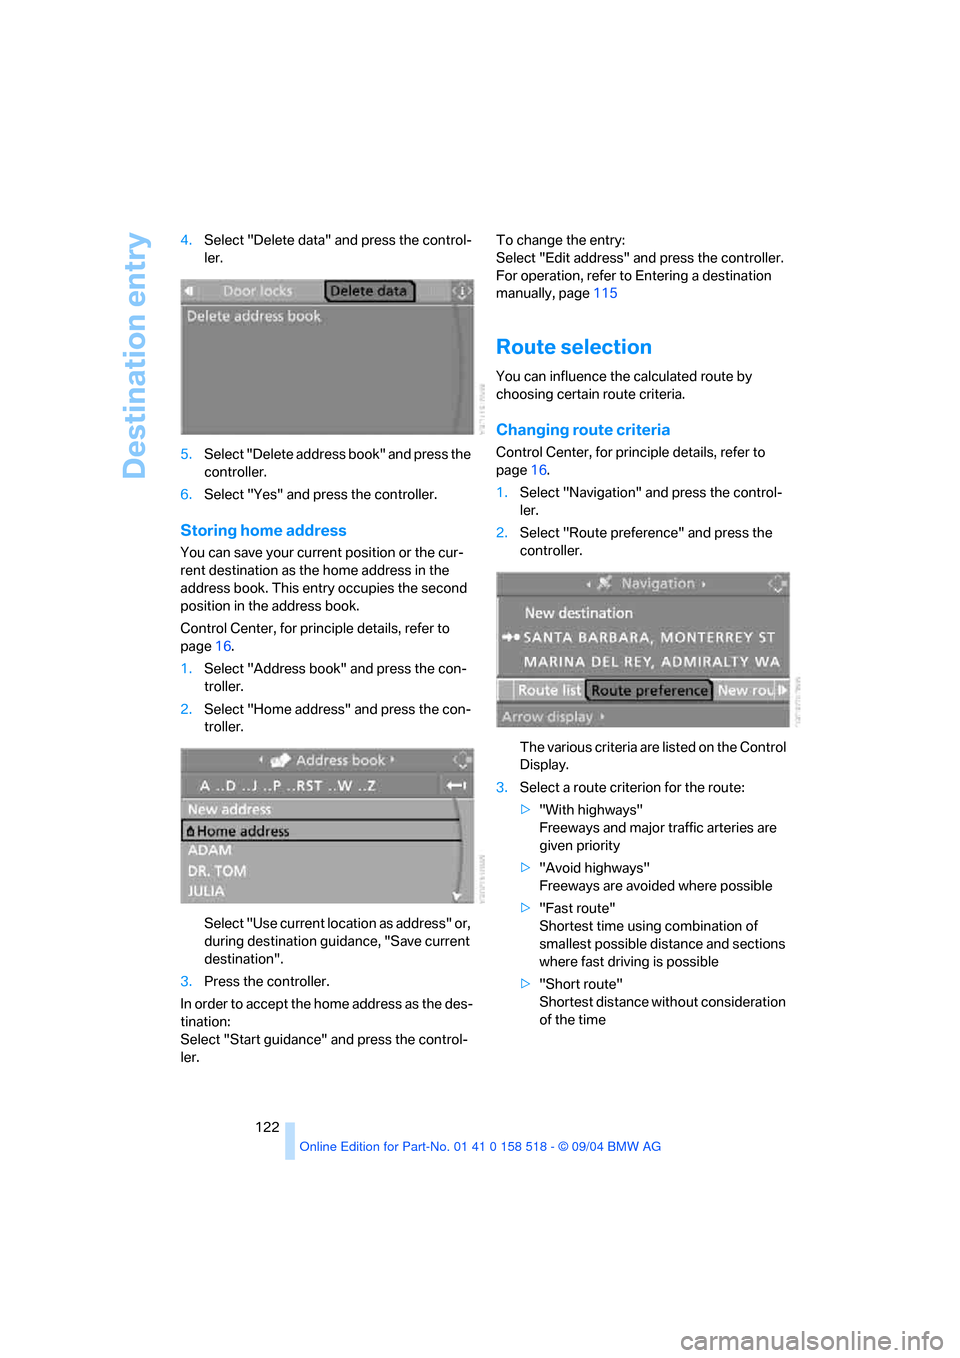
Storing home address
You can save your current position or the cur-
rent destination as the home address in the
address book. This entry occupies the second
position in the address book.
Control Center, for principle details, refer to
page16.
1.Select "Address book" and press the con-
troller.
2.Select "Home address" and press the con-
troller.
Select "Use current location as address" or,
during destination guidance, "Save current
destination".
3.Press the controller.
In order to accept the home address as the des-
tination:
Select "Start guidance" and press the control-
ler.To change the entry:
Select "Edit address" and press the controller.
For operation, refer to Entering a destination
manually, page115
Route selection
You can influence the calculated route by
choosing certain route criteria.
Changing route criteria
Control Center, for principle details, refer to
page16.
1.Select "Navigation" and press the control-
ler.
2.Select "Route preference" and press the
controller.
The various criteria are listed on the Control
Display.
3.Select a route criterion for the route:
>"With highways"
Freeways and major traffic arteries are
given priority
>"Avoid highways"
Freeways are avoided where possible
>"Fast route"
Shortest time using combination of
smallest possible distance and sections
where fast driving is possible
>"Short route"
Shortest distance without consideration
of the time
Page 125 of 221
Destination guidance
124
Destination guidance
Starting destination
guidance
Control Center, for principle details, refer to
page16.
1.Select "Navigation" and press the control-
ler.
2.Select the destination from the destination
list and press the controller or enter a new
destination, refer to page115.
3.Select "Start guidance" and press the con-
troller.
The destination guidance is started.
This symbol indicates the current destina-
tion.
After the route has been calculated, destination
guidance is indicated by arrows or a route map
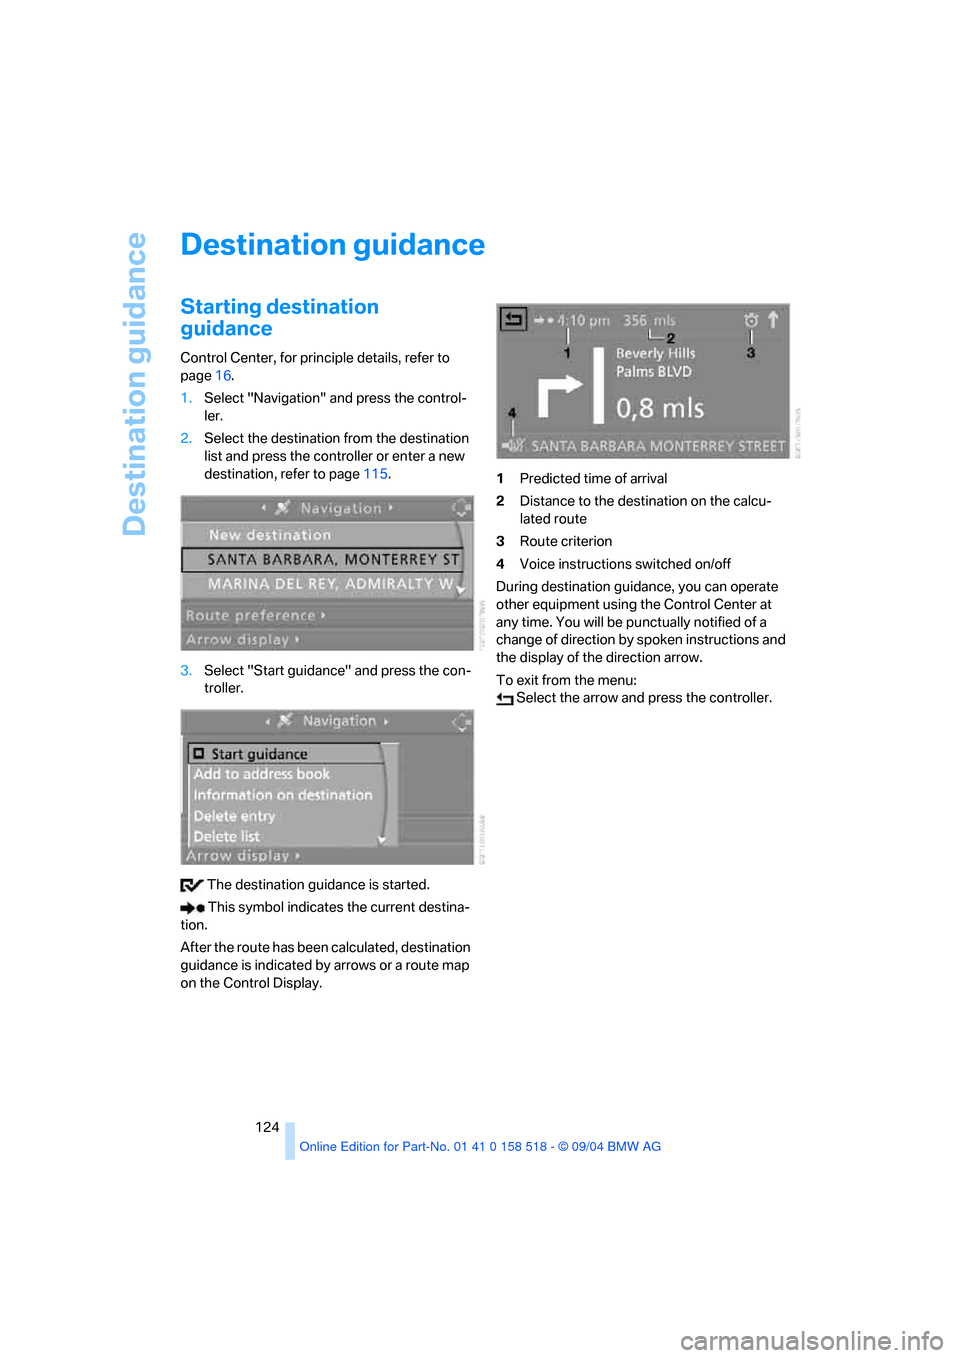
on the Control Display.1Predicted time of arrival
2Distance to the destination on the calcu-
lated route
3Route criterion
4Voice instructions switched on/off
During destination guidance, you can operate
other equipment using the Control Center at
any time. You will be punctually notified of a
change of direction by spoken instructions and
the display of the direction arrow.
To exit from the menu:
Select the arrow and press the controller.