2005 BMW 530I width
[x] Cancel search: widthPage 16 of 221
At a glance
15Reference
Controls
Driving tips
Communication
Navigation
Entertainment
Mobility
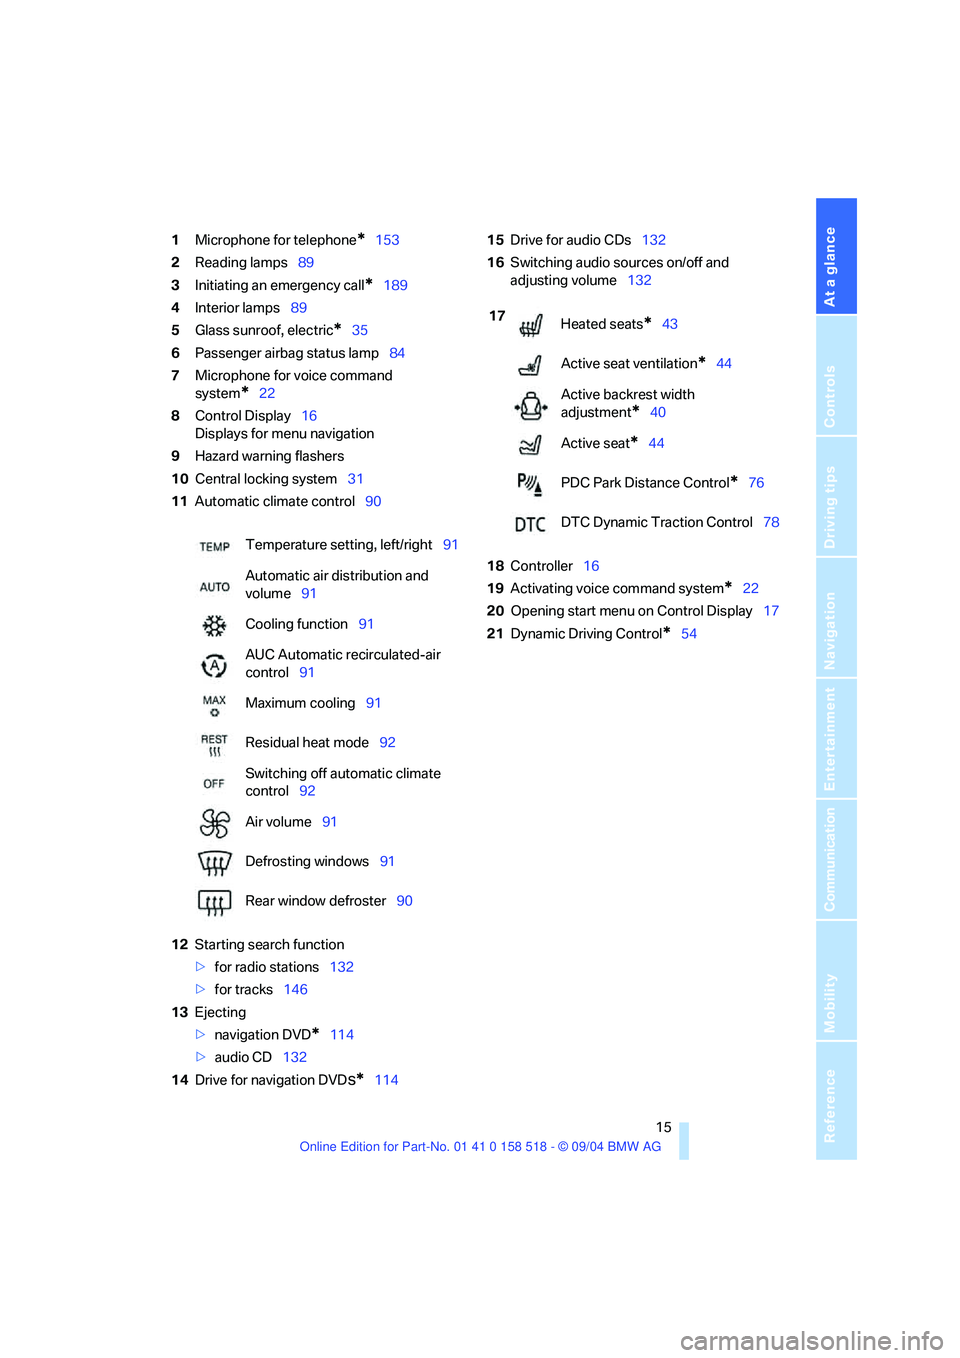
1Microphone for telephone*153
2Reading lamps89
3Initiating an emergency call
*189
4Interior lamps89
5Glass sunroof, electric
*35
6Passenger airbag status lamp84
7Microphone for voice command
system
*22
8Control Display16
Displays for menu navigation
9Hazard warning flashers
10Central locking system31
11Automatic climate control90
12Starting search function
>for radio stations132
>for tracks146
13Ejecting
>navigation DVD
*114
>audio CD132
14Drive for navigation DVD
s*11415Drive for audio CDs132
16Switching audio sources on/off and
adjusting volume132
18Controller16
19Activating voice command system
*22
20Opening start menu on Control Display17
21Dynamic Driving Control
*54 Temperature setting, left/right91
Automatic air distribution and
volume91
Cooling function91
AUC Automatic recirculated-air
control91
Maximum cooling91
Residual heat mode92
Switching off automatic climate
control92
Air volume91
Defrosting windows91
Rear window defroster90
17
Heated seats*43
Active seat ventilation
*44
Active backrest width
adjustment
*40
Active seat
*44
PDC Park Distance Control
*76
DTC Dynamic Traction Control78
Page 40 of 221
Controls
39Reference
At a glance
Driving tips
Communication
Navigation
Entertainment
Mobility
Please observe the information on damage to
safety belts provided on page43 and the infor-
mation on the active front head restraints
on
page42.
Seat adjustment
To ensure that the safety systems con-
tinue to provide optimized protection,
please observe the adjustment instructions on
page38.<
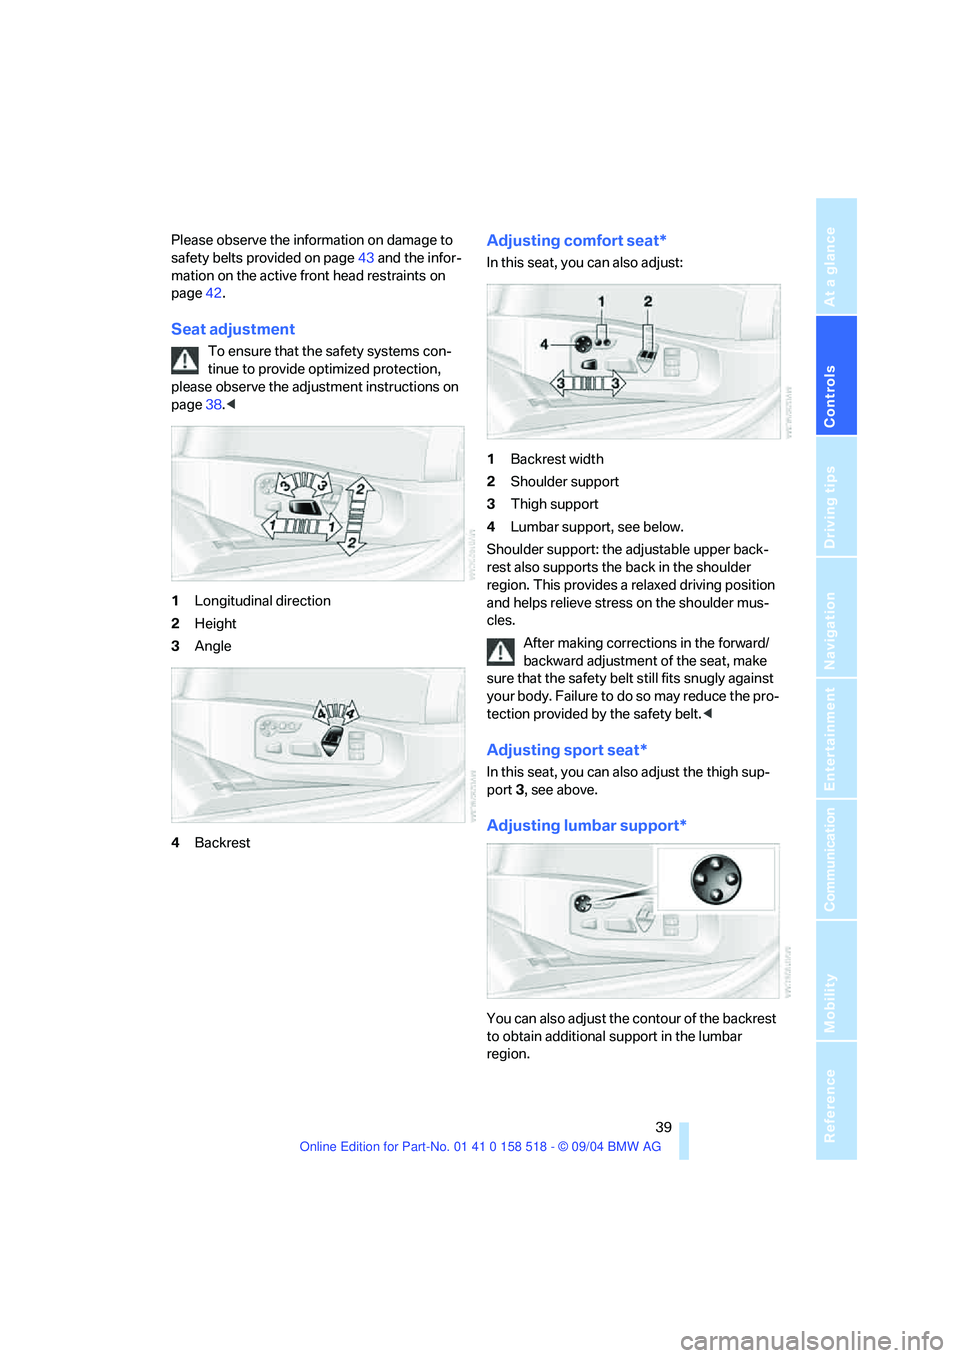
1Longitudinal direction
2Height
3Angle
4Backrest
Adjusting comfort seat*
In this seat, you can also adjust:
1Backrest width
2Shoulder support
3Thigh support
4Lumbar support, see below.
Shoulder support: the adjustable upper back-
rest also supports the back in the shoulder
region. This provides a relaxed driving position
and helps relieve stress on the shoulder mus-
cles.
After making corrections in the forward/
backward adjustment of the seat, make
sure that the safety belt still fits snugly against
your body. Failure to do so may reduce the pro-
tection provided by the safety belt.<
Adjusting sport seat*
In this seat, you can also adjust the thigh sup-
port 3, see above.
Adjusting lumbar support*
You can also adjust the contour of the backrest
to obtain additional support in the lumbar
region.
Page 41 of 221
Adjustments
40 The upper hips and spinal column receive sup-
plementary support to help you maintain a
relaxed, upright sitting position.
>Increase or decrease curvature: push
switch forward or back.
>Shift curvature up or down: push switch up
or down.
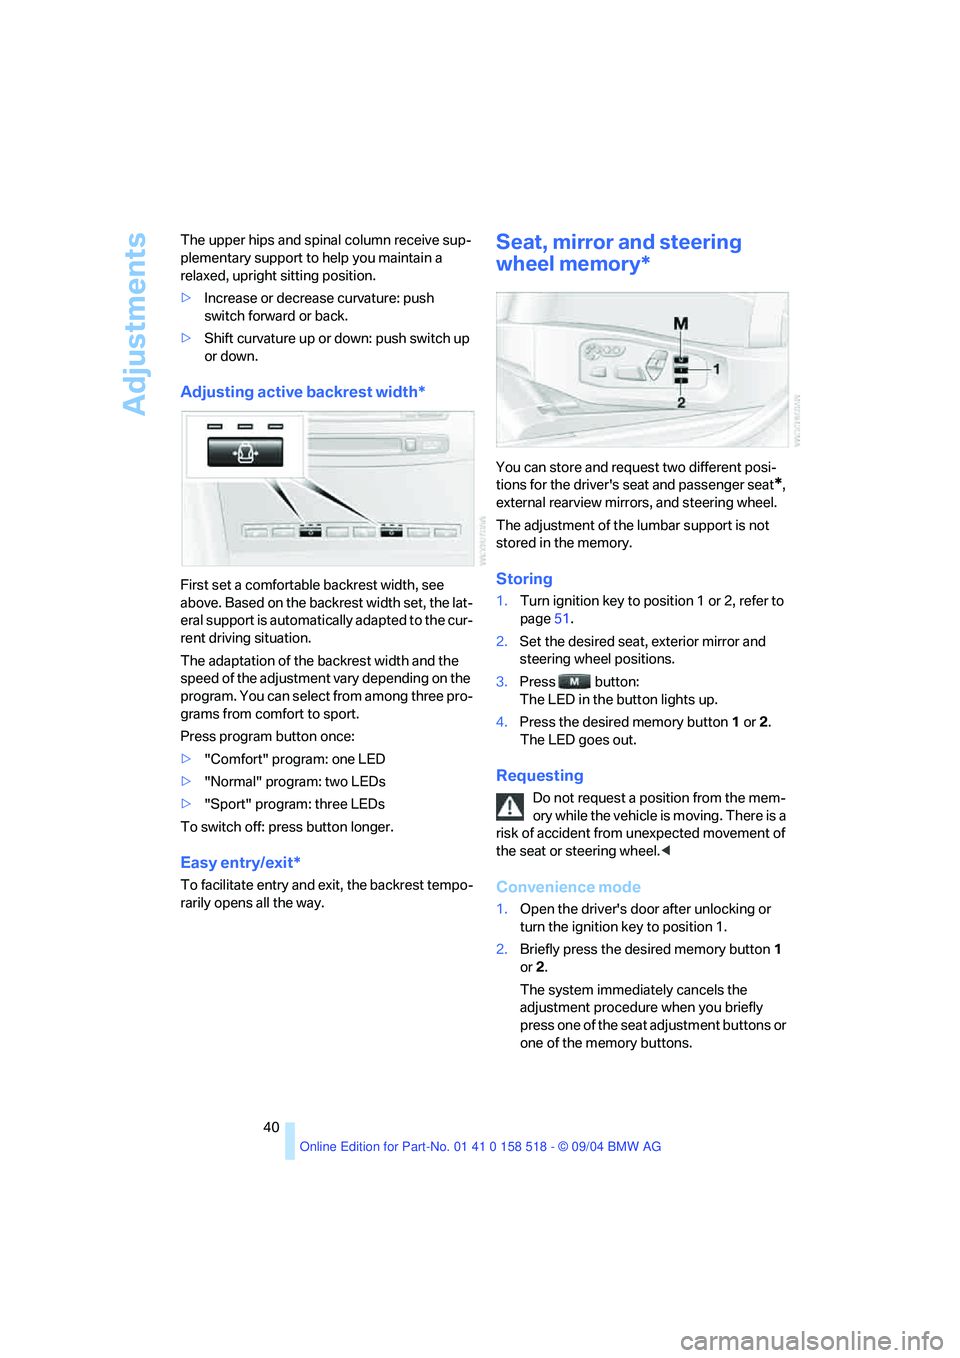
Adjusting active backrest width*
First set a comfortable backrest width, see
above. Based on the backrest width set, the lat-
eral support is automatically adapted to the cur-
rent driving situation.
The adaptation of the backrest width and the
speed of the adjustment vary depending on the
program. You can select from among three pro-
grams from comfort to sport.
Press program button once:
>"Comfort" program: one LED
>"Normal" program: two LEDs
>"Sport" program: three LEDs
To switch off: press button longer.
Easy entry/exit*
To facilitate entry and exit, the backrest tempo-
rarily opens all the way.
Seat, mirror and steering
wheel memory*
You can store and request two different posi-
tions for the driver's seat and passenger seat
*,
external rearview mirrors, and steering wheel.
The adjustment of the lumbar support is not
stored in the memory.
Storing
1.Turn ignition key to position 1 or 2, refer to
page51.
2.Set the desired seat, exterior mirror and
steering wheel positions.
3.Press button:
The LED in the button lights up.
4.Press the desired memory button1 or2.
The LED goes out.
Requesting
Do not request a position from the mem-
ory while the vehicle is moving. There is a
risk of accident from unexpected movement of
the seat or steering wheel.<
Convenience mode
1.Open the driver's door after unlocking or
turn the ignition key to position 1.
2.Briefly press the desired memory button1
or2.
The system immediately cancels the
adjustment procedure when you briefly
press one of the seat adjustment buttons or
one of the memory buttons.
Page 48 of 221
Controls
47Reference
At a glance
Driving tips
Communication
Navigation
Entertainment
Mobility
Transporting children safely
The right place for children
Children always in the rear
Accident research shows that the safest place
for children in a vehicle is in the rear seat.
Older children should be tightly secured with a
safety belt, after they have outgrown a booster
seat that is appropriate for their age, height and
weight.
A child sitting in the rear seat and not
properly restrained may place his or her
head on or near the airbag, if so equipped. For
example, a child, even though belted, may fall
asleep with his or her head against the side air-
bag. It may be difficult for a driver to ens ure that
children in the rear seat will remain properly
positioned at all times and do not place their
heads on or near the side airbag. Therefore, we
recommend that the rear seat side airbags, if
provided, be deactivated if you plan to transport
children in the rear seat.<
Deactivating rear seat side airbags
The rear seat side airbags may already have
been deactivated by a BMW center. Labels in
the rear door opening should indicate the status
of your rear seat side airbags. If you are uncer-
tain of their status, or wish to have the airbags
activated or deactivated, please contact your
BMW center.
Child-restraint system in the rear
Children under 13 years of age and chil-
dren less than 5 ft/150 cm tall should
always ride in the rear and the restraint systems
should be secured with the vehicle's safety
belts.<
Younger children should be secured in an
appropriate forward-facing child-restraint sys-
tem that has first been properly restrained. We
strongly urge you to carefully read and comply
with the instructions for installation and use provided by the child-restraint's manufacturer
whenever you use such a device.
All rear sitting positions in your vehicle meet the
recommendations of SAE J1819, an industry-
recommended practice for securing child-
restraint systems in motor vehicles.
Exception for front passenger seat
Should it be necessary to use a child-
restraint system on the front passenger
seat, the airbags on the front passenger side
must be deactivated. Otherwise, there is a con-
siderable risk of injury for the child when the air-
bags are triggered, even with a child-restraint
system. Your BMW center will be glad to advise
you.<
Never install a rearward-facing child-
restraint system in the front passenger
seat of this vehicle if the passenger's airbag is
not deactivated. If you do so, the child could be
severely injured when the airbag is trig-
gered.Your vehicle is equipped with an airbag
supplemental restraint system for the front pas-
senger. Because the backrest on any rearward-
facing child-restraint system – of the kind
designed for infants under 1 year and 20 Ibs./
9 kg – would be within the airbag's deployment
range, you should never mount such a system
in the front passenger seat, since the impact of
the airbag against the child restraint's backrest
could lead to serious or fatal injuries.<
More information on automatic deactivation of
the front passenger airbags, refer to page83.
Backrest width adjustment
The backrest width adjustment of the
passenger seat must be opened com-
pletely. After the child's seat is installed, mem-
ory positions must not be requested and the
active backrest width adjustment must be
deactivated, otherwise there is the risk of
injury.<
Page 49 of 221
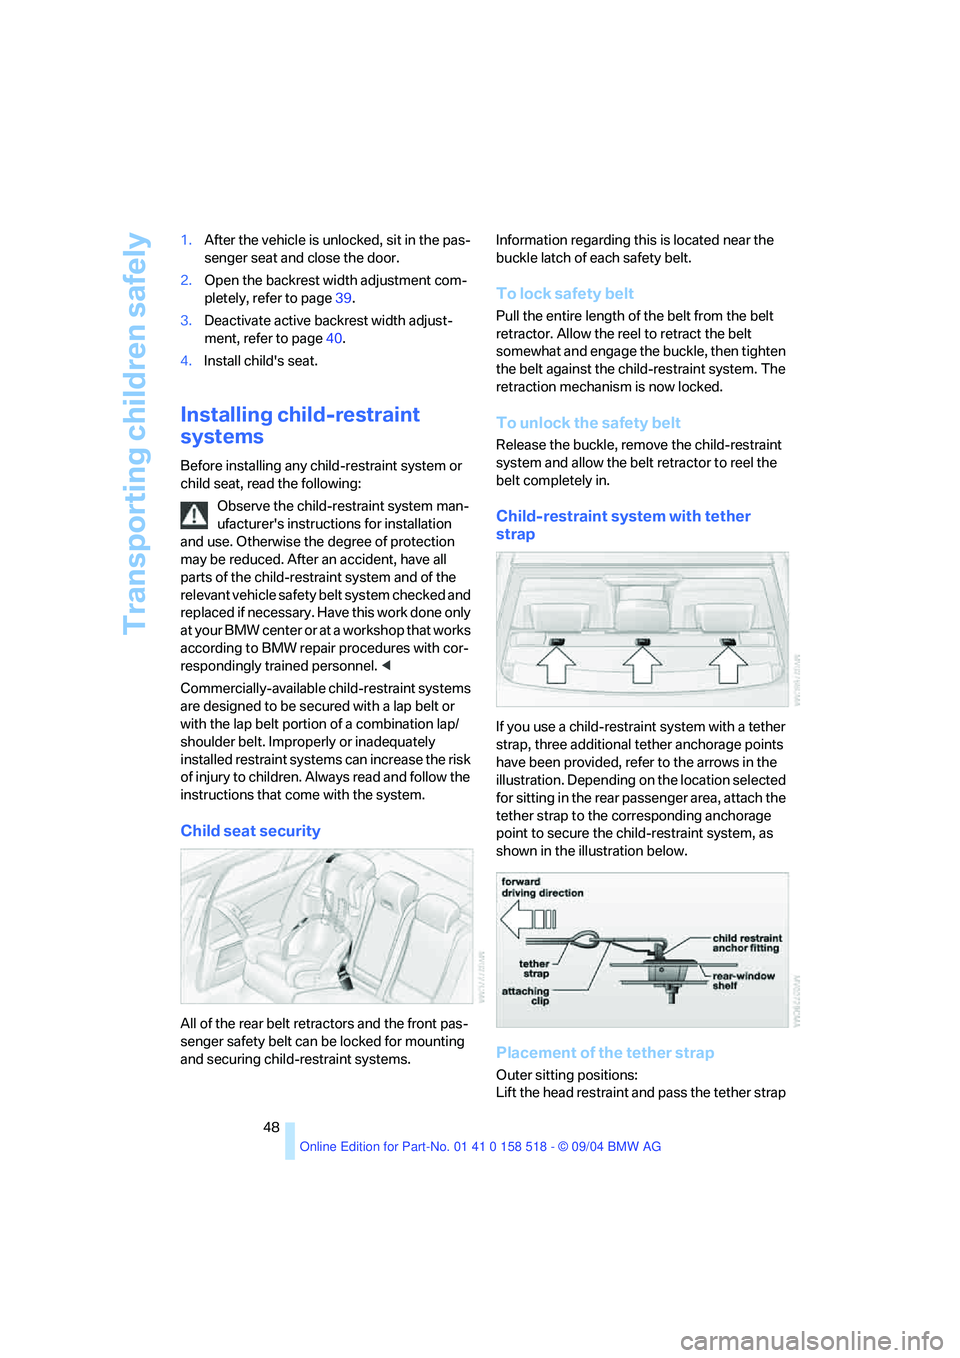
Transporting children safely
48 1.After the vehicle is unlocked, sit in the pas-
senger seat and close the door.
2.Open the backrest width adjustment com-
pletely, refer to page39.
3.Deactivate active backrest width adjust-
ment, refer to page40.
4.Install child's seat.
Installing child-restraint
systems
Before installing any child-restraint system or
child seat, read the following:
Observe the child-restraint system man-
ufacturer's instructions for installation
and use. Otherwise the degree of protection
may be reduced. After an accident, have all
parts of the child-restraint system and of the
relevant vehicle safety belt system checked and
r e p la c e d i f n e c e s s a ry . H a v e t h is w o r k d o n e o n ly
at your BMW center or at a workshop that works
according to BMW repair procedures with cor-
respondingly trained personnel. <
Commercially-available child-restraint systems
are designed to be secured with a lap belt or
with the lap belt portion of a combination lap/
shoulder belt. Improperly or inadequately
installed restraint systems can increase the risk
of injury to children. Always read and follow the
instructions that come with the system.
Child seat security
All of the rear belt retractors and the front pas-
senger safety belt can be locked for mounting
and securing child-restraint systems.Information regarding this is located near the
buckle latch of each safety belt.
To lock safety belt
Pull the entire length of the belt from the belt
retractor. Allow the reel to retract the belt
somewhat and engage the buckle, then tighten
the belt against the child-restraint system. The
retraction mechanism is now locked.
To unlock the safety belt
Release the buckle, remove the child-restraint
system and allow the belt retractor to reel the
belt completely in.
Child-restraint system with tether
strap
If you use a child-restraint system with a tether
strap, three additional tether anchorage points
have been provided, refer to the arrows in the
illustration. Depending on the location selected
for sitting in the rear passenger area, attach the
tether strap to the corresponding anchorage
point to secure the child-restraint system, as
shown in the illustration below.
Placement of the tether strap
Outer sitting positions:
Lift the head restraint and pass the tether strap
Page 173 of 221
Wheels and tires
172
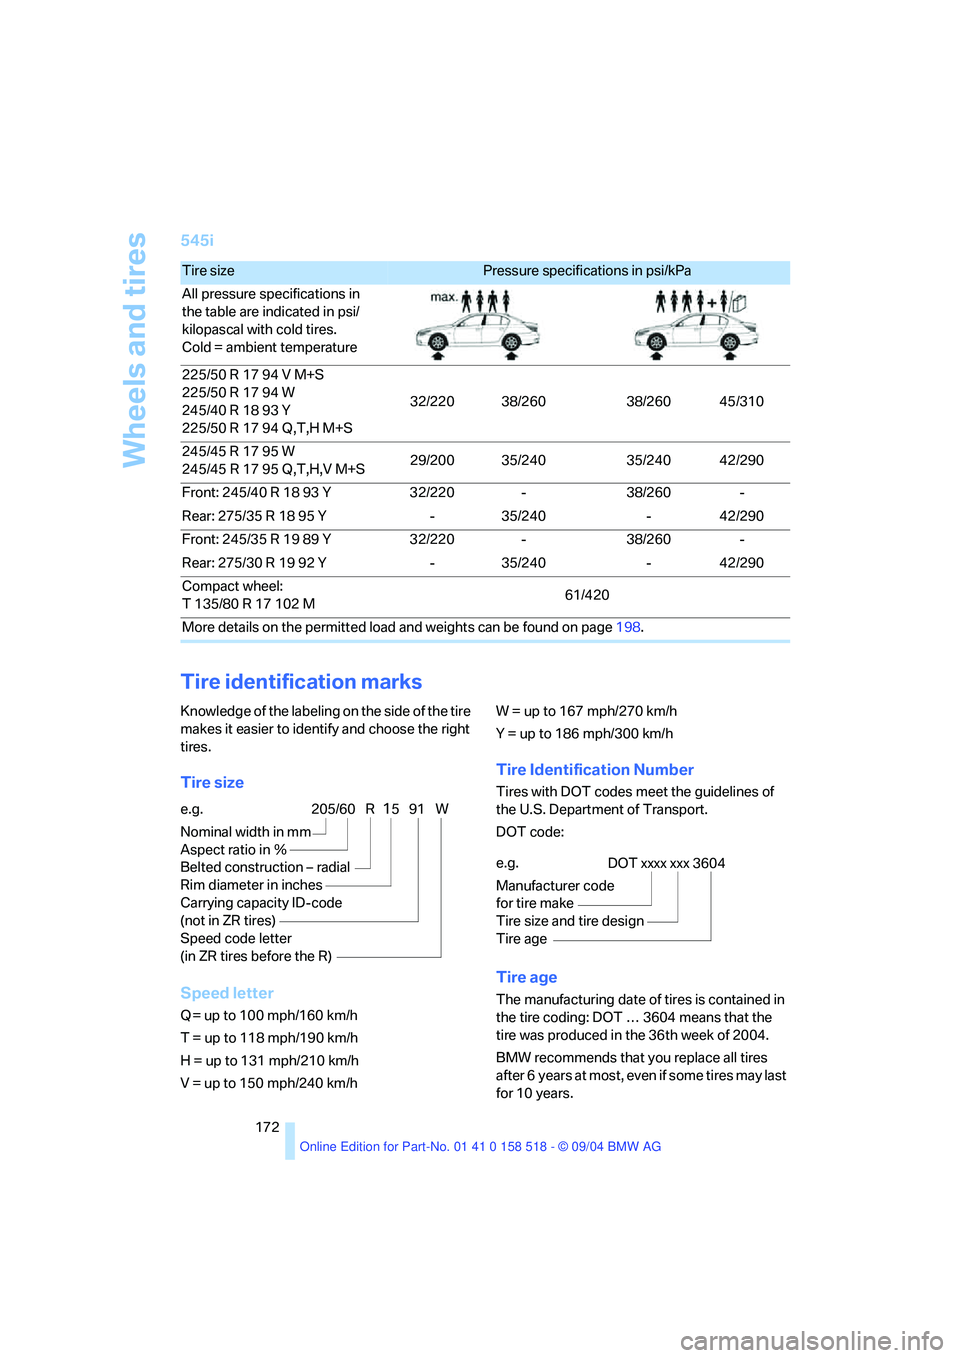
545i
Tire identification marks
Knowledge of the labeling on the side of the tire
makes it easier to identify and choose the right
tires.
Tire size
Speed letter
Q = up to 100 mph/160 km/h
T = up to 118 mph/190 km/h
H = up to 131 mph/210 km/h
V = up to 150 mph/240 km/h W = up to 167 mph/270 km/h
Y = up to 186 mph/300 km/h
Tire Identification Number
Tires with DOT codes meet the guidelines of
the U.S. Department of Transport.
DOT code:
Tire age
The manufacturing date of tires is contained in
the tire coding: DOT … 3604 means that the
tire was produced in the 36th week of 2004.
BMW recommends that you replace all tires
after 6 years at most, even if some tires may last
for 10 years.
Tire size Pressure specifications in psi/kPa
All pressure specifications in
the table are indicated in psi/
kilopascal with cold tires.
Cold = ambient temperature
225/50 R 17 94 V M+S
225/50 R 17 94 W
245/40 R 18 93 Y
225/50 R 17 94 Q,T,H M+S32/220 38/260 38/260 45/310
245/45 R 17 95 W
245/45 R 17 95 Q,T,H,V M+S29/200 35/240 35/240 42/290
Front: 245/40 R 18 93 Y 32/220 - 38/260 -
Rear: 275/35 R 18 95 Y - 35/240 - 42/290
Front: 245/35 R 19 89 Y 32/220 - 38/260 -
Rear: 275/30 R 19 92 Y - 35/240 - 42/290
Compact wheel:
T 135/80 R 17 102 M61/420
More details on the permitted load and weights can be found on page198.
e.g.
Nominal width in mm
Aspect ratio in Ξ
Belted construction – radial
Rim diameter in inches
Carrying capacity ID-code
(not in ZR tires)
Speed code letter
(in ZR tires before the R)205/60 R1591 W
e.g.
Manufacturer code
for tire make
Tire size and tire design
Tire ageDOT xxxx xxx 3604
Page 174 of 221
Mobility
173Reference
At a glance
Controls
Driving tips
Communication
Navigation
Entertainment
Uniform Tire Quality Grading
Quality grades can be found where applicable
on the tire sidewall between tread shoulder and
maximum section width. For example:
Tread wear 200 Traction AA
Temperature A
DOT Quality Grades
Tread wear
Traction AA A B C
Temperature A B C
All passenger car tires must conform to
Federal Safety Requirements in addition
to these grades.<
Tread wear
The tread wear grade is a comparative rating
based on the wear rate of the tire when tested
under controlled conditions on a specified gov-
ernment test course. For example, a tire graded
150 would wear one and one-half, 1γ, times as
well on the government course as a tire graded
100. The relative performance of tires depends
upon the actual conditions of their use, how-
ever, and may depart significantly from the
norm due to variations in driving habits, service
practices and differences in road characteris-
tics and climate.
Traction
The traction grades, from highest to lowest, are
AA, A, B, and C.
Those grades represent the tire's ability to stop
on wet pavement as measured under controlled
conditions on specified government test sur-
faces of asphalt and concrete. A tire marked C
may have poor traction performance.
The traction grade assigned to this tire is
based on straight-ahead braking traction
tests, and does not include acceleration, cor-
nering, hydroplaning, or peak traction charac-
teristics.<
Temperature
The temperature grades are A, the highest, B,
and C, representing the tire's resistance to the
generation of heat and its ability to dissipate heat when tested under controlled conditions
on a specified indoor laboratory test wheel.
Sustained high temperature can cause the
material of the tire to degenerate and reduce
tire life, and excessive temperature can lead to
sudden tire failure. The grade C corresponds to
a level of performance which all passenger car
tires must meet under the Federal Motor Vehi-
cle Safety Standard No. 109. Grades B and A
represent higher levels of performance on the
laboratory test wheel than the minimum
required by law.
The temperature grade for this tire is
established for a tire that is properly
inflated and not overloaded. Excessive speed,
underinflation, or excessive loading, either sep-
arately or in combination, can cause heat
buildup and possible tire failure.<
RSC – run-flat tires
You will recognize run-flat tires by a circular
symbol containing the letters RSC on the side
of the tire, refer to page174.
M+S
Winter and all-season tires.
These have better winter properties than sum-
mer tires.
Tire condition
Inspect your tires frequently for tread wear,
signs of damage and for foreign objects lodged
in the tread. Check the tread depth.
Minimum tread depth
The tread depth should not drop below 0.12 in/
3 mm, although, for example, European legisla-
tion only specifies a minimum tread depth of
0.063 in/1.6 mm. At tread depths below 0.12 in/
3 mm there is an increased risk of high-speed
hydroplaning, even when only small amounts of
water are present on the road surface.
When winter tires wear down past a tread depth
of 0.16 in/4 mm, they become perceptibly less
suitable for winter conditions. For the sake of
safety, new tires should be installed.
Page 203 of 221
Everything from A to Z
202
Everything from A to Z
Index
"..." Identifies Control Display
texts used to select
individual functions,
pointing out where these are
located.
A
ABS Antilock Brake
System77
– indicator lamp79
– malfunction79
ACC, refer to Active cruise
control59
Acceleration assistant for
SMG Sequential manual
transmission55
Accessories6
Acoustic Signal, refer to
Check Control67
Activated-charcoal filter94
"Activation time" for
independent ventilation94
Active cruise control59
– indicator lamp60
– malfunction64
– selecting distance62
– sensor, refer to
Malfunction64
Active head restraints,
front42
Active roll stabilization79
Active seat44
Active seat ventilation44
Active steering81
– initializing system81
– warning lamp81
Adaptive Head Light88
"Add digits" for portable
phone155
"Address book" for
navigation120Address for navigation
– deleting121
– entering115
– selecting121
– storing current position120
"Add to destination list"117
Adhesive bandages, refer to
First-aid kit189
Adjusting active backrest
width40
Adjusting temperature in
upper body region93
Adjusting the temperature
with automatic climate
control91
Adjusting the thigh support39
Adjusting the tone during
audio operation, refer to
Tone control133
Adjustment in audio mode
– front-to-rear134
– right/left balance134
"After opening door"41
"After unlocking"41
Airbags83
– sitting safely38
– warning lamp84
Air circulation, refer to Air
recirculation91
Air distribution
– automatic91
– manual92
Airing, refer to Ventilation93
Air recirculation
– AUC Automatic recircu-
lated-air control91
– recirculated-air mode91
"Air recirculation on / off"46
Air vent outlets of automatic
climate control90
Air vents90
– refer to Ventilation93
Air volume91AKI, refer to Fuel
specifications169
Alarm system33
– avoiding unintentional
alarms34
– interior motion sensor34
– switching off the alarm34
– switching off the tilt alarm
sensor and interior motion
sensor34
– tilt alarm sensor34
All around the center
console14
All around the steering
wheel10
"All channels"143
"All doors"29
All-season tires, refer to
Winter tires175
Altering stretch of road127
"AM", reception
range133,138
Antenna for portable
phone152
Antifreeze
– coolant178
– washer fluid58
Antilock Brake System
ABS77
– indicator lamp79
Anti-theft alarm system, refer
to Alarm system33
Anti-theft system29
Anti-trapping mechanism
– glass sunroof, electric36
– power windows35
Approved axle loads, refer to
Weights198
Approved gross vehicle
weight, refer to Weights198
Armrest, refer to Center
armrest
– rear100