2005 BMW 530I length
[x] Cancel search: lengthPage 49 of 221
Transporting children safely
48 1.After the vehicle is unlocked, sit in the pas-
senger seat and close the door.
2.Open the backrest width adjustment com-
pletely, refer to page39.
3.Deactivate active backrest width adjust-
ment, refer to page40.
4.Install child's seat.
Installing child-restraint
systems
Before installing any child-restraint system or
child seat, read the following:
Observe the child-restraint system man-
ufacturer's instructions for installation
and use. Otherwise the degree of protection
may be reduced. After an accident, have all
parts of the child-restraint system and of the
relevant vehicle safety belt system checked and
r e p la c e d i f n e c e s s a ry . H a v e t h is w o r k d o n e o n ly
at your BMW center or at a workshop that works
according to BMW repair procedures with cor-
respondingly trained personnel. <
Commercially-available child-restraint systems
are designed to be secured with a lap belt or
with the lap belt portion of a combination lap/
shoulder belt. Improperly or inadequately
installed restraint systems can increase the risk
of injury to children. Always read and follow the
instructions that come with the system.
Child seat security
All of the rear belt retractors and the front pas-
senger safety belt can be locked for mounting
and securing child-restraint systems.Information regarding this is located near the
buckle latch of each safety belt.
To lock safety belt
Pull the entire length of the belt from the belt
retractor. Allow the reel to retract the belt
somewhat and engage the buckle, then tighten
the belt against the child-restraint system. The
retraction mechanism is now locked.
To unlock the safety belt
Release the buckle, remove the child-restraint
system and allow the belt retractor to reel the
belt completely in.
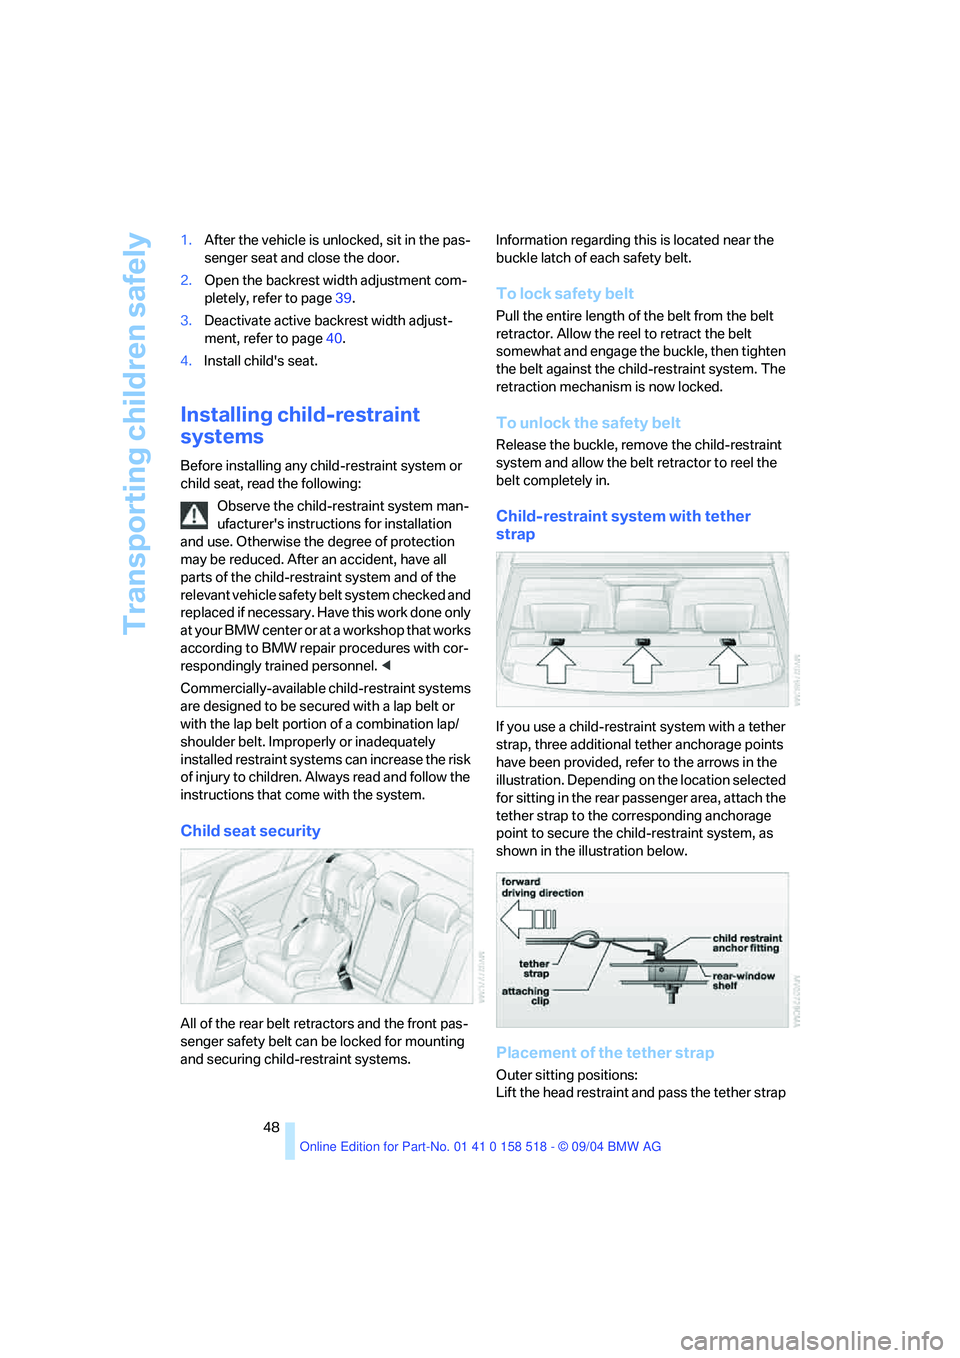
Child-restraint system with tether
strap
If you use a child-restraint system with a tether
strap, three additional tether anchorage points
have been provided, refer to the arrows in the
illustration. Depending on the location selected
for sitting in the rear passenger area, attach the
tether strap to the corresponding anchorage
point to secure the child-restraint system, as
shown in the illustration below.
Placement of the tether strap
Outer sitting positions:
Lift the head restraint and pass the tether strap
Page 102 of 221
Controls
101Reference
At a glance
Driving tips
Communication
Navigation
Entertainment
Mobility
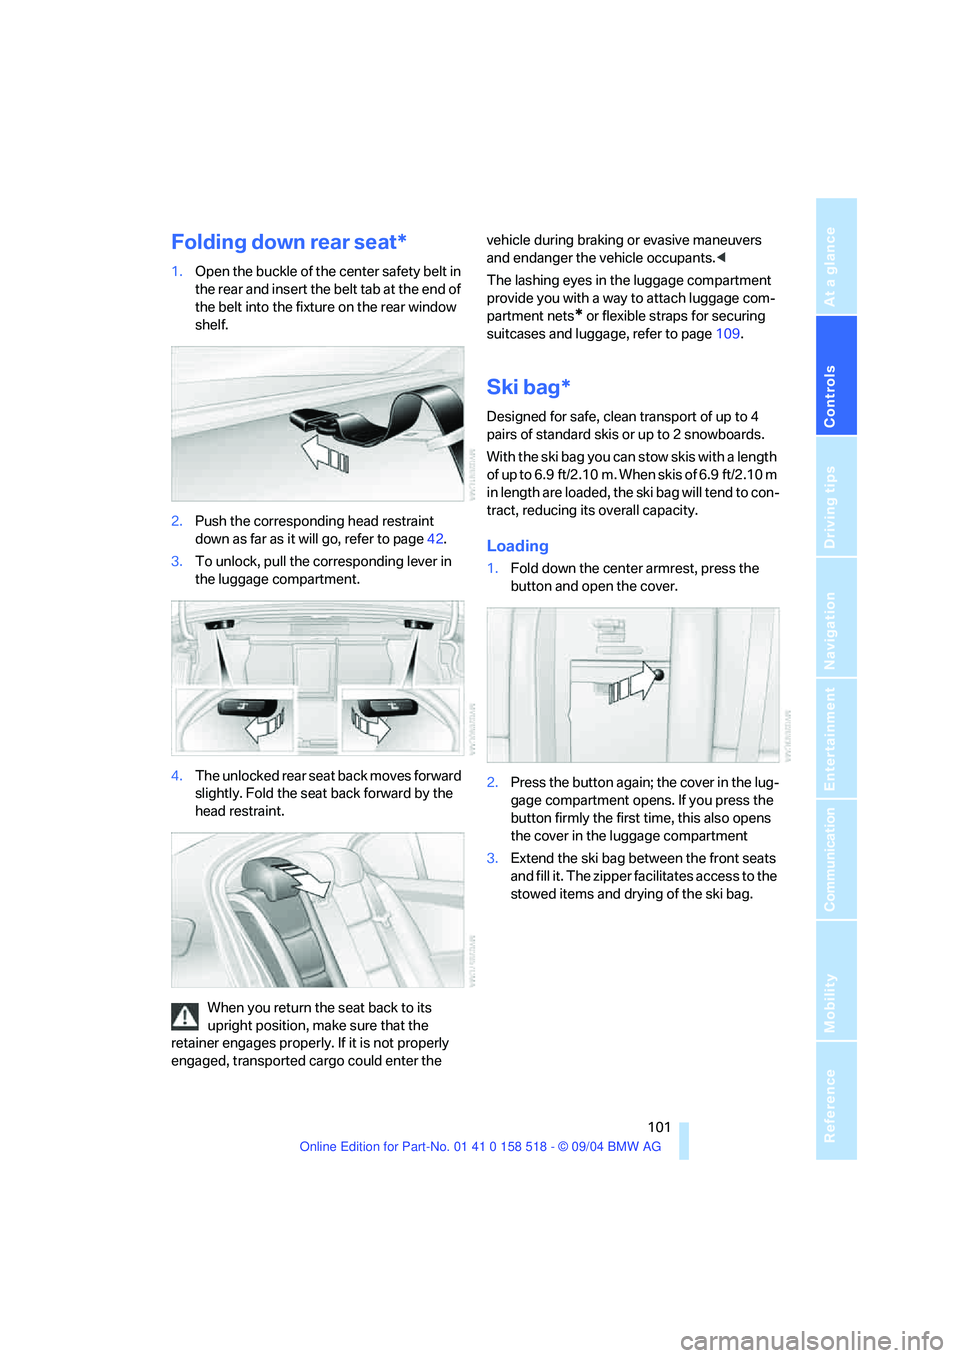
Folding down rear seat*
1.Open the buckle of the center safety belt in
the rear and insert the belt tab at the end of
the belt into the fixture on the rear window
shelf.
2.Push the corresponding head restraint
down as far as it will go, refer to page42.
3.To unlock, pull the corresponding lever in
the luggage compartment.
4.The unlocked rear seat back moves forward
slightly. Fold the seat back forward by the
head restraint.
When you return the seat back to its
upright position, make sure that the
retainer engages properly. If it is not properly
engaged, transported cargo could enter the vehicle during braking or evasive maneuvers
and endanger the vehicle occupants.<
The lashing eyes in the luggage compartment
provide you with a way to attach luggage com-
partment nets
* or flexible straps for securing
suitcases and luggage, refer to page109.
Ski bag*
Designed for safe, clean transport of up to 4
pairs of standard skis or up to 2 snowboards.
With the ski bag you can stow skis with a length
of up to 6.9 ft/2.10 m. When skis of 6.9 ft/2.10 m
in length are loaded, the ski bag will tend to con-
tract, reducing its overall capacity.
Loading
1.Fold down the center armrest, press the
button and open the cover.
2.Press the button again; the cover in the lug-
gage compartment opens. If you press the
button firmly the first time, this also opens
the cover in the luggage compartment
3.Extend the ski bag between the front seats
and fill it. The zipper facilitates access to the
stowed items and drying of the ski bag.
Page 124 of 221
Navigation
Driving tips
123Reference
At a glance
Controls
Communication
Entertainment
Mobility
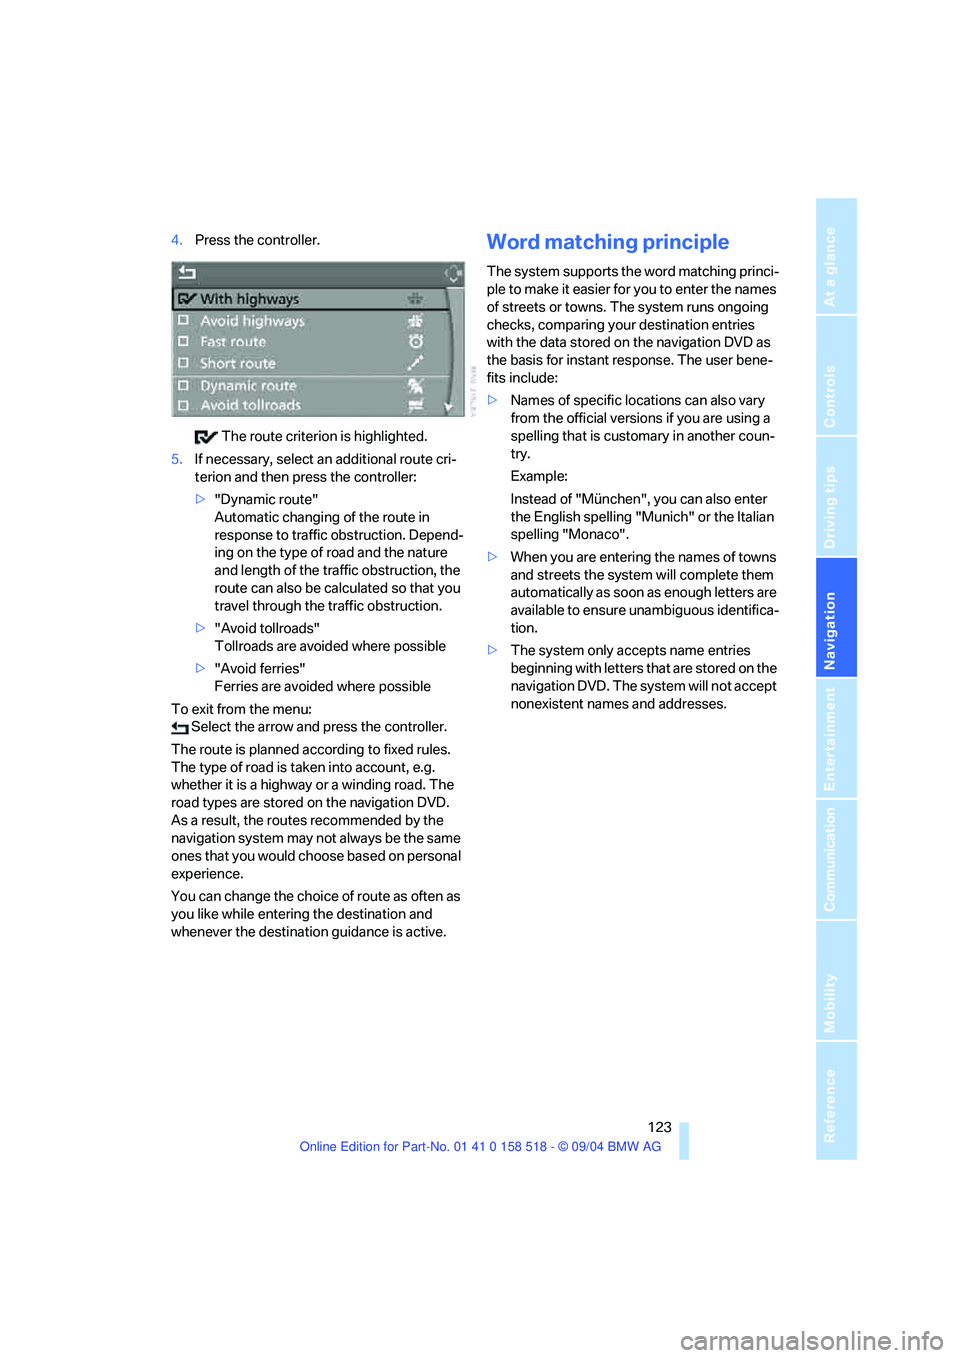
4.Press the controller.
The route criterion is highlighted.
5.If necessary, select an additional route cri-
terion and then press the controller:
>"Dynamic route"
Automatic changing of the route in
response to traffic obstruction. Depend-
ing on the type of road and the nature
and length of the traffic obstruction, the
route can also be calculated so that you
travel through the traffic obstruction.
>"Avoid tollroads"
Tollroads are avoided where possible
>"Avoid ferries"
Ferries are avoided where possible
To exit from the menu:
Select the arrow and press the controller.
The route is planned according to fixed rules.
The type of road is taken into account, e.g.
whether it is a highway or a winding road. The
road types are stored on the navigation DVD.
As a result, the routes recommended by the
navigation system may not always be the same
ones that you would choose based on personal
experience.
You can change the choice of route as often as
you like while entering the destination and
whenever the destination guidance is active.Word matching principle
The system supports the word matching princi-
ple to make it easier for you to enter the names
of streets or towns. The system runs ongoing
checks, comparing your destination entries
with the data stored on the navigation DVD as
the basis for instant response. The user bene-
fits include:
>Names of specific locations can also vary
from the official versions if you are using a
spelling that is customary in another coun-
try.
Example:
Instead of "München", you can also enter
the English spelling "Munich" or the Italian
spelling "Monaco".
>When you are entering the names of towns
and streets the system will complete them
automatically as soon as enough letters are
available to ensure unambiguous identifica-
tion.
>The system only accepts name entries
beginning with letters that are stored on the
navigation DVD. The system will not accept
nonexistent names and addresses.
Page 161 of 221
Telephoning
160
Storing entry*
An entry always consists of a name and phone
number.
Selecting an entry
The connection to the phone number of the
selected entry is established.
Having entries read aloud* and
selecting
You can have all the entries of your voice phone
book read aloud in the order of input and select
a certain entry to establish a connection:
Redialing
The {Redial} command calls "Redial".
Deleting entry*
You can delete any entry from the voice phone
book.
Deleting all entries*
{Delete phone book} deletes all entries in the
phone book.
Notes
The voice commands in English were
available as of this printing. Other lan-
guages are currently not available. To operate
the portable phone via the voice command sys-
tem, refer to page22.<
Important for voice commands
For voice commands, bear in mind the follow-
ing:
>Issue the commands smoothly and at nor-
mal volume, avoiding excessive emphasis
and pauses.
>Keep the doors, windows and glass sunroof
closed to prevent interference from ambi-
ent noise.
>Avoid other sources of noise in the vehicle
while speaking, and ask other vehicle occu-
pants to refrain from talking while you are
using the system. 1.{Save name}.
The dialog for storing a name is
opened.
2.Speak name and repeat entry upon
request.
The spoken length of the names in the
phone book must not exceed approx. 2
seconds.
3.Say the phone number when prompted.
4.To store the phone number:
{Save}.
1.{Dial name}.
The dialog for selecting an entry is
opened.
2.Say the name when prompted.
3.Confirm the prompt with {Yes}.
1.{Read phone book}.
The dialog for reading phone book is
opened.
2.{Dial number} when the desired entry is
read aloud.
1.{Delete name}.
The dialog for deleting an entry is
opened.
2.Say the name when prompted.
3.Confirm the prompt with {Yes}.
1.{Delete phone book}.
The dialog for deleting phone book is
opened.
2.Confirm the prompt with {Yes}.
3.Confirm the repeated prompt with
{Yes}.
Page 210 of 221
Reference 209
At a glance
Controls
Driving tips
Communica-
Navigation
Entertainment
Mobility
Indicator/warning lamps13
– ABS Antilock Brake
System79
– active steering81
– airbags84
– brake fluid179
– brake pads179
– brake system13,79
– DSC Dynamic Stability
Control13,78
– DTC Dynamic Traction
Control13,78
– Flat Tire Monitor80
– front fog lamps13
– overview13
– safety belt warning42
Individual air distribution92
Individually assignable
buttons on the steering
wheel46
Individual settings, refer to
Key Memory28
Inflation pressure, refer to Tire
inflation pressure170
Inflation pressure monitoring,
refer to Flat Tire Monitor79
Information
– on another location118
– on current position118
– on destination location118
"Information" for
navigation119
"Information on
destination"119
Initializing, refer to Power
loss187
"Input map"118
Installation location
– CD changer147
– portable phone98
Instructions for navigation
system, refer to Voice
instructions125
Instrument cluster12
Instrument illumination, refer
to Instrument lighting89
Instrument lighting89Instrument panel
– refer to Cockpit10
– refer to Instrument
cluster12
Integrated universal remote
control96
"Interim time"73
Interior lamps89
– remote control30
Interior motion sensor34
– switching off34
Interior rearview mirror45
– automatic dimming
feature107
Interlock on automatic
transmission51
Intermittent mode of the
wipers57
J
Jacking points186
Joystick, refer to Control
Center16
Jumpering, refer to Jump
starting190
Jump starting190
K
Key Memory28
"Keypad"157
Keys28
Kick-down
– automatic transmission with
Steptronic56
– SMG Sequential manual
transmission54
Knock control169
L
Lamps, refer to Parking lamps/
low beams87
Lamps and bulbs182
"Languages"74
– for navigation126
Lashing down cargo, refer to
Securing cargo109
Lashing eyes, refer to
Securing cargo109
Last destinations, refer to
Destination list119
"Last seat pos."41
LATCH child-restraint fixing
system49
LEDs light-emitting
diodes185
Length, refer to
Dimensions197
Letter symbol with portable
phone157
License plate lamp, replacing
bulbs184
"Light"56,87
Light-emitting diodes
LEDs185
Lighter99
Lighter socket100
Lighting
– instruments89
– of the vehicle, refer to
Lamps87
Lights on warning87
Light switch87
"Limit"72
Loading
– securing cargo109
– stowing cargo109
– vehicle108
Location, navigation drive114
"Lock after driving off"32
Lock buttons in the doors,
refer to Locking32
Locking
– from inside32
– from outside30
– setting confirmation
signals30