2005 BMW 530I warning light
[x] Cancel search: warning lightPage 82 of 221

Controls
81Reference
At a glance
Driving tips
Communication
Navigation
Entertainment
Mobility
2.At the next opportunity, check the air pres-
sure in all four tires.
If the tire inflation pressure in all four
tires is correct, the Flat Tire Monitor
has not been initialized. The system must
then be initialized.<
3.In the event of complete tire pressure loss,
0 psi/0 kPa, or obvious tire damage, you can
estimate the possible distance for contin-
ued driving on the basis of the following
guide values:
>With a light load:
1 to 2 persons without luggage:
approx. 155 miles/250 km
>With a medium load:
2 persons, luggage compartment full, or
4 persons without luggage:
approx. 94 miles/150 km
>With a full load:
4 or more persons, luggage compart-
ment full:
approx. 30 miles/50 km
Drive reservedly and do not exceed a
speed of 50 mph/80 km/h. In the event of
pressure loss, vehicle handling changes. This
includes reduced tracking stability in braking,
extended braking distance and altered natural
steering characteristics.
If unusual vibrations occur while the vehicle is
being driven, this can indicate final failure of the
damaged tire. Reduce speed and stop as soon
as possible. Do not continue driving. Contact
your BMW center.<
Malfunction
The warning lamp lights up yellow and
a message appears on the Control Dis-
play. The Flat Tire Monitor has a mal-
function or has failed. Have the system checked
as soon as possible.
Active steering*
The concept
The active steering is a system that actively var-
ies the steering angle of the front wheels in rela-
tion to the steering wheel movements.
When you are driving in the low road speed
range, e. g. in a town or when parking, the steer-
ing angle increases, i.e. the steering becomes
very direct. In the higher speed range, on the
other hand, the steering angle is reduced more
and more. This improves the handling capability
of your BMW over the entire speed range.
In critical situations, the system can make tar-
geted corrections to the steering angle pro-
vided by the driver and thus stabilize the vehicle
before the driver intervenes. This stabilizing
intervention is simultaneously deactivated
when DSC is switched off, refer to page78.
Malfunction
The warning lamp lights up. The active
steering is no longer operational. At low
speeds, greater steering wheel move-
ments are required, whereas at higher speeds,
the vehicle reacts more sensitively to steering
wheel movements. Have the system checked.
If the warning lamp lights up during the first
engine starting following a power supply inter-
ruption, the system must be activated by being
initialized.
Initializing system
1.Start the engine.
2.With the vehicle stationary, turn the steer-
ing wheel from the straight-ahead position
t o t h e le f t a s f a r a s i t w i ll g o a n d t h e n b a c k t o
the straight-ahead position.
3.Switch off the engine.
When you start the engine again, all the func-
tions of the active steering are available once
again.
Page 85 of 221
Technology for comfort, convenience and safety
84 >When an adult is traveling in the front seat,
the front and side airbags remain active on
the passenger side.
Although not desired, it can occur in the
case of heavier children that the front
passenger airbags remain active or in the case
of very light adults or young persons that the
front passenger airbags are deactivated. In
these cases, have the person ride in the rear
seat, refer to Passenger airbag status lamp
below. Do not load the passenger seat with any
items in addition to the person to be trans-
ported. Do not fit seat covers, seat cushion pad-
ding, ball mats or other items onto the front pas-
senger seat unless they are specifically
r e c o m m e n d e d b y B M W . D o n o t p l a c e a n y i t e m s
under the seat. Otherwise, the function of the
seat occupation detection could be impaired.<
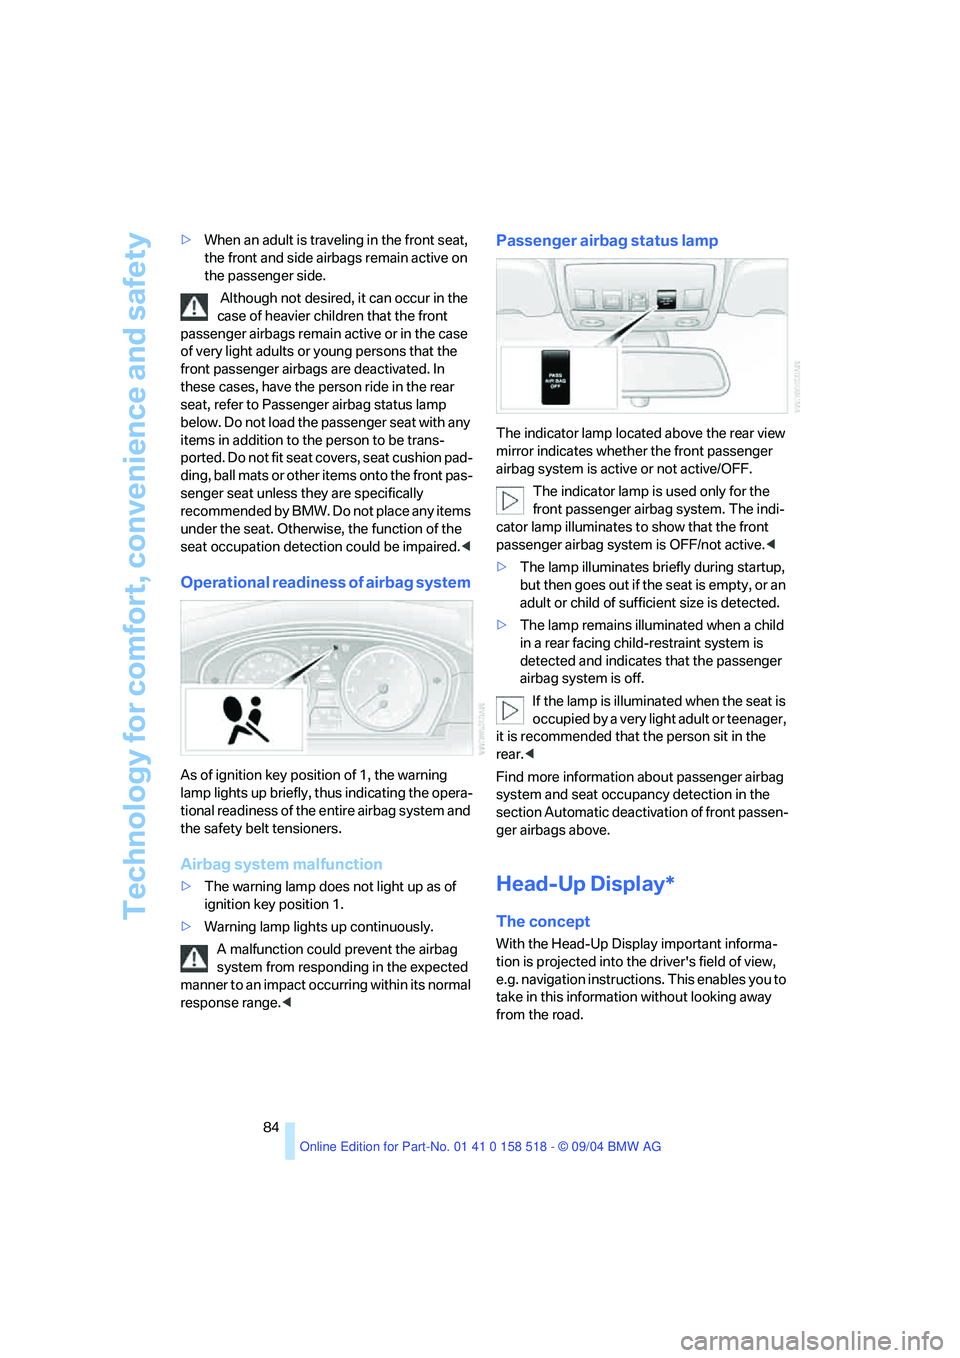
Operational readiness of airbag system
As of ignition key position of 1, the warning
lamp lights up briefly, thus indicating the opera-
tional readiness of the entire airbag system and
the safety belt tensioners.
Airbag system malfunction
>The warning lamp does not light up as of
ignition key position 1.
>Warning lamp lights up continuously.
A malfunction could prevent the airbag
system from responding in the expected
manner to an impact occurring within its normal
response range.<
Passenger airbag status lamp
The indicator lamp located above the rear view
mirror indicates whether the front passenger
airbag system is active or not active/OFF.
The indicator lamp is used only for the
front passenger airbag system. The indi-
cator lamp illuminates to show that the front
passenger airbag system is OFF/not active.<
>The lamp illuminates briefly during startup,
but then goes out if the seat is empty, or an
adult or child of sufficient size is detected.
>The lamp remains illuminated when a child
in a rear facing child-restraint system is
detected and indicates that the passenger
airbag system is off.
If the lamp is illuminated when the seat is
occupied by a very light adult or teenager,
it is recommended that the person sit in the
rear.<
Find more information about passenger airbag
system and seat occupancy detection in the
section Automatic deactivation of front passen-
ger airbags above.
Head-Up Display*
The concept
With the Head-Up Display important informa-
tion is projected into the driver's field of view,
e.g. navigation instructions. This enables you to
take in this information without looking away
from the road.
Page 88 of 221
Controls
87Reference
At a glance
Driving tips
Communication
Navigation
Entertainment
Mobility
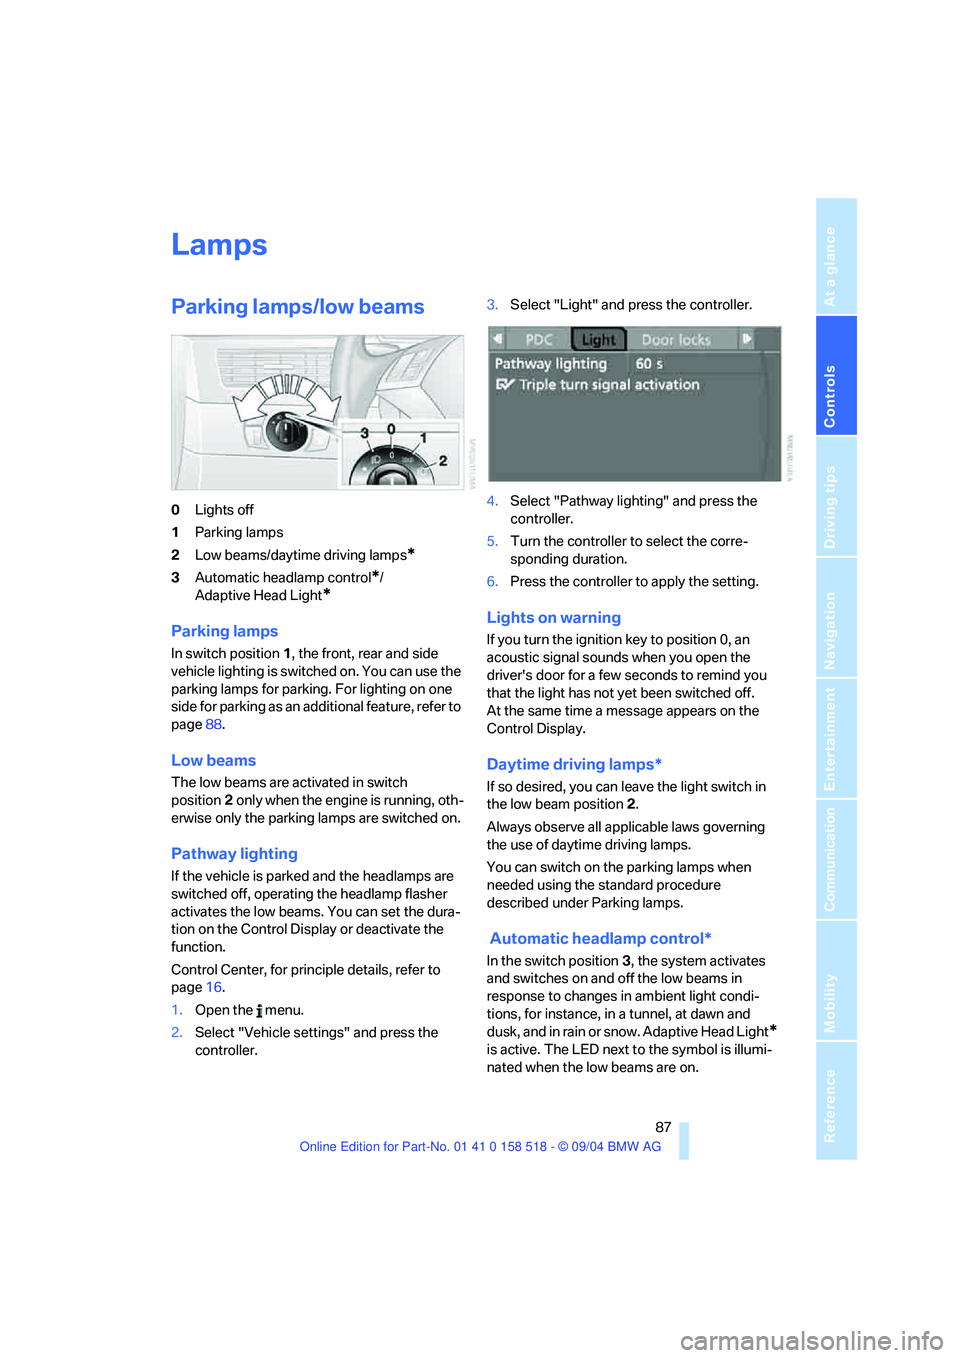
Lamps
Parking lamps/low beams
0Lights off
1Parking lamps
2Low beams/daytime driving lamps
*
3Automatic headlamp control*/
Adaptive Head Light
*
Parking lamps
In switch position1, the front, rear and side
vehicle lighting is switched on. You can use the
parking lamps for parking. For lighting on one
side for parking as an additional feature, refer to
page88.
Low beams
The low beams are activated in switch
position2 only when the engine is running, oth-
erwise only the parking lamps are switched on.
Pathway lighting
If the vehicle is parked and the headlamps are
switched off, operating the headlamp flasher
activates the low beams. You can set the dura-
tion on the Control Display or deactivate the
function.
Control Center, for principle details, refer to
page16.
1.Open the menu.
2.Select "Vehicle settings" and press the
controller.3.Select "Light" and press the controller.
4.Select "Pathway lighting" and press the
controller.
5.Turn the controller to select the corre-
sponding duration.
6.Press the controller to apply the setting.
Lights on warning
If you turn the ignition key to position 0, an
acoustic signal sounds when you open the
driver's door for a few seconds to remind you
that the light has not yet been switched off.
At the same time a message appears on the
Control Display.
Daytime driving lamps*
If so desired, you can leave the light switch in
the low beam position2.
Always observe all applicable laws governing
the use of daytime driving lamps.
You can switch on the parking lamps when
needed using the standard procedure
described under Parking lamps.
Automatic headlamp control*
In the switch position3, the system activates
and switches on and off the low beams in
response to changes in ambient light condi-
tions, for instance, in a tunnel, at dawn and
d u s k , a n d in r a i n o r s n o w . A d a p t iv e H e a d L ig h t
*
is active. The LED next to the symbol is illumi-
nated when the low beams are on.
Page 180 of 221
Mobility
179Reference
At a glance
Controls
Driving tips
Communica-
Navigation
Entertainment
sure to escape, then continue turning to
open.
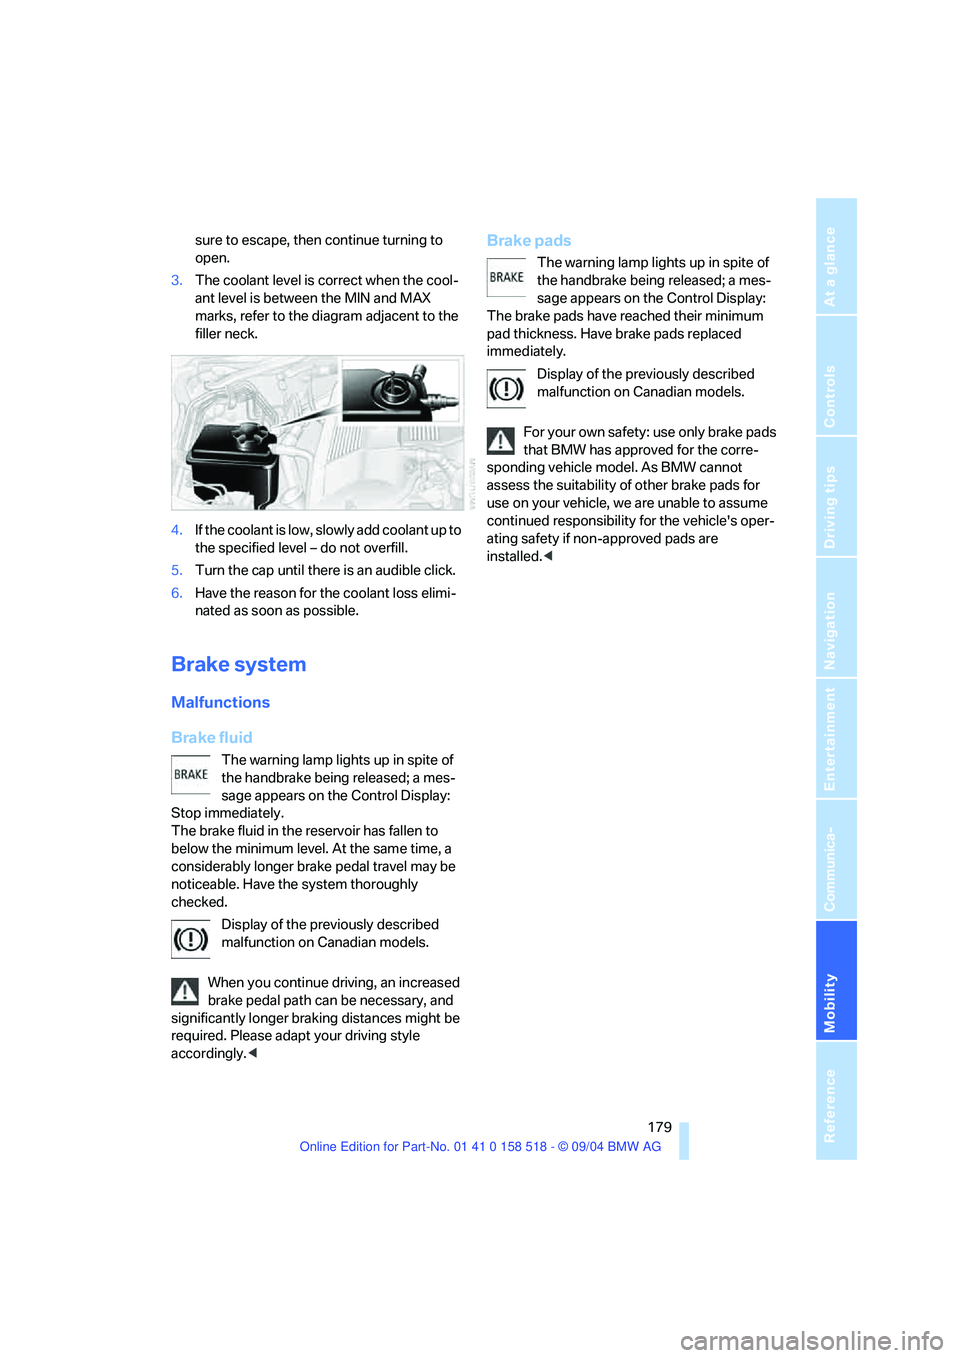
3.The coolant level is correct when the cool-
ant level is between the MIN and MAX
marks, refer to the diagram adjacent to the
filler neck.
4.If the coolant is low, slowly add coolant up to
the specified level – do not overfill.
5.Turn the cap until there is an audible click.
6.Have the reason for the coolant loss elimi-
nated as soon as possible.
Brake system
Malfunctions
Brake fluid
The warning lamp lights up in spite of
the handbrake being released; a mes-
sage appears on the Control Display:
Stop immediately.
The brake fluid in the reservoir has fallen to
below the minimum level. At the same time, a
considerably longer brake pedal travel may be
noticeable. Have the system thoroughly
checked.
Display of the previously described
malfunction on Canadian models.
When you continue driving, an increased
brake pedal path can be necessary, and
significantly longer braking distances might be
required. Please adapt your driving style
accordingly.<
Brake pads
The warning lamp lights up in spite of
the handbrake being released; a mes-
sage appears on the Control Display:
The brake pads have reached their minimum
pad thickness. Have brake pads replaced
immediately.
Display of the previously described
malfunction on Canadian models.
For your own safety: use only brake pads
that BMW has approved for the corre-
sponding vehicle model. As BMW cannot
assess the suitability of other brake pads for
use on your vehicle, we are unable to assume
continued responsibility for the vehicle's oper-
ating safety if non-approved pads are
installed.<
Page 186 of 221
Mobility
185Reference
At a glance
Controls
Driving tips
Communication
Navigation
Entertainment
1.Insert screwdriver into the slot and press to
the right, refer to arrows. This releases the
lamp.
2.Remove the lamp and replace the bulb.
Backup lamps
In the event of a malfunction, please go to your
BMW center or a workshop that works accord-
ing to BMW repair procedures with correspond-
ingly trained personnel.
LEDs light-emitting diodes
Light-emitting diodes installed behind translu-
cent lenses serve as the light source for many of
the controls and displays in your vehicle. These
light-emitting diodes, which operate using a
concept similar to that applied in conventional
lasers, are officially designated as Class 1 light-
emitting diodes.
Do not remove the covers, and never
stare directly into the unfiltered light for
several hours, as this could result in irritation of
the retina.<
Changing wheels
Safety precautions in the event of a flat
tire or wheel change: Park the vehicle as
far as possible from passing traffic and on solid
ground. Switch on the hazard warning flashers.
Lock the steering wheel in straight-ahead set-
ting of the wheels. Apply the handbrake and
engage first gear, reverse gear or selector lever
position P.
Have all vehicle occupants get out of the vehicle
and ensure that they remain outside the imme-
diate area in a safe place, such as behind a guardrail.
If a warning triangle or portable hazard warning
lamp is required, set it up on the roadside at an
appropriate distance from the rear of the vehi-
cle. Comply with all safety guidelines and regu-
lations.
Change the wheel only on a level, firm surface
which is not slippery. The vehicle or the jack
could slip to the side if you attempt to raise the
vehicle on a soft or slippery surface such as
snow, ice, tiles, etc.
Position the jack on a firm support surface.
Do not use a wooden block or similar object as a
support base for the jack, as this would prevent
it from extending to its full support height and
reduce its load-carrying capacity.
To avoid serious or fatal injury: never lie under
the vehicle, and never start the engine while it is
supported by the jack.<
What you will need
To avoid rattling noises later on, note the posi-
tions of the tools before removing them, then
return them to their initial positions after com-
pleting work.
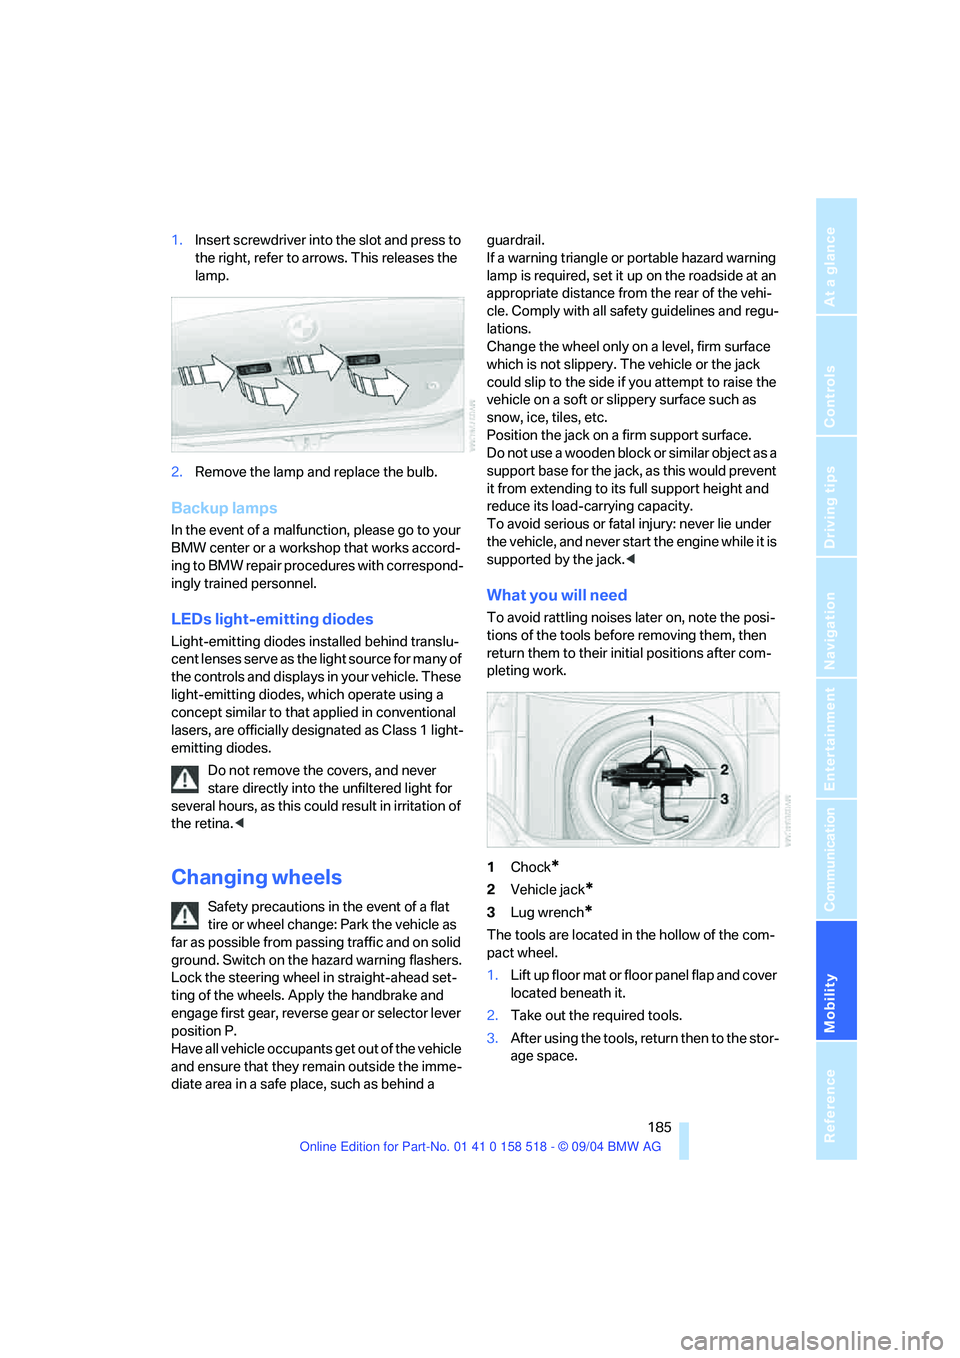
1Chock
*
2Vehicle jack*
3Lug wrench*
The tools are located in the hollow of the com-
pact wheel.
1.Lift up floor mat or floor panel flap and cover
located beneath it.
2.Take out the required tools.
3.After using the tools, return then to the stor-
age space.
Page 190 of 221
Mobility
189Reference
At a glance
Controls
Driving tips
Communication
Navigation
Entertainment
Giving and receiving assistance
Emergency calling*
Conditions for an emergency call:
>Once ignition key is in position 1.
>The car phone is logged on to a cellular
telephone network.
>The emergency call system is operable.
Initiating an emergency call
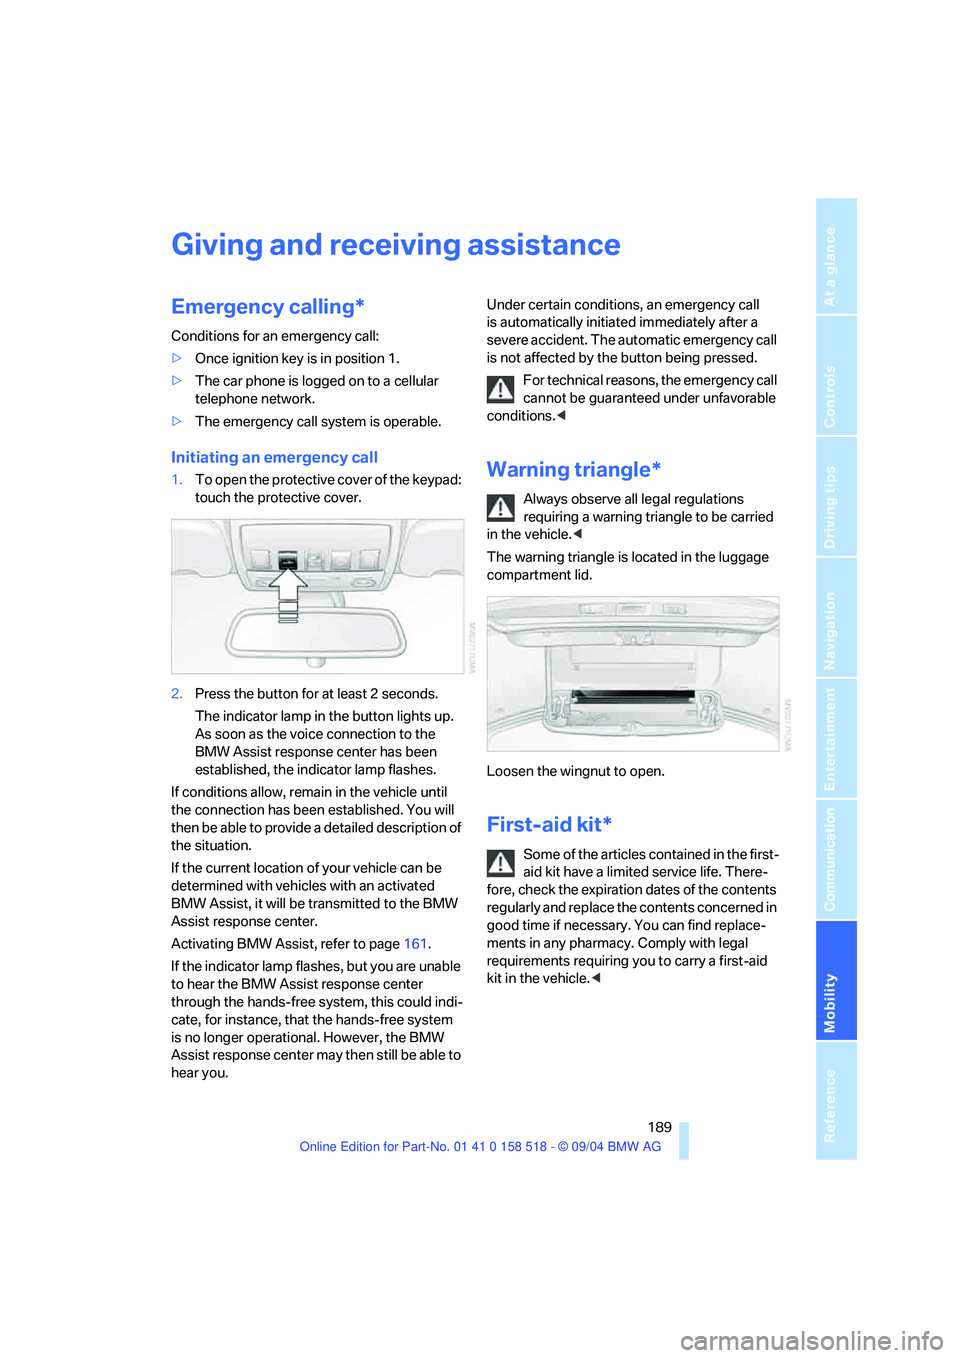
1.To open the protective cover of the keypad:
touch the protective cover.
2.Press the button for at least 2 seconds.
The indicator lamp in the button lights up.
As soon as the voice connection to the
BMW Assist response center has been
established, the indicator lamp flashes.
If conditions allow, remain in the vehicle until
the connection has been established. You will
then be able to provide a detailed description of
the situation.
If the current location of your vehicle can be
determined with vehicles with an activated
BMW Assist, it will be transmitted to the BMW
Assist response center.
Activating BMW Assist, refer to page161.
If the indicator lamp flashes, but you are unable
to hear the BMW Assist response center
through the hands-free system, this could indi-
cate, for instance, that the hands-free system
is no longer operational. However, the BMW
Assist response center may then still be able to
hear you.Under certain conditions, an emergency call
is automatically initiated immediately after a
severe accident. The automatic emergency call
is not affected by the button being pressed.
For technical reasons, the emergency call
cannot be guaranteed under unfavorable
conditions.
requiring a warning triangle to be carried
in the vehicle.<
The warning triangle is located in the luggage
compartment lid.
Loosen the wingnut to open.
First-aid kit*
Some of the articles contained in the first-
aid kit have a limited service life. There-
fore, check the expiration dates of the contents
regularly and replace the contents concerned in
good time if necessary. You can find replace-
ments in any pharmacy. Comply with legal
requirements requiring you to carry a first-aid
kit in the vehicle.<
Page 193 of 221
Giving and receiving assistance
192
Vehicles with manual transmission
Gearshift lever in neutral position.
Vehicles with automatic transmission
Selector lever in position N.
Do not exceed a towing speed of 45 mph/
70 km/h and a towing distance of
90 miles/150 km, as otherwise the automatic
transmission may be damaged.<
Vehicles with SMG Sequential manual
transmission
With the ignition switched on, engage the
selector lever position N, then switch off the
ignition again.
Towing methods
In some countries, towing with tow bars or
ropes in public traffic is not permitted. Familiar-
ize yourself with the regulations on towing in the
respective country.
With tow bar
The towing vehicle may not be lighter
than the vehicle to be towed, as otherwise
it will not be possible to control vehicle
response.<
The tow fittings used should be on the same
side on both vehicles. Should it prove impossi-
ble to avoid mounting the tow bar at an offset
angle, please observe the following:
>Clearance and maneuvering capability will
be sharply limited during cornering.
>When mounted at an angle, the tow bar will
exert lateral forces, tending to push the
vehicle sideways.
Secure the tow bar to the tow fitting only.
Otherwise damage to other vehicle parts
could result.<
With tow rope
When starting off in the towing vehicle, make
sure that the tow rope is taut.To avoid jerking and the associated
stresses on vehicle components when
towing, always use nylon ropes or nylon straps.
Secure the tow rope to the tow fitting only.
Otherwise damage to other vehicle parts could
result.<
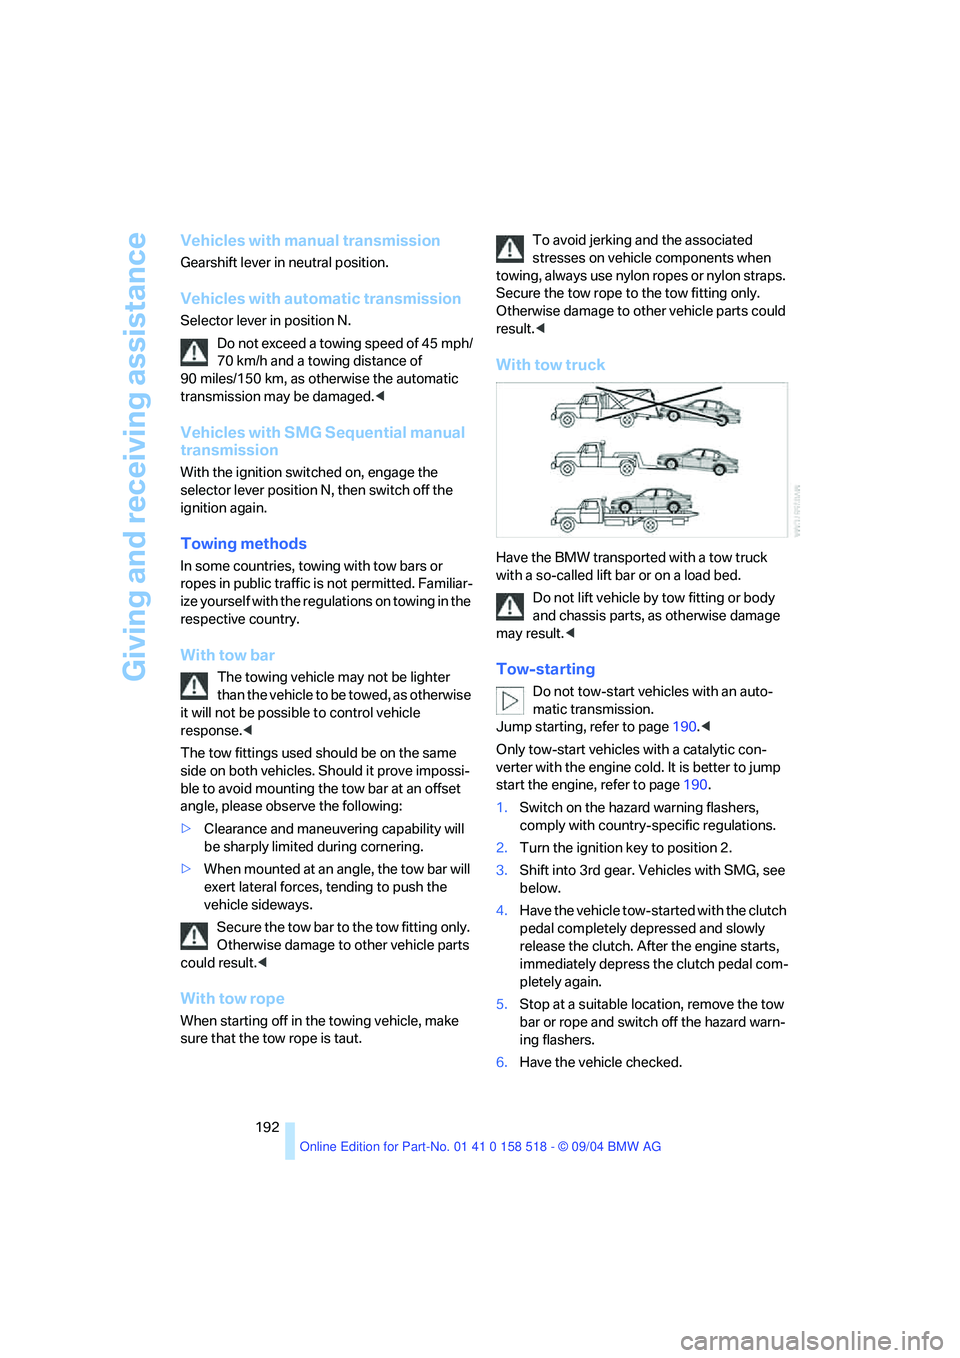
With tow truck
Have the BMW transported with a tow truck
with a so-called lift bar or on a load bed.
Do not lift vehicle by tow fitting or body
and chassis parts, as otherwise damage
may result.<
Tow-starting
Do not tow-start vehicles with an auto-
matic transmission.
Jump starting, refer to page190.<
Only tow-start vehicles with a catalytic con-
verter with the engine cold. It is better to jump
start the engine, refer to page190.
1.Switch on the hazard warning flashers,
comply with country-specific regulations.
2.Turn the ignition key to position 2.
3.Shift into 3rd gear. Vehicles with SMG, see
below.
4.Have the vehicle tow-started with the clutch
pedal completely depressed and slowly
release the clutch. After the engine starts,
immediately depress the clutch pedal com-
pletely again.
5.Stop at a suitable location, remove the tow
bar or rope and switch off the hazard warn-
ing flashers.
6.Have the vehicle checked.
Page 203 of 221
Everything from A to Z
202
Everything from A to Z
Index
"..." Identifies Control Display
texts used to select
individual functions,
pointing out where these are
located.
A
ABS Antilock Brake
System77
– indicator lamp79
– malfunction79
ACC, refer to Active cruise
control59
Acceleration assistant for
SMG Sequential manual
transmission55
Accessories6
Acoustic Signal, refer to
Check Control67
Activated-charcoal filter94
"Activation time" for
independent ventilation94
Active cruise control59
– indicator lamp60
– malfunction64
– selecting distance62
– sensor, refer to
Malfunction64
Active head restraints,
front42
Active roll stabilization79
Active seat44
Active seat ventilation44
Active steering81
– initializing system81
– warning lamp81
Adaptive Head Light88
"Add digits" for portable
phone155
"Address book" for
navigation120Address for navigation
– deleting121
– entering115
– selecting121
– storing current position120
"Add to destination list"117
Adhesive bandages, refer to
First-aid kit189
Adjusting active backrest
width40
Adjusting temperature in
upper body region93
Adjusting the temperature
with automatic climate
control91
Adjusting the thigh support39
Adjusting the tone during
audio operation, refer to
Tone control133
Adjustment in audio mode
– front-to-rear134
– right/left balance134
"After opening door"41
"After unlocking"41
Airbags83
– sitting safely38
– warning lamp84
Air circulation, refer to Air
recirculation91
Air distribution
– automatic91
– manual92
Airing, refer to Ventilation93
Air recirculation
– AUC Automatic recircu-
lated-air control91
– recirculated-air mode91
"Air recirculation on / off"46
Air vent outlets of automatic
climate control90
Air vents90
– refer to Ventilation93
Air volume91AKI, refer to Fuel
specifications169
Alarm system33
– avoiding unintentional
alarms34
– interior motion sensor34
– switching off the alarm34
– switching off the tilt alarm
sensor and interior motion
sensor34
– tilt alarm sensor34
All around the center
console14
All around the steering
wheel10
"All channels"143
"All doors"29
All-season tires, refer to
Winter tires175
Altering stretch of road127
"AM", reception
range133,138
Antenna for portable
phone152
Antifreeze
– coolant178
– washer fluid58
Antilock Brake System
ABS77
– indicator lamp79
Anti-theft alarm system, refer
to Alarm system33
Anti-theft system29
Anti-trapping mechanism
– glass sunroof, electric36
– power windows35
Approved axle loads, refer to
Weights198
Approved gross vehicle
weight, refer to Weights198
Armrest, refer to Center
armrest
– rear100